
Licensing System
This document is no longer available beyond version 22. Information can now be found here: License Management for version 24
Altium Designer provides a streamlined licensing system that enables you to get licensed and up and running with your Altium Designer software in a timely and efficient manner. The system offers various licensing types to meet and suit your licensing needs. This includes web-based on-demand licensing. Tightly integrated with customer accounts through the Altium portal, web-based on-demand license management allows a license to be used on any computer without the need to move license files or activate on each machine. This provides a global floating license capability – within the geographic scope of your license and the conditions set out in the EULA – without needing to implement your own server.
License Types
The Altium Designer licensing system features three distinct license types:
- On-Demand - client-side license acquisition is administered by an Altium managed server. There are two 'modes' when using a seat of an On-Demand license:
- On-Demand – a seat of an On-Demand license acquired by any client computer, only while you are signed in to your account. When you sign out, the seat is released so that another user can acquire it. Licenses can be centrally pooled for 'use and release' by all designers on your team, or alternatively, licenses can be allocated to defined roles within your company.
- Roaming – a seat of an On-Demand license acquired for a specified time. In this mode, you can sign out and work offline, in essence roaming freely with your acquired seat; a temporary standalone license as it were.
- Standalone - client-side license acquisition is managed by the user through use of a licensing file (
*.alf). This file can be saved, copied and backed-up as required. The.alffile is reusable on a home computer (in accordance with the EULA) by copying the file to a specific folder on that computer then adding the file as part of Standalone License Configuration.
- Private Server - for organizations that require their Altium Designer installations to remain offline (isolated from the internet) the convenience and flexibility of on-demand software licensing can be provided by a localized Altium Private License Service, rather than from the cloud-based Altium Licensing Service. Client-side license acquisition is administered by the Private License Service of an Altium Infrastructure Server (a free, on-premise server that provides remote Altium product installation and license management) or an Altium On-Prem Enterprise Server. The dedicated Private License Service (PLS), implemented on a PC connected to the company LAN/WAN, is set up by an administrator to acquire the company's Altium licenses locally and then serve these to Altium Designer installations as required. When initially acquired from Altium's web-based license service, the licenses are converted to Private Licenses for localized access. A seat (instance) of a PLS-hosted Altium license can be 'leased' by workstation software when it is in use, then 'revoked' (returned to the available pool of licenses) when no longer required. Licenses can also be served on a Roaming basis, where the license seat is leased to the target machine for a specified time, allowing the software's host PC, e.g., a laptop, to 'roam' freely while isolated from the network.
-
Viewer License - a license that is linked to your AltiumLive account that allows you to view Altium Designer without needing a license. The Viewer License has no expiration date and the subscription date is set to the date of the request for the license. The Altium Designer Viewer license is linked to your AltiumLive account and is therefore not accessible from the Dashboard.
License Availability, Selection and Configuration
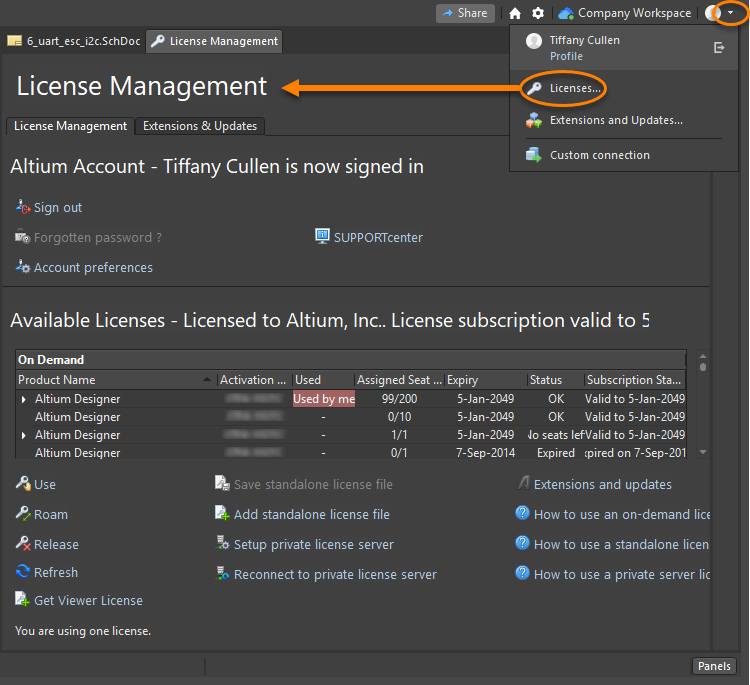
License configuration and selection is performed from the License Management view, which is accessed by clicking the ![]() control at the top-right of the workspace then choosing Licenses from the menu. This is 'command central' for obtaining a license. Sign-in to your Altium account and view and select the On-Demand or Standalone licenses available to you.
control at the top-right of the workspace then choosing Licenses from the menu. This is 'command central' for obtaining a license. Sign-in to your Altium account and view and select the On-Demand or Standalone licenses available to you.
Whether using an On-Demand license and Standalone license, the Available Licenses region of the page will automatically present the specific licenses available to you. Choose the license that you want to use then click on the applicable command, depending on how you want to use that license.
Browser-Based License Management
Main article: Dashboard
The Altium Dashboard is a dedicated area that allows administrators of an organization's Altium account to manage the users, licenses and other assets associated to that account, as well as define the organization's profile, which can be made public for viewing by other organizations and their users within the AltiumLive community.
Account management of any type should never feel burdensome. With the Dashboard, being able to manage all aspects of an organization's account is both intuitive and expedient, and all from one convenient location. The Dashboard will even notify of pending items requiring action, such as renewing a subscription that is about to expire - and enable renewal to be conducted right there-and-then, online and hassle free, allowing your organization to remain licensed with continuous subscription and access to all the benefits that entails.
Access to the Dashboard can be made in the following ways:
- By entering the URL: https://dashboard.live.altium.com in a tab of your preferred Web Browser. Depending on your browser, you can drop the https:// prefix.
- By clicking the Dashboard link at the top of any page within the AltiumLive community (such a page will have a URL ending in .live.altium.com).

Use the Dashboard to manage your account with Altium including, most importantly, your product licensing.