
SCH过滤器面板

Quickly locate and highlight objects using logical queries in the SCH Filter panel.
Summary
The SCH Filter panel allows you to construct filters through the creation of logical queries. A defined filter can then be applied to the active schematic document or all open schematic documents, allowing you to select and edit multiple objects with greater accuracy and efficiency.
Panel Access
The panel can be accessed in the following ways:
- Click the Panels button at the bottom-right of the editor when the SCH Editor is active then select SCH Filter from the pop-up menu.
- Click View » Panels » SCH Filter.
- Click the F12 shortcut key.
Defining Filter Scope
The first region of the panel contains controls for defining the scope of the filter:
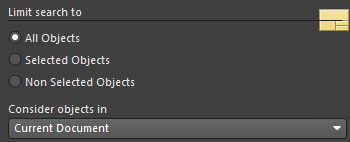
The Limit search to area provides controls to further refine the scope of the filter:
- All Objects - apply the filter to all design objects.
- Selected Objects - apply the filter only to those design objects that are currently selected.
- Non Selected objects - apply the filter only to those design objects that are not currently selected.
The Consider objects in drop-down field allows you to control where the filter is applied. Choose from the following options:
- Current Document - apply filtering to just to the active schematic document (default).
- Open Documents - apply filtering to all open schematic documents.
- Project Documents - apply filtering to all open schematic documents that are source documents of the same parent project.
Defining Filter Queries
The central region of the panel allows you to construct filters through the entry of logical queries. You can type a query directly into the field. As you type, a prompt list of possible keywords will appear as an aid.
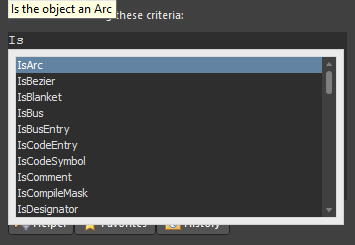
The Query Helper is available to provide aid in the creation of queries. This function can be very useful if you are unsure of the syntax of a query or the possible keywords that you may want to use. To use the Query Helper, click the Helper button to open the Query Helper dialog. The underlying Query Engine analyzes the document and lists all available objects along with generic keywords for use in queries.
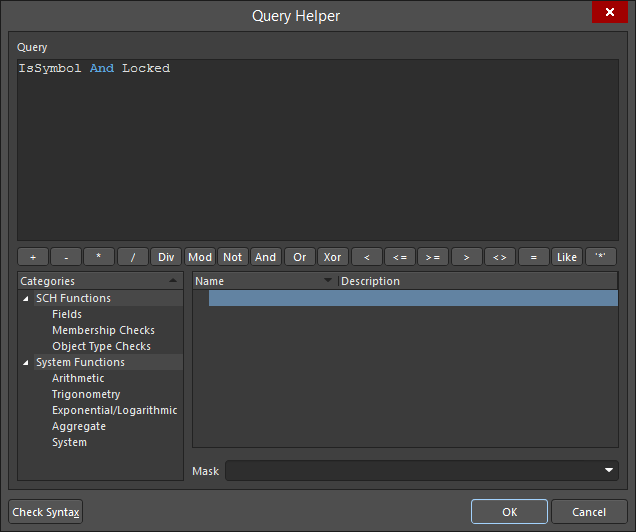
Use the top section of the dialog to compose a query expression, using the available SCH Functions and System Functions. The middle section of the dialog provides a range of operators for use when constructing an expression. Use the Check Syntax button to verify that an expression is syntactically correct.
When the expression for the query has been defined as required, clicking OK will load the central region of the SCH Filter panel with the query, ready to apply the filter.
Historical Queries
As you enter and apply a new query, it will be added to a query history list. Click the History button in order to access this list - the Expression Manager dialog will open with the History tab active.
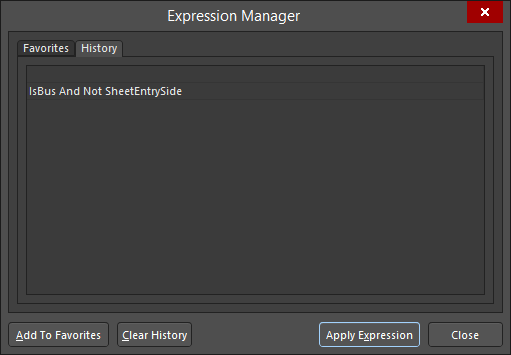
To use an historical query from the list, either select its entry then click on the Apply Expression button or double-click on the entry directly. The dialog will close and the expression for the query will be loaded into the central region of the SCH Filter panel.
An historical query can be added to the list of favorite queries by selecting its entry then clicking the Add To Favorites button. Use the Clear History button if you want to 'flush' the history list. Up to nine most recently used query expressions from the list will be available for use from the panel's right-click menu.
Favorite Queries
Any defined query may be added to a list of favorite queries in two ways:
- Use the Add to Favorites command from the panel's right-click menu to add the query expression currently defined in the central region of the panel.
- Select an historical query entry in the History tab of the Expression Manager dialog then click the Add To Favorites button.
Click the Favorites button in the SCH Filter panel in order to access this list. The Expression Manager dialog will open with the Favorites tab active.
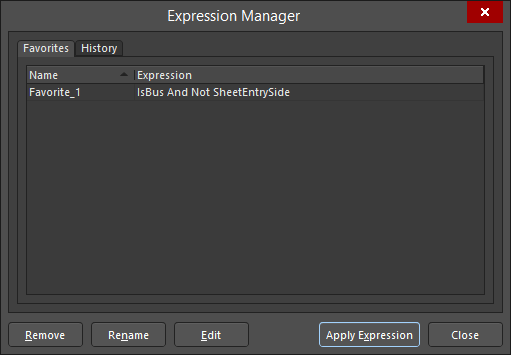
To use a favorite query from the list, either select its entry and click on the Apply Expression button or double-click on the entry directly. The dialog will close and the expression for the query will be loaded into the central region of the SCH Filter panel.
When a query expression is added to the favorites list, it is assigned a unique name. By default, a generic name is assigned - Favorite_n - where n is the next available unused number. The name for an entry can be changed at any stage by using one of the following methods:
- Select the query entry then click the Rename button.
- Select the query entry then choose the Change command from the right-click menu.
- Select the query entry then click again within the Name field.
In each case, type the new name as required and click outside the Name field to effect the change.
To remove a query from the favorites list, select its entry in the list then either click on the Remove button or choose the Remove command from the right-click menu. A dialog will appear requesting confirmation of the removal. Up to ten most recently added query expressions to the list will be available for use from the top of the panel's right-click menu.
Defining Filter Highlighting
Before application of the query, it is best to define how you want the result of the filtering to appear visually in the design workspace. The Objects passing/not passing the filter regions of the panel provides various options that collectively form the highlight controls for permanent filtering.
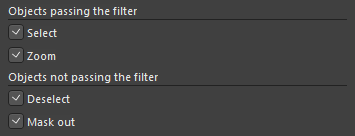
The options available in the Objects passing the filter area allow you to control the visual display in the workspace of all objects that fall under the scope and match the specific query expression of the filter:
- Select - when enabled (default), the filtered objects will be selected in the workspace.
- Zoom - when enabled (default), the filtered objects will be zoomed and centered (where possible) in the design editor window.
The options available in the Objects not passing the filter area allow you to control the visual display in the workspace of all objects that do not fall under the scope and/or do not match the specific query expression of the filter:
- Deselect - when enabled (default), all objects not falling under the scope of the filter will be deselected in the workspace.
- Mask out - when enabled (default), the filtered objects will appear fully visible in the design editor window with all other objects becoming dimmed. With masking applied, all objects not under the filter scope will be unavailable for selection/editing.
Any combination of these options can be enabled. For example, you might want to have all filtered objects that fall under the scope of your query to be zoomed, centered and selected in the design editor window, while also applying masking to take away the clutter of other design objects.
Applying and Clearing the Filter
Once you have defined your query and set up the options in the panel as required, the filter can be applied - either by clicking the Apply button or pressing Enter.
To clear the currently-applied filter from within the panel, clear the entry for the query expression in the panel then either click the Apply button or press Enter. All objects in the design workspace will become fully visible and available for selection/editing.
Right-Click Menus
Right-clicking within the SCH Filter panel provides access to additional options and commands via a pop-up menu.
The menu provides the following commands:
- Add to Favorites - add the query expression currently displayed in the panel to the list of favorite queries. The query will appear as a new entry on the Favorites tab of the Expression Manager dialog. As a query is added to the list of favorite queries, it will be displayed at the top of the right-click menu. The ten most recently added queries to the favorites list will be displayed on the menu (most recent at the top), enabling you to quickly access and reuse your favorite query expressions.
- Organize Favorites - use this command to access the Favorites tab of the Expression Manager dialog in which you can organize (rename, delete) entries in the list of favorite queries as required.
- Examples - click to access a sub-menu of predefined example filters. Choosing an example filter will load the associated, underlying query expression into the central region of the panel.
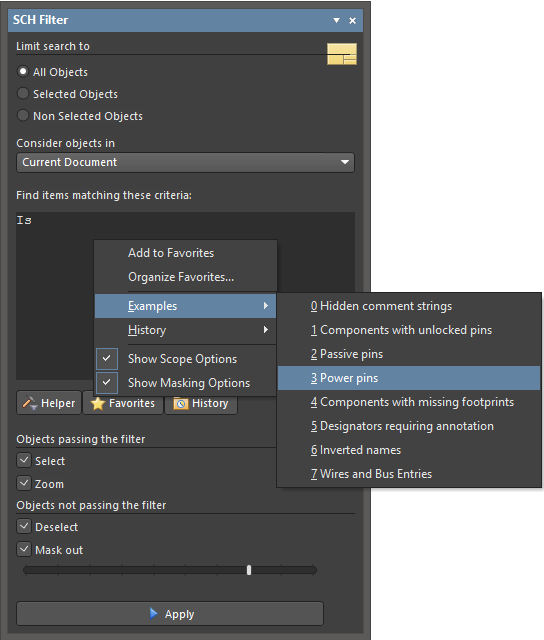
- History - click to access a sub-menu containing the nine most recently used query expressions taken from the query history list for the panel. Click on the More entry to access the History tab of the Expression Manager dialog in which you can browse through and apply a query from the full list of historical queries and also clear the history list as required.
- Show Scope Options - use this command to toggle the display of the filter scope region of the panel.
- Show Masking Options - use this command to toggle the display of the filter highlighting region of the panel.
Tips
General
- Pressing the F12 key will toggle the visibility of the panel in the workspace.
- When using the Query Helper dialog to construct a query, clicking inside a typed keyword or on a keyword in one of the available lists and pressing F1 will launch help for that particular keyword. Similar access to keyword-level help is available by clicking within a keyword in the central region of the SCH Filter panel then pressing F1.
- Depending on the shape and size of the panel, the content will be dynamically arranged horizontally or vertically.
When building query expressions
- It is highly advisable to use brackets whenever there is any possibility whatsoever that the query might not be correctly interpreted.
- Brackets have the highest precedence within an order of precedence that has been defined for the various operators provided and which determines how queries are interpreted by the software (whenever you have not provided brackets). The sequence of this order is as follows:
Brackets
Not
^, *, /, Div, Mod, And
+, -, Or, Xor
=, <>, <, >, <=, >=
&&, ||
This order of precedence is similar to that used in Pascal type languages. However, generous usage of brackets removes doubt and makes the resulting queries easier to read by others. - Ambiguities are resolved by working from left to right.
- Parentheses are evaluated from inside to outside and equal levels are done left to right.
- As the display options for objects passing and not passing the applied filter are separated, you can effectively apply new filter queries to build upon the results of previous filtering.
- Filtering applied when using Queries from the SCH Filter panel is permanent. When masking-out design objects not passing the filter, the extent of the masking is controlled by the slider bar at the bottom of the panel.
- A permanent filter must be cleared by applying an empty query from the SCH Filter panel.