Project History in an Altium 365 Workspace
Parent page: Workspace Projects
Not being able to easily access a historical view of a projects' development journey is quite often a pet peeve for designers and product managers. Too often, a designer has to get to grips with external VCS management tools which can require a fair level of expertise to drive them – quite time consuming when wanting to perform basic project management tasks. Even if you are competent with external VCS tools, they only ever deal with certain aspects of the project – VCS-related actions like opening, cloning and reverting. But what about the wider scope of project management, including releases and MCAD exchanges? Also, let's not forget to factor in that most of this would typically require being shackled to the desktop.
Providing an elegant solution to the desire to see such information and interact with it from a single location, the Altium 365 Workspace facilitates the notion of Project History. Accessible through the Workspace's browser interface (a constituent part of the parent Altium 365 Platform Interface) or from within Altium Designer, a dedicated History view provides a progressive timeline of major events relating to the project – its creation, commits, releases, clones and MCAD exchanges – with various actions (such as viewing a snapshot of the design source) supported where applicable.
Accessing the Project History
Access to the History view for a project is gained from the detailed management page for that project. Click the History entry in the left-hand pane.
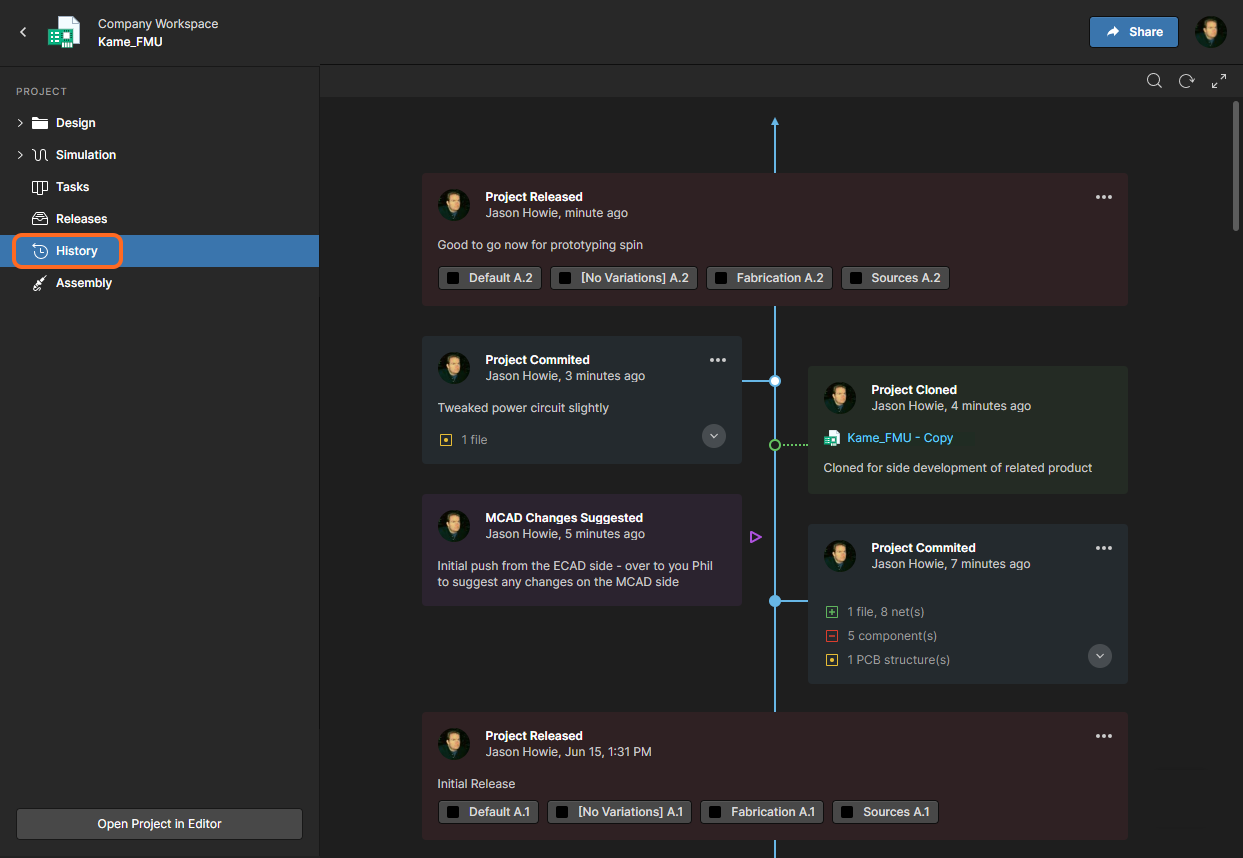 Access the history for a project from that project's detailed management page.
History Timeline – Overview
The History view presents a timeline of basic events that have occurred during the project's evolution. It can essentially be broken down into three key sections, as shown in the following image and detailed thereafter.
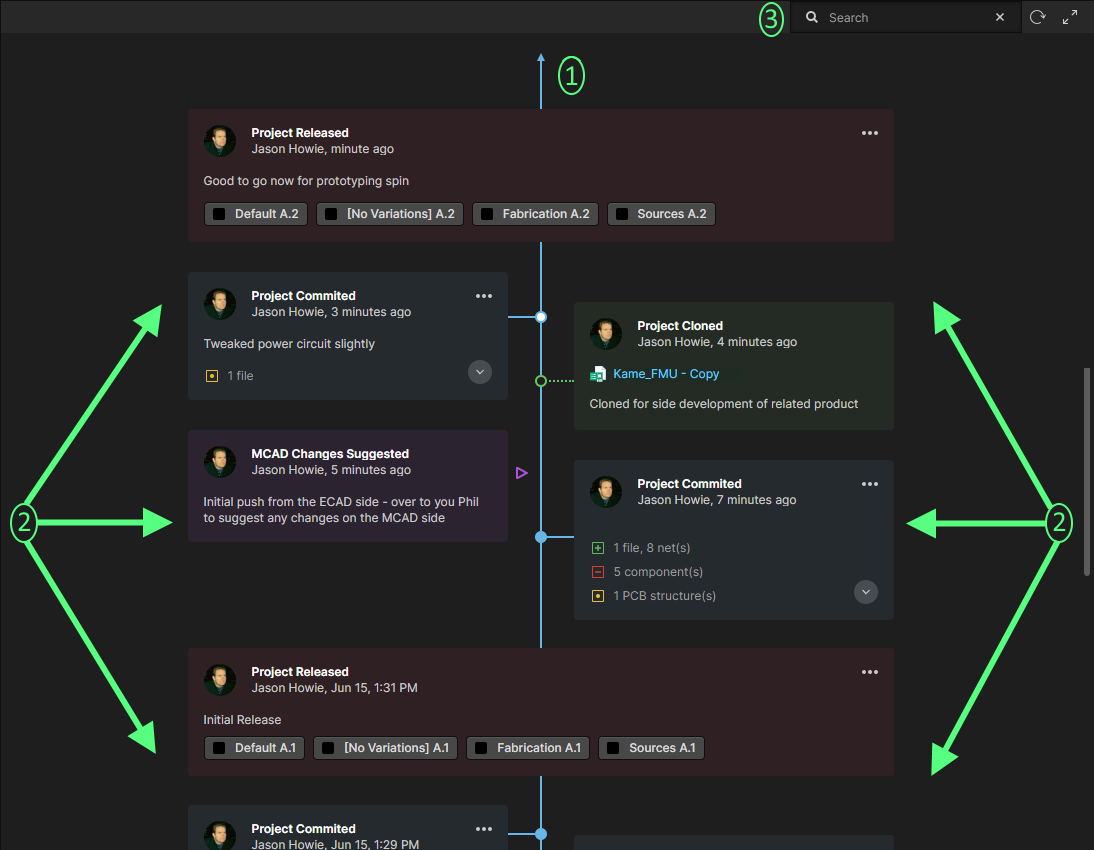 Identifying the three key components of the History view.
- Main trunk of the timeline. The direction of event chronology is from the bottom up. The first event – the creation of the project – will appear at the bottom of the timeline. Subsequent events appear above, with the latest (the most current event) appearing at the top of the timeline.
- Events. Each time a supported event (see below) happens in association with the project, that event is added to the timeline as a dedicated tile. Each type of event will have a different colored tile and will either be linked directly to the main trunk of the timeline, or have some additional icon next to it (as is the case for MCAD Exchange events).
- Search. Click the
 control at the top-right of the view to access a search field that facilitates basic searching of the project history. As you type your search string, filtering will be applied to the timeline to present only the events relevant to that search. For more information, see Filtered Searching.
Supported Events
The timeline shows a progression of events that happen during the life of a project. Each of these events appears along the timeline as a dedicated 'event tile'. The following sections take a look at the range of events currently supported and presentable as part of a project's historical timeline.
Project Creation
Related pages: Creating a New Managed Project (browser interface / Altium Designer), Making an Existing Project Available Online, Cloning a Project (browser interface / Altium Designer)
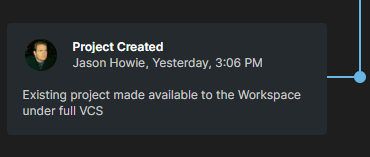
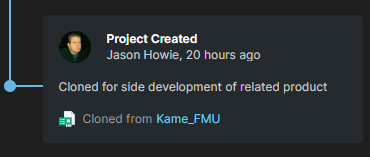
When a project is created, the Project Created event tile will be added to the timeline. This event marks the beginning of the historical timeline for the project. As such, it can always be found as the entry at the bottom of the timeline. The tile for this event can appear in two distinct variations:
- When the project is newly created within the Workspace. The creator of the project is presented by name (and picture), along with the date and time of the project's creation. The description for the project is also displayed within the tile, if one was entered at the time of creation.
- When the project is a clone of an existing project. The person who created the cloned project is presented by name (and picture), along with the date and time of the project's creation. The description for the project is also displayed within the tile, if one was entered at the time of cloning. A link is provided to the original project – clicking this will access the detailed management page for that project, which opens on a separate tab of the browser.
Project Commit
Each time you perform a Commit & Push of the project to the Workspace (where the project is managed under the Workspace's internal Versioned Storage Git repository), a Project Committed event tile will be added to the timeline. The person who performed the commit and push is presented by name (and picture), along with the date and time. If a comment was added at the time of the commit and push – through the Commit to Version Control dialog – then that will also be displayed within the tile.
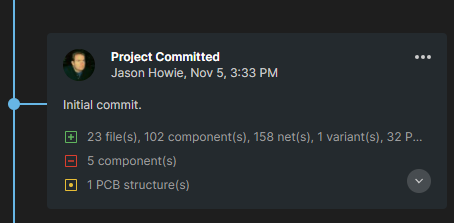 Example initial Project Committed event tile.
The tile also supports and presents design diffing information, showing more detailed information on what has changed between the current and previous commits. Elements supported include files, components, nets, variants, and PCB structure. The diffing section of the tile summarizes the various elements affected by the commit event, grouped by the following states:
![]() – element added.
– element added.
![]() – element removed.
– element removed.
![]() – element modified.
– element modified.
Clicking on the ![]() control in the tile will expand this diffing section to present the affected elements by name.
control in the tile will expand this diffing section to present the affected elements by name.
Click the ![]() control at the tile's top-right corner to access a menu with the following commands:
control at the tile's top-right corner to access a menu with the following commands:
- View – use this command to open the selected commit's source design data in the Web Viewer as a snapshot of the design at that time.
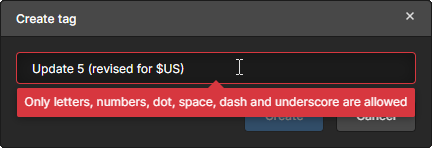
- Create Tag – add a VCS tag name to the currently selected commit. Tags attached to a commit appear in its History view tile, in the header of its snapshot view in the Web Viewer, and any comments attached to that snapshot view. Once a Tag has been added to a commit, the tile's menu command changes to Tag and offers sub-options to modify (Edit) or delete (Remove) the commit's tag.
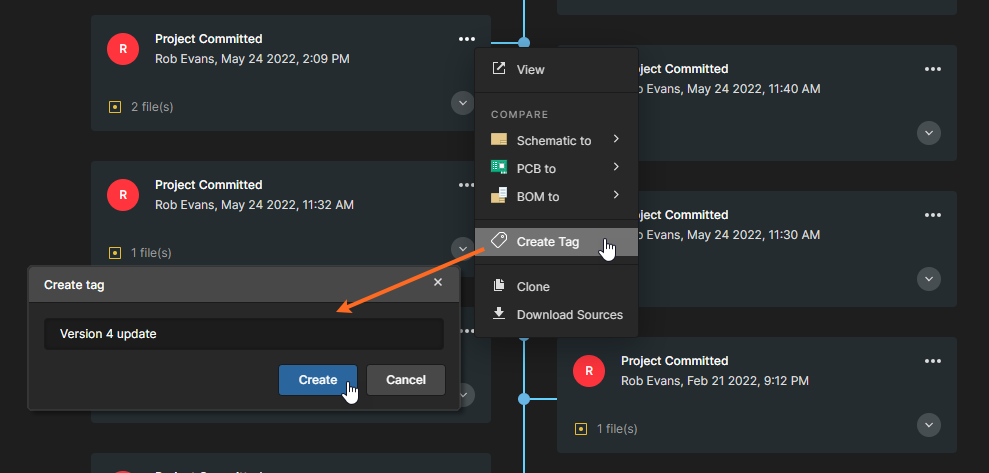 Select the Create Tag menu option to add a tag name to a commit History event.
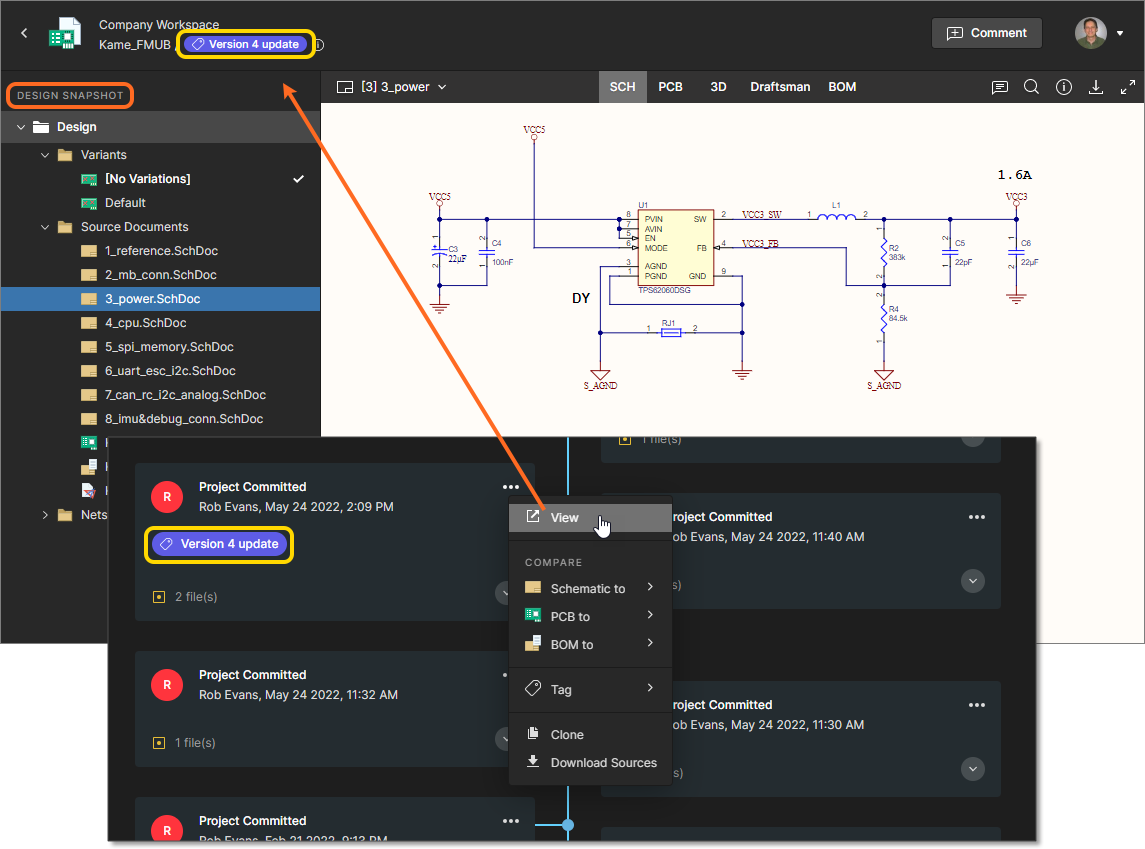 The snapshot view of a tagged History commit event is labeled with the tag name.
When comments are viewed in the live WIP design, those created in the design snapshot of a tagged commit will include the associated tag name. Select the tag name link to open the related commit snapshot. See Web Viewer Comments for more information on working with comments.
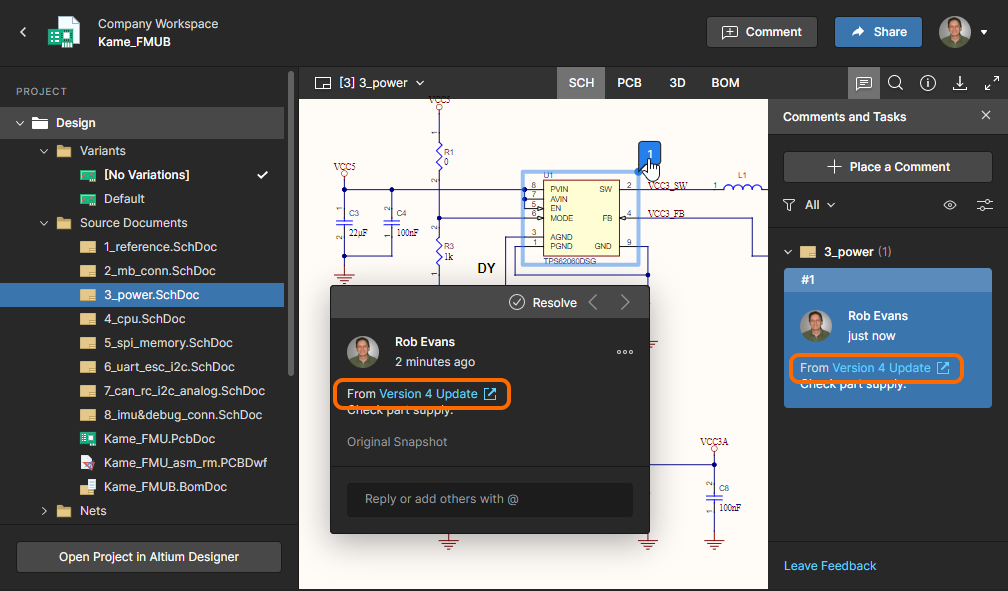 Comments added to a snapshot of a tagged commit event will include the associated tag name.
The Commit event associated with a project Release, as created by Altium Designer's Project Releaser, is tagged automatically with the Release Revision ID. If required, the resulting Revision commit tag subsequently can be edited or deleted. See Releasing to a Workspace for related information.
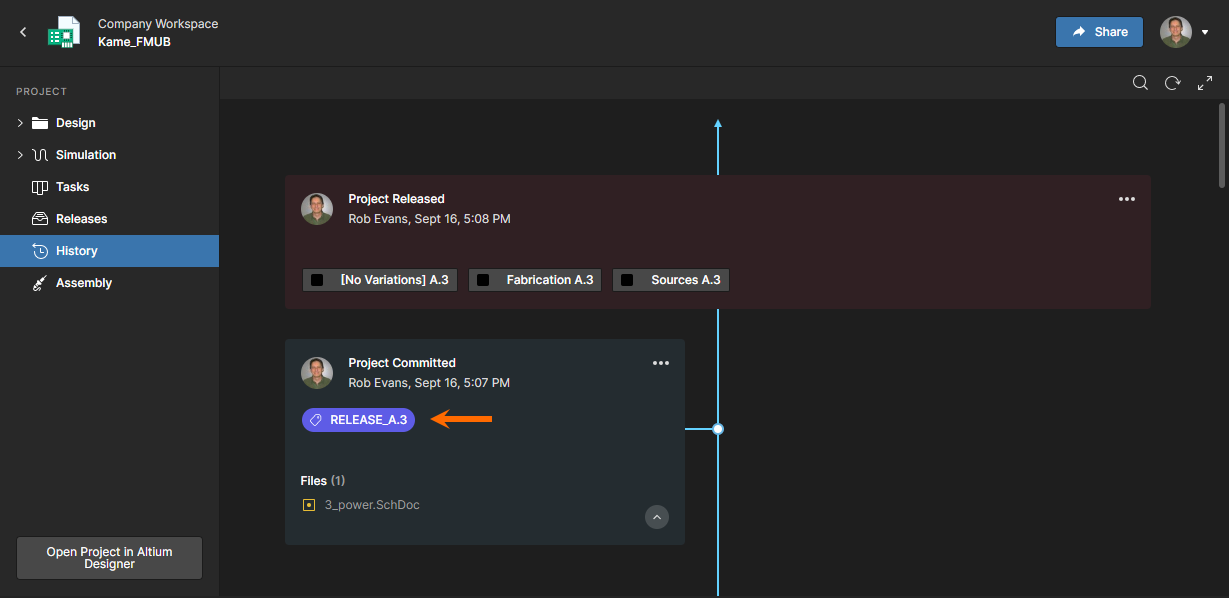 The Commit associated with a Release is automatically tagged with the Release ID by Altium Designer.
- Schematic to – allows you to compare the Schematic data in this commit against that of another commit or release event. Use the sub-menu to compare against the previous commit's source data, or select from all possible commits or releases. Once the comparison release/commit has been chosen, the results of the comparison are presented in the Compare view, which opens as a new tab in your default web browser. For more information, see Schematic Comparison.
- PCB to – allows you to compare the PCB data in this commit against that of another commit or release event. Use the sub-menu to compare against the previous commit's source data, or select from all possible commits or releases. Once the comparison release/commit has been chosen, the results of the comparison are presented in the Compare view, which opens as a new tab in your default web browser. For more information, see PCB Comparison.
- BOM to – allows you to compare the BOM data in this commit against that of another commit or release event. Use the associated sub-menu to compare against the previous commit's BOM data, or select from all commits/releases that have been made for the project. Once the target of the comparison has been chosen, the results of the comparison are presented as a list of color-coded BOM entries that represent items that have changed between the specified Commit/Release events. A collated summary of the changes is generated in a standard CSV format and made available for download in a ZIP archive file. For more information, see BOM Comparison.
- Clone – use this command to create a clone from that specific revision of the project. The Clone Project window will appear with which to determine the project Name, Description, and the Parent Folder (within the Workspace). Note that the window's banner text reflects from which revision of the project the clone is being created. With the information defined as required, click the
 button. The project will be created and a Project Cloned event tile will be added to the timeline.
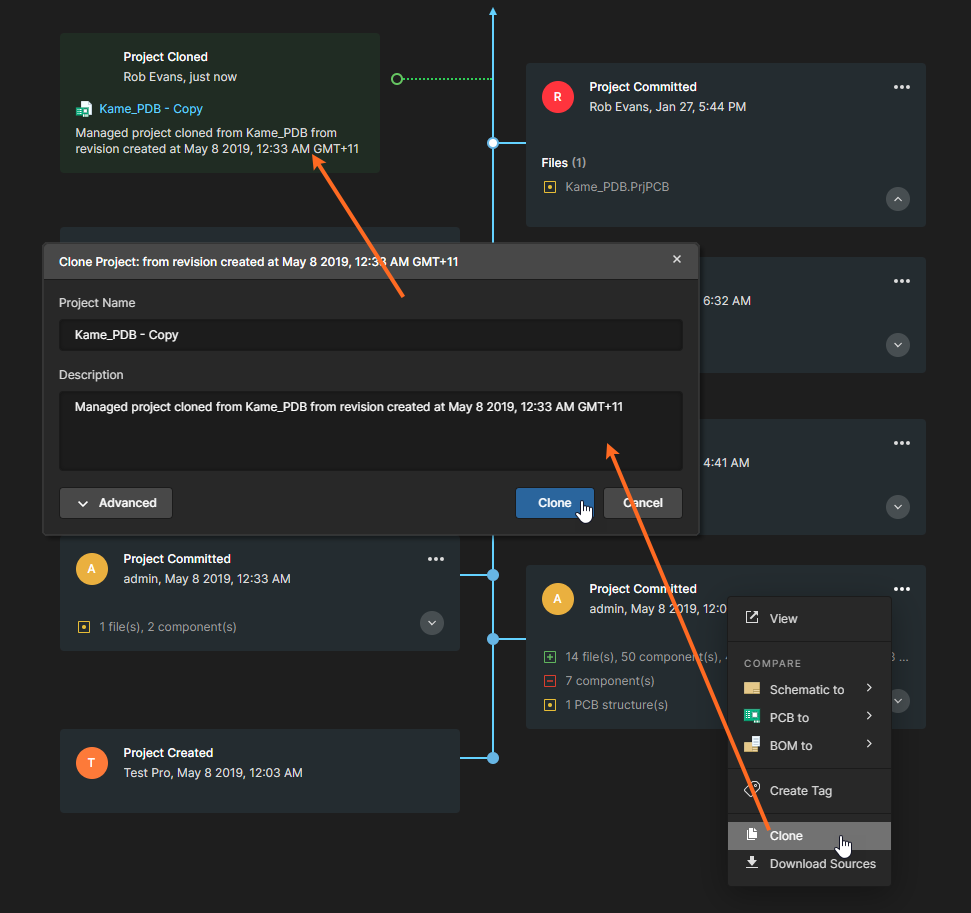 You can make a clone from any specific revision of the active project – directly from the corresponding Project Committed event tile for that revision.
- Download Sources – use this command to download the project source for that specific revision of the project, in a Zip archive. The name of the Zip file and the PCB project file will include the date and time (in UTC time) at which that revision of the project was committed and pushed to the Workspace.
Project Release
Related page: Design Project Release
Each time you perform a release of the project – using Altium Designer's Project Releaser – a Project Released event tile will be added to the timeline. The person who performed the release is presented by name (and picture), along with the date and time. If a release note was added at the time of releasing the generated data to the Workspace – through the Confirm Release dialog – then that will also be displayed within the tile. Each of the data sets included in the release will also be listed, with indication of lifecycle state.
 Example Project Released event tile.
Click the ![]() control at the tile's top-right corner to access a menu with the following commands:
control at the tile's top-right corner to access a menu with the following commands:
- View – opens a dedicated manufacturing portal (on a separate browser tab) with which to more closely inspect the released data. From this portal you can view and navigate the released file data, inspect the BOM, and view and comment on the snapshot of the design itself; the source for that released data. You'll also have access to controls for downloading manufacturing data at various levels of granularity (from full data set(s) to individual generated output file(s)). A chosen release can also be sent – as a Manufacturing Package – directly to your manufacturer. For more information, see Browsing a Release Package through the Manufacturing Portal.
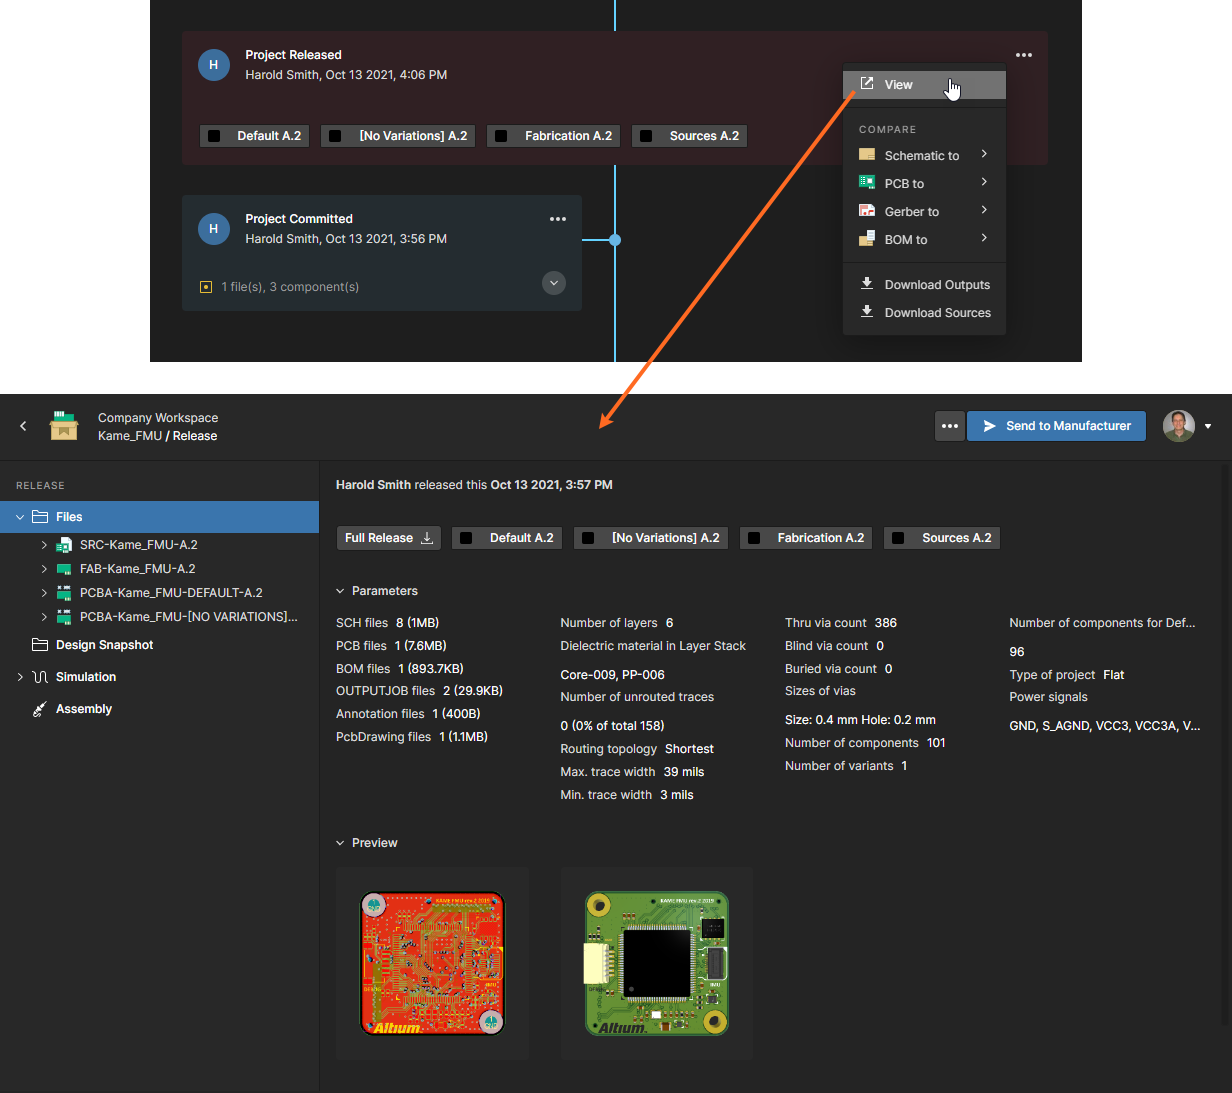 Accessing the dedicated Manufacturing Portal tab, with which to more closely inspect the release of the project.
- Schematic to – allows you to compare the Schematic data in this release against that of another release or commit event. Use the sub-menu to compare against the previous release's source data, or select from all possible releases and commits. Once the comparison release/commit has been chosen, the results of the comparison are presented in the Compare view, which opens as a new tab in your default web browser. For more information, see Schematic Comparison.
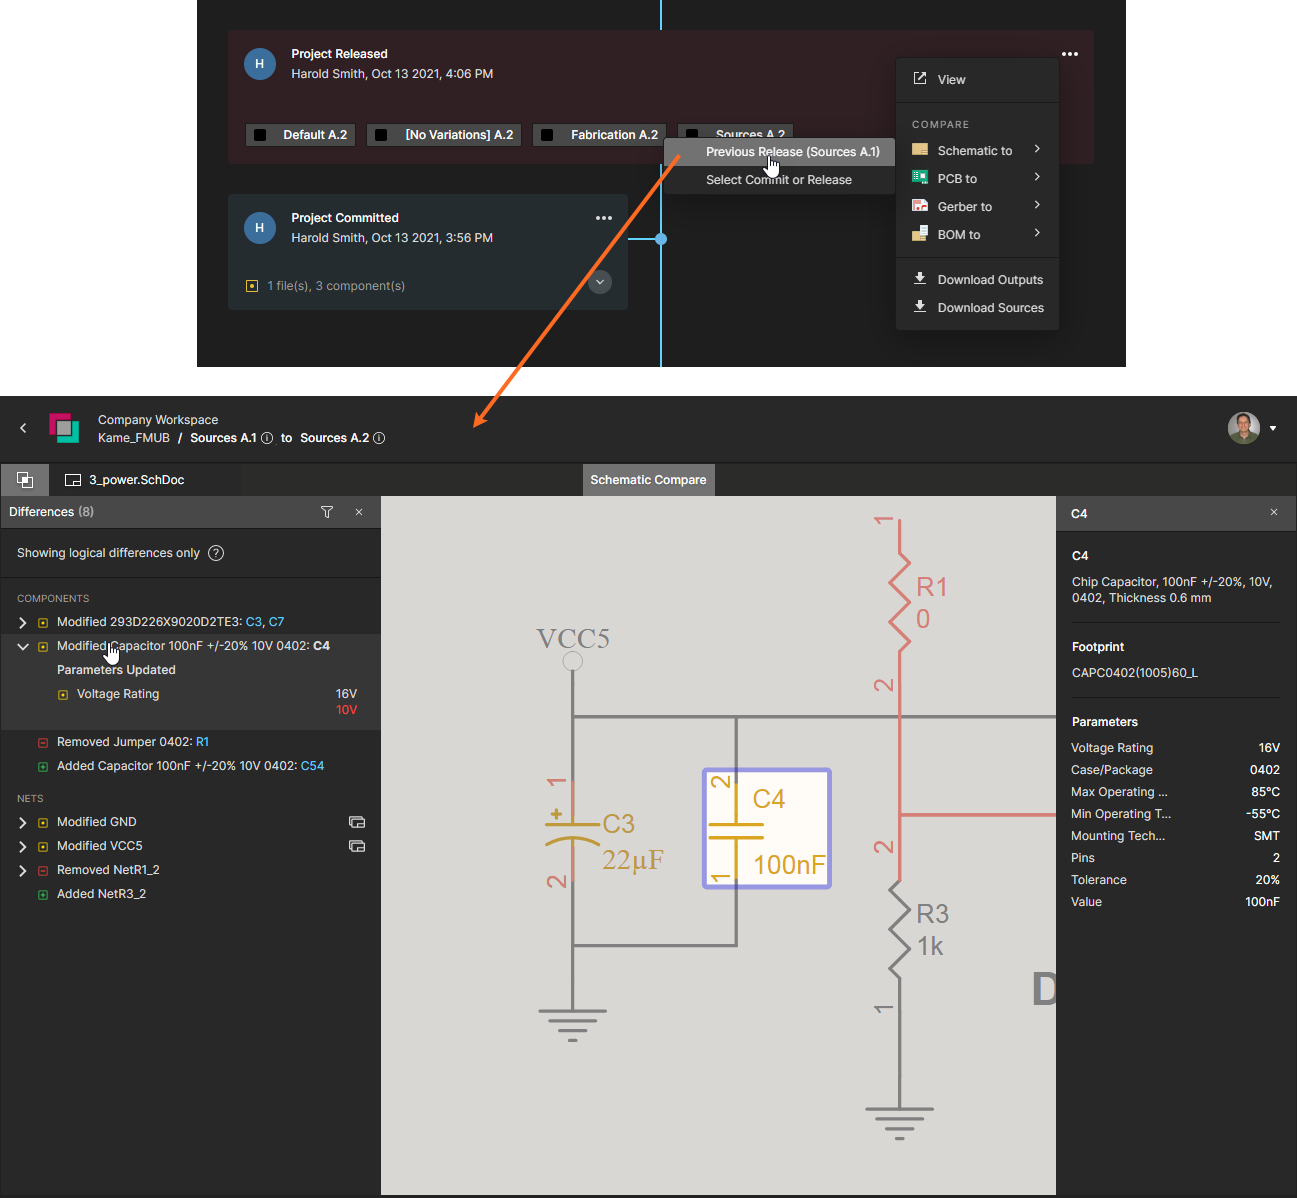 Comparison of Schematic data between two releases of the design project.
- PCB to – allows you to compare the PCB data in this release against that of another release or commit event. Use the sub-menu to compare against the previous release's source data, or select from all possible releases and commits. Once the comparison release/commit has been chosen, the results of the comparison are presented in the Compare view, which opens as a new tab in your default web browser. For more information, see PCB Comparison.
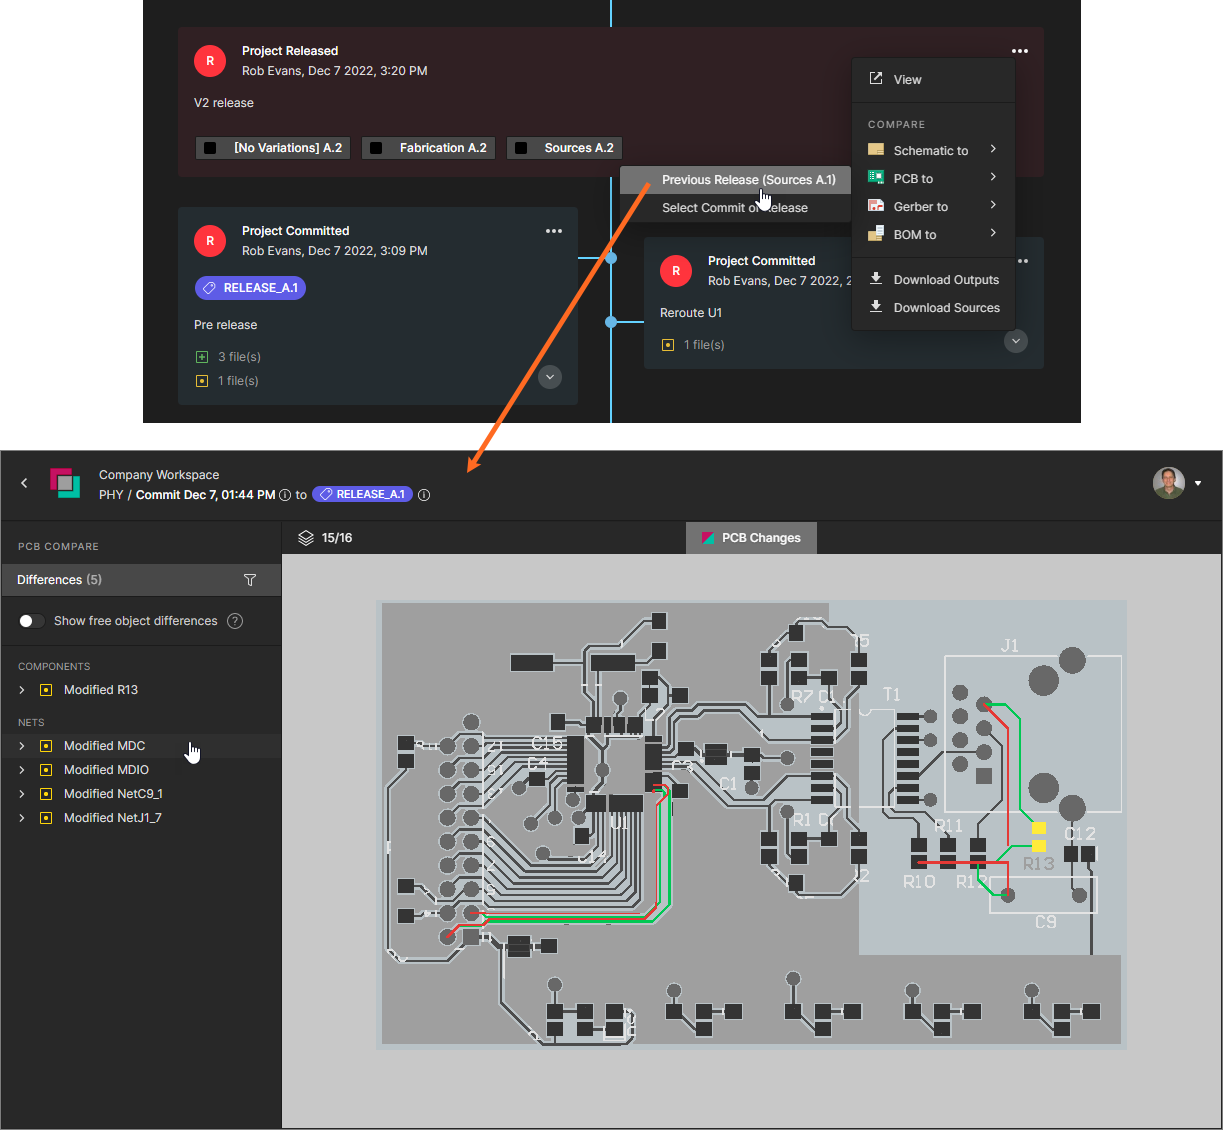 Comparison of PCB data between two releases of the design project.
- Gerber to – allows you to compare the generated Gerber data for this release against another set of Gerber data. Use the associated sub-menu to compare against the previous release's fabrication data, select from all releases that have been made for the project (the timeline will be filtered to just show Project Released event tiles), or compare with a chosen locally-generated (and uploaded) file set. Once the target of the comparison has been chosen, the results are presented in the Gerber Compare view, which opens in a separate browser tab. For more information, see Gerber Comparison.
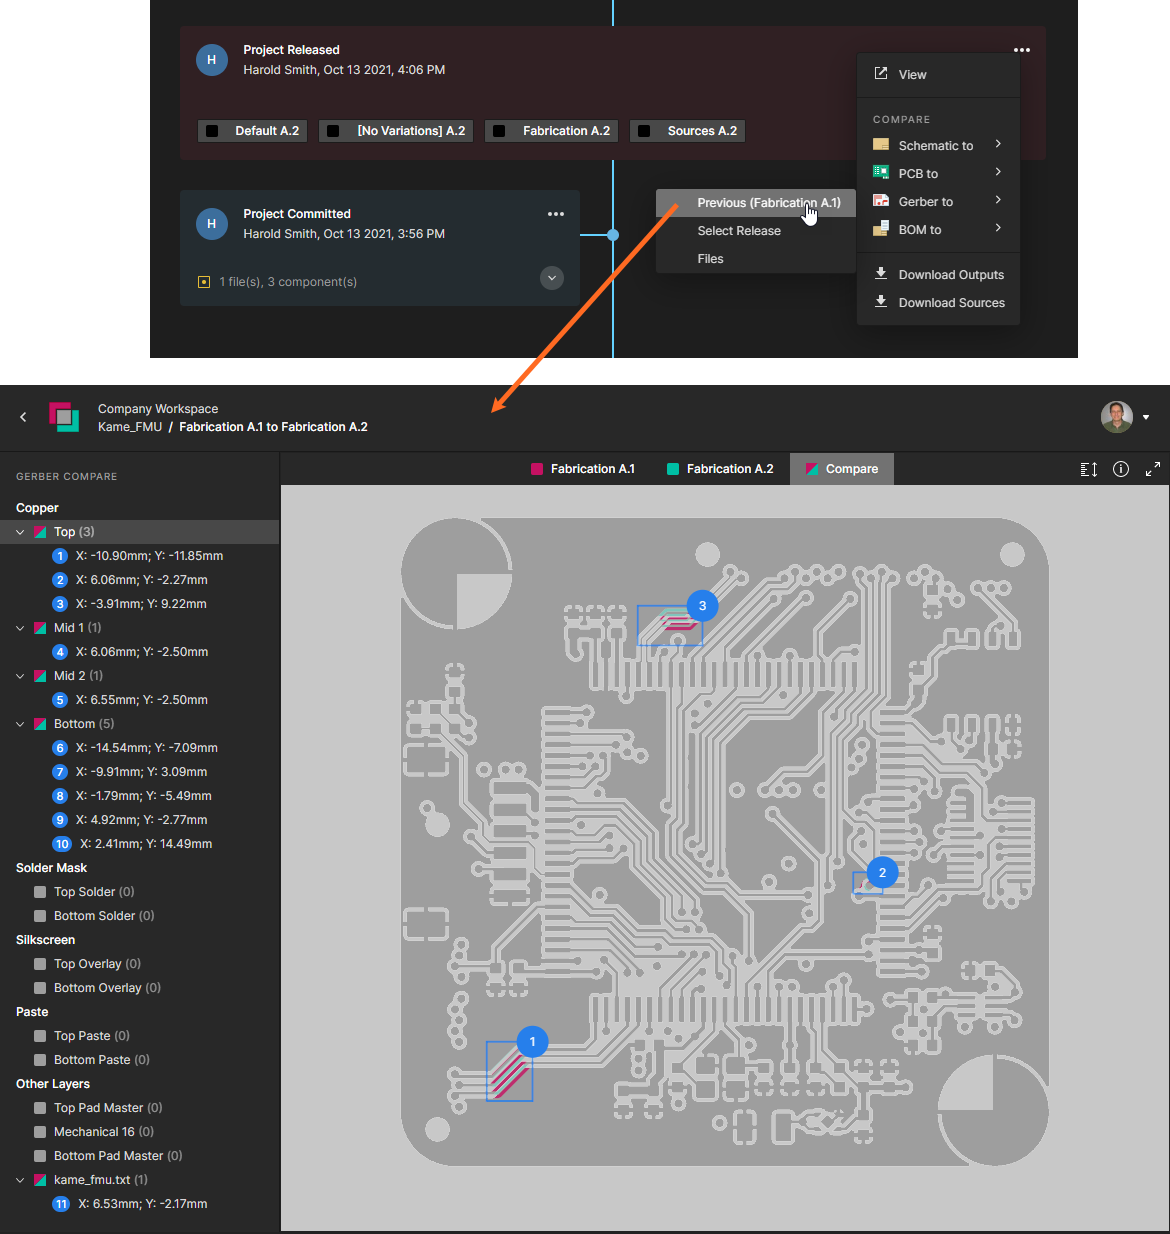 Comparison of generated Gerber data between two releases of the design project.
- BOM to – allows you to compare the BOM data in this release against that of another commit or release event. Use the associated sub-menu to compare against the previous commit's BOM data, or select from all commits/releases that have been made for the project. Once the target of the comparison has been chosen, the results of the comparison are presented as a list of color-coded BOM entries that represent items that have changed between the specified Commit/Release events. A collated summary of the changes is generated in a standard CSV format and made available for download in a ZIP archive file. For more information, see BOM Comparison.
 Download a comparison of generated BOM data between two events of the design project.
- Download Outputs – allows you to choose, through a subsequent window, which of the output data sets in the release package to download. With choices made, click the
 button. A single Zip archive will be downloaded, containing folders for each of the chosen data sets.
 - Download Sources – allows you to download the source data of the version of the design that was used to create that release package, as a Zip archive.
Project Cloning
Related page: Cloning a Project (browser interface / Altium Designer)
Each time you clone the project – either through the Workspace's browser interface, or from within Altium Designer – a Project Cloned event tile will be added to the timeline. The person who performed the clone is presented by name (and picture), along with the date and time. If a description was added at the time of cloning – through the Clone Project window (browser-based) or Clone Project dialog (Altium Designer) – then that will also be displayed within the tile. A link is provided to the cloned project – clicking this will access the detailed management page for that project, which opens on a separate tab of the browser.
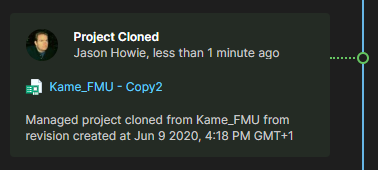 Example Project Cloned event tile.
MCAD Exchanges
Related page: More about ECAD-MCAD CoDesign
When working between the electronic and mechanical design domains, the Workspace acts as the bridge between the two – facilitating direct ECAD-MCAD codesign. Whenever changes are made to the project's PCB design and those changes are pushed to the Workspace through the relevant CoDesigner panel, an MCAD Changes Suggested event tile will be added to the timeline. The person who performed the push is presented by name (and picture), along with the date and time. If a message was posted at the time of pushing – through the MCAD CoDesigner panel (Altium Designer), or Altium CoDesigner panel (in the supported MCAD software) – then that will also be displayed within the tile.
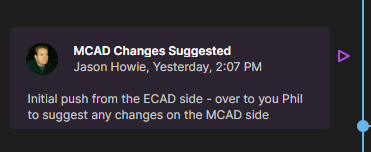 Example MCAD Changes Suggested event tile.
When the MCAD engineer makes changes to the PCB in their supported MCAD software and pushes those changes to the Workspace, the corresponding push event will automatically be displayed on the project's history timeline. Note that you may need to perform a refresh on the History page for the latest change to be displayed.
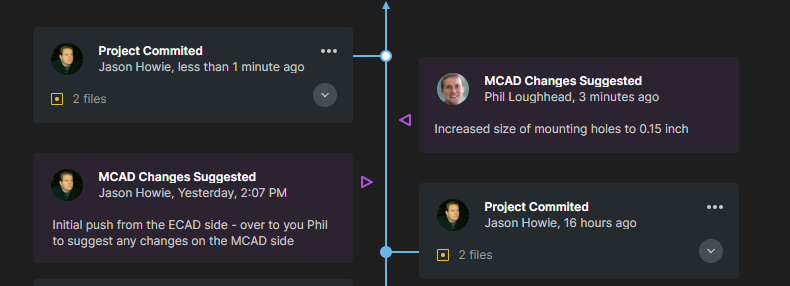 Example showing two MCAD-related events. On the left of the timeline's trunk the push event from the ECAD side, while on the right the push event from the MCAD side.
Filtered Search
Click the ![]() control at the top-right of the view to access a search field with which to quickly find events of interest along the timeline. The search facility supports basic searching of the project history, with dynamic filtering applied as you type your search string – leaving only the events relevant to that search displayed on the page. The matching text within an event tile is highlighted.
control at the top-right of the view to access a search field with which to quickly find events of interest along the timeline. The search facility supports basic searching of the project history, with dynamic filtering applied as you type your search string – leaving only the events relevant to that search displayed on the page. The matching text within an event tile is highlighted.
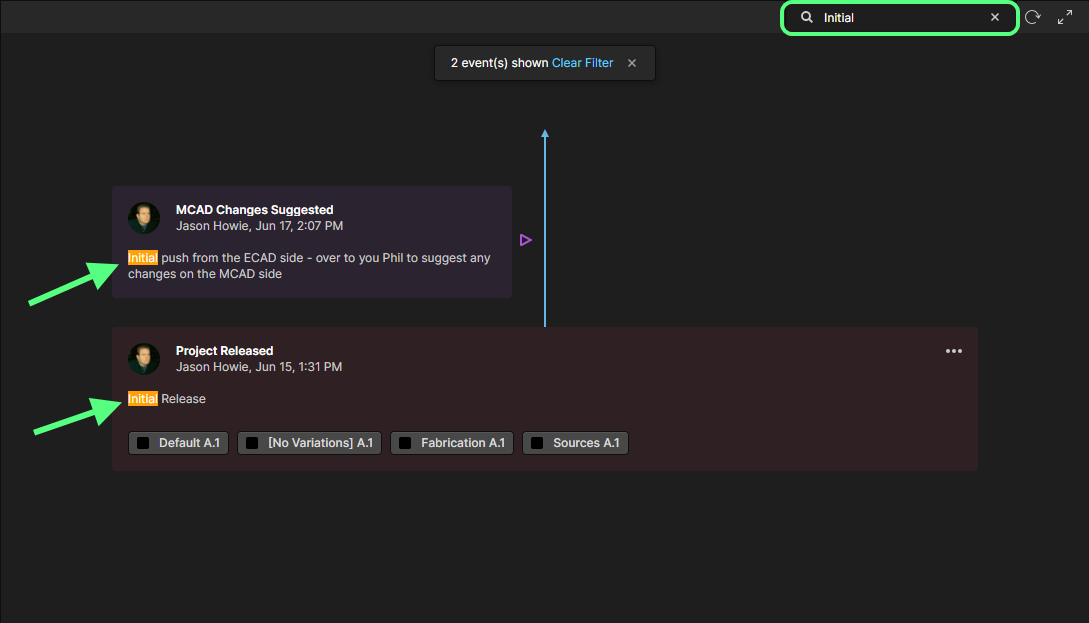 Example search of a project's history. The timeline is dynamically filtered as you type your (case insensitive) search term, with matching entries highlighted within each relevant event tile.
The search facility works with the following information:
- Event tile title.
- Person's name who performed the event.
- Descriptive text (the text sourced from a comment/note/description when the relevant event occurred).
- Diffing data text – in a Project Committed event tile.
- Data set name – in a Project Released event tile.
- Project name – in a Project Cloned event tile and Project Created event tile (when created through cloning).
Updating with New Events
Whenever a supported event happens in relation to the project, that event will be detected and made available to the History view automatically. Notification will appear at the bottom of the view shortly after the event takes place – click the ![]() control to update the timeline with the new event.
control to update the timeline with the new event.

