
Keeping Track of Your Tasks Using the To-Do Panel in Altium NEXUS
This document is no longer available beyond version 4. Information can now be found here: To-Do Panel for version 5
Parent page: Working with Panels

The To-Do panel
Summary
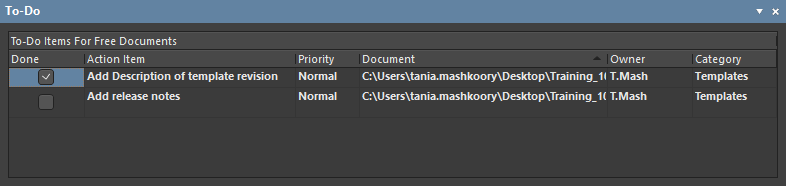
The To-Do panel lists all To-Do items that are currently defined for the active project. A To-Do item is used as a reminder for a task that needs to be carried out at a later stage in relation to a document.
Panel Access
The To-Do panel can be accessed in the following ways:
- Click the Panels button at the bottom-right of the design space then select To-Do.
- Choose View » Panels » To-Do from the main menus.
Content and Use
The To-Do panel can list two varieties of "to do" items for the active project:
- A project-level To-Do item.
- A document-level To-Do item - added to a text-based document within the project.
For each To-Do item, the following information is displayed:
- Done - this check box enables you to check the item when its defined task has been completed.
- Action Item - the actual task that needs to be performed.
- Priority - the importance of the task to be performed (Lowest, Low, Normal (default), High, Highest).
- Document - a reference to the source document to which a document-level To-Do item has been added.
- Owner - this could be the name of the person entering the task or who is to actually perform the task.
- Category - this could be the particular area within the project that the task to be performed falls under (e.g., schematics, design rules, routing, constraints, etc.).
Adding Project-level To-Do Items
Project-level To-Do items are added from within the panel itself. Before adding any items, ensure that the active document in the design editor window is one of the design documents for the project for which you want to define To-Do items.
To add a new To-Do item, right-click within the panel and choose the Add Project To-Do Item entry from the subsequent context menu that appears. The Edit To-Do Item dialog will open.
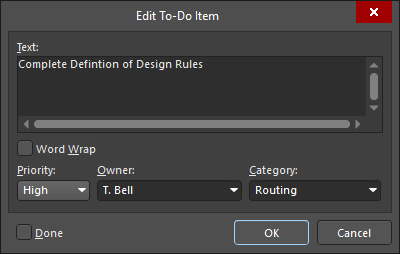
Use this dialog to enter suitable text pertaining to the task that needs to be carried out for the project. Use the available fields in the dialog to define a Priority, Owner, and Category for the task. After defining the item as required, click OK to add the new item to the panel.
Adding Document-level To-Do Items
Document-level To-Do items are added to a text-based source document (e.g., VHDL file, Constraint file, Embedded Source code document, etc.,). Before adding any items, ensure that the required document is active in the design editor window and that this document belongs to the project whose overall To-Do items you are currently defining.
To add a new To-Do item, place the text cursor at the required position within the document at which you wish to place a To-Do item, right-click and choose the Add To-Do Item entry from the subsequent pop-up menu that appears. The Edit To-Do Item dialog appears. Use this dialog to enter suitable text pertaining to the task that needs to be carried out at that point in the document. Use the available fields in the dialog to define a Priority, Owner and Category for the task (e.g., Formatting pass, Code Review pass, etc.,). After defining the To-Do item as required, click OK to close the dialog and return focus to the current document. An entry for the To-Do item will appear in the To-Do panel and also at the point marked by the current text cursor position. The entry will appear as a comment (between the comment delimiter(s) defined for that document type), including the actual text for the item and a unique identifier as shown in the image below.
Right-click Menu
The right-click menu provides the following commands:
- Goto Source - this command becomes available when the selected item in the panel is a document-level To-Do item. Use this command to open (if not already) the associated source document referenced in the Document field of the item and make it the active document in the design editor window. The text cursor will be placed at the beginning of the To-Do item text.
- Add Project To-Do Item - add a project-level To-Do item to the panel for the active project.
- Edit - edit the selected To-Do item. The Edit To-Do Item dialog will appear in which you can make the required changes.
- Delete - delete the selected To-Do item from the panel.
- Show Completed Items - with this option enabled, only To-Do items that have been marked as complete (Done option enabled) will remain displayed in the panel.
- Report - generate a report containing all To-Do items currently displayed in the panel. After launching the command, the Report Preview dialog will open in which you can configure, print and export the report in various file formats.
Tips
- If a document-level To-Do item has been defined in the panel and the corresponding source document is the active document in the design editor window, the text for the entire To-Do entry in the panel will become bold.
- Double-clicking on a To-Do item entry in the panel will open the Edit To-Do Item dialog, enabling you to make any required modifications to the task's definition.
- The entries in the panel may be sorted by any column by clicking on the header for that column. Click once to sort in ascending order; click again to sort in descending order.
- Direct filtering is available, allowing you to quickly jump to a To-Do item entry by directly typing within the panel. You can filter based on any data column in the panel. Use the Right Arrow and Left Arrow keys to switch between columns for filtering, or click directly on a field within a column. To use this filter feature, click within a data column and type the first letter of the entry to which you want to jump. The first entry in that column starting with the letter you type will become selected and the letter will be highlighted to show that filtering of the column content is based upon the letter typed.