
Altium Concord Pro on A365 - Creation and Management
Parent page: Concord Pro - Hosted on Altium 365
A Workspace - the incarnation of Altium Concord Pro when hosted on the Altium 365 infrastructure platform - is a dedicated server for your managed content. It facilitates the seamless connectivity of, and the mechanics for moving data between, the design, manufacturing and supply domains.
Getting a Workspace
You will automatically have a single Workspace created for you when you purchase Altium Concord Pro and have it hosted on Altium 365.
Licensing
Licensing for Concord Pro hosted on Altium 365 is identical to that of the self-managed hosting variant and consists of two components:
- Server License - enables the full set of Concord Pro services for your organization, including provisioning the required storage space - a Workspace - for data and backups. One server license is required per organization.
- Client Access License - provides user access to Concord Pro functionality. One Client license is required per user accessing Concord Pro services.
Are there any Limitations?
Workspaces can only be accessed from Altium Designer 19.0 and later.
Only a single Workspace is typically created per company, based on purchasing an Altium Concord Pro server license. Multiple Workspaces are only possible when buying multiple instances of Altium Concord Pro - multiple server licenses - and where you have opted to have those instances hosted on the Altium 365 platform.
A user who is not using an On-Demand license of Altium Designer cannot be the owner of a Workspace. They can, however, participate through invitation to become a team member in a Workspace owned by another user (who is using an On-Demand license of Altium Designer).
There is no limit on:
- How many users can connect to a Workspace instance through its browser interface.
- How many users can connect to a Workspace instance through Altium Designer (naturally limited to the number of seats of Altium Designer, and therefore those with an active AltiumLive account).
- The number of users registered within a Workspace instance.
- The number of MCAD Engineers connecting and collaborating on projects that are managed within a Workspace instance.
Viewer Access
When connecting to a Workspace instance through its browser interface, or through Altium Designer (licensed as a Viewer), the only limitations are those involving core design data modification operations:
- Using the Workspace browser interface, it is not possible to:
- Modify a managed BOM.
- Using a Viewer license of Altium Designer, it is not possible to:
- Create a new design.
- Checkin (commit) a new version.
- Create a new Item Revision (e.g. modify a component).
- Perform project release using the Project Releaser.
You can freely add new comments, review designs and BOM, and share projects and manufacturing data.
Privacy & Sharing
By default, all created content is visible only to the individual user creating that content and Workspace Administrators. In order to make it available to others, it needs to be explicitly shared with the individual user, role, or your organization.
In order to allow a contractor to work on a design (using company components, templates etc...), they need to be invited into the Workspace instance. Access rights would need to be looked at closely, as they could gain accidental access to areas you don't want them to see. Similar for access by customers (e.g. design bureaus) - invite them into your single shared company Workspace instance, with appropriately configured access rights.
You can create and share a manufacturing package without inviting people into your Workspace team. Those people can then browse the content of that package through Altium 365's Manufacturing Package Viewer - an element of the Altium 365 platform's Global Sharing support that allows invited stakeholders to view a manufacturing package from any web browser - anywhere in the world - but outside of your Workspace. This allows you to keep your designs themselves, and other valuable IP, off limits.
Subscription Expiration & Data Retention
If subscription for your Altium Designer licenses lapses, then you will be able to still work with your Workspace instance, and are able to create any new content in that instance, provided you still keep active subscription to Altium Concord Pro. If the latter also lapses, you will still be able to work with existing content in your Workspace instance, but will not be able to create any new content in that instance.
In addition, this use of existing content is only permitted for the time period defined in the Data Retention Policy. When your subscription expires and you have opted to stop service usage, you will be given a certain time for data extraction. After that, your Workspace will be moved to an inactive state. After 3 months it will be archived and deleted only after 6 months of inactivity, unless you have requested earlier cleanup.
Data can be extracted from the instance prior to that by:
- Exporting components to IntLib format.
- Checking out designs.
- Downloading release packages.
Managing Workspaces
Once Altium has created your organization's Workspace, and you have been added as part of that Workspace's Team, you will be able to access its browser interface directly by signing in to the Altium 365 Platform Interface (https://365.altium.com). If you have been added to the teams of one or more other organization's Workspaces, you'll be able to see, and choose between those Workspaces, from a dedicated Workspaces dashboard.
 Example defined Workspaces, listed when accessing the Workspaces area of the Altium Dashboard.
This listing can be accessed directly (once signed into AltiumLive) using the URL: https://workspaces.altium.com/spaces.
Each workspace is listed in terms of the following information:
- Workspace Name - the name of the Workspace. This is a live link that, once clicked, will take you to the Altium 365 Platform Interface's Home page, with that Workspace loaded as the active Workspace.
- Type - the type of Workspace (Altium Designer Workspace).
- Status - the current state of the Workspace. This will be Active provided you have active subscription to Altium Concord Pro. If subscription lapses, the state will change to Expired.
- Location - location of the server on which the Workspace is hosted (Europe, Asia, US East, or US West).
- User - the current number of users defined in the Team for the Workspace. There is no limit to the number of users that can be added to a Workspace's team.
- Server Address - the URL for access to the Workspace. This is a live link that, once clicked, will take you to the Home page of the Altium 365 Platform Interface's Home page, with that Workspace loaded as the active Workspace.
- Default - if you are part of (have access to) multiple Workspaces, one of these can be nominated to be the default Workspace. Enabling this option means that when you sign in to the Altium 365 Platform Interface, that Workspace will be loaded as the active Workspace. If a default is not defined, the alphabetically first Workspace will be loaded. Note also that if a default Workspace has been nominated, then you will connect directly to that Workspace when signing in to your Altium account (through Altium Designer) using your AltiumLive credentials.
- Action - the following action buttons are provided:
 - click this button to copy the address for the Workspace (Server Address) to the clipboard.
 - click this button to access the Workspace Config window, from where changes to the Workspace's name and description can be made. A snapshot of the Workspace can also be created. For more information, see Modifying a Workspace Configuration.
 - this button is only available for another organization's Workspace, and to which you have been added as a user to that Workspace's team. Click to remove yourself from the Workspace. A confirmation dialog will appear in which you will be required to literally enter the text delete, and then click OK. You will be removed from that Workspace's team and the entry for the Workspace will be removed from your available Workspaces listing.
 - this button is only available for a Workspace that has been created for your organization (and for which you are an administrator for). Click to delete the Workspace. A confirmation dialog will appear in which you will be required to literally enter the text delete, and then click OK. The Workspace will be permanently deleted and removed from your available Workspaces listing.
Modifying a Workspace Configuration
To modify a Workspace's configuration, click on its associated button, in the Workspaces summary listing. The Workspace Config window will appear.
 Change the configuration for a Workspace through the Workspace Config window.
From this dialog you can change the following information for the Workspace:
- Its name
- Its description
and gain the following information:
- Its type
- Its location
- Its server address
Changes are applied after clicking the 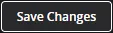 button.
Snapshots
Any user who is a member of the team for a Workspace, is able to create a Snapshot of that Workspace. Think of this as being analogous to a Windows restore point. A method by which to restore a backup of a Workspace to how it was, including its configuration and content, at a particular point in time.
To create a Snapshot:
- Access the Workspace Config window for the required Workspace (click its associated button).
- Click the Create Snapshot control, in the Snapshots region of the window.
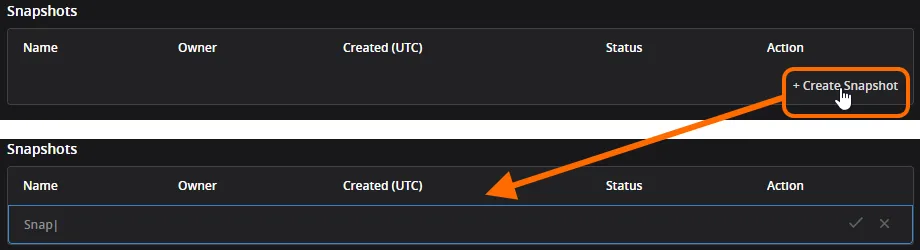
- Give the Snapshot a name, then click the
 control. The Snapshot will be created at this point, you do not need to click the button (unless you have made other changes to the Workspace elsewhere in the window).

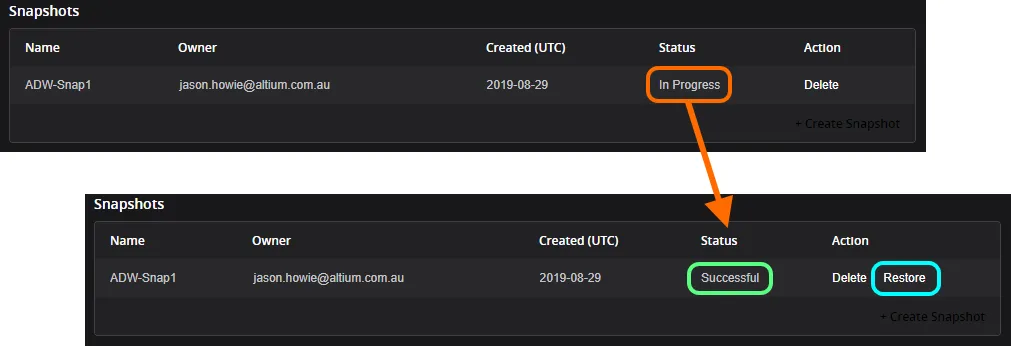
The Status will change to In Progress, and then finally to Successful, once the process validly completes. A Restore action will also then be available.
To restore a Workspace from a Snapshot:
- Access the Workspace Config window for the required Workspace (click its associated button).
- Click the Restore control associated to the Snapshot you wish to restore - in the Snapshots region of the window.
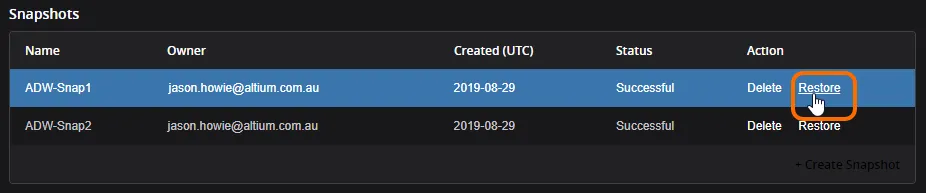
- A confirmation window will pop-up, asking whether you wish to restore this backup of the Workspace - click OK.
- After a short duration another confirmation window will alert you to the fact that Workspace restoration was successful.