
Mô-đun Dự án
Mô-đun Project trong Requirements & Systems Portal trình bày thông tin chi tiết và cung cấp các khả năng quản lý dự án. Giao diện người dùng của Mô-đun Project là trang Home, được mở khi truy cập Requirements & Systems Portal từ menu chín chấm ở phía trên bên phải giao diện Workspace trên trình duyệt (![]() ). Trang này cung cấp quyền truy cập vào các dự án requirements hiện có, phục vụ cho việc quản lý requirements, đồng thời cũng cho phép tạo một dự án requirements mới.
). Trang này cung cấp quyền truy cập vào các dự án requirements hiện có, phục vụ cho việc quản lý requirements, đồng thời cũng cho phép tạo một dự án requirements mới.

Tạo Dự án Requirements Mới
Để tạo một dự án requirements mới, hãy nhấp vào nút ![]() phía trên danh sách dự án. Cửa sổ Create Requirements Project sẽ mở ra.
phía trên danh sách dự án. Cửa sổ Create Requirements Project sẽ mở ra.

Cửa sổ Create Requirements Project sẽ hiển thị các trường sau:
-
Project Name – nhập tên bắt buộc cho dự án.
-
Description – nhập mô tả tùy chọn cho dự án.
-
Electronics Project – tùy chọn, chỉ định (các) dự án PCB đang tồn tại trong Workspace của bạn (tìm hiểu thêm về Workspace Projects). Với mỗi dự án PCB được thêm vào trường này, một block thuộc loại Electronics sẽ được tạo trong dự án requirements với cùng tên như dự án đó, và block này sẽ được liên kết với dự án PCB tương ứng. Ngoài ra, một specification có cùng tên với dự án PCB cũng sẽ được tạo trong dự án requirements, và block tương ứng sẽ được thêm vào danh sách Default blocks của specification đó.
Sau khi xác định dự án requirements mới theo nhu cầu, hãy nhấp vào ![]() . Bạn sẽ quay lại danh sách dự án ở mức tổng quan, nơi lúc này sẽ hiển thị một mục cho dự án requirements vừa được tạo.
. Bạn sẽ quay lại danh sách dự án ở mức tổng quan, nơi lúc này sẽ hiển thị một mục cho dự án requirements vừa được tạo.

Duyệt các Dự án Requirements
Danh sách dự án trên trang Home của Requirements & Systems Portal bao gồm tất cả các dự án requirements đang tồn tại trong Portal. Sử dụng nút ![]() để chuyển trang sang dạng xem danh sách và nút
để chuyển trang sang dạng xem danh sách và nút ![]() để chuyển trang sang dạng xem đồ họa.
để chuyển trang sang dạng xem đồ họa.


Danh sách các dự án requirements được tự động sắp xếp theo ngày sửa đổi gần nhất, với dự án được sửa đổi gần đây nhất xuất hiện ở góc trên bên trái danh sách (trong dạng xem đồ họa) hoặc ở đầu danh sách (trong dạng xem danh sách). Trong dạng xem đồ họa, có thể dùng nút ![]() để nhanh chóng sắp xếp các tài liệu dự án theo tên, mô tả, tác giả, chủ sở hữu hoặc ngày sửa đổi gần nhất (
để nhanh chóng sắp xếp các tài liệu dự án theo tên, mô tả, tác giả, chủ sở hữu hoặc ngày sửa đổi gần nhất ( ).
).
Trong dạng xem danh sách, danh sách dự án có thể được sắp xếp theo Name, Description, Author, Owner hoặc Last Modified, bằng cách dùng tiêu đề cột tương ứng. Nhấp một lần để sắp xếp tăng dần và nhấp lại để sắp xếp giảm dần. Các mũi tên ở bên phải tên cột sẽ cho biết hướng sắp xếp hiện đang được áp dụng. Phương thức sắp xếp được chọn trong một dạng xem sẽ được áp dụng cho cả hai dạng xem.
Ngoài ra còn có tính năng Search của dự án cho phép bạn tìm kiếm các dự án requirements theo tên của chúng. Nhập chuỗi tìm kiếm vào trường ở phía trên giao diện trình duyệt. Danh sách sẽ được cập nhật để chỉ bao gồm những mục dự án có tên chứa chuỗi tìm kiếm đó. Để xóa bộ lọc tìm kiếm, hãy nhấp vào mục trang Home chính trong khung điều hướng bên trái hoặc xóa nội dung trong trường tìm kiếm (x).
Truy cập một Dự án Requirements
Một dự án requirements có thể được truy cập từ cả dạng xem danh sách hoặc dạng xem đồ họa của trang Home trong Requirements & Systems Portal.
-
Trong dạng xem đồ họa của trang Home, hãy nhấp vào điều khiển
 trong ô của dự án requirements mong muốn và chọn lệnh Open từ menu liên kết. Ngoài ra, hãy nhấp vào tên dự án trong ô đó hoặc nhấp đúp vào ô.

-
Trong dạng xem danh sách của trang Home, di con trỏ lên mục của dự án requirements mong muốn, nhấp vào điều khiển
ở ngoài cùng bên phải của mục và chọn lệnh Open từ menu liên kết. Ngoài ra, hãy nhấp vào tên dự án trong mục đó hoặc nhấp đúp vào mục.

Dự án requirements sẽ mở trong một tab trình duyệt mới.
Xóa một Dự án Requirements
Một dự án requirements hiện có có thể được gỡ bỏ (xóa) khỏi Workspace từ cả dạng xem danh sách hoặc dạng xem đồ họa của trang Home trong Requirements & Systems Portal.
-
Trong dạng xem đồ họa của trang Home, hãy nhấp vào điều khiển
trong ô của dự án requirements mong muốn và chọn lệnh Remove từ menu liên kết.

-
Trong dạng xem danh sách của trang Home, di con trỏ lên mục của dự án requirements mong muốn, nhấp vào điều khiển
ở ngoài cùng bên phải của mục, và chọn lệnh Remove từ menu liên kết.

Trước khi việc xóa hoàn tất, bạn sẽ được yêu cầu xác nhận.
 ).
).Thay đổi các Thuộc tính Chính của một Dự án Requirements
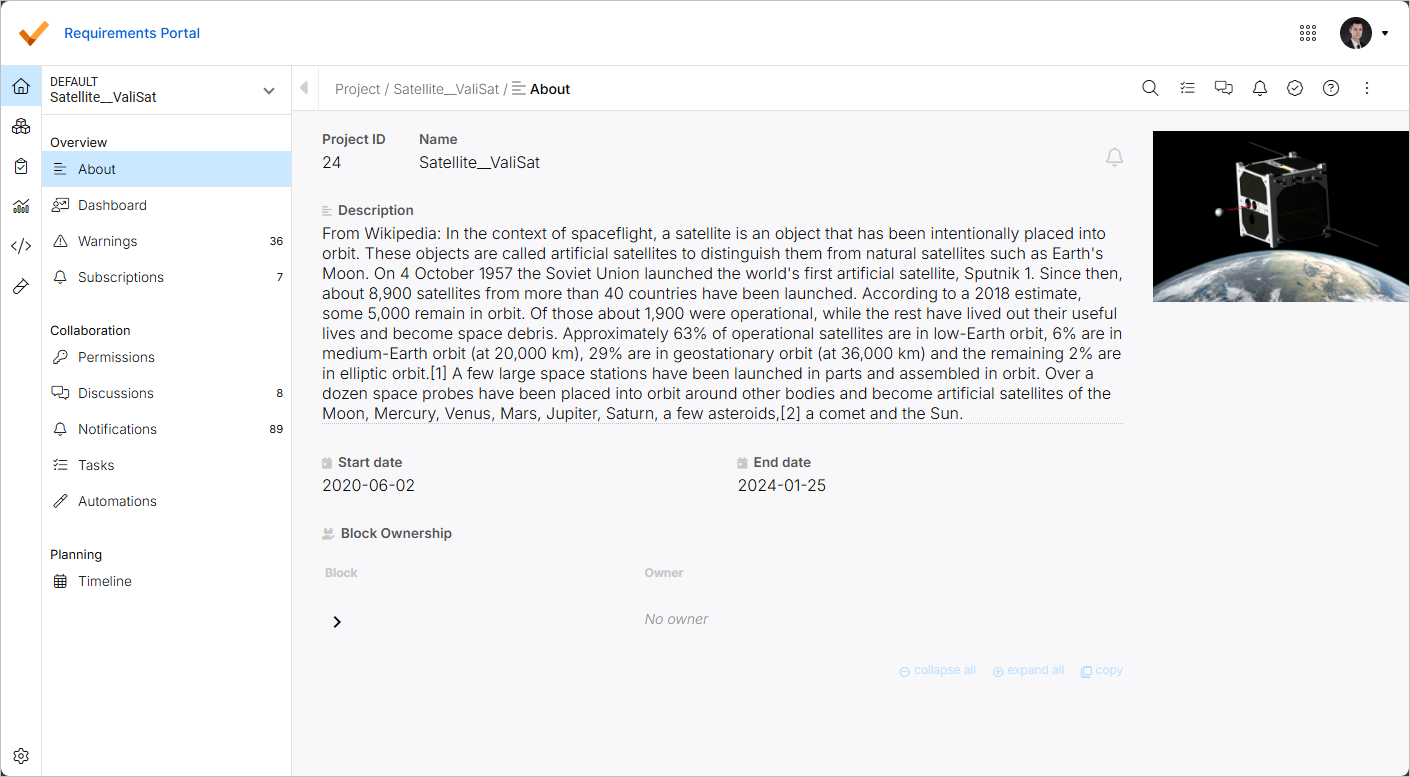
Từ trang About của Mô-đun Project, bạn có thể thay đổi các thuộc tính chính của một dự án requirements. Khi đang ở trong Mô-đun Project (![]() ), hãy chọn mục About trong menu bên trái (dưới tiêu đề Overview) để truy cập trang tại đó có sẵn các thông tin và điều khiển sau:
), hãy chọn mục About trong menu bên trái (dưới tiêu đề Overview) để truy cập trang tại đó có sẵn các thông tin và điều khiển sau:
-
Project ID – ID của dự án do hệ thống gán.
-
Name – tên của dự án. Nếu cần, bạn có thể thay đổi bằng cách nhấp vào trường, sửa tên theo yêu cầu và nhấn
Enter(hoặc nhấp ra ngoài trường). -
Description – mô tả có ý nghĩa mà bạn có thể thêm vào dự án của mình.
-
Start date / End date – ngày bắt đầu và ngày kết thúc dự kiến của dự án.
-
Block Ownership – hiển thị danh sách các block của dự án cùng với chủ sở hữu của chúng. Mở rộng hoặc thu gọn các mục block để khám phá cấu trúc dự án (theo cách được định nghĩa trong Blocks Module) bằng các nút mũi tên hoặc các điều khiển collapse all và expand all ở cuối danh sách. Sử dụng điều khiển copy để sao chép nội dung danh sách vào Clipboard (chỉ những mục hiện đang hiển thị mới được sao chép).
Để biết thêm thông tin về quyền sở hữu, hãy tham khảo trang Ownerships.
Nhấp vào nút ![]() ở góc trên bên phải của trang để đăng ký nhận thông báo cho dự án.
ở góc trên bên phải của trang để đăng ký nhận thông báo cho dự án.
Để biết thêm thông tin về thông báo, hãy tham khảo trang Notifications.
Bạn cũng có thể thêm hình ảnh cho dự án bằng cách nhấp vào điều khiển + Add Image ở góc trên bên phải của trang. Sử dụng hộp thoại xuất hiện để thêm hình ảnh từ tệp hoặc URL. Khi hình ảnh đã được thêm vào, hãy di con trỏ lên phần xem trước của hình ảnh và dùng các nút xuất hiện để thay đổi hoặc xóa hình ảnh.
 Bản địa hóa bằng AI