Altium 365 BOM Portal 是一款用于创建和管理物料清单(BOM)条目列表的高级工具,面向评审与采购用途。该应用依托 Altium 全面的制造商器件与供应商数据资源,在导入/创建的 BOM 数据基础上,补充实时、详尽的器件可用性信息,并提供带有质量评级的替代器件建议。其功能包括:解决 BOM 列表中的问题、确定首选供应链选项、补充附加信息、指定 BOM 生命周期状态等,远不止于此。
作为独立的 BOM 分析工具,BOM Portal 允许 Altium 365 用户在无需访问设计端软件的情况下执行设计评估与采购数据更新。最终可得到一份已完全核准且保持最新的 BOM 文档,可直接交付到制造阶段。
相关信息请参阅 altium.com BOM Portal 页面。
BOM Portal 还支持创建、访问和管理 Consolidated BOM。这是一种面向采购的复合 BOM,通过纳入多个 Managed BOM 形成,并提供额外功能以自动(或手动)汇总等效器件并全面管理订购数量。
详细信息请参阅 Consolidated BOM page。
访问 BOM Portal
Altium BOM Portal 支持通过上传 BOM 文件数据、从现有项目自动生成,以及将多组 BOM 数据合并为系统级 Consolidated BOM 来创建内容详尽、数据丰富的 Managed BOM 文档。要访问与 BOM Portal 相关的所有功能,请从顶部的 9 点菜单中打开 Workspace BOM Portal 视图。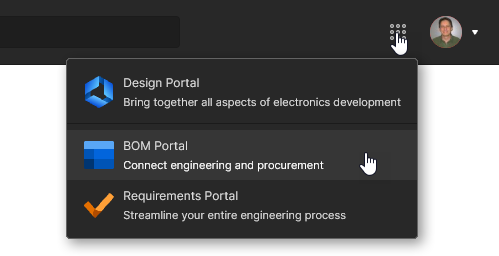 Home、BOMs 和 Parts in Use 页面为 BOM Portal 独有,详见下文。
Home page
专用 BOM 视图的 Home 页面提供可选择的 BOM 相关 Workspace 文件与文档(Recents)列表、用于创建 Managed BOM 的命令(Create New),以及所有可用 Managed BOM 文档的质量汇总(顶部图形磁贴)。虽然 Design Portal Projects page 也允许创建和访问 Managed BOM,但 BOM Portal 才是处理 Managed BOM 文档的主要且功能最完整的应用。
专用 BOM Portal 视图为所列 Managed BOM 文档提供多种图形化汇总:
-
顶部 All BOMs 磁贴内容表示所有 Managed BOM 文档的健康状态汇总,该汇总源自各个 BOM 文件的 BOM Health 列数据。
-
顶部 All parts In Use 图形表示所列 Managed BOM 文件中所有已用元器件的健康状态汇总。 有关 Workspace Projects 与 Managed BOM 中所有已用元器件的详细概览,请参阅门户的 Parts in Use page。
-
Savings and Opportunities 磁贴显示已应用到可用 BOM(Savings)的总节省金额,以及通过应用 BOM Portal 的节省功能(Savings Opportunities)可实现的预计节省金额。 相关信息请参阅 BOM Order Savings。
-
各个 BOM Health 列(或磁贴)的图标评级为汇总评分,基于 BOM 组成元器件的 Lifecycle 与 Compliance 状态计算得出。
-
各个 BOM 与 Project Price 列(或磁贴)中的数值为总成本数据,来源于 Project/BOM 的供应商定价数据。请注意,设计 Project 需要一个 ActiveBOM document 才能进行此计算。
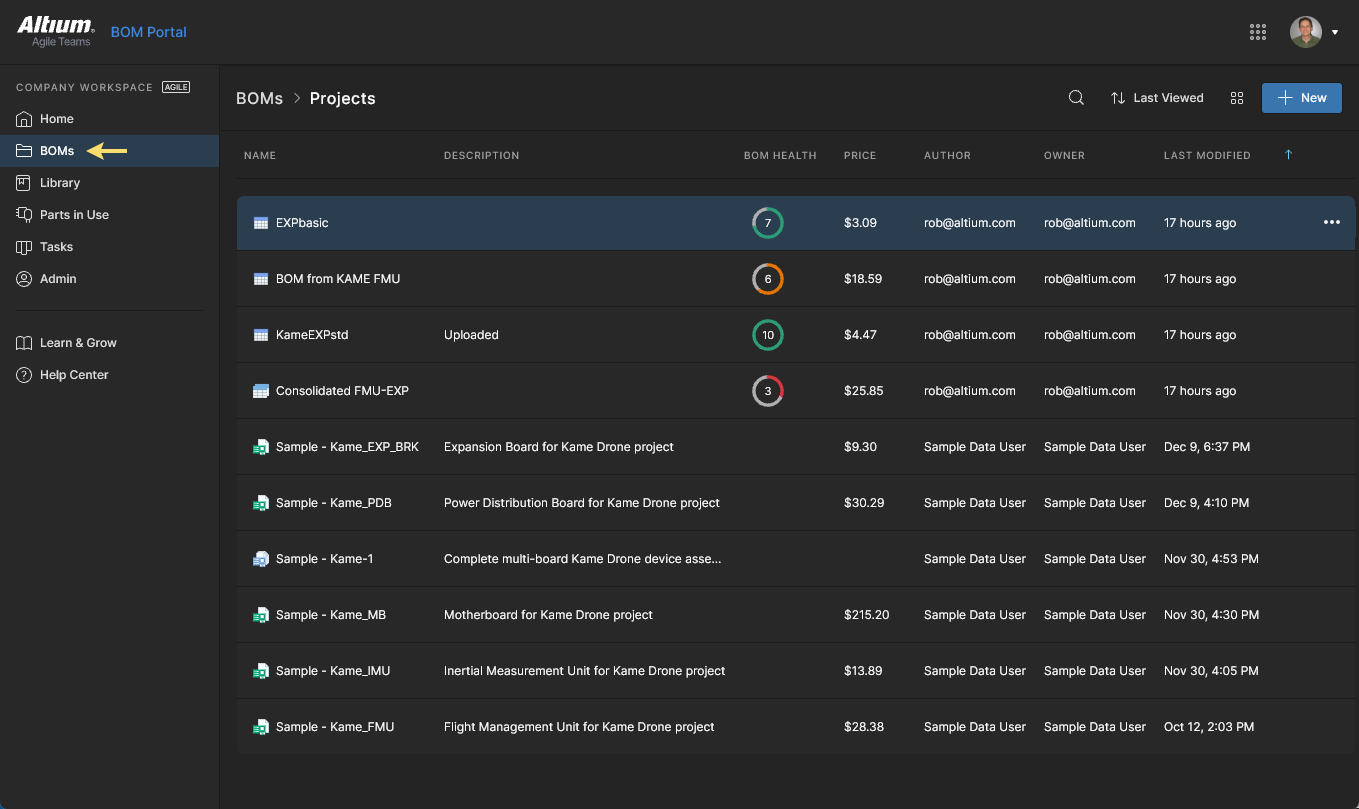
BOMs page
Projects 与 Managed BOM 列表也可在 BOM Portal 的 BOMs 页面中查看。同样,该列表默认按修改日期排序,并且仅包含与 BOM Portal 相关的文件——不会列出诸如多板项目、制造文件(Gerber)、发布包以及线束文档等设计内容。 所选 BOM(或项目)的摘要信息显示在右侧 Info 面板中,BOM 的管理选项可从条目的省略号菜单( )进入。BOM 上传与创建功能可从
  菜单访问。
菜单访问。
Home 页面与 BOMs 页面都提供可选筛选器,可将 BOM 列表限定为特定文档 Types、Owners,或两者的组合。更高层级的 Altium 解决方案还包含 Has Access 选项,可按用户访问权限筛选列表——其中包括按 Guest 访问进行筛选的能力。 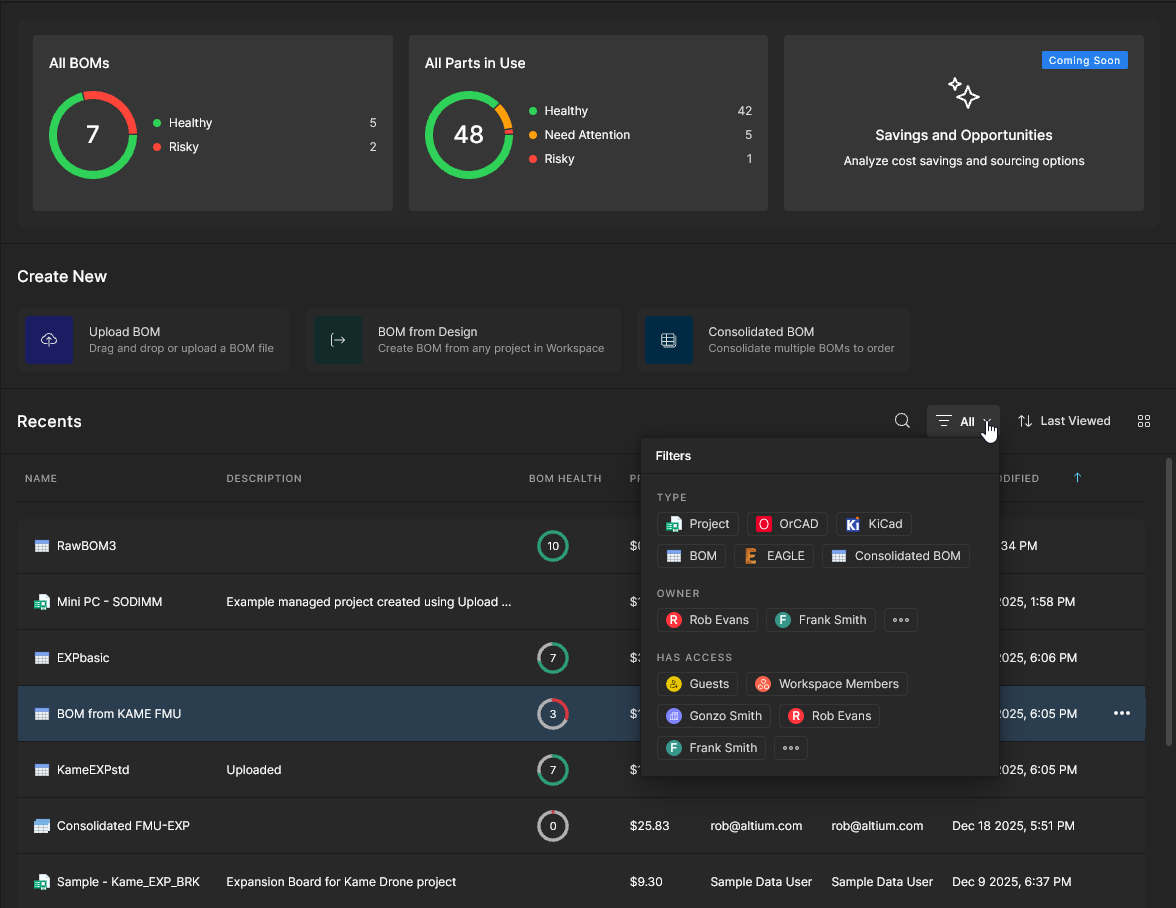
更多信息请参阅 Project Filters。
Parts in Use page
Main information:Parts in Use
BOM Portal 的 Parts in Use 页面提供对 Workspace 所有 Projects 与 Managed BOM 中所用元器件的详细清单。该聚合视图包含用于识别每个已用元器件的列数据(MFR、MPN 等)、其 Library ID/IPN(如适用)、使用该器件的 BOM/Project 文件、其元器件 Type category,以及所有其他与 BOM 相关的健康度、供应商与合规性详情。 该列表还提供交互式 part Analytics、高级排序与筛选,以及创建与调用精选的 Part Report Views 的能力。

详细信息请参阅 Parts in Use page。
创建 Managed BOM
BOM Portal 的 Create New 命令集提供了从现有文件或项目数据创建高级 Managed BOM 文档的方法。
Upload BOM
要直接上传现有 BOM 数据文件,请选择 Upload BOM 命令,浏览并选择合适的 BOM 数据文件,然后在 Upload BOM 窗口中输入/修改其详细信息(并可选指定目标存储文件夹),再选择  以确认。或者,也可以将 BOM 数据文件拖放到 Upload BOM 磁贴上,或从 Design Portal 视图中的 New 菜单上传。
 无论哪种方式,BOM Portal 都会自动解析该数据文件,生成带有高级供应商数据的标准化格式。
该界面支持以常见 CSV/XLS 格式上传 BOM 列表,即使其中仅包含最低限度的元器件信息(如 Designator、Quantity、Manufacturer, 和 Manufacturer Part Number);超出该基础层级的制造商器件数据也会被识别并纳入。上传的 BOM 数据文件可由任何系统生成,因此不受特定流程或软件的限制。
 将 CSV/XML BOM 数据文件上传到 Workspace,作为可通过 BOM Portal 访问的项目实体。
BOM From Design
除了上传通用的 BOM 数据文件外,还可以使用 BOM Portal 的 BOM from Design 命令从现有设计 Project 创建 BOM 项目条目。该流程可选择基于项目可用的 design variants 或其 project releases 来创建 Managed BOM 文档。
Workspace 还提供了其他位置和选项菜单,可从选定的设计项目或其发布数据创建托管 BOM:
-
在 BOM Portal 视图中,从项目条目的省略号选项菜单中选择 Create Managed BOM 选项,选择所需的项目变体,并指定 BOM 名称以及(可选)父级存储文件夹(Change)。
 单击查看全尺寸。
-
在 Design Portal 视图中,从项目条目的省略号选项菜单中选择 Create Managed BOM 选项(如上所述),或从所选项目的上方选项菜单中选择该选项。
 单击查看全尺寸。
-
当设计项目在 Web Viewer 的 Design view 中打开时,从上方省略号菜单选项中选择 Create Managed BOM()。
 单击查看全尺寸。
-
当设计项目在 Web Viewer 的 Releases view 中打开时,从某个发布条目的省略号选项菜单中选择 Create Managed BOM。
 单击查看全尺寸。
从 Workspace 项目创建的托管 BOM 文档将包含与源项目之间的双向导航链接:
 单击 Source Project 选项以打开该 BOM 所源自的项目。
 直接打开从所选项目派生的“子”BOM 文档。
设计项目与由其创建的托管 BOM 之间的链接会在 BOM 创建过程中自动生成,并支持将源项目中的元器件数据 synchronization 到其关联的托管 BOM。Project–BOM 链接本身是一个托管 BOM 项目参数,可通过 Workspace 的 Edit Project 窗口访问——请参见该窗口 Advanced 部分下的 Project 条目。 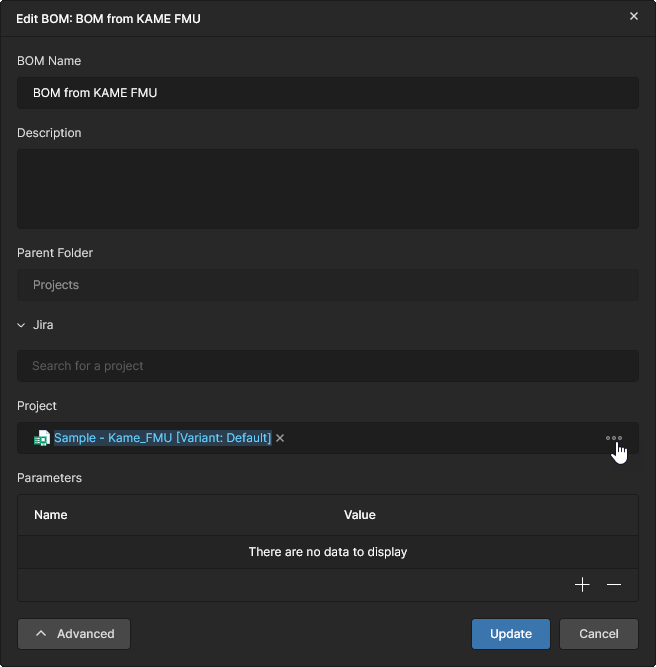
Consolidated BOM
Main page: Consolidated BOM
BOM Portal 还通过 Consolidated BOM 功能提供一组面向采购的高级能力,可将多个 BOM 和/或发布包合并为一个可直接下单的 BOM 文档。
Consolidated BOM 会自动合并相同的元器件,为多个 PCB 创建系统级 BOM;它可按单个或整体的订购数量进行调整,并可将相似但等效的器件手动合并(整合)为一个可采购的器件。生成的 BOM 订单文档可轻松针对批量订购进行优化,从而利用更有利的阶梯价格。
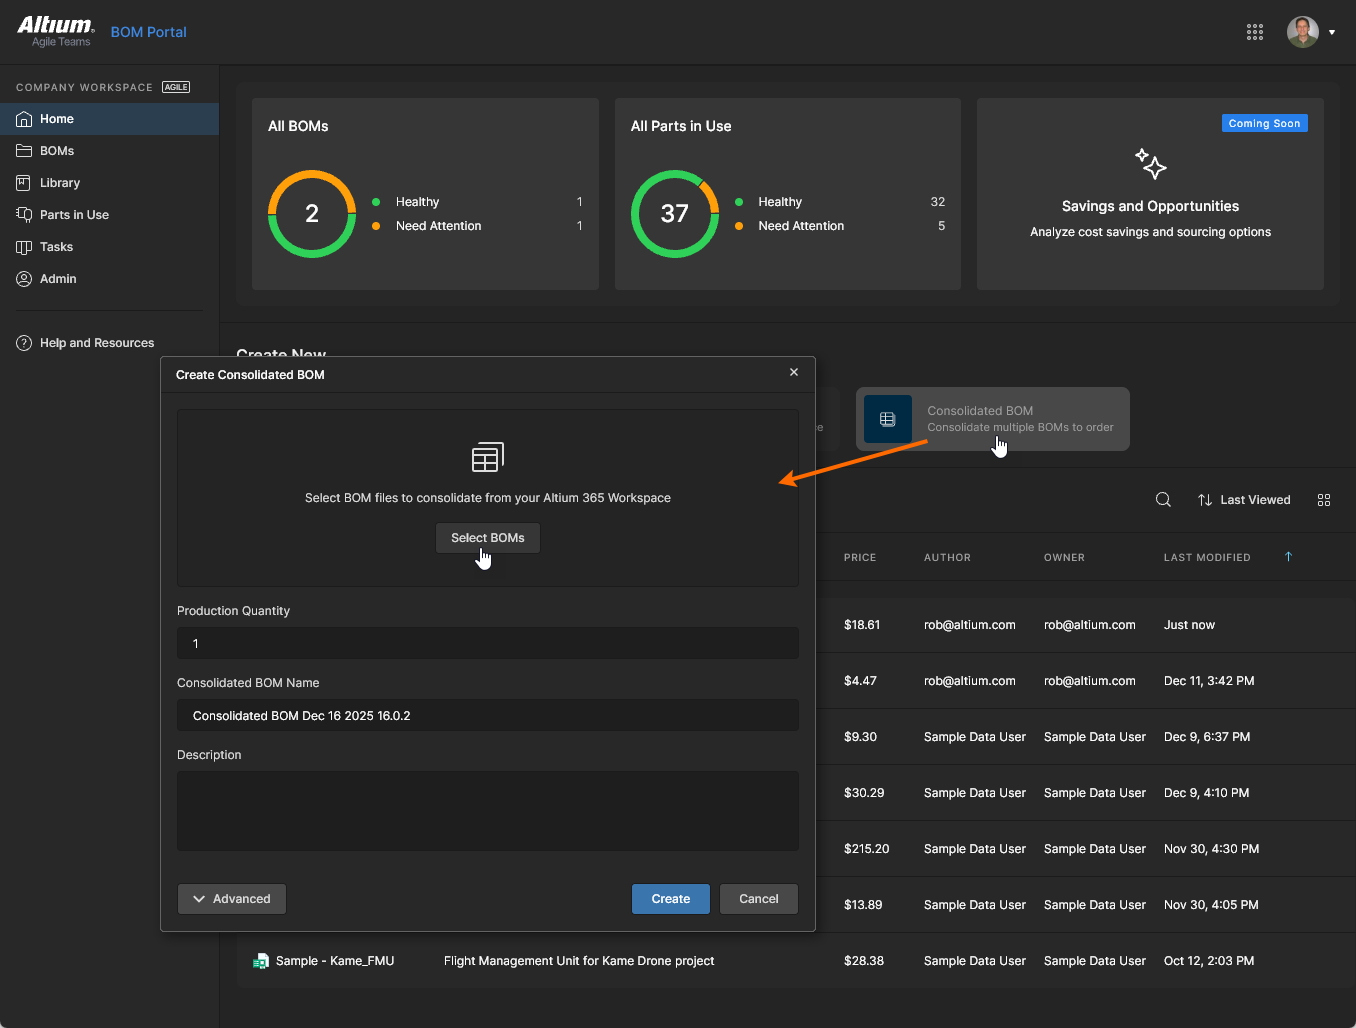
可通过 BOM Portal 的 Consolidated BOM 选项创建新的 Consolidated BOM:在通过  按钮打开的 Select BOM sources to Consolidate 窗口中添加多个设计项目、托管 BOM 或其发布版本。在 Select BOM sources to Consolidate 窗口中展开可用的设计项目、托管 BOM 和发布版本层级结构,按需勾选对应复选框,然后单击
  按钮确认。
按钮确认。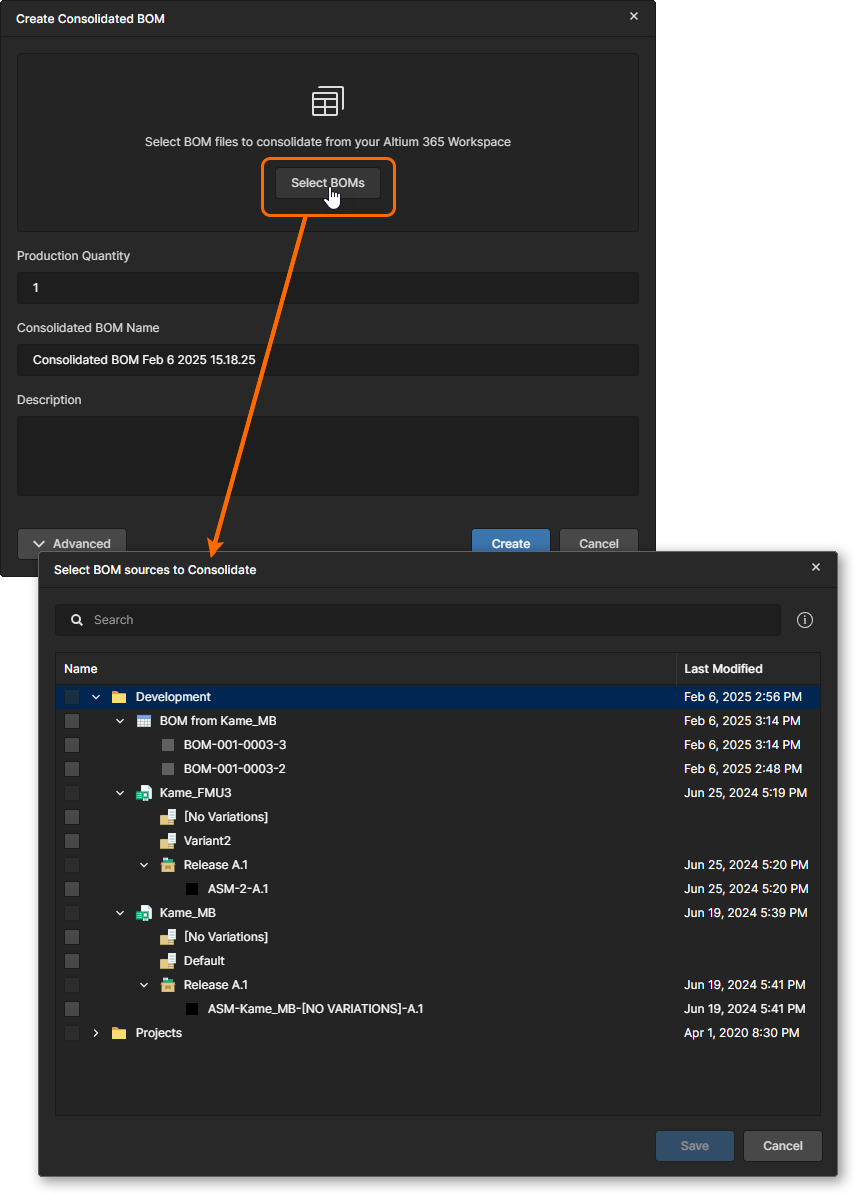
 面向采购的 Consolidated BOM 文档支持多个 BOM 数据源,并支持合并等效元器件以及调整采购数量。
详细信息请参见 Consolidated BOM page。
BOM CoDesign
BOM CoDesign 是通过 Altium Designer 提供的 BOM 数据协作功能,可在设计侧的 ActiveBOM document 与 Workspace 侧对应的托管 BOM 文档之间实现双向交互。该功能通过允许审查并接受在 Workspace(采购)侧所做的 BOM 变更,完成设计(ECAD)与采购(Workspace)域之间的协作闭环。
该能力可通过 Altium Designer 中与 Workspace BOM 文档建立链接(见上文说明)的 ActiveBOM 文档里的 Properties panel 使用。实际应用中,这是从包含 ActiveBOM 文档的设计项目创建的托管 BOM。设计侧的 ActiveBOM 可通过接受在对应 Workspace 托管 BOM 中检测到的变更来更新;反之,托管 BOM 也会通过接受源设计项目中的检测到的变更(例如修订后的 ActiveBOM)而被 updated。
有关该功能的信息,请参见 Altium Designer BOM CoDesign page。

更新 Project BOM
当在 BOM Portal 中打开从项目创建的托管 BOM 时,系统会自动检测源项目是否已更新——即是否从 Altium Designer 发布了新的修订版本。在这种情况下,通知横幅会提供选项:立即更新托管 BOM,或先执行源项目 BOM Comparison 以在更新前查看详细差异。
选择 Compare Changes 链接以调用当前(新)与先前源项目提交数据之间的 BOM Comparison。
更多信息请参见 Design Data Comparisons 页面中的 BOM Comparison。
选择 Update BOM 链接,将现有托管 BOM 数据更新为新的源项目数据。
托管 BOM 访问
上传/创建的托管 BOM 文档会添加到 BOM Portal 列表中。该条目将包含 BOM Health 评分和订单 Price 列数据,并可通过关联的省略号选项菜单( )使用标准文件管理功能,例如 Share、Move、Edit、Clone 和 Remove(移动到 Trash)。门户的磁贴视图还提供
 Price per BOM 和 Batch Size 信息。 
单击某个 BOM 条目的名称,或从 菜单中选择 Open 选项以打开 BOM 文档。系统会对初始 BOM 数据进行有效性分析,映射其参数化数据,将制造商料号匹配到合适的供应商器件,并将任何器件适用性问题记录为错误或警告。详细信息请参见以下各节。
如果你的 Workspace 订阅或试用期已到期,现有的 Managed BOM 文档仍会在 Projects 视图中以只读实体形式保留。它们只能打开查看,但仍可使用非编辑类操作。
参数数据映射
BOM Portal 界面同时提供自动与手动映射功能,可将导入 BOM 的参数条目分组映射到标准化数据列(例如 Name、Designator、Description 等)。其他常见参数名(如 RefDes、Manufacturer、Part Number)也会被识别并相应预映射。
当 BOM 中存在基础 Manufacturer 和 Manufacturer Part Number 条目(或这些名称的常见变体)时,系统会尝试自动映射所有参数;否则将启动手动映射流程。注意:你也可以随时通过 BOM 的 选项菜单( )中访问的 Remap 功能手动执行该操作。参数映射通过一个 Map Columns 窗口完成——按下方所示的步骤序列,选择匹配的数据列(或跳过不存在的列)来完成映射。
-
BOM Portal 的自动映射能力在一定程度上具备学习功能:如果系统再次遇到相同的参数集合,即使原始 BOM 文件已被删除,也会自动重新应用之前导入 BOM 的参数映射。
-
成功映射导入 BOM 所需的最少参数为 Designator 和 Part Number——在这种情况下,Quantity 参数会根据 Designator 引用自动计算。 不过,绝对最低要求仅为
 Manufacturer Part Number,此时对应的 Quantity 参数将被设置为默认值 1。
-
导入 BOM 中包含的任何空白 Description 或 Manufacturer(MFR)参数,都会由 BOM Portal 以其获取的数据进行填充。
-
如果导入 BOM 数据中不存在 Description 或 Manufacturer 参数列,则它们不会包含在 Managed BOM 中。不过,这些列可在后续添加并重新映射 BOM,从而使 Description 和 MFR 数据自动填充。
-
若源数据中包含 Target Price 数据,则在上传/创建的 BOM 中也会包含该数据。若某个 BOM 项的 Target Price 条目大于当前供应商方案的 Unit Price,将默认触发 Target price missed BOM 报告警告。
Target Price可编辑相关参数条目,或在 BOM Settings 中启用 Target Price 选项后,使用 Set Target Price to Actual Price commands 将单个(或全部)条目强制设置为当前方案的 Unit Price。
-
你可以随时通过 菜单中的 Remap 选项重新执行 BOM 参数映射分配。
-
Managed BOM 包含以静态 Release 形式保存的数据快照:在 BOM 首次 创建或上传时会自动生成一次,并在 BOM 数据完成映射后再生成一次。之后也可随时通过 菜单中的 Release BOM 选项生成更多 Release。更多信息请参见 BOM Release Management。
-
要移除对当前 BOM 的访问权限,请在 菜单中选择 Remove 选项。该 BOM 文件将被移动到 Workspace Trash。有关这些相关功能的信息,请参见 Edit, Move and Clone。
已获取的制造商与供应商数据
Main page: 制造商与供应商数据
当导入的 BOM 数据完成映射后,系统会分析元器件条目,并从 Altium 的 enabled parts data sources 中获取关键器件信息。获取到的制造商与供应商数据会以额外的 BOM 列提供,其中包括制造商与采购适配性信息(如生命周期与标准符合性)、数据手册链接、advanced pricing data、库存水平与交期等。
某个条目的当前采购方案会在 BOM 的 Order List 条目中汇总(并可编辑);该条目在 Main View 与 Supply Chain 视图中均可用,具体取决于其 Column display preferences。作为数据源启用的供应商在当前 BOM Settings 中指定,而可供选择的供应商则通过 Admin - Part Providers page 定义。

SiliconExpert 数据集成
Main information: SiliconExpert 集成
SiliconExpert® Integration 可直接访问一组额外的高级制造商器件数据,这些数据可用于 Managed BOM 及其他与 BOM 相关的实例。从 SiliconExpert 获取的增强参数化数据会以特定参数列(YTEOL、Inventory risk 等)填充到 Workspace BOM 中。
额外的 SiliconExpert 参数化数据会通过关联的  图标标识;当 Altium 365 SiliconExpert Integration 功能可用,并且已在 Workspace 的 Admin - Extensions page 中 enabled 时即可使用。
都可通过 Info 窗格访问。")
Z2Data 集成
Main information: Z2Data 集成
Z2Data® Integration 可直接访问一组额外的高级制造商器件数据,这些数据可用于 Managed BOM 及其他与 BOM 相关的实例。从 Z2Data 获取的增强参数化数据会以特定参数列(YTEOL、Z2Data Part Score 等)填充到 Workspace BOM 中。
额外的 Z2Data 参数化数据会通过关联的  图标标识;当 Altium 365 Z2Data Integration 功能可用,并且已在 Workspace 的 Admin - Extensions page 中 enabled 时即可使用。
都可通过 Info 窗格访问。")
BOM 错误检测与修正
Main page: 错误检测与修正
BOM Portal 的核心功能之一是自动检测 BOM 条目问题(BOM Analysis),并提供允许你修正这些问题的功能。系统会基于获取到的制造商与供应商数据检测多种条目问题,例如无效料号、已停产或低库存条目、以及不符合规范的器件等。BOM 条目本身的问题也会被标记,例如位号重复、元器件数量条目不匹配等。
可直接在相关行条目中处理 BOM 问题,或通过 Issues 选项卡视图处理;该视图提供指向检测到错误与警告的条目行的专用链接。

问题报告与管理
Main information: 问题管理
BOM Portal 提供用于控制检测哪些器件问题以及如何报告这些问题的命令与选项。这些包括:配置问题报告(BOM Checks 设置)、忽略某个 BOM 行中的所有问题(右键选项),或忽略(豁免)特定问题类型(Info pane option)。

参数化搜索
Main information: 参数化搜索
虽然 BOM Portal 会自动为 BOM 行中指定的 Manufacturer Part Number(MPN)器件获取相关制造商与供应商数据,但在某些情况下需要基于 MPN 选择不同的器件——例如由设计变更或该器件存在问题导致。门户的高级 Parametric Search 提供自动化、以数据为中心的界面,用于定位额外或替代的 BOM 器件,并将元器件 Part Choices、已批准的 Alternates 以及高置信度 Suggestions 作为优先来源选项。

Workspace Components 集成
Main page: Workspace Components 集成
在可能的情况下,BOM Portal 会自动将某个 BOM 行条目链接到 Workspace Components library 中的合适器件。该链接由检测到的匹配关系决定:条目的 Manufacturer Part Number(MPN)与某个元器件的 Part Choice 条目相匹配;该匹配会在 Info pane 中以  标记指示——链接本身由元器件的 Revision ID 表示。
界面允许断开并重新连接该链接、改为链接到不同的 Part Choice 条目,或由 MPN 以外的参数来确定链接,例如 Internal Part Number(见下文)

过期的元器件修订版
Main information: 更新元器件修订版
当与某个 BOM 条目链接的元器件已更新——即存在更新的 Item ID 可用——BOM Portal 会检测到这一点( ),并提供将该条目更新到当前修订版的选项。

内部料号链接
Main information: IPN 链接
对于使用特定参数在公司系统中标识器件的组织(通常是“关键”或“主”参数),可以 configure the BOM Portal 使用该参数来实现 BOM 条目与元器件的链接。该参数会被指定并映射为 Internal Part Number,从而成为 BOM 到元器件的链接机制,替代现有的 Item ID 参数(Revision ID 的一个子集)。

从 BOM 创建元器件
Main information: 创建元器件
BOM Portal 数据中未链接到 Workspace 元件的条目(例如没有可用的兼容 Part Choice 时)可用于在 Workspace 库中生成一个基础元件。该器件会基于通过 Altium component data services(Octopart、IHS 等)提供的参数化信息创建,并自动与该 BOM Item 建立链接。

Configuration and Options
Main page: Configuration and Options
BOM Portal 界面提供了一系列选项和功能,使你能够按自身需求配置并使用系统。这些包括:按公司要求配置所获取的供应商数据,以及以符合你流程的方式处理 BOM 列表。

BOM Settings
Main information: BOM Settings
通过上方 菜单进入的 BOM Settings 窗口,提供了适用于当前 Managed BOM 的大量配置设置。你可以在其中指定可用的器件供应商、器件 Issues 的报告方式、列表中包含的列等更多内容。
有关详细信息,请参见:

List View Features
Main information: List View Features
Managed BOM 的器件列表在右上角图标中提供了额外功能,用于管理视图、访问并纳入更多信息,以及处理最终可采购的 BOM。这些功能包括 Commenting,以及 Info Pane(信息窗格),后者提供丰富的库数据与制造商器件数据。

List Structure Features
Main information: List Structure Features
BOM 列表左上角的图标包含用于处理条目网格的选项。除列/行操作外,这些图标及右键选项还允许你管理与单个条目相关的数据,例如 Adding Alternate parts 和 Creating a Library Component。

BOM Management Features
上方 x 下拉菜单中还提供了一系列额外的 BOM 管理与流程选项,例如自动填充替代料以及额外订购数量。
其中包括(但不限于):

BOM Dashboard
选择 BOM Portal 的 Dashboard 选项卡,可查看基于图表与统计的当前 BOM 生产适用性概览。信息以可视化形式呈现,包括制造商器件可用性以及任何供应链问题的图表/柱状图/气泡图摘要。Dashboard 视图提供了一种快速方式,用于评估 BOM 当前是否适合生产以及是否需要修正。
BOM Dashboard 按适用于制造商器件状态与供应商来源状态的通用部分进行划分:
Interactive List Filters
Dashboard 视图中的所有图形元素都可作为可选的 BOM 列表过滤器。点击 Dashboard 的弧段、柱状图或气泡点,会将关联的 BOM 表格条目过滤为符合该选择的条目——例如,在 Supply Chain 图形中选择某个供应商弧段,会将 BOM 列表限制为具有该供应商采购解决方案的条目。再次点击该弧段/柱/点可移除该列表过滤器,或取消选择其与列表关联的 Filter 条目;也可点击 Reset Filters 以移除所有已应用的过滤器。
交互式过滤适用于所有 Manufacturability、Supply Chain 和 Compliance 子元素,从而提供一种快速且简单的方法,可基于状态数据查看特定 BOM 行项目。上方 BOM Health 区域包含摘要信息,例如可选择的 Issue 与风险过滤器,用于将 BOM 列表定制为制造商、采购与合规问题的汇总视图。
请参见 Parts in Use page,以查看包含在 Workspace Managed BOM 文档中的元件列表。除与采购相关的参数外,该列表还包含 Where Used 数据,用于标识引用某个特定元件的所有 Managed BOM。请注意,此功能在 BOM Editor 中不可用。
BOM Release Management
为管理 BOM 变更与更新的推进过程,系统提供了一组功能,用于将 BOM 推进到不同的生命周期状态并进行正式发布。你可以随时通过 菜单中的 Release BOM 选项发布工作中的 BOM。
Release BOM 窗口包含可编辑的发布名称、待发布(递增后的)修订号、用于添加发布信息的备注字段,以及通过 Templates 下拉菜单为该发布应用 BOM Template 的选项。当发布中包含模板时,下载版本将为 Excel 格式(*.xlsx),并应用模板格式( );否则下载为纯 CSV 格式。

Release Naming
在上述 BOM 发布流程中,Release BOM 窗口中的 Release Name 字段默认采用 Managed BOM 项目名称,也可以通过直接编辑该条目进行更改。
若需要更正式的命名方式,Workspace 管理员可在 BOM Portal settings 视图的 Releases 部分(通过 Admin-Settings 访问)重新定义该默认命名,指定替代名称或组合名称。应用程序的 Default Release Name 条目同时支持纯文本以及一系列预定义的宏字符串,包括以下内容:
-
[ProjectName]:受管 BOM 条目名称——默认命名约定。
-
[<ParameterName>]:自定义(用户指定的)受管 BOM 参数,通过受管 BOM 的 编辑对话框 添加。
-
{<0000>}:具有特定长度的字母数字定义,每次 BOM 发布都会递增。
注意事项:
-
基于参数的宏用方括号 [ ] 括起来,字母数字宏用花括号 { } 括起来。
-
按字母数字规则,{000} 命名定义会将 BOM 发布名称递增为 001,而 {AAA} 定义会将名称递增为 AAB,依此类推。这些可以组合使用,因此从 1Z 的下一次递增是 2A。
-
如果达到字母数字宏定义所指定的长度,它将不再递增 BOM 发布编号。例如,{00} 宏会在 99 停止递增,因为 100 会超出定义长度。
-
更改 Default Release Name 后,请确保保存页面( )。
)。
下面的发布名称定义示例使用了 BOM 名称(ProjectName)、纯文本(“Release”)、一个 BOM 参数(MyParameter)以及一个递增的数字引用(000)。该参数在受管 BOM 中定义,其值为 MyParameterValue。

使用发布版本
选择 Releases 选项卡视图,以访问当前 BOM 发布条目的平铺列表。

每个发布修订版的磁贴包含以下命令选项:
默认情况下,处于 Obsolete 生命周期状态的发布版本会被隐藏。切换 Show Hidden Releases 选项以显示/隐藏这些发布版本。

请注意,BOM Portal 会在受管 BOM 首次创建(上传或从项目生成)时自动创建初始发布版本;随后在自动(或手动引导)映射完成后生成第二个发布版本。 
BOM Compare
BOM Portal 提供高级对比引擎,可让您快速比较 BOM 发布版本之间或不同受管 BOM 文件之间的关键变更。
对比所选 BOM 文件或发布版本时,BOM 参数数据会被解析为标准化的列分组,然后在一个专用的 BOM 差异视图中进行比较(该视图会在新的浏览器标签页中打开)。该视图会显示一列带颜色标识的条目,表示在被对比的 BOM 数据集之间发生变化的 BOM 项目。除对比视图外,您还可以查看正在对比的两个单独 BOM 数据集。
对比入口
BOM Portal 的 BOM 对比功能可从受管 BOM 的 Main 或 Releases 视图中使用,并支持在 BOM 发布版本、WIP BOM 文档以及指定项目或其发布版本之间进行数据对比:
对比结果
Related information: 设计数据 BOM 对比
BOM 对比引擎使用归一化的参数类别来检测两个 BOM 数据集之间的差异。例如,如果您的源 BOM 包含已映射的参数(如 RefDes 和 MPN),它们将分别显示为 Designator 和 Manufacturer Part Number 。
BOM Compare 视图会显示一列带颜色标识的条目,表示在指定 BOM 数据集之间发生变化的 BOM 行元素。列表顶部的 Compare 选项卡旁边还有源数据集选项卡,可打开用于对比的每个 BOM 数据集。您可以通过页面左上角的活动链接直接导航到这些源文件。
其他 BOM Compare 视图功能包括:
-
将鼠标悬停在 BOM 行右侧的状态图标上时弹出差异摘要信息(

 )。
)。
-
将鼠标悬停在对比源文件引用上时弹出源数据集的创建者(及创建时间)信息。
-
在 BOM Compare 窗格中(位于 Components 下)可选择差异类型(Added、Removed 等)。
-
在 BOM Compare 窗格中(位于 Modified Components 下)显示详细差异信息。 
-
用于在对比列表条目中定位特定关键字的基于文本的搜索功能( )。
)。
-
可下载基于 CSV 文件的当前显示 BOM 差异摘要( )。
)。
使用上方视图选项卡在源数据集与对比结果之间切换,并使用左侧 BOM Compare 窗格中的列表控件选择/取消选择要纳入对比结果的项目变更类别(Added、Removed、Modified 和 Not Modified)。
BOM 共享
可通过  按钮,将当前正在使用的 BOM 以
 Edit 或 View 权限共享给其他 Workspace 成员,或共享给 Workspace 外部人员。
在 Share Item 窗口中,选择 Share Item With 字段以访问并从 Workspace 成员与用户组列表中进行选择。如果您希望将用户(或组)对 BOM 的访问限制为只读,请指定 Can View 选项。对于 Workspace 外部用户,会出现确认窗口,显示共享将如何应用以及共享给谁——更多信息参见 Sharing Overview。Workspace 外部人员将通过其自己的 Workspace 或 Personal Space 以 Guest-level 只读权限访问共享的 BOM。
请注意, Can Edit sharing for Workspace Members 的默认设置将覆盖您应用的任何特定成员共享——在这种情况下,应将 Workspace Members 组(所有成员)设置为 No Access。
有关在 Altium 365 Workspace 中共享的详细信息,请参见 Sharing a Project。

 AI 翻译
AI 翻译