Parent page: Working with Managed Components
Altium NEXUS, in conjunction with your managed content server, provides a streamlined process to quickly migrate your existing libraries to that Server. The GUI to this process – the Library Migrator view – presents an intuitive flow that takes selected libraries, and migrates them to the managed content server to which you are actively signed in. Catering for all types of libraries, relating to older component management methodologies – SCHLIB, PCBLIB, INTLIB, DBLIB, SVNDBLIB – the Library Migrator is the perfect solution to quickly building your company's set of managed components, and the many benefits that such components enjoy (high-integrity, lifecycle management, centralized storage and management, where-used functionality, ease of design reuse). And while the migration process can be configured – giving you enhanced control over how that migration is performed – you can accept the default settings and set the migration in motion within a matter of clicks.
What gets Migrated?
All information that is present in an original source library is migrated, in order to arrive at a folder of Unified Components (managed components that have assigned part choices), with all referenced domain models (schematic symbols, PCB footprints, Simulation Models) and parametric information. Component templates can even be created, and used to create those managed components. If your original components have multiple PCB footprints defined, you can rest assured that the Library Migrator will bring those models across, and keep the current default footprint too.
And if you only work with PCB libraries – your only concern is PCB layout – then the Library Migrator supports migration of just those libraries.
While migration may seem daunting, the defaults have been defined to enable you to get your collection of managed components without having to change a thing – start the process and then design with the Migrator's results. The system conducts and handles a number of validations, for example to ensure no duplicate IDs for the resulting managed components, or to ensure no duplicate models or component templates are created, and that such entities are reused across (linked to) components where needed. And if issues do arise, the system flags them, with suggestions on how to resolve those issues, aiming to get the migration back on track as quickly, and as smoothly as possible.
Migration of pin mapping information (for simulation models) is not currently supported.
Accessing the Library Migrator
The graphical interface to the component migration process is the Library Migrator view, which is accessed by choosing the File » Library Migrator command from the main menus – available when signed in to an Altium Managed Content Server.

Accessing the Library Migrator view – the user interface to the component migration process.
The Migration Process
The migration process is a staged flow, with the entries on the left-hand side of the Library Migrator view showing you at-a-glance, which stage you are currently at.
Stage 1 – Select Libraries
This stage of the release process is where you specify the libraries that you wish to migrate. Library types that can be migrated are:
- Schematic Library (*.SchLib).
- PCB Footprint Library (*.PcbLib).
- Integrated Library (*.IntLib)
- Database Library (*.DBLib).
- SVN Database Library (*.SVNDBLib).
File-based (unmanaged) libraries are made available to the Library Migrator through a number of mechanisms:
- By default, all loaded and supported libraries will be enabled ready for migration. These include project libraries, installed libraries, and libraries found along the specified search paths.
- Libraries files can be added for migration from the
 button in the Library Migrator.
- Library files can be dragged and dropped from a Windows folder onto the migrator's main libraries listing area.
To successfully migrate a Schematic Library (SCHLIB) to the server, the Library Migrator must be able to locate Models that are linked to that library, such as component footprints in a corresponding PCB Library. This requires that the related model Library is installed – see Data Management - File-based Libraries.
Alternatively, if you do not wish to install multiple model libraries, you will need to ensure that the model source library is specified for components in the Schematic Library, and the libraries are located in the software's default library path. See the below collapsible section for more information.
More information on SCHLIB migration.

If you encounter a 'model not found' error (such as Footprint <footprint name> not found in available libraries) when attempting to migrate a schematic library, it is likely caused by one or both of the below conditions:
- The target model library's name is not specified for that component in the Schematic Library.
To ensure that the model library linked to by a schematic library component will be known to the Library Migrator, ensure that its name is specified in the PCB Model dialog.

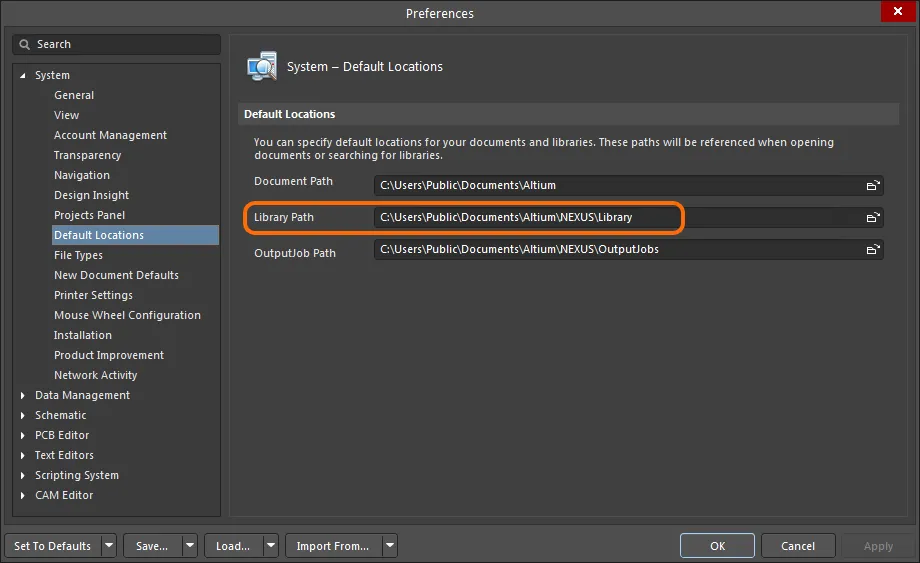
- The model library cannot be found in the Library Migrator's default search path.
To ensure that a model library required by the Schematic Library is available during the library migration process, the libraries should be located in the system's default library path. To check this location, see the Library Path entry on the System - Default Locations page of the Preferences dialog. If a library file has been added/copied to that path location, you may need to restart Altium NEXUS to register the change.
Note that it is not necessary, or even desirable, to migrate a PCB Library along with its Schematic Library counterpart, since the required model migration and linking will be performed by the Library Migrator itself. The migration process identifies, locates and transfers the correct model(s) for each component to create a unified managed component in the target server.
With the libraries required to be migrated selected (checked or unchecked) in the list, click the  button at the bottom-right of the view to proceed to the next stage.

Libraries are listed in alphabetical order.
Stage 2 – Configure Migration
This stage of the migration process loads the component list ready for migration, and presents optional controls for configuring the migration.
The migration process has been built to be as simple and streamlined as possible. Accepting the defaults and proceeding with the migration is all that is needed, with no additional configuration required by the user. However, should you wish to have more control over the migration process, then use this page to set up various options – either for all libraries involved in the migration, or on a per-library basis.

An example of accessing the controls to configure the migration for a specific library, in this case Crystals.IntLib.
The page is divided into the following two key regions, with a third region dedicated to providing a preview of the resulting folder structure that will be created/used.
Source Libraries
This region lists all of the libraries involved in the migration process. Select a library to access and configure settings specifically concerned with the migration of that library's components.
Select the <All Libraries> entry to access component settings that can be applied to all libraries. Only those settings that are shared by all libraries selected for migration will be presented.
The Split option associated with each library entry is used to separate monolithic libraries – those that contain multiple types of component – into individual, virtual sub-libraries that correspond to each component type. These are then configured for migration in the same way as conventional single-type libraries. Click the Split option to invoke the component type extraction/grouping process, and if required use the following Merge command to revert the library back to its single/monolithic state.

The migrator automatically detects a Type for each library component based on the presence of key string values in the component Designator, Description or Comment, etc – for example, a Designator of R? or a 'Resistor' string in the Description indicates that component type. All components detected as that type are grouped as a Type sub-library.
Uncategorized Split components
Components that fail the detection rules are grouped in a [libraryname].Uncategorized sub-library, and by default, will be migrated as that component type to a matching server folder. In the current Configuration stage however, the component type for the sub-library (Component Type) may be manually edited, assigned to an existing type through the Component Type diaog, or set by the application of a Component Template – see the following Component Settings sections for more information.
In the below example image the undetected, and therefore grouped as Uncategorized, components were inverter/buffer ICs with U? Designators. Applying an IC Component Template sets the type, and consequently the target server folder, to IC.

Component Settings
This region of the page presents all settings that can be configured, specifically for the selected library.
At any time, you can rewind to use the default settings, by clicking the Reset to Default link, which appears to the right of the source library entry whenever a change to a setting has been made.
The following collapsible sections look at the various settings available:
Component Type
Use this field to specify the type of component stored in the library. The Library Migrator will try to automatically determine the component type, based on the name of the source library (or table within a Database library). So if the library is named Crystals.IntLib, the Component Type will be set to Crystal & Oscillator. If a Component Template has been selected (see below), the Component Type is set to the type specified in the applied template.
You also have the following choices to change the component type yourself:
- Choose [LibraryName] from the drop-down to set the Component Type to be the name of the library.
- Choose [Parameter.Component Type] from the drop-down, to set the component type to be the type defined in the source component's Component Type parameter (which can be Standard, Mechanical, Graphical, Net Tie (In BOM), Net Tie, Standard (No BOM), or Jumper).
- If your components use any of the following defined parameters: Category, Component Category, or SubType, then entries will be available from the drop-down – [Parameter.Category], [Parameter.Component Category], and [Parameter.SubType] – to set the Component Type to the value for that parameter.
- Click the
 button at the right of the field to access the Component Type dialog. Use this dialog to choose an existing server component type, or create and assign a new one.
- Directly enter the required Component Type.
- For a DbLib/SVNDbLib, you can also choose [TableName] or [LibraryName]\[TableName].
The selected Component Type will set the target server folder name for the migration, unless a Component Template is specified – where its Default Folder setting applies – or the target folder is manually assigned in the migrator's FolderPath field (in the Naming Schemes & Folders area).
Where the Component Type cannot be detected automatically, the default is [LibraryName].
This field is not applicable when migrating a source PCB Library.
Component Template
Use this field to determine whether or not a component template will be used or is to be created. By default, a new component template will be created and associated with the folder of components, and used in the creation of all Component Items in that folder. Use the drop-down field to select from the following:
- Create new – create a new component template for the source library. The created template includes the current migration configuration settings, such as Parameter Types and the Component Naming Scheme. The migration target server folder will be associated with the new template, unless already associated with another template.
- Do not create – don't create a component template for this library.
- Same as <LibraryName> – choose this entry to use the same component template being created for another source library. This option is available when multiple source libraries have been selected for migration, and there will be an entry in the menu for each of the other source libraries (SchLib/IntLib/DbLib/SVNDbLib) being migrated.
<TemplateName> – choose an existing Component Template from the list of templates that are available from the server. The applied template will determine the Parameter types (text or unit aware values) and the target server folder (and item naming scheme) for the migration. Settings that are determined by the applied template are uneditable and marked with a [From Template] suffix.
This field is not applicable when migrating a source PCB Library.
Include Datasheets
Select this checkbox to specify if files (typically PDF Datasheets) linked to by a library component are migrated to the managed component in the server.
Linked files in the source component library differ from linked web (HTML) references in that they point to a local file via a specified path. During component migration to the server, the Library Migrator transfers component web links as parameters, but uploads any local files that are referred to by a component file link. This can be seen at the Preview stage under the Datasheets tab in the lower region.
When the library migration is complete, a component's uploaded (PDF) files can be seen under the Data Sheet tab in the Explorer panel and under References in the Components panel Details pane.
Parameter Mapping
This grid presents all parameters defined across the components in the source library, and allows you to map them to parameters required for the components when they are created in the Server (either directly, or via a component template if specified for use). The parameters are sorted alphabetically, with the Server system parameters (ID, Comment, and Description) at the top of the list.
Points to be aware of when working with the grid:
- For the Server Parameter ID, the Source Library Parameter is set to <Auto>. This results in component IDs automatically created based on the Naming Template specified for Component (at the bottom of the settings region), which is in the format $CONTENT_TYPE_CODE-<xyz>-{0000}, with the central portion (<xyz>) unique to each migrated library. This gives components with IDs like CMP-005-0000, CMP-005-0001, CMP-005-0002, and so on. This can be changed to use any parameter in the source library (that is unique for each component entry) to create the ID – available from the drop-down.
- When a Component Template has been applied, any parameter that has not been automatically matched to a source library parameter can be manually selected using the source parameter drop down menu options. For example, the source parameter
ROHS might be selected to match the RoHS Compliant parameter defined by the server template.
- You can skip the migration of a parameter – specifying that it not be created for the migrated components in the Server. Do this either by unchecking the associated checkbox for a parameter entry, or by choosing the <Skip> entry form the drop-down for the Source Library Parameter field.
- With the exception of the system parameters (ID, Comment, Description), you can change the type of a parameter – allowing you to create unit-aware parameters for the components in the Server (via an applicable component template). Use the drop-down associated with the Type field to choose the required unit.
- Use the checkbox at the top-left of the mapping grid to quickly disable (skip) all component parameters, with the exception of ID, Comment, and Description.
Supplier Link parameters – Supplier n/Supplier Part Number n – will be disabled (skipped) by default. The Part Choices for the created managed components will be created from this information automatically.
Only the ID, Comment, and Description parameters are applicable when migrating a source PCB Library.
Part Choice Fields in Source Libraries
If Supplier Links are included with the source library components, the Library Migrator will automatically interpret the supplier data to extract a manufacturer name and part number (a Part Choice) for each migrated component. Where multiple supplier links are included with a component, the primary supplier reference (Supplier 1 / Supplier Part Number 1) is used for the Part Choice field entries.
This section also allows you to specify component parameters to be used for manufacturer part information. Click the  button and use the new (blank) field drop down list to select a set of manufacturer and manufacturer part number parameters that are available in the component source library – for example,
 MFG and MPN. Multiple sets of Part Choice parameters may be added, but Supplier Links are always included if available.
This section is not applicable when migrating a source PCB Library.
Naming Schemes & Folders
This section allows you to define the naming scheme and target folder that is applied when creating the various migration entities.
Naming Scheme:
The default Naming Schemes for entities created by the library migration are:
- Component – $CONTENT_TYPE_CODE-<xyz>-{0000}
- Component Template – $CONTENT_TYPE_CODE-{0000}
- Symbol – $CONTENT_TYPE_CODE-<xyz>-{0000}
- Footprint – $CONTENT_TYPE_CODE-<xyz>-{0000}
- Simulation – $CONTENT_TYPE_CODE-<xyz>-{0000}
<xyz> is a 3-digit number that is unique to each migrated library.
Naming Schemes are set to the default values unless overruled by the Item Naming Scheme of a specifically selected target folder (see below), or in the case of the Component target folder, where the migration configuration has a Component Template (and inherent Naming Scheme) applied. Also, the applied Naming Schemes may be manually edited to suit your requirements – ensure that the variable portion is enclosed in curly braces.
Any changed Naming Scheme settings are shown in bold, and with a [From Folder Template] or [From Folder] suffix where the scheme has been defined by a template or target folder settings, respectively.
Folder Path:
The target server folder paths for created migration entities are set to the server defaults unless changed by that specified in an applied template, by the selection of an alternative existing server folder, or by manual editing.
- By default, the component target folder is the migrator's current Component Type setting, as a sub-folder of the server's top level
Components folder.
- The Component target folder specified in an applied Component Template will override the default component Folder Path, which is indicated by a
[From Template] suffix. The entry is shown in gray and is non-editable.

- Select the button at the right of the field to access the Choose Folder dialog (a trimmed incarnation of the Explorer panel). Use this dialog to select an existing folder into which to migrate the source library's components, or create a new folder on-the-fly.
- Manually edit a folder path entry to an alternative server folder – either an existing folder or one that will be created.
- Changed folder paths are shown in bold and with an information suffix where applicable. Non-editable folder paths, as defined by an active Component Template, are shown in gray.
As outlined in the Naming Scheme section above, a change in target folder path may be accompanied by change in the applied Naming Scheme, as set by the folder itself or by an applied/associated Component Template. Any folder changes are automatically reflected in the migrator's Folder Structure Preview panel on the right
 As you change the entry in the Folders field, the Folder Structure Preview region will update accordingly.
The Folder Structure Preview shows where the migrated components will be stored for each source library included in the migration, and also how many components (shown in brackets) will be created in those folders. The shown structure also includes the folder arrangement that will store the generated component models (under Models) and any created Component Templates (under Managed Content).
Lifecycle Definition:
The Lifecycle Definition applied to the various migrated entities is set to the server defaults unless an alternative is selected from the entry's drop down menu, or in the case of the definition for the Component entity, is overruled by an applied Component Template (indicated by a [From Template] suffix).
Both the default Lifecycle Definition setting and the options available from the drop down menu are determined by the server Lifecycle settings, which can be accessed via the Data Management - Servers page of the Preferences dialog. In the Servers section of the page, choose the Lifecycles option from the Properties menu associated with the currently active server to open the Edit Lifecycle Definitions in [server name] dialog.
This dialog allows you to view, edit and create Lifecycle Definitions that will be available in the server, and importantly, set which definitions are enabled for each type of content. To see the latter for the currently selected Lifecycle Definition tab, click Content Types (upper right) to open the Content Types dialog – the definition is available to Content Types that have their Use box checked. Uncheck the Control Lifecycle Definition per Content Type option to enable the Lifecycle Definition for all content types.
Revision Naming Scheme:
The Revision Naming Scheme applied to the various migrated entities is set to the server defaults unless an alternative is selected from the entry's drop down menu, or in the case of the scheme for the Component entity, is overruled by an applied Component Template (indicated by a [From Template] suffix).
Both the default Revision Naming Scheme setting and the options available from the drop down menu are determined by the server Revision Naming Scheme settings, which can be accessed via the Data Management - Servers page of the Preferences dialog. In the Servers section of the page, choose the Naming schemas option from the Properties menu associated with the currently active server to open the Edit Revision Naming Schemes in [server name] dialog.
This dialog allows you to view, edit and create Revision Naming Schemes that will be available in the server, and importantly, set which schemes are enabled for each type of content. To see the latter for the currently selected Revision Naming Scheme tab, click Content Types (upper right) to open the Content Types dialog – the scheme is available to Content Types that have their Use box checked. Uncheck the Control Revision Naming Scheme per Content Type option to enable the Revision Naming Scheme for all content types.
The current migration configuration settings can be saved for reuse while in the Configuration stage by selecting File » Export » Library Migration Config from the main menu. The configuration is saved as a *.lmcfg file, which can be restored during a subsequent Library Migration process when at the Configuration stage – choose the File » Import » Library Migration Config command and select a saved configuration file to load that setup.
With migration settings configured for libraries as required, click the  button at the bottom-right of the view to move to the following Preview stage. Alternatively, select the Migrate option from the button's drop down menu to bypass the Preview step and proceed directly to the Migrate stage.
Stage 3 – Preview
This stage of the migration process provides a preview of the content that will be created in the managed content server, flags any issues, and allows any last minute changes to component types, parameter names, and parameter types.

The Preview stage of the migration process allows you to see, in greater detail, what exactly will be created in the Server as a result of the migration.
The preview is essentially divided into two key regions:
Folders
This region, on the left, presents the folder structure that will be created/used in the Server, and is the same as the Folder Structure Preview presented when configuring the migration in the previous stage of the process. Click on a folder entry to load its components in the region on the right.
If there are any issues with components in a folder, a visual indication is given to the right of the folder's name. Read more about issues detected during the preview in the section
Previewing Issues.
Components
This region, on the right, presents the components that will be created in the selected Server folder. The region is further sub-divided into two:
- Upper Region – presents a listing of all Component Items that will be created in the Server. For each component, its ID, Comment, Description, and Component Type are shown, along with all user-defined parameters from the original source library. Should you need to change the Component Type for one or more components, select them in the list, then right-click and choose the Change component type command from the context menu. The Change Type dialog will appear. Use this to enter a type directly, or click the button to access and use the Component Type dialog with which to do so.
Similarly, you can change attributes of user-defined parameters on-the-fly too. To rename a parameter, right-click over the column for that parameter and choose the Rename parameter command from the context menu. Use the Rename Parameter dialog that appears to change the name as required. And if you need to change the parameter's type (to make it unit-aware), choose the Change parameter type command from the context menu. Set the required type from the Change Type for Parameter dialog accordingly.
, renaming a parameter, and changing the component type.")
The components that will be created in a folder, along with their parametric information. Commands on the right-click context menu cater for last minute changes, such as changing the type of a parameter (shown), renaming a parameter, and changing the component type.
- Lower Region – presents information relating to the chosen component in the upper region, across the following tabs:
- Details – lists any issues found for the component, such as footprint model not available in the source libraries, or if pin mapping information is defined for a linked simulation model, a caution that this is not supported for migration. See Previewing Issues for more information.
- Part Choices – if supplier information was defined for the original source component, through supplier link parameters (Supplier n/Supplier Part Number n) or text-based manufacturer/manufacturer part number parameters, then this tab will list those supply chain solutions.

Example supply-chain solution associated to the selected component, that will become a defined part choice for the created Component Item.
- Models – this tab lists the domain models that will be referenced by the created Component Item (Schematic Symbol, PCB Footprint Model, Simulation Model). All of these models will be items in the Server in their own right. Models may be created specifically for the component, under sub-folders, or may be referenced from elsewhere in the Server, if already created (or going to be created). The system avoids duplication of models, instead reusing a model between multiple components.

Example models that will be referenced by the selected component.
- Datasheets – lists any links that have been extracted from the currently selected library source component. These are typically URLs for the component manufacturer's website, and one or more links to PDF reference material such as component datasheets. The datasheet links are included as clickable web reference parameters in the migrated server component, while any local file-based references are migrated to be stored with the component as the indicated server item – by default, the datasheet items will be found in a
Datasheets subfolder of the component folder.
 Example links that will be referenced by the selected component.
Previewing Issues
While previewing the components and related entities that will be created in the Server, the Library Migrator also flags any issues. Two graphical icons are used to do this:
-
 – an error. A problem with the original component in the source library will lead to unsuccessful migration of the indicated component. An example might be that the referenced footprint model is not available.
-
 – a warning, or caution. The migration of the component will proceed, but not fully for some reason. An example is the caution that the migration of pin mapping data is not supported, or that simulation parameters will not be migrated as component parameters.
Issues are flagged in the following places:
- At the folder level, to indicate there are issues with components therein.
- At the component level, with the appropriate icon to the left of a component's entry.
- At the detailed level. Issues are listed on the Details tab, when the affected component is selected.

Flagging issues and providing details of those issues.
Catching issues at the preview stage allows you to go back to the source libraries and make any required changes that will ensure successful migration.
Components with errors will be skipped, and therefore not migrated.
Once you are comfortable that all is in order, you can proceed with the actual migration itself, by pressing the  button at the bottom-right of the view.
Stage 4 – Migration
This stage of the process involves the actual migration of the components to the Server. The system performs a final set of checks, including:
- If there are any components with errors (), you will be alerted that those will be skipped (and how many). You are given the option to cancel the migration (and resolve those issues), or click to continue with the migration of those components remaining, and that can be migrated.
- If you have components referencing simulation models with defined pin mapping, you will be alerted that migration of pin mapping is not supported. Again, you can cancel the migration at this point, or click to continue.
- If there are components with defined simulation parameters, you will be alerted that such parameters will not be migrated as component parameters. Again, you can cancel the migration at this point, or click to continue.
The migration process then proceeds, with progress displayed graphically through a progress bar, and in detail through a report that shows you exactly what is happening at each point in time.
You can stop the migration process at any time by clicking the Stop button, at the bottom-right of the view.

An example migration in action. You are kept informed of progress and given detailed information of what the Library Migrator is doing at every stage of the process.
The initial flow of the process involves the following elements being created in the Server (depending on the migration configuration settings/options):
- The general folder structure is created.
- The component template folder is created, that will house all Component Template Items created for the source libraries. This is: Managed Content\Templates\Component Templates.
- Component types for each library involved in the migration are created, where needed.
- Component templates for each library are then released into Component Template Items, within the component template folder.
For each source library included in the migration process, the following flow is then followed:
- The component list to skip is selected – those components that cannot be migrated due to an existing issue.
- The component list to migrate is selected – those components that can be migrated without issue.
- The library folder structure is created within the Server, consisting of a component folder and folders for each involved model type. Model folders are created once under a generic sub-folder named Models.
- The model libraries are then released, creating the Symbol Items, Footprint Items, and Simulation Model Items (only where existing models are not available for reuse).
- The Component Items themselves are then created.
- Folder attributes are then set for the various folders.
- A saved search item is created.
- Supply chain information is then migrated, creating the associated part choices for the released components.
The final act of the migration process is to create an 'Item Manager rule'. This creates the necessary auto-mapping, so that once your components have been migrated to the Server, you can then migrate your existing designs to use those components, using the Item Manager, without any additional effort.
Stage 5 – Report
This is the final stage of the process, providing a detailed report (essentially the completed report that could be seen in real-time during the Migration stage).

The final, detailed report for the migration.
The right-click context menu provides the following commands:
- Export to file – use this command to export the entire report. The Save As dialog allows you to specify where, and with what name, the report is saved. Supported formats for export are: Excel files (*.xls; *.xlsx), HTML files (*.html), PDF files (*.pdf), Text files (*.txt), and CSV files (*.csv).

An example migration report, exported into Excel format.
- Copy to clipboard – use this command to copy the currently selected rows of the migration report, to the Windows clipboard, for pasting into an external application.

An example illustrating a portion of a migration report copied to the clipboard, then pasted into Notepad to be saved as a txt file.
That's it – with your components migrated, you can close the Library Migrator view and begin designing with your new set of managed components, or click the  button to start a fresh library migration session.
Browsing Migrated Components
Browse your migrated components from the Components panel or for accessing all managed server content, the Explorer panel.
By clicking the
button, at the bottom-right of the view when the Library Migrator is presenting the migration report, you can quickly gain access to the
Explorer panel. You will be taken to the first component, in the first migrated library.

Viewing the migrated components, directly in the managed content server, courtesy of the Explorer panel.
And don't forget the Component Templates that were created, and which are used in the creation of those components. These can be found, as mentioned previously, in the Managed Content\Templates\Component Templates folder.

Viewing the Component Templates, created as part of the migration process, and used in the creation of the components themselves.
If for some reason – such as an unsatisfactory migration result – you wish to delete a collection of components, those selected in the Explorer panel can be cleanly removed by choosing the Delete Components and Models option from the right-click content menu. Along with the selected components, their associated models also will be deleted (if not used by other components). This feature is available to users with server Administrator privileges.
