An Altium NEXUS Server installation includes a CSV Component database importer tool that can be used to bring component data into the NEXUS Server from a file exported from an enterprise system, such as a company ERP or PLM system. Implemented as a configurable batch (*.bat) file, the desktop tool imports component data from a target spreadsheet file (*.csv) into the server as determined by existing server templates or a dedicated configuration file.
► See PLM Integration for more information on working between the NEXUS Server and PLM systems.
The command line tool can be found in the \Program Files (x86)\Altium\Altium NEXUS Server\Tools\CSVImport folder of the NEXUS Server installation. See the csv-import.bat for information on the command line syntax used with the tool, or simply execute the batch file without attributes for more detailed information.
Notes:
- The tool and its supporting Java runtime folder (
JRE8) may be copied to and run in any location, including on a different networked machine to the NEXUS Server host machine.
- The tool may need to be run with elevated (Administrator) privileges, depending on where it is located.
- The tool syntax is case sensitive, as are references in Server Templates and any configuration files used.
Source file format:
The CSV data importer tool requires the source comma-delimited CSV file to use UTF-8 character encoding. If the file uses other encoding formats such as ANSI or UTF-8-BOM, the importer will not parse extended characters (such as µ) correctly, or may not accept the *.csv source file.
If creating a basic CSV file for testing purposes, note that some versions of Windows' Notepad do not save in a compatible UTF-8 format. If in doubt, an alternative text editor such as Notepad++ can be used to create and save UTF-8 encoded files, and is also useful for checking the encoding format of *.csv files exported from a source enterprise system.
Auto mode
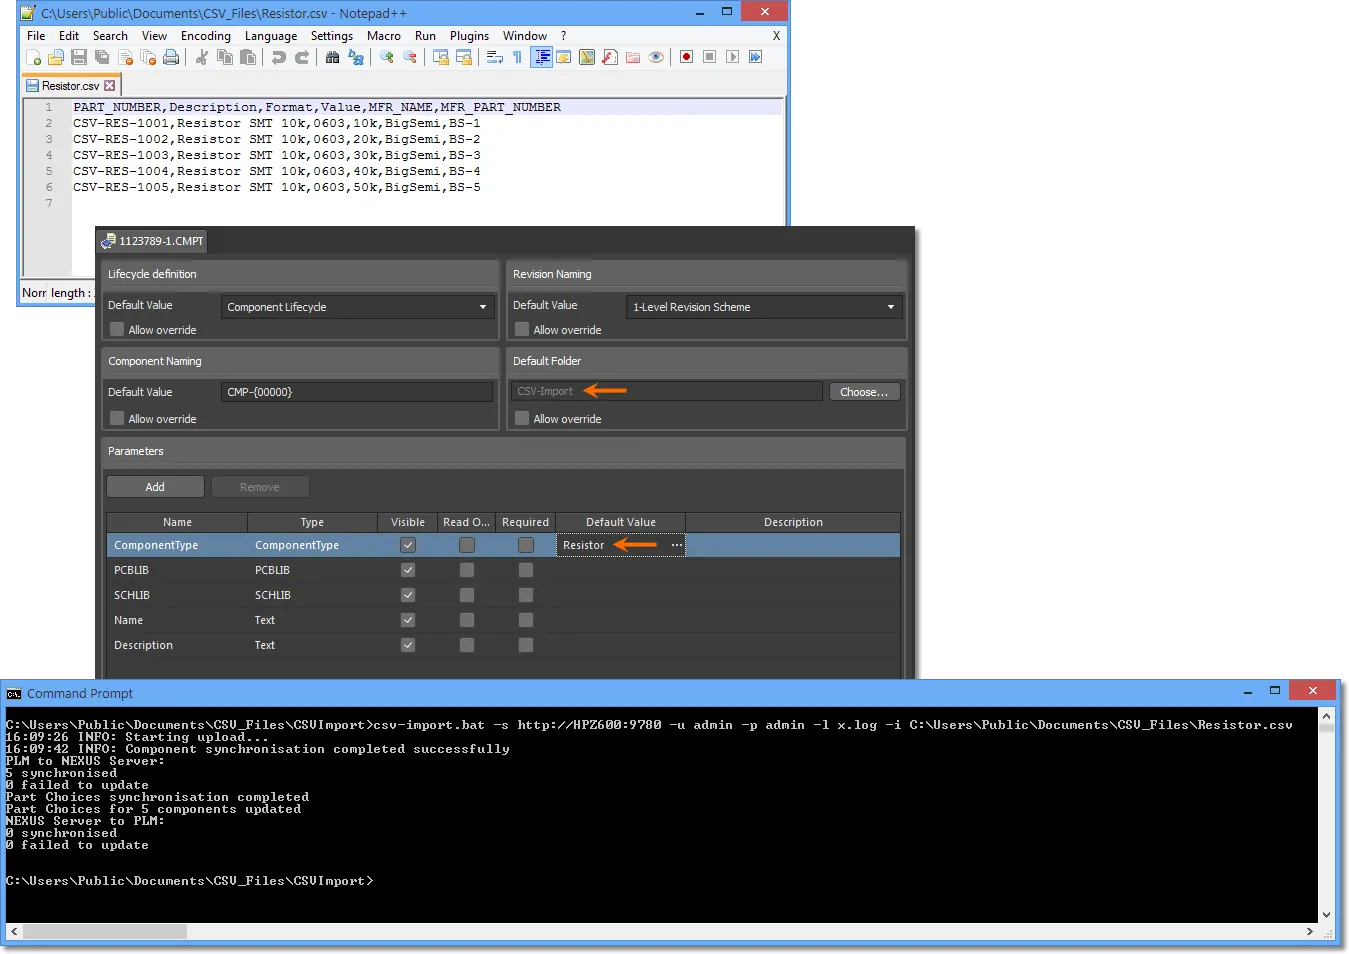
When used without applying a configuration file (option –c) the CSVImport tool process will attempt to match the target CSV filename (say, Resistor.csv) with a server Component Template that supports that Component Type (Resistor). The found Template will determine the Revision, Lifecycle and Default Folder (server target) for the imported data. Note that the minimum data requirement for the source CSV file is the PART_NUMBER parameter column and its matching Values.
Tool Command Syntax
For automatic import mode, a typical CSVImport command string might be:
csv-import.bat -s http://HPZ600:9780 -u admin -p admin -l x.log -i C:\CSV_Files\Resistor.csv
Where:
http://HPZ600:9780 is the NEXUS Server URL and Port.admin / admin are the server name/password login credentials.x.log is the file name of the process log that will be saved in the /CSVImport folder (unless otherwise specified).C:\CSV_Files\Resistor.csv is the path and filename of the source CSV component data file, as generated by the enterprise system (such as a PLM).
Run the tool without appended arguments to see its usage syntax:
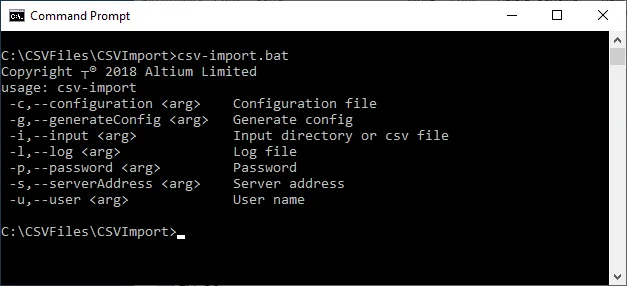
The CSVImport utility tool provides general progress information in the console window as it runs, and can also produce a log file as specified by the command syntax (-l). If component manufacturer part parameters are present in the CSV file (by default; MFR_PART_NUMBER and MFR_NAME), matching Part Choice entries are created in the server.

The optional log file provides details of a successful import process – if the process fails, a log file is not generated.

Note that components also may be inspected and accessed in the NEXUS server Workspace Components page view.
► See Workspace Components for more information.
Configured mode
The tool’s more advanced mode uses an XML configuration file to specify file-to-server parameter mapping, and options such as the target folder, a different Template, etc for the import process.
To obtain a base configuration file that can be modified to suit, run the tool with the generate configuration file setting (-g). This will create the specified XML file with parameter key/value pairs extracted from the source CSV file, and the Revision, Lifecycle and target folder setting from the matched Template. Also included is Component Type entries for both the PLM (source) and the NEXUS Server (target) – Resistor in this example case – and the Template ID.
A typical command string for the tool would be:
csv-import.bat -s http://HPZ600:9780 -u admin -p admin -g MyConfig.xml -i C:\Users\Public\Documents\CSV_Files\Resistor.csv
► Example of generated configuration file (download)
Once generated, the configuration file (MyConfig.xml) might be edited map the source Value parameter to Resistance in the server, and the Format parameter to Package. Edit those attribute strings accordingly in the ToAltium section of the configuration file (for the Resistor PLM class) to map as required.
Mapping edits for this example
For the example shown here, the related Attributes would be changed from:
<ns2:Attribute attributeType="revision">
  <ns2:Key>Format</ns2:Key>
  <ns2:Value>${attribute.Format}</ns2:Value>
</ns2:Attribute>
<ns2:Attribute attributeType="revision">
  <ns2:Key>Value</ns2:Key>
  <ns2:Value>${attribute.Value} </ns2:Value>
</ns2:Attribute>
...to:
<ns2:Attribute attributeType="revision">
  <ns2:Key>Package</ns2:Key>                 <!-- Updated -->
  <ns2:Value>${attribute.Format}</ns2:Value>
</ns2:Attribute>
<ns2:Attribute attributeType="revision">
  <ns2:Key>Resistance</ns2:Key>              <!-- Updated -->
  <ns2:Value>${attribute.Value}</ns2:Value>
</ns2:Attribute>
The configuration file is then used with the tool (option –c) to perform the required mapping:
csv-import.bat -s http://HPZ600:9780 -u admin -p admin -c MyConfig.xml -i C:\Users\Public\Documents\CSV_Files\Resistor.csv

If the component entries already exist in the Server (as imported in the above
Auto mode example process), new Revisions will be created and the remapped parameters added to the existing data – existing parameters are not removed.
Other Mapping options
Other configuration options include the ability to set the Component Type class for both the PLM and NEXUS Server by editing the file's <Entity altiumType="Resistor" plmType="Resistor"> line, as would be generated for this example. Typical changes might be:
- Specifying
altiumType="ResistorSMT" to set the imported components to that type (assuming the type registered in the Server).
- Specifying
plmType="PLM-Export_Resistors" to allow a source file named PLM-Export_Resistors.csv to be imported. Note that source CSV file names that do not match an existing server Component Type (Resistor, Capacitor, etc) are not recognized unless the plmType is specified in this way.
The server target folder entry in a configuration file (for example; <Folder>Components/Resistors</Folder>) will overrule all other target path settings, such a those in a default or specified Component Template.
For a successful import process, the Attribute entries in an applied configuration file (as were automatically generated) must match those in the source CSV file column headers. For example a CSV column group Format must have a matching configuration attribute entry Value of ${attribute.Format}, regardless of any applied parameter mapping (as outlined above). Additional Attributes may be added for a component Entity however, such as a fixed identifier for example, which might take the following format:
<ns2:Attribute>
  <ns2:Key>DataSource</ns2:Key>
  <ns2:Value>Imported from PLM</ns2:Value>
</ns2:Attribute>
In this case, the component data imported into the Server will include a DataSource parameter with a value set to Imported from PLM.
Additional features:
- An applied configuration file determines all settings for the import process, including parameter mappings, independently of related server Templates.
- All parameters may be mapped to accommodate the input CSV file parameters, including what name is used in the file for PLM Number and the part manufacturer data (Part Choices).
- Multiple Entity definitions, including their constituent parameter Attributes, can be included in a configuration file. Copy an existing Entity group entry, say for
Resistor, and then paste/edit this to create another for Capacitor.
- Component Template parameters that are set with a default value will be applied to imported components, unless they have a corresponding attribute in the imported CSV data – in that case, the source attribute value will be imported to the server parameter. In the CSVImport auto mode, the applied template will be that for the Component Type, as defined by the source CSV filename. In configured mode, the template is set by the
<ComponentTemplate>[CMPT-xxxx]</ComponentTemplate> line in the configuration file.
- When a source path is specified without a CSV file, the tool will search the source folder for CSV filenames that match Entity definitions in the configuration file. So if configuration Entity references exist for
Capacitor and Resistor and matching CSV files are found, the data for those components will be imported into the server. This is effectively the tool's batch operation mode.
Part Choices handling
The propagation of component manufacturer Part Choice data from an external enterprise system (such as a PLM) to the Altium Server is arranged to avoid the possibility of data duplication or unwanted removal. Where component data is brought into the server directly from the external system or via a CSV file, the creation and/or modification of Part Choice entries is handled intelligently, based on the current conditions and data history:
- If a component Part Choice entry being imported already exists for that server component, it will not be duplicated.
- If a server component Part Choice entry was added within the server (not imported), it will not be replaced by imported Part Choice data. An imported Part Choice will be added as a new, additional Part Choice for that component.
- If new Part Choice data is imported for a component, it will replace the previously imported Part Choice entry for that component.
In summary, other than respecting a component's existing non-imported Part Choice data, the Part Choice data imported from the external system will determine the server component Part Choice entry.
In the example image shown below, the input CSV file does not include Part Choice data (Manufacture Name and Manufacturer Part Number parameters) for PLM entry CVS-RES-1001 (the 10k Resistor), so this is not added to the server component. In this example case however, a Part Choice entry (Vishay) has been manually added to that server component from within the NEXUS Explorer panel.

If Part Choice data for that component (CVS-RES-1001) is included in a subsequently imported/synchronized CSV file, as shown below, the new Part Choice entry (Rohm) will be added to the component – since an existing 'native' Part Choice entry cannot be replaced by imported Part Choice data.

If a following imported/synchronized CSV file has new Part Choice data for the component, as shown below, that Part Choice data (Yageo) will replace the Part Choice entry that was previously imported (Rohm) – the existing 'native' Part Choice entry (Vishay) remains untouched. Alternatively, if the CSV Part Choice data has been removed (blank MFR_.. entries), the import process will delete the existing imported Part Choice entry in the server (Yageo).

Multiple Manufacturer Part Choices
The CSV Importer also accommodates multiple sets of manufacture part data for a given component through a repeated structure in the source CSV file, where additional component entries are included for each manufacturer part data variation. For example, if a source component CSV-RES-1001 has three related part numbers, then three CSV entries for that component are included where each specifies different MFR_NAME and MFR_PART_NUMBER column data (one from Vishay Dale and two from Yageo).
When this component data is imported to the server, a single component item is created for part CSV-RES-1001, but with multiple Part Choice entries derived from the additional CSV data references.

Parameter Unit and Value handling
When component data are imported from an external enterprise system into the NEXUS Server by the CSVImport tool, the server's automated parameter Unit processing will both interpret the value data and handle any errors in that data.
During a component data importation or synchronization process, any component parameters specified in the applicable Component Template as a unit-aware Type (Percent(%), Watts(W), etc) are interpreted accordingly. Since the formatting of the imported parameter values may vary widely, as they have been defined in an external system (such as a PLM), the server's unit-aware value processing caters for all likely formats and then correctly handle any errors.
The below image shows an example case where a set of server components are updated by a CSV import file that includes the Power parameter for each component entry. The Power parameter values in the source CSV file use a range of formatting, and this includes a value error (62500x) for the CSV-RES-1001 component entry. Prior to the data import, the server components did not include Power parameter data and were at their first revision (Revision 1) – as shown in the upper Explorer panel.

The results of the CSV import process, as appear in the lower Explorer panel image (above), show the effects of both the unit-aware parameter interpretation and its error handling:
- A Power value has not been added to component
CSV-RES-1001 due to the CSV source data format error.
- A new revision has not been created for component
CSV-RES-1001 (it remains at Revision 1).
- The Power value source formats for all other components have been correctly interpreted from the source data.
- New revisions have been created for the correctly updated components.
A subsequent component data import process, with a revised Power value (62500u) for component CSV-RES-1001, is correctly interpreted for that component – as shown in the below image. The server component data has been updated, creating a new revision (Revision 2).

