Parent page: Server Items
Altium NEXUS, in conjunction with your managed content server, caters for the ability to create and manage Script Items in that server. Such Items are created directly within the server, with the relevant script project (*PrjScr) uploaded to a revision of a target item. Once a Script Item has been created (and data released into a revision of it), and its lifecycle state set to a level that the organization views as ready for use at the design level, it can be reused in future board-level design projects.
Ranging from simple utility scripts to those performing complex source operations, Scripts can be both a convenient and powerful way of adding functionality to Altium NEXUS. In Altium NEXUS, these managed Scripts can be opened directly from the managed content server, loaded as permanently available projects, and used in custom menu commands.
In addition, a managed Script Item can be used indirectly as part of a revision of a managed Design Preferences Item in one or more defined Environment Configurations. An environment configuration is used to constrain a designer's Altium NEXUS working environment to only use company-ratified design elements. Environment configurations are defined and stored within the Team Configuration Center - a service provided through the NEXUS Server installation, and the facilitator of this concept of Environment Configuration Management.
Folder Type
When creating the folder in which to store a Script Item, you can specify the folder's type. This has no bearing on the content of the folder - uploading will always result in a Script Item. It simply provides a visual 'clue' as to what is stored in a folder and can be beneficial when browsing a server for particular content. To nominate a folder's use as a container for Script Items, set its Folder Type as Scripts, when defining the folder properties in the Edit Folder dialog.

Specifying the folder type - its intended use - gives a visual indication of the content of that folder when browsing the server.
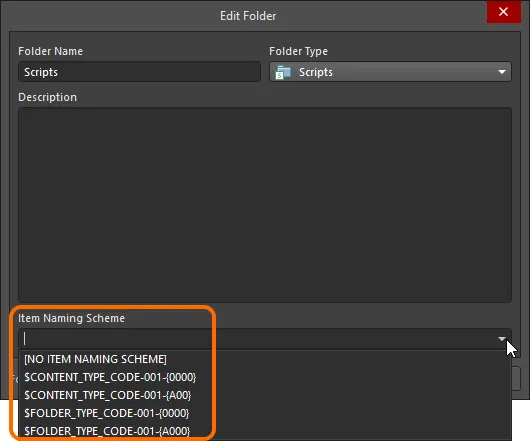
Item Naming Scheme
Another important aspect of the parent folder is the Item Naming Scheme employed for it. This defines the format of the unique ID for each Item created in that particular folder. Several default example schemes are available, utilizing the short-form code for either the folder type (ASC - Altium Script Catalog) or the content type (ASF - Altium Script File):
- $CONTENT_TYPE_CODE-001-{0000} - for example, ASF-001-0001.
- $CONTENT_TYPE_CODE-001-{A00} - for example, ASF-001-A01.
- $FOLDER_TYPE_CODE-001-{0000} - for example, ASC-001-0001.
- $FOLDER_TYPE_CODE-001-{A000} - for example, ASC-001-A001.
Using a default naming scheme, the software will automatically assign the next available unique ID, based on that scheme, having scanned the entire server and identifiers of existing Items. This can be a great time-saver when manually creating Script Items.
A custom scheme can also be defined for a folder, simply by typing it within the field, ensuring that the variable portion is enclosed in curly braces (e.g. SCRIPT-001-{0000}).
The Item Naming Scheme of the parent folder is applied to the Unique ID for each Item
created within that folder.
The Item Naming Scheme employed for the parent folder can be changed at any time. The modified scheme will then be applied to any subsequent newly-created Items within that folder.
Item Type
When creating the target Script Item in which to store your script project, ensure that its Content Type is set to Script in the Create New Item dialog. If you are creating the Item in a Scripts type folder, this Item type will be available from the right-click context menu when creating the Item.

Creating a Script Item within a Scripts folder - the correct Content Type is available on the context menu.
Item Lifecycle Definition and Revision Naming
When defining the Script Item, to which the source script project is uploaded, be sure to specify the type of lifecycle management to be used for the Item, and the naming scheme employed for its revisions, respectively.
Control over which Item types can use a particular lifecycle definition or revision naming scheme, can be defined and enabled at a global level from within the Content Types dialog, when defining each schema. The default schemes assigned for use by a Script Item are: Generic Lifecycle and 1-Level Revision Scheme, respectively.
Once a file has been uploaded into the initial revision of a Script Item, these schemes cannot be changed for that particular Item.
Specify the required schemes in the Create New Item dialog, using the Lifecycle Definition and Revision Naming Scheme fields respectively.
If the option to control use of lifecycle definitions and revision naming schemes per content type is enabled for any definitions/schemes, and the Script Item type is not set to use a particular definition/scheme, then that definition/scheme will not be available in the applicable drop-down list.

Selecting the Lifecycle Definition and Revision Naming schemes for a manually created Item.
Observing standard revision naming schemes and lifecycle definitions, across the various types of design item in a managed content server ensures smooth, consistent management of those items.
It is a good idea to add a Name and Description as part of the Item's definition. This information is used when searching the server and enables quick identification of what a Script Item offers.
Uploading a Script Project
So far, we've discussed the support for a Script Item in the server, in terms of related folder and item types. Uploading a script project into the revision of such an item can be performed by right-clicking on the required Script Item in the Explorer panel, and choosing the Upload command from the context menu. The standard Windows Open dialog will appear, with which to browse to the required script project file (*.PrjScr).
If the Item has no planned revision, upload will be to the next planned revision, created on-the-fly as part of the upload process.
 Specifying the script project file to be uploaded to the target Script Item.
With the desired file selected, proceed with the upload by clicking the Open button. The project file, along with all files in the same folder, are uploaded to the revision, and will be available on the Details aspect view tab for that revision, in the Explorer panel.
 The uploaded project, along with all files in the same folder, are listed on the Details aspect view tab for the revision of the Script Item.
Drag and Drop from Windows Explorer
A script project can also be uploaded into a new Script Item by dragging the selected script project file and related source files from a source folder in your Windows Explorer, and dropping into the required folder in the Explorer panel. The Create New Item dialog will appear, with the dragged files listed in the Sources region. The Name of the item will be the file names, including extension (entries will be separated by a semi-colon). The Description will be in the format Uploaded from <FileNameandPath>, Size <FileSize>, Created on <FileCreationDate> (entries will be separated by a semi-colon). Change these as required. The Item ID will be in accordance with the Item Naming scheme defined at the folder level. If the folder has no naming scheme defined, naming will follow the $CONTENT_TYPE_CODE-001-{0000} scheme.
 Uploading a script project and related files to the initial revision of a newly-created Script Item, using the drag and drop method.
Reusing a Managed Script Item
Related page: Controlling Access to Server Content
Once a script project has been uploaded to a managed content server, and its lifecycle state set to a level that the organization views as ready for use at the design level, that script can be reused in future board-level design projects.
When you are signed in to your managed content server, you are free to manually reuse the revisions of any Script Items that have been shared with you.
If you do not sign in to your managed content server you can still work with Altium NEXUS (under your valid Altium NEXUS License), but you will not be able to access your organization's managed content server, or any other services it provides. You will therefore not be able to reuse any managed Script Items. You will only be able to use file-based scripts defined locally.
Running a Managed Script
To run a managed accessible script directly in Altium NEXUS:
- Choose the File » Run Script command from the main menus.
- In the Select Item To Run dialog, click the
 button and choose the From server entry.
- Browse to and select, the required revision of the Script Item in the Choose Item dialog (essentially an incarnation of the Explorer panel). Then click OK.
- The managed script project will be opened in the Select Item To Run dialog, where it can be Run in the usual way.
 Choose to run a script from a managed content server source, rather than a local source, by using the From server command in the Select Item to Run dialog.
Installing a Managed Script
Altium NEXUS allows any number of script projects to be installed on a permanent basis, so their functionality becomes available at all times, for all Altium NEXUS sessions. This feature is available from the Scripting System - Global Projects page of Altium NEXUS's Preferences dialog (click on the  control at the top-right of the workspace).
To install a script project from your managed content server, click the  button and choose the Install from server command from the associated menu. Select the desired managed script Item from the subsequent Choose Item dialog (essentially an incarnation of the Explorer panel), and click OK to install the script project.
 Installed scripts are always available in Altium NEXUS, and are configured on the Scripting System - Global Projects page of the Preferences dialog.
The installed script project will be available to Altium NEXUS whenever a user is signed in to the managed content server with suitable credentials. Note that the installed script project is listed by its location or 'path' within the server's folder structure, and the ID of the Script Item containing the script project data.
 A managed script installed from a managed content server is listed by its server path and Item ID.
The server reference links created in the Preferences by an installed managed script project are retained, and therefore will be included if the current Preferences set is also released to the server. A revision of the resulting managed Design Preferences Item, if reused, will therefore automatically provide the linked managed script.
Creating a Managed Script Command
In Altium NEXUS, a script (either locally or server-sourced) can be applied to a menu item with a number of simple steps. This relies on the permanent availability of that script, which must be installed through the Scripting Preferences (as detailed previously).
A custom command is created from an installed script using the Customize feature - make the editor in which you wish to use the script active (open a document of the required type), then double-click to the right of the main menus to access the Customizing dialog. Once there, click the  button to create a new command, the properties of which are defined through the Edit Command dialog.
 Access customization to create a new command that will run your intended managed script.
This involves the definition of a new Action based on the script Process (ScriptingSystem:RunScript) and Parameters. The command parameters define the full path to the script and its target procedure, and are in the form: ProjectName|ProcName>Process. So for a typical locally-stored script, this might be:
ProjectName=C:\Server Testing\Altium Scripts\HelloWorld.PRJSCR|ProcName=HelloWorld.pas>HelloWorld
For a managed script project hosted in a managed content server however, the path, and therefore the command’s parameters entry, must point to the correct server location - which is based on the Script Item’s GUID reference. So this reference link must be obtained before attempting to create the new script command entry.
To capture the correct parameters for a script installed from the server, open the Select Item To Run dialog (File » Run Script), right-click on the desired procedure in the script and choose the Copy script parameters command from the context menu. This will copy the entire path, process name and procedure to the clipboard.
 Select the required process/procedure in the managed script project, then copy the script's parameters.
Back in the Edit Command dialog, paste the copied script parameters into the Parameters field, then complete the other fields (Caption, Image, Shortcuts) as required.
 Paste the copied managed script parameters in the Parameters field, then proceed as you would when creating a command from a locally-sourced script.
From the Customizing dialog, the completed script command can be dragged to a suitable Altium NEXUS Toolbar or Menu, and run as needed.
Note that since the command's script is sourced from your managed content server, it will be only available when the user has signed in to that server with the correct credentials.
 A menu command created from a managed script is functional when the user is signed in to its host server.
Reuse as Part of an Environment Configuration
A managed Script Item can be used indirectly as part of a revision of a managed Design Preferences Item - when installed as part of those released preferences, through the Scripting System - Global Projects page of the Preferences dialog - in one or more defined Environment Configurations. An environment configuration is used to constrain a designer's Altium NEXUS working environment to only use company-ratified design elements. Environment configurations are defined and stored within the Team Configuration Center - a service provided through the NEXUS Server installation. Once you have signed in to the NEXUS Server, and chosen (if applicable) from the selection of environment configurations available to you, Altium NEXUS will be configured, with respect to use of preferences. If the chosen environment configuration has a defined Design Preferences Item revision, then that is applied straight away. If the chosen environment configuration applicable to you does not have a Design Preferences Item revision specified, then preferences will remain manually definable. In other words, you are free to manually reuse a revision of a managed Design Preferences Item, or use a locally saved preferences file. For more information, see Environment Configuration Management.
Re-releasing a Script Item
At any stage, you can come back to any revision of a Script Item in the server, and edit it directly. Right-click on the revision and choose the Edit command from the context menu. This will open that revision in Altium NEXUS where it can be edited as required, then released back to the server as the next revision using the Release to server command (shortcut: Alt+Ctrl+S) - available from the right-click context menu associated with the entry for the project in the Projects panel.
Right-clicking on the top-level entry for an Item itself, will edit the latest revision of that Item.
 Accessing the command to launch direct editing of an existing revision of a Script Item.
Updating a Script Item
If you need to change the project or associated source stored in a Script Item, and you have the updated source files, you can upload those files to that Item - the new files will be stored in the next revision of that Item.
Downloading Files
Downloading the files (project and associated source) stored in a revision of a Script Item can be performed from the Explorer panel in the following ways:
- By right-clicking on that revision and choosing the Operations » Download command from the context menu. The files will be downloaded into a sub-folder under the chosen directory, named using the Item Revision ID. The files can be found in the Released folder therein.
Access the Download command from the top-level entry for a Script Item itself, to download the files stored in the latest revision of that Item.
Click the Explore button in the Download from Server dialog, to quickly explore to the download folder.
- By selecting one or more source files stored in the Item Revision, on its Details aspect view tab, right-clicking, and choosing the Download command from the context menu. Nominate the target folder to receive the file(s), in the subsequent Browse For Folder dialog.
Opening a Script Source File
To open the project file that is stored in a revision of a Script Item, or one of its associated source files, select that file - on the Details aspect view tab for the revision - then right-click and choose the Open command from the context menu. The project (all source files too) or source file(s) (as free document(s)) will be opened within Altium NEXUS.
