
Legacy Part Requests
Organizations that employ a dedicated parts librarian can formalize the process of adding new Library parts when needed by using the Workspace Part Requests features.
Available as an advanced process-based workflow or a basic document-based arrangement, Part Requests allow users (typically engineers) to assemble and submit details of the needed part to a specified Librarian or Librarians Group. In turn, a Librarian creates the requested part and completes the Part Request, or rejects/cancels the request.
Of the advanced and basic approaches to Part Requests, this document looks at the simpler Legacy Part Requests method.
Configuring Legacy Part Requests
The Legacy Parts Request feature, which is not available by default, is enabled in the Workspace Admin – Settings page. This page also provides the setting for specifying the librarians that will receive and can process Part Requests, and the configuration setting for Part Request progress States (In Progress, Completed, etc).
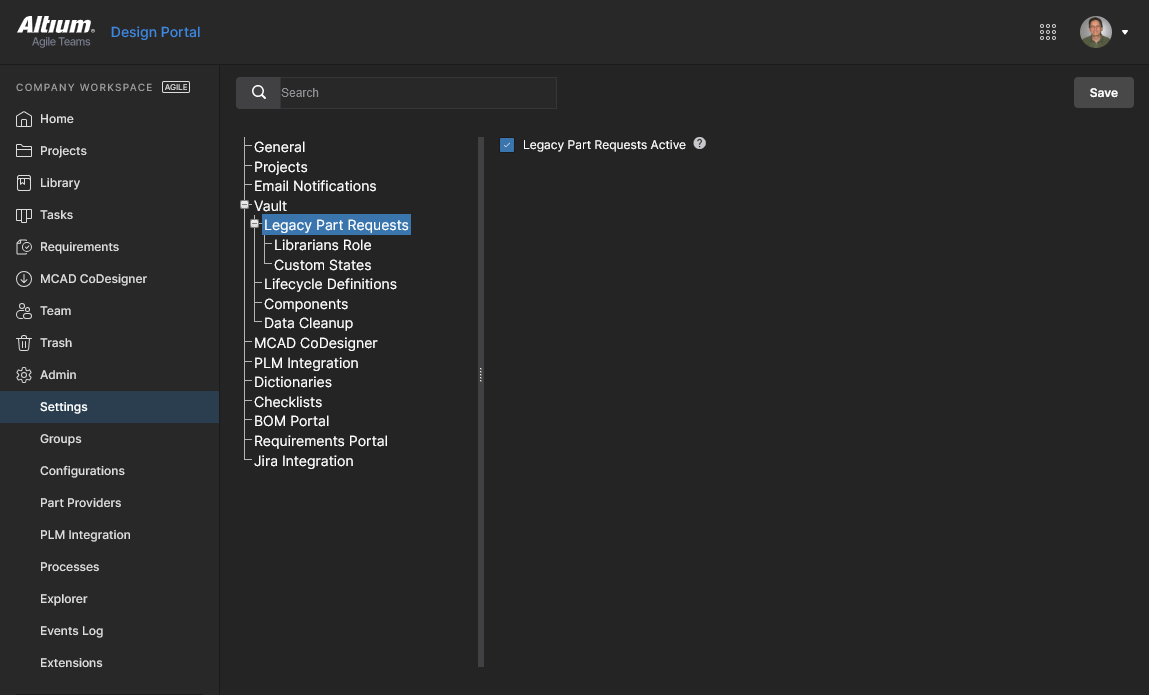
Start by enabling the Legacy Part Requests Active checkbox in the Admin – Settings page. Select  to confirm, and then refresh the browser view to see the feature under the Library entry in the main navigation tree.
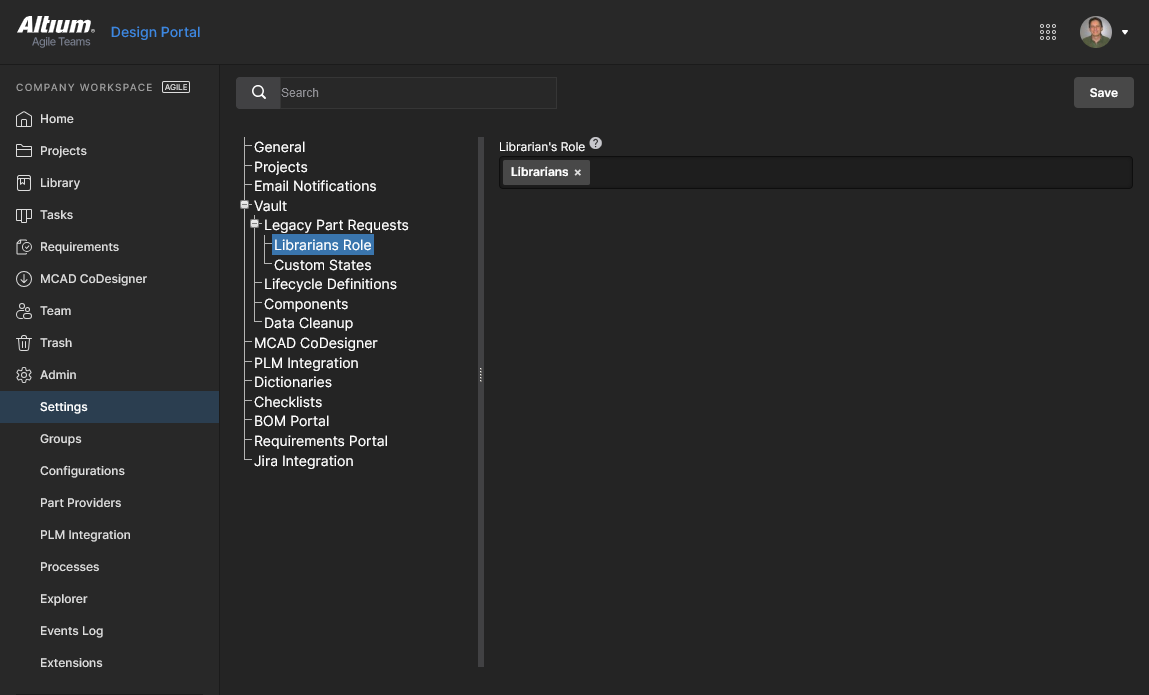
Access the current Librarians Role setting in the Admin – Settings page. This is set to the Librarians group by default but can be changed to any available Group. Select to confirm. See the Managing Workspace Membership page for related information.
Creating Part Requests
Part Requests can be created and maintained through the Library – Legacy Part Requests page of the Workspace browser interface.
Adding a New Request
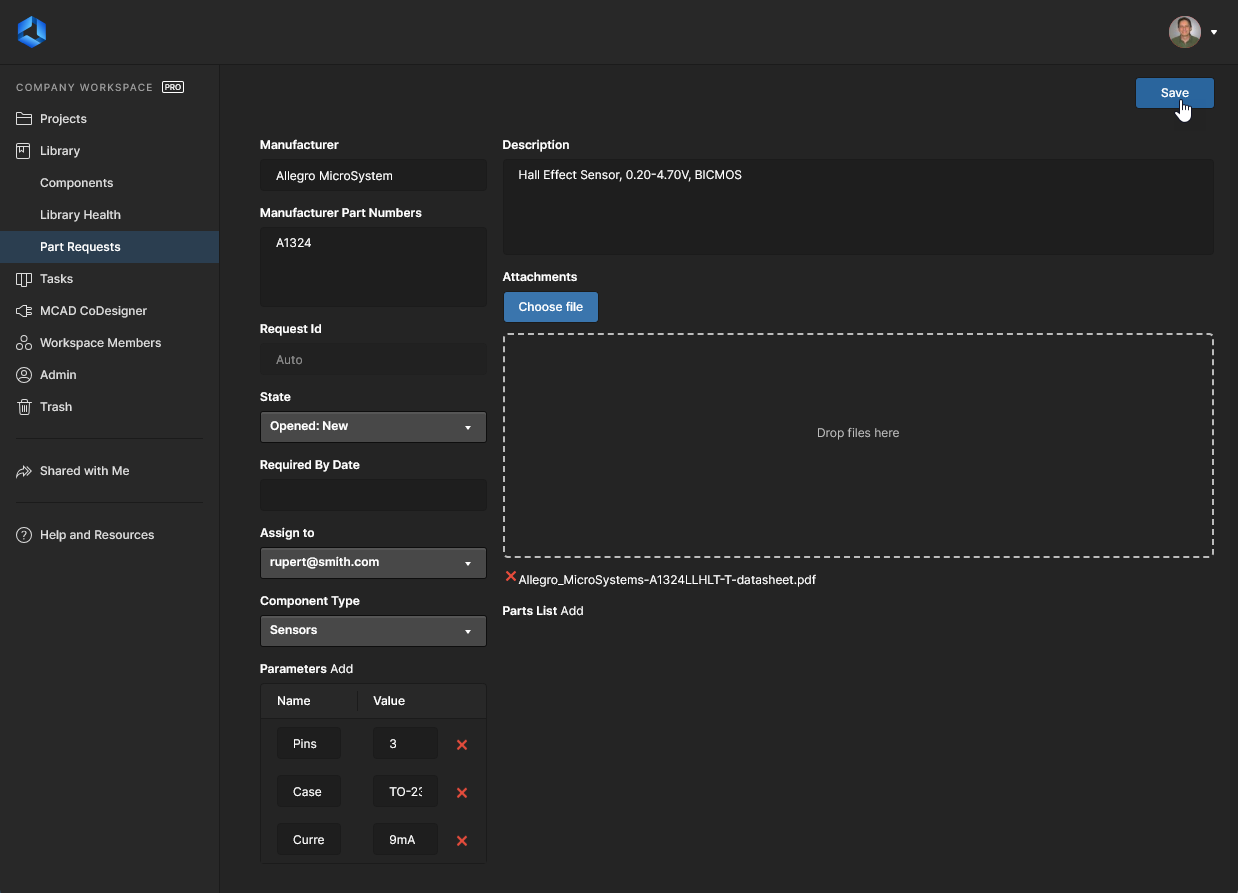
To add a new part request, click the  button at the top-right of the page. The page will change to present the new part request form, as shown in the following image and detailed thereafter.
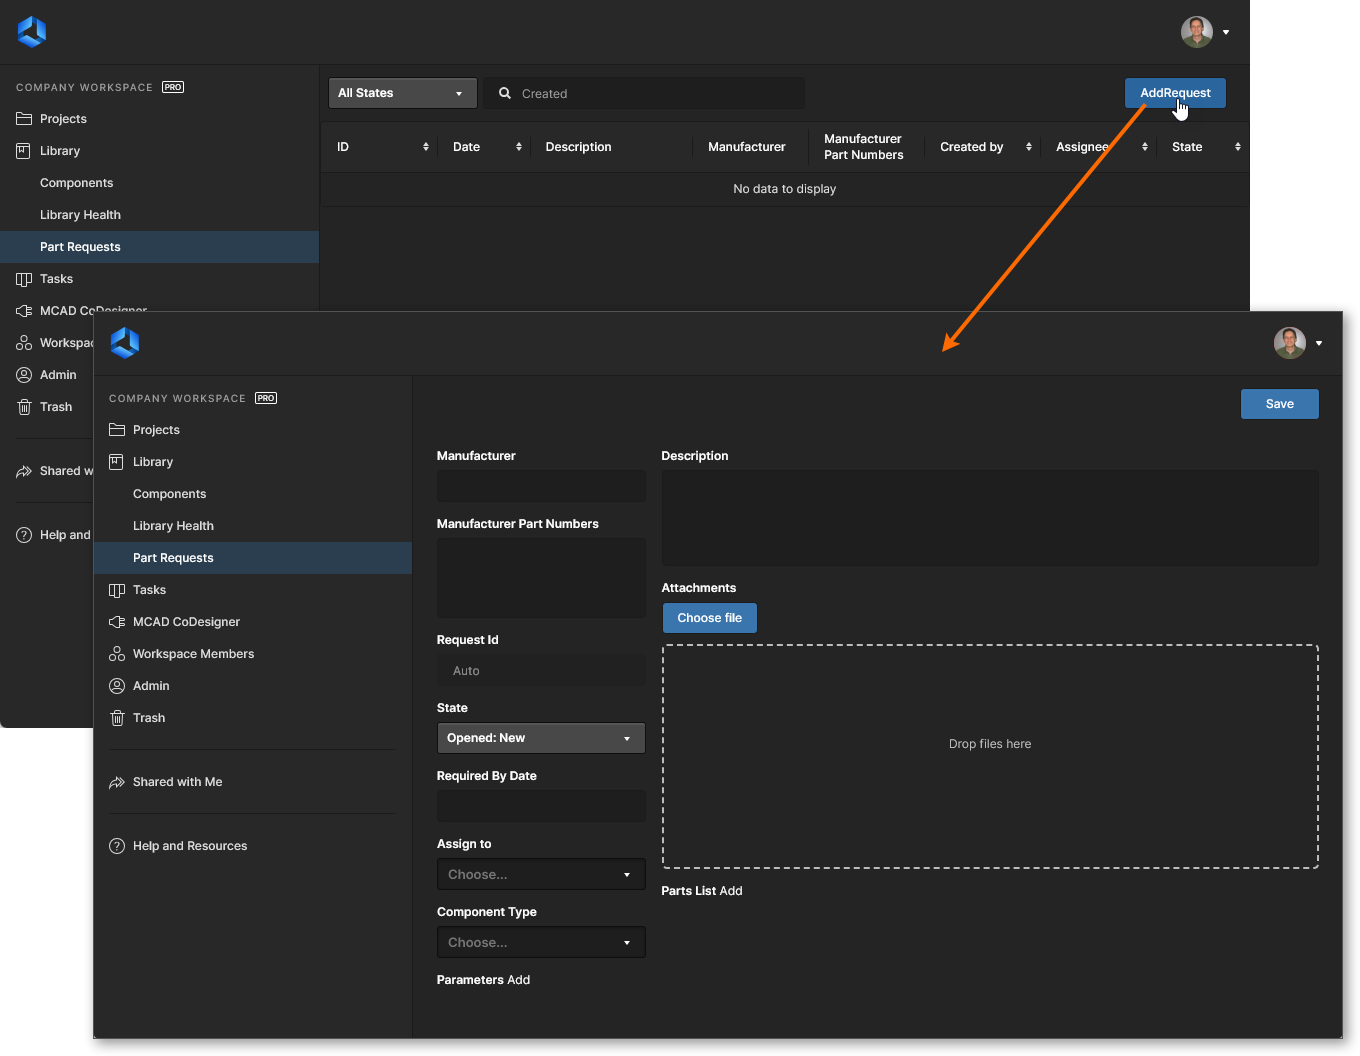 Adding a new part request through the Workspace browser interface Library – Legacy Part Requests page.
Use the controls on the page to supply as much information as possible:
-
Manufacturer – this is a mandatory field to indicate to the librarian who actually makes the part.
-
Manufacturer Part Numbers – this is a mandatory field indicating to the librarian the specific part number(s) of the parts you need them to make. Multiple part numbers must be separated by a comma (,).
- Request Id – an ID is automatically generated with, and assigned to the request, enabling users to easily track the request's progress.
-
State – this field is used to specify the status of the request. The options are
Opened: New,Opened: In Progress,Closed: Completed,Closed: Rejected, orClosed: Cancelled.
- Required By Date – use this field to specify the date by which you need the component(s) to be ready. Clicking within the field will pop up a calendar window with which to specify the required date.
- Assign to – this field shows which librarian is currently working on the request. The drop-down field lists all Workspace users who are part of the nominated Librarian's group(s).
-
Component Type – this field can be used to specify the type of component being requested. The drop-down list will include all types currently defined on the Data Management – Component Types page of the Preferences dialog.
-
Parameters – this area can be used to add a set of specific parameters required for the part(s). Click Add and use the subsequent fields to provide a name and value for the parameter. If no parameters are specified, the librarian will likely fall back to the addition of the parameters in a related datasheet for that part, in accordance with organizational policy.
-
Description – this field can be used to give a rich description of the part (typically taken from the manufacturer datasheet).
-
Attachments – this area can be used to attach any useful files related to the requested part, for example a PDF datasheet, an image, or a document. Either click the
 button to locate the file(s) through a standard dialog, or drag and drop the file(s) onto the indicated area.
-
Parts List – use this area to specify any existing Component Item(s) in the Workspace, which you have created as temporary stub components. Click Add and browse for the required Item accordingly. The librarian can then run with this to fulfill the request. If no stub part exists, the librarian will simply create a new Component Item in the Workspace, along with the requisite domain model Items.
Once all information is defined as required – and essentially the Manufacturer and Manufacturer Part Numbers (which are mandatory) – click the  button at the top-right of the form to effect the creation of the request. With the request saved, its full details will be presented.
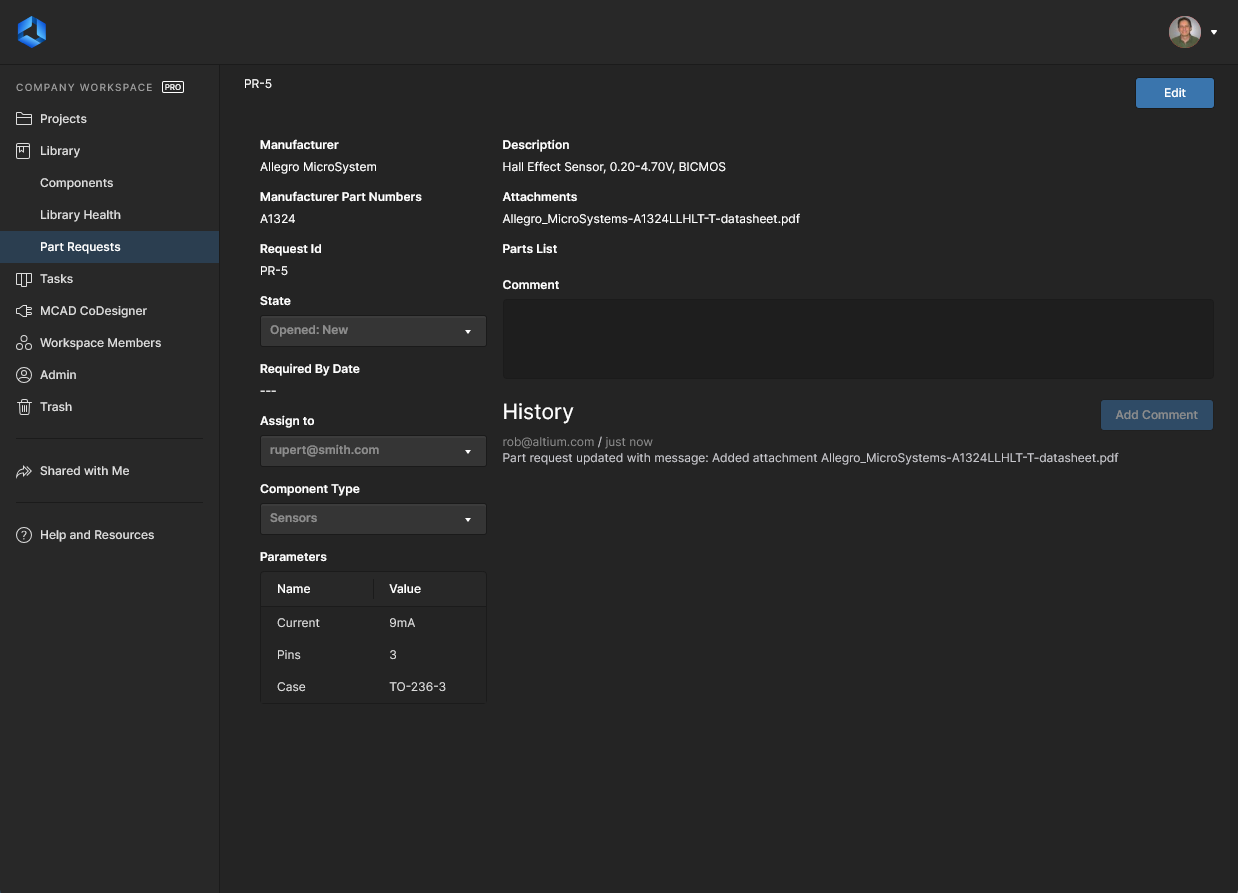
The saved Part Request, which includes full details of the newly-added part. Use the  button to make any changes.
Note that in addition to the information supplied during the Part Request creation, the following is displayed:
-
Request Id – the system-assigned title for the request, in the format PR-n (where n is the next integer identifier available).
-
Comment – use this field to comment on the request. This allows for bi-directional communication between the requestor and the librarian. For example, the requestor may change something since the original submission and needs to flag the librarian working on the part. Or perhaps the librarian requires additional information, or confirmation on some aspect of the part. With the comment written, click the
 button to submit it. Any comment will appear in the History region of the page and also in the information stream when viewing the part request in Altium Designer through the Explorer panel.
-
History – a running stream of events related to this request.
Viewing Part Requests
At any time, a user can view the part requests that they were responsible for initiating (Requestor), or are responsible for working on (Librarian). This can be performed from the Library – Legacy Part Requests page of the Workspace browser interface.
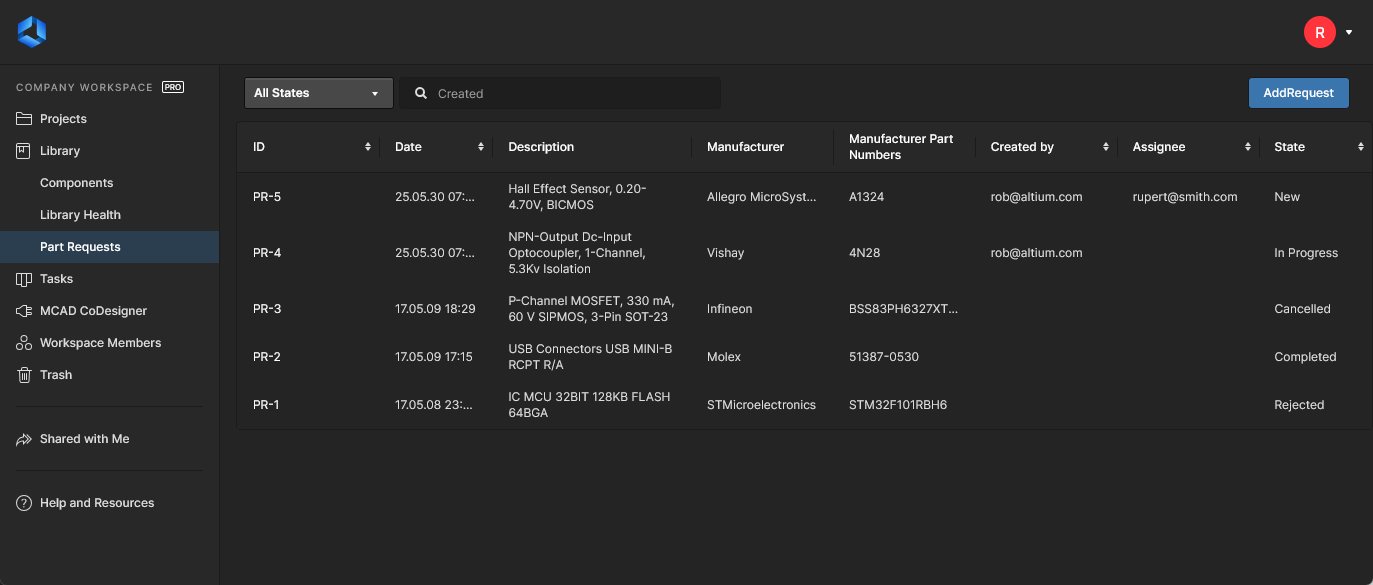 Main summary listing of Part Requests – access this at any time by clicking on the Part Requests entry in the navigation tree.
Each part request at this summary level is listed in terms of the following supplied information:
-
ID – an automated sequential identifier provided by the system.
-
Date – the date the request was created.
-
Description – additional information provided when the request is created or edited.
-
Manufacturer – a key part identifier for the request.
-
Manufacturer Part Numbers – the other key part identifier for the request.
-
Created by – the original author of the request (the Requestor).
-
Assignee – the Librarian who is currently working on the part request.
-
State – the current state of the request, as provided when the request is created or edited.
 control – click on the control or the column name.
You can access the detailed page for a part request by clicking on its ID.
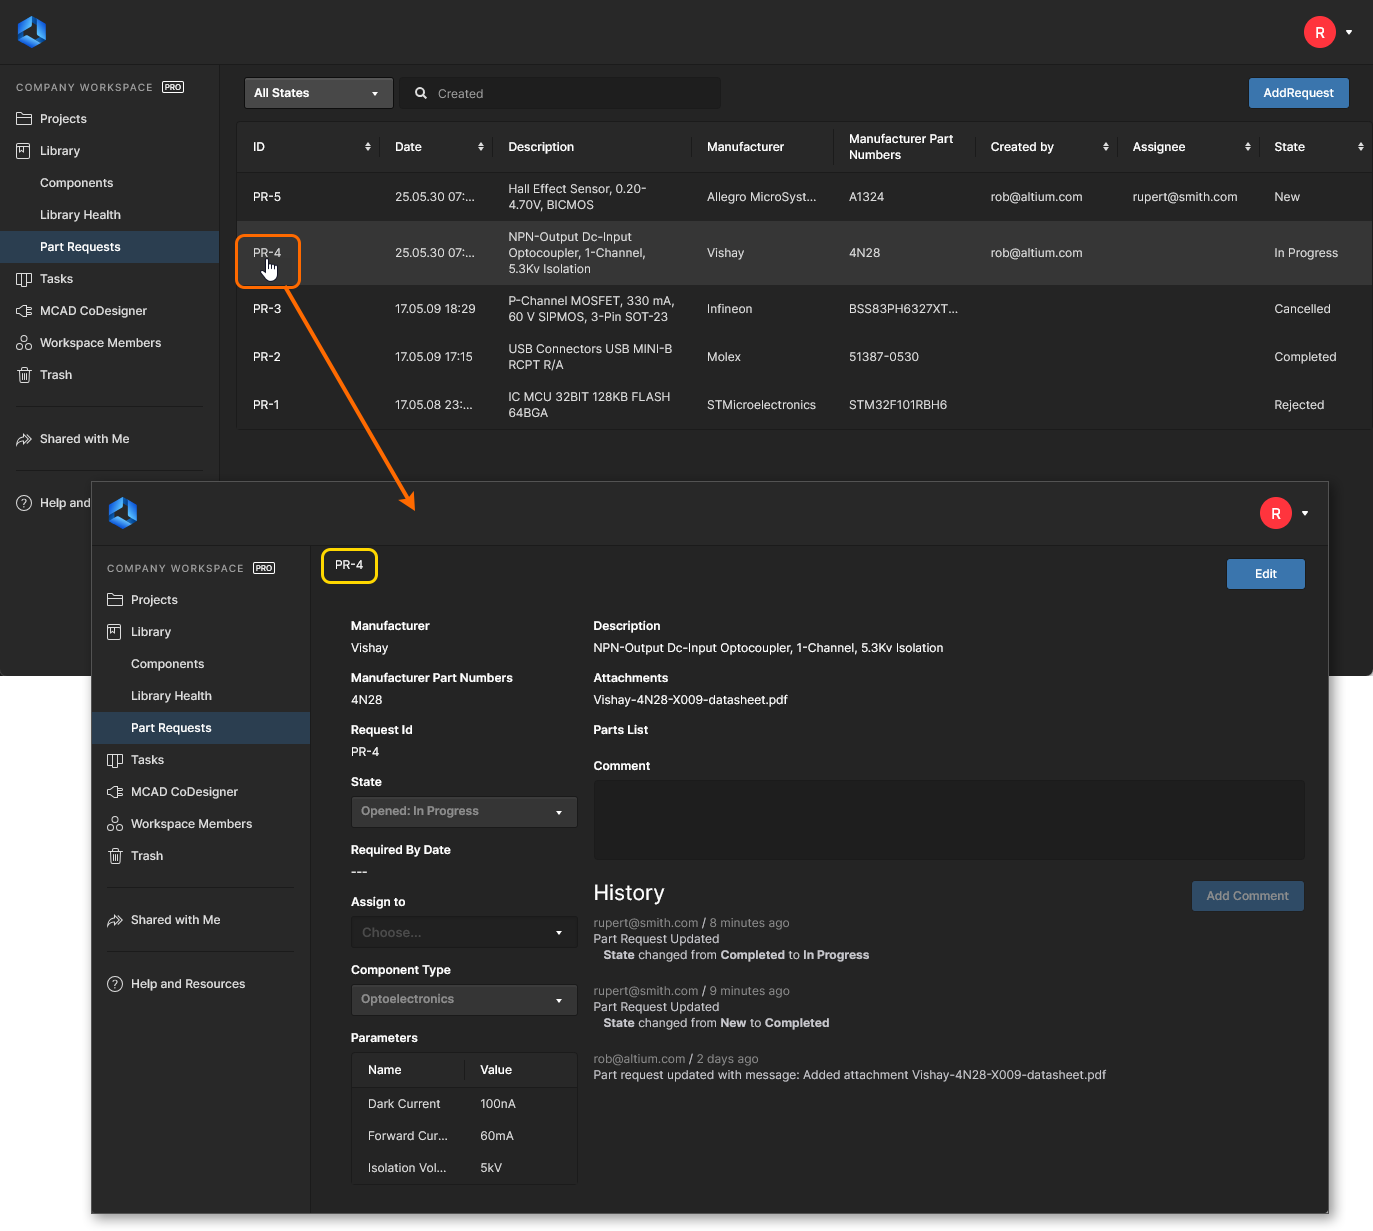 Accessing the detailed page for a part request from the main Part Requests page.
Editing a Part Request
To edit a part request, access its detailed page then click the  button at the top-right of the page. Notice also that a Comment field is available. This is specifically for adding some explanatory text in relation to any modification to the request. This is separate from the Commenting feature available outside of editing the request.
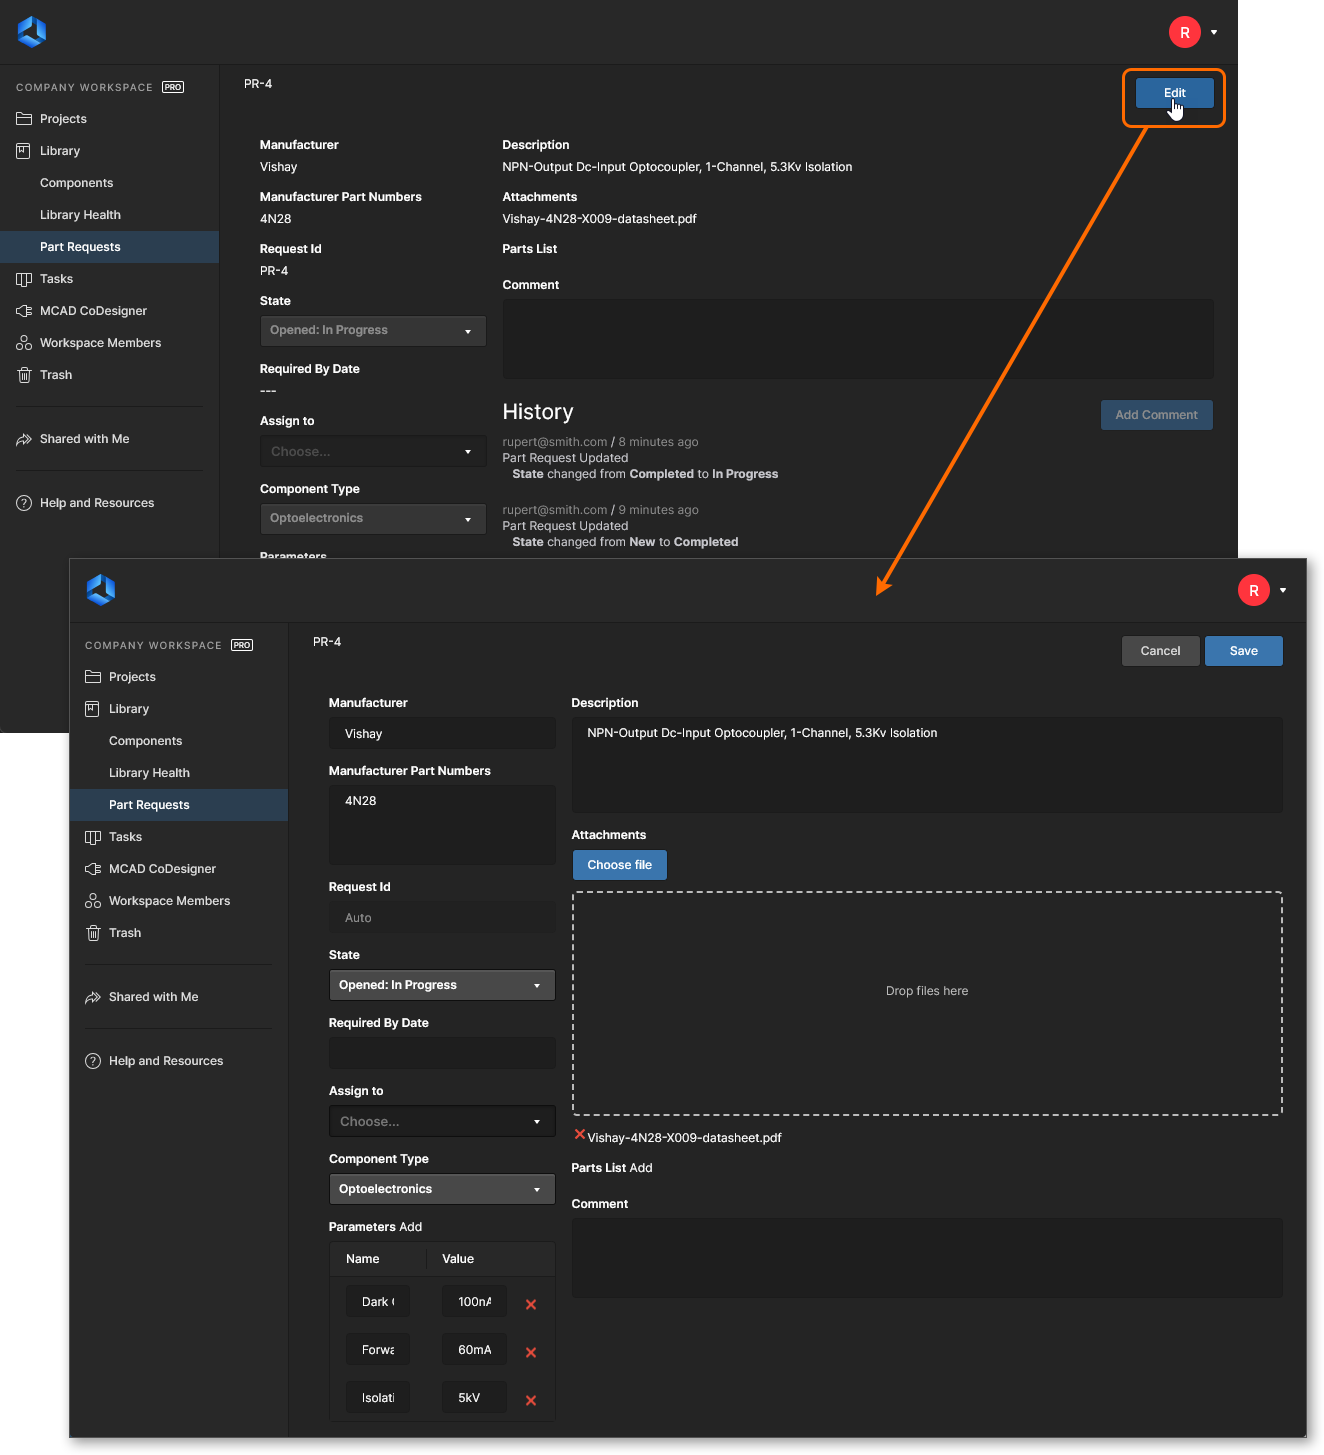 Accessing the form with which to edit an existing part request.
Make changes as required, then click  . To back out without making changes, click
  .
.
Notifications
Upon creation of a part request the requestor, members of the Librarian group, and Workspace Administrators will receive email notifications – providing the Email Notifications feature is enabled. This is performed by an Administrator, on the Admin – Settings – Email Notifications page of the Workspace browser interface.
Customizing States
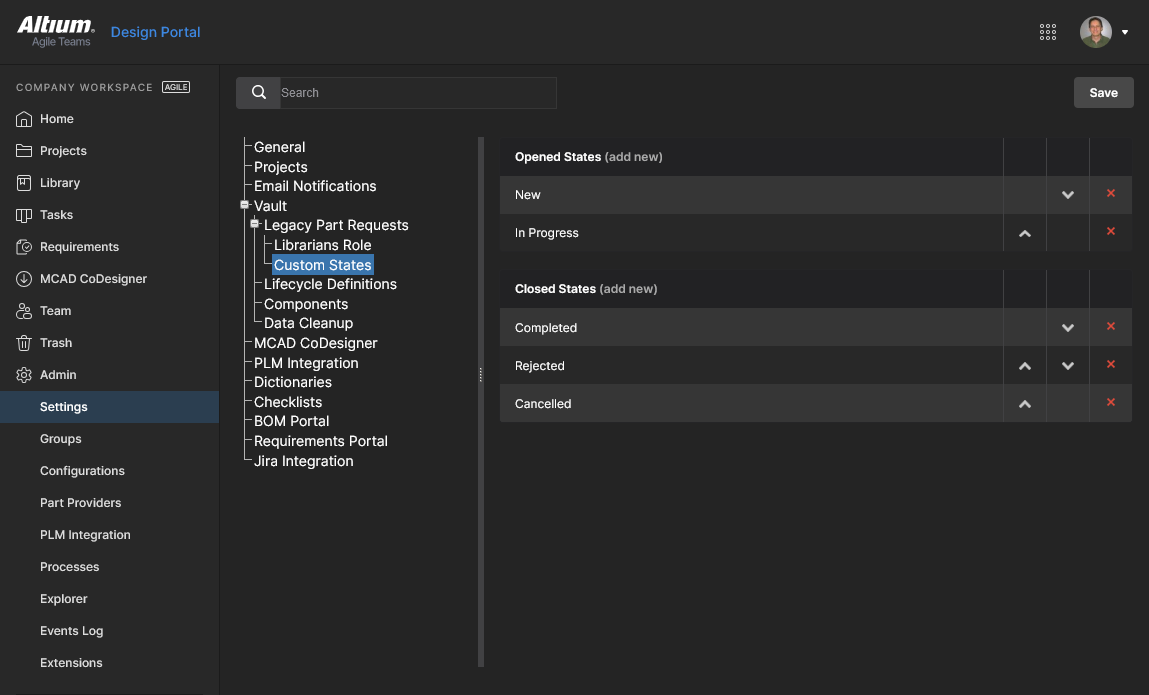
Once the request for a new part has been submitted, there are a number of states that it can ultimately enter. By default, the following states are provided:
-
Opened States – states in which the request is currently still 'alive':
- New
- In Progress
-
Closed States – states in which the request has been considered resolved and therefore 'closed':
- Completed
- Rejected
- Cancelled
To accommodate the requirements of different organizations, states are customizable. You can:
- Edit the names of the default states.
- Add additional states (named as required).
- Change the ordering of states (how states will appear on the relevant State drop-down menu when creating/editing a part request).
This is configured by an Administrator on the Admin – Settings – Vault – Legacy Part Requests – Custom States page of the Workspace browser interface.
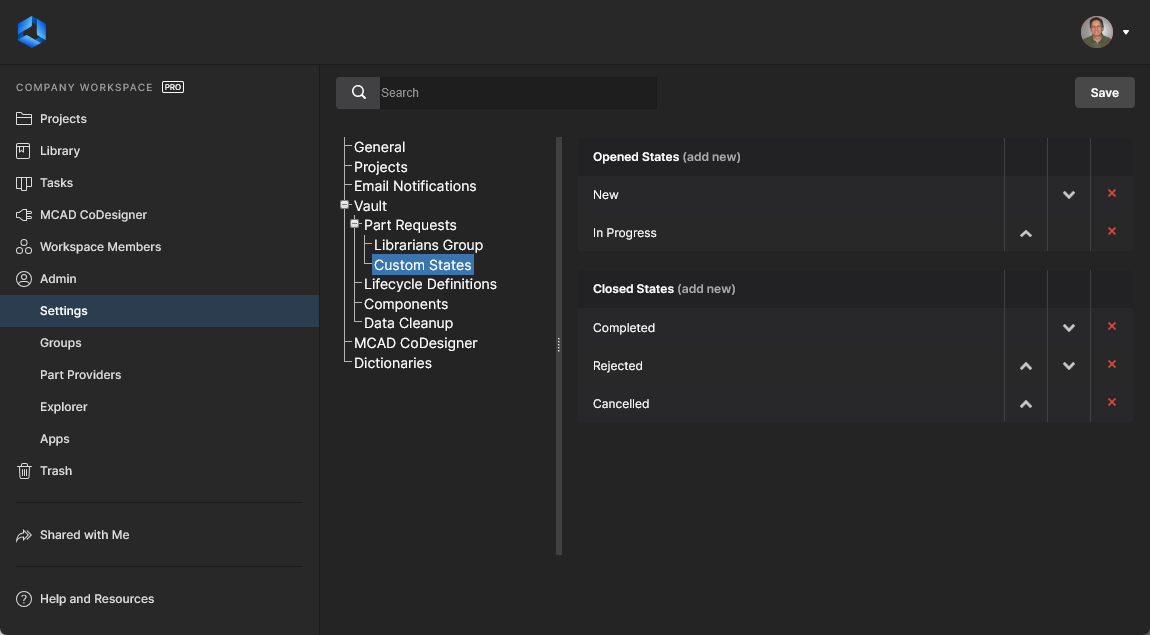 The Custom States page of the Admin – Settings area provides the interface for customizing the states used in the Part Request feature.
Make changes as follows:
- To edit the name of an existing state, click on its name. The Custom State Name window will appear in which to do so.
- To add a new state, click the add new control, associated with the type of state (opened or closed). Use the Custom State Name window to give the state the required naming.
-
To change the order of the states, use the Move Up (
 ) and Move Down (
 ) controls, as applicable (and where available).
-
To remove a state, click its associated Remove control (
 ).
).