
Rest API and Python API Documentation
This page provides the reference for Requirements Portal's REST API. Using the REST API, you can get and modify data from Requirements Portal or even write data back into Requirements Portal and thus update information. Additionally, this gives you the possibility to connect/integrate with other applications.
Accessing the Rest API in Requirements Portal using the Tokens
To access the REST API in Requirements Portal, you can generate the tokens on the Settings – User Tokens page (accessed by clicking the  icon at the top right, selecting Settings from the menu that appears, and then selecting User Tokens from list in the left-hand pane). On this page, you will find the API address for your specific deployment. This address is necessary for making API calls.
Click the + icon at the bottom right of the Settings – User Tokens page to generate a new token. Each token is valid for 3 months and must be regenerated after it expires.
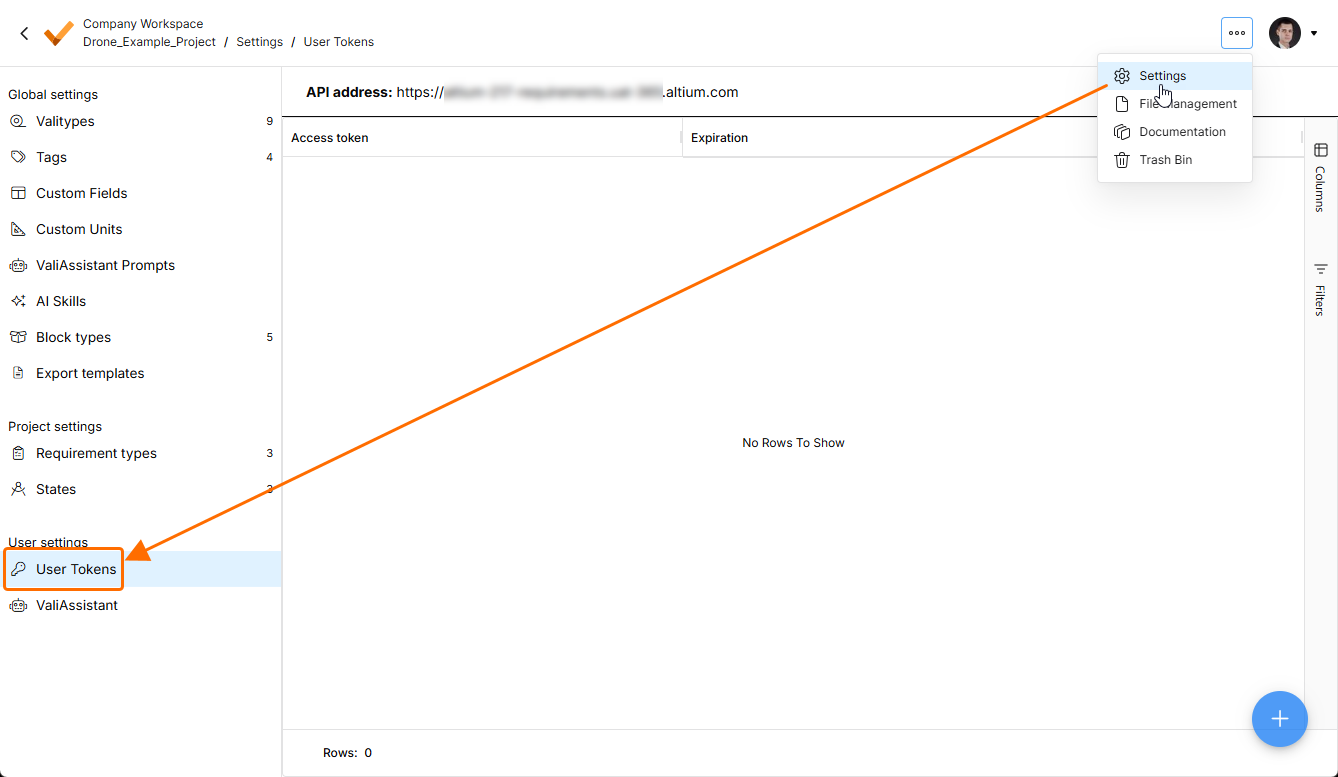
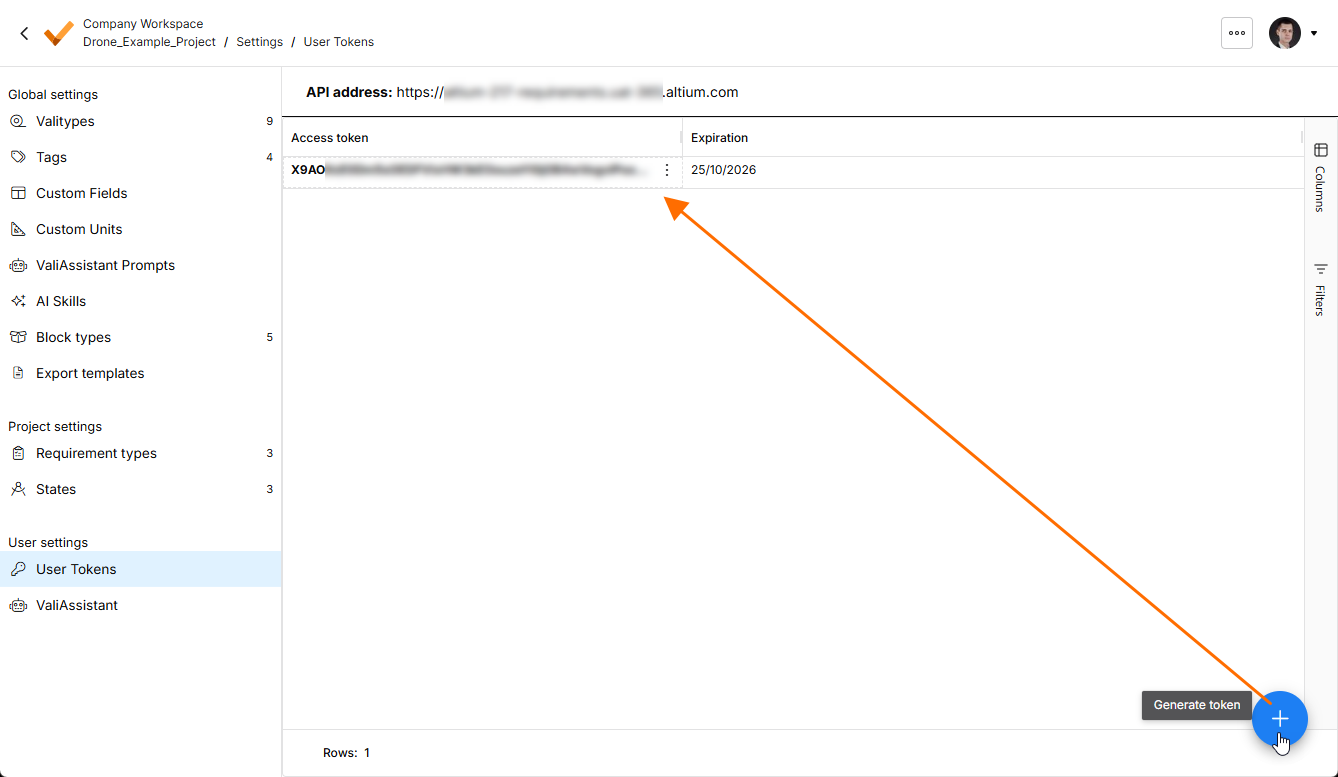
Consuming the API using the access_token, adding a token through a "Bearer ..." using the application type "JSON" to the Authorization HTTP request header is necessary.
curl --location 'http://deployment_name/rest/requirements/versions/search/' \
--header 'Content-Type: application/json' \
--header 'Authorization: Bearer hO2lwhLZsYOgXPNVI' \
--data '{
    "size": 10,
    "query_filters": {
        "object_id": 93
    }
}'
or using the requests, you can send the access token like this
access_token = 'Generated_Access_token'
api_url = 'Api_Address'

# workspace id and component type

workspace_id = 1
component_type_name = "CompA"

# Define headers with the access token
headers = {
    'Authorization': f'Bearer {access_token}',
    'Content-Type': 'application/json',  # Adjust content type as needed
}

# Make a GET request (you can use other HTTP methods like POST, PUT, etc.)
component_types_workspace = requests.get(api_url + "components/types/?workspace="+str(workspace_id), headers=headers)
Python API Documentation
The Python API lets you access and update objects in your deployment with python code.
Install the necessary python API package with pip:
pip install valispace
Import the API module in a python script:
import valispace
and initialize with
valispace = valispace.API()
More information about the functionalities and functions in the API can be found at here. The python API package is licensed under the MIT license, which means that anyone can contribute to the code by cloning the GitHub repository.
Endpoints
The users can access the endpoints on the swagger page. To access the page, add swagger/ at the end of the API URL that can be found on the Settings – User Tokens page. The page shows the Django Swagger with all the existing endpoints.
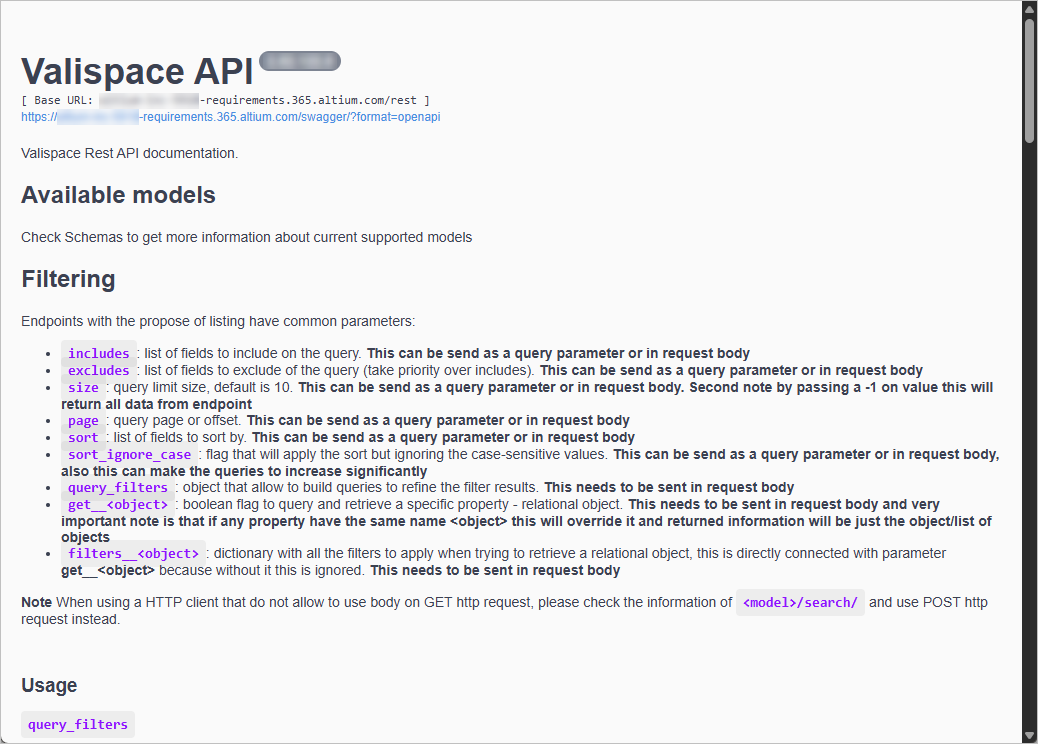
There are GET, POST, PUT, PATCH, and DELETE methods.
Every object in Requirements Portal has its own ID. You can use it to look for and retrieve the object information itself. The object ID can be seen either directly in Requirements Portal or in the URL when clicking on the object in Requirements Portal.
For example, if you use the GET function to get requirement history information through the swagger, you can use the following endpoint to get the requirement history details.
GET /rest/requirements/{requirement-id}/history/
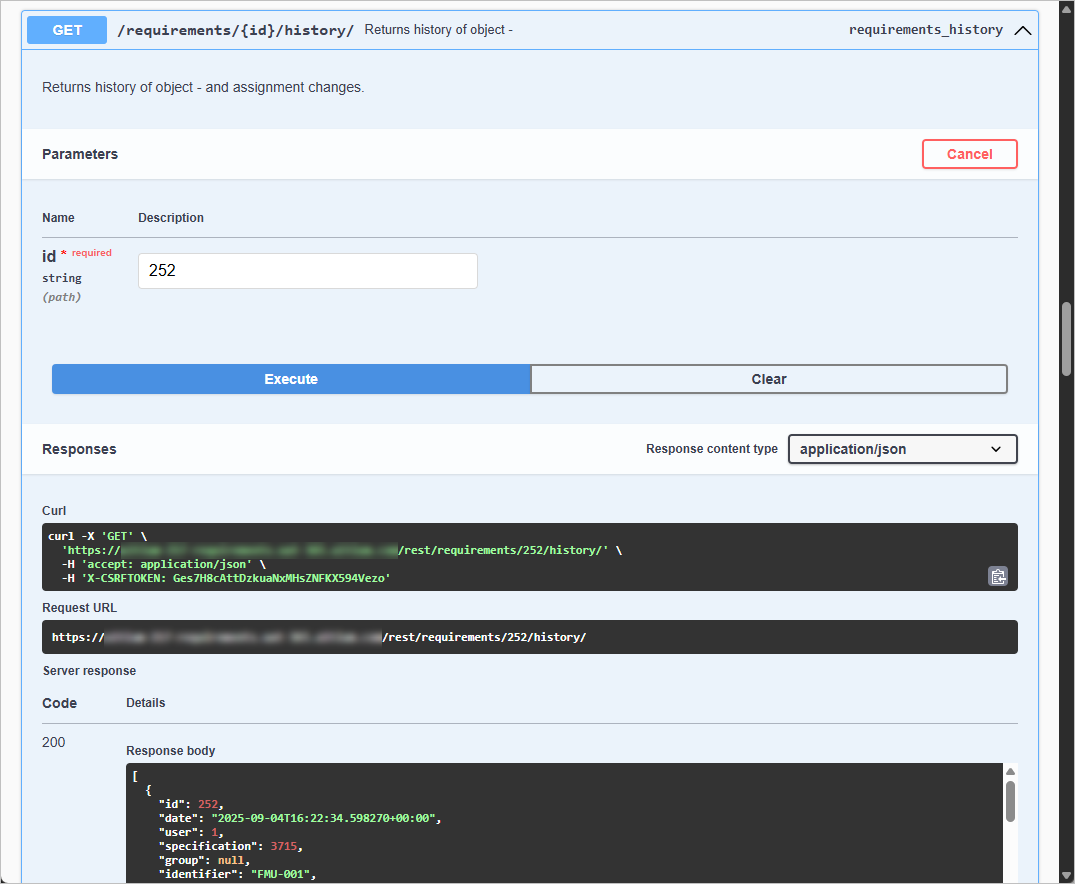
Using GET, retrieving the information of the requirement history
Similarly, you can use the methods to retrieve/update or post different objects such as blocks, tags, valis, textvalis, requirements, specifications, verification methods, etc. You can search for the endpoints on the swagger page.
Filtering objects for projects
In addition to authentication, you can use the GET method to retrieve objects such as Valis or Requirements within the deployment. If you need to filter the results based on a specific project, you can achieve this by leveraging the filtering capabilities, provided the endpoint is configured accordingly. For instance, to retrieve requirements associated with project 24, you can use the following GET request:
GET /rest/requirements/?project=24
This functionality is demonstrated in the video below for a clearer understanding.
Inbuilt Functions
Within Requirements Portal, whenever a user types the text in the text field, the text is saved in the backend in the HTML format. The HTML format retains the formatting references to valis or other objects. So, if you are getting the requirements information, you might get the HTML text in your import. To avoid this, we have implemented two functions which can be useful to convert the HTML fields to just text or HTML formatting with valis converted to text. The functions are clean_text and clean_html.
Clean_text function
The clean text function converts all the HTML formats and object references within the field to text. However, in this case, the formatting is also lost. For example, the formatting is also lost if you have a list, tables or color. You can use this as shown below.
Here, I am doing the filter for project 24 and asking to give the clean text for the text and rationale of the field. The output would be this for this specific action.
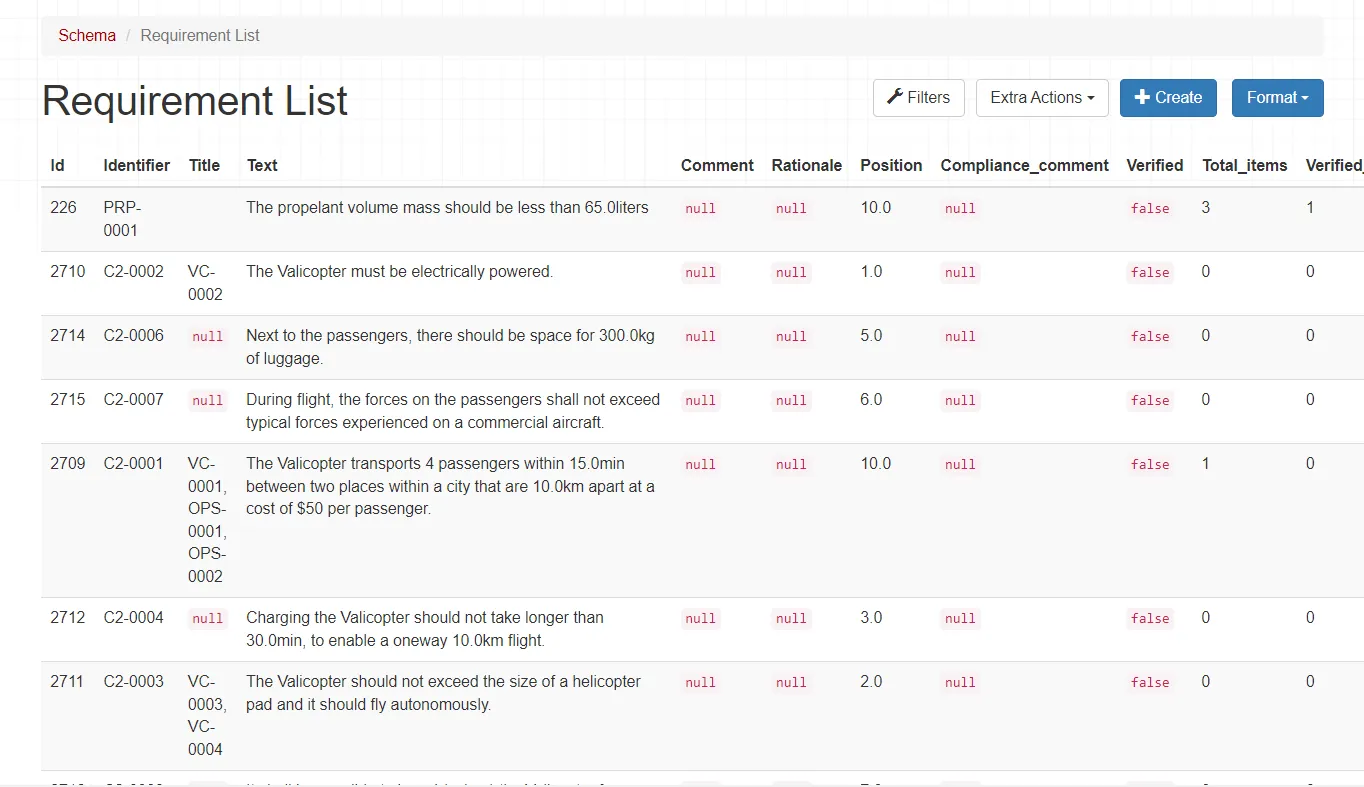 Requirements after using the Clean_text function
Clean_html function
The clean_html function keeps the formatting options of the text but then converts the references/objects like valis to text. If the text contains formatting options such as lists, background color, tables, etc., this information is retained.
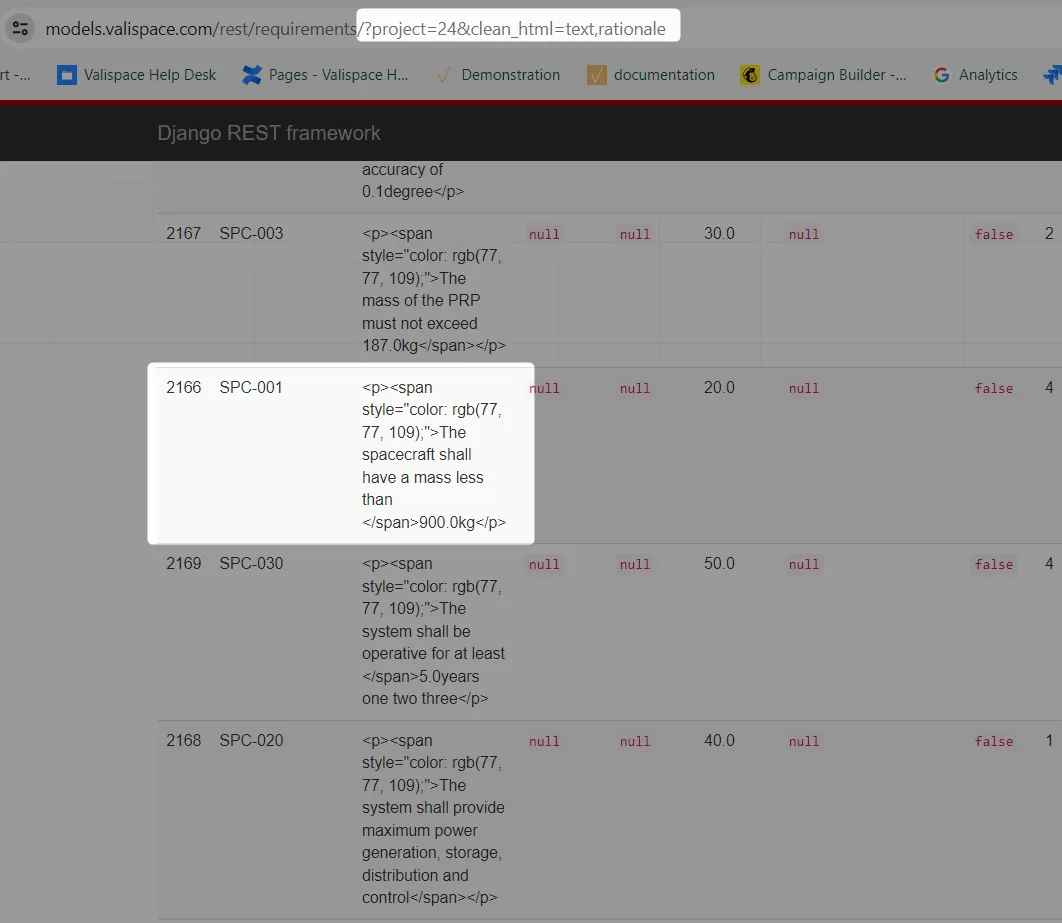 Requirements after using the clean_html function
Common Questions
How to find the correct endpoint?
Navigating through numerous endpoints with similar names can be confusing. If you ever find uncertainty about a specific endpoint, we encourage you to contact our Altium Support Page for clarification. Alternatively, you can leverage your browser's "network" feature to observe which endpoints are triggered when performing actions within the software's front end.
As an illustration, consider the process of creating a block. In this case, the associated endpoint can be identified as a "POST" request to "/rest/components," this information can be easily discerned by inspecting the network activity during the action. A concise demonstration of this approach is provided in the brief video below.