Parent page: Altium Concord Pro
In addition to connecting to Concord Pro through Altium Designer - interfacing to it through the Explorer panel and Components panel (for direct interaction with the managed components therein) - you can also connect to it through a dedicated browser interface. In fact, connection in this way is more than just a connection to Concord Pro itself. Rather it is a connection into the Concord Pro server platform, with access to management interfaces for the various services available as part of the wider Concord Pro installation. Indeed with some of these services, your only interaction with them is through this browser-based interface.
Accessing the Interface
To access your Concord Pro installation through its browser interface, use a preferred external Web browser and type the address for Concord Pro in one of the following formats:
http://<ComputerName>:<PortNumber>http://localhost:<PortNumber> - if accessing from the same computer on which Concord Pro is installed.
(e.g. http://designerhome:9780, or http://localhost:9780, for an instance of Concord Pro installed using the default port assignment). You will be presented with a Sign-in page.
Note that a newly installed instance of Concord Pro is unlicensed and not accessible from the network, so the initial browser connection must be made using the local machine - the PC that hosts Concord Pro. To connect, use Concord Pro's internal address (http://localhost:9780, using the default port number) or its network address (http://<computername>:9780 - where <computername> is the Concord Pro host PC's network name, and using the default port number). To confirm a PC's network name, go to Control Panel\System and Security\System and note the 'Computer Name' entry.
When subsequently licensed, Concord Pro can be reached from all computers on the network using the <computername> address.
Depending on your browser, you can drop the http:// part, and simply enter <ComputerName>:<PortNumber>, or localhost:<PortNumber>.
Note that Concord Pro also supports a secure connection using the HTTPS protocol: https://<ComputerName>:<PortNumber>. For more information, see HTTPS Protocol Support.
Sign in through the browser interface using the same Concord Pro credentials used to connect through Altium Designer. For a newly installed Concord Pro instance there is a default administrative user with the credentials:
- Username: admin
- Password: admin
While the default admin user could be left for general entry to Concord Pro by administrators, it is a good idea to change the First Name, Last Name and Username to something more meaningful for your organization. And it's definitely a good idea to change the default password from admin to something only known/passed to authorized administrators - otherwise everyone could access Concord Pro as an administrator!
If you want to sign in using your Windows login credentials - taking advantage of Concord Pro's support for Windows Authentication - enable the
Use Windows Session option. For more information, see
User Authentication.
 Access Altium Concord Pro and its associated platform services through a preferred external Web browser. Roll the mouse over the image to see the effect of successfully signing in to the interface.
What's Provided?
The interface provides a number of key technologies and services, and can be coarsely divided into two groupings, as shown in the following image, and listed thereafter.
 The overall browser interface can be divided into two distinct sets of interface elements - those accessible in general by all users of Concord Pro and those accessible only by Concord Pro Administrators.
- Interface elements that can be accessed by any Concord Pro user. To access a page click on its name within the left-hand navigation tree.
- Interface elements that can only be accessed by a Concord Pro Administrator. A user is bestowed administrative powers by membership to the role Administrators. To access a page choose the required entry within the Admin section of the left-hand navigation tree.
At the far right of the banner area, at the top of the interface, an entry reflects the user that is currently signed into Concord Pro, along with a picture (if defined) and the name of the server.
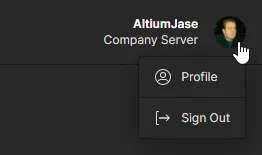
The drop-down menu associated with the entry provides the following:
- Profile - accesses the Edit User window with which the signed-in user can make changes to their own user profile. This is the only way that a non-admin user can make changes, since they do not have access to the Admin - Users page of the interface.
This control is only accessible from the following general pages of the interface: Projects, Components, Trash. And also from the following Admin-only pages: Users, Roles, Sessions, LDAP Sync.
- Sign Out - signs you out of the Concord Pro browser interface.
General Access Interface Elements
The following sections summarize the elements of Concord Pro's browser interface that can be accessed by all users of Concord Pro - both administrators and standard users.
Projects
Related page: Managed Projects
This page provides the interface to the Projects service, to create and manage design projects in a central location, in a CAD-centric way, and share those projects for team collaboration as required. The page lists all projects that have been made available to Concord Pro and which are shared with the currently signed-in user. Managed projects target the development stage of the project lifecycle, simplifying the creation and ongoing workflow for version controlled projects. From here you can create new projects and open and manage existing ones. From this interface a project can also be shared, or rather its access permissions configured.
The beauty of managed projects is that they are version controlled by default and can be collaboratively worked upon without having to worry about shared drives, servers, agreements etc.
Prior to creating a new managed project, or converting an existing non-managed project, ensure that a Design Repository exists in which to store that project and all future projects. Design Repositories are centrally managed as part of Concord Pro through its local Version Control service. A new installation of Concord Pro provides a single Git-based design repository - Versioned Storage - for accommodating all of your managed design projects.
If you have upgraded your server from Altium Vault 3.0, then use of SVN repositories will also be enabled, so that you can continue to use your previous (and established) design flow. In this case, you can continue to create repositories through the local Version Control service (SVN-only), or connect to external repositories (SVN or Git).
 Centralized design project management - all part of your Concord Pro installation.
A project created through this interface, or through Altium Designer, will initially be available to the designer who created it and all Administrators for that Concord Pro installation, in terms of full Read/Write access. The project will also be shared to all server users, but with Read-only access. To make a project accessible to other server users, share it by configuring its permissions.
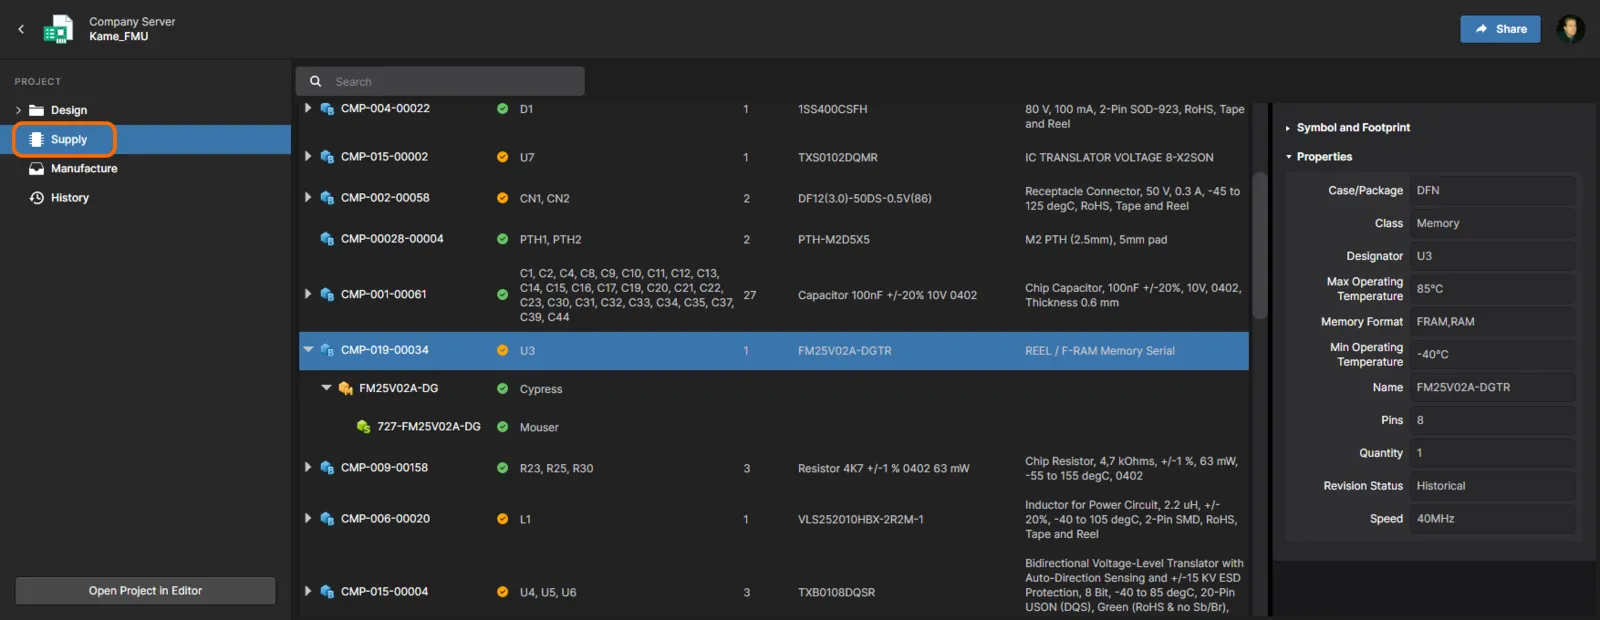
You can also access a detailed, CAD-centric view of the project, opened by selecting the required project, clicking the  control above the listing of projects, and choosing the Open entry on the associated menu. Alternatively, double-click directly on the required project entry in the list (or click on its name). The Projects Management page for that project opens in a new browser tab incorporating the CAD-centric interface, which offers Design, Supply, Manufacture and History view options:
- Design - display and navigate source project design documents, view design object properties and place review comments. This view uses the Web Viewer interface to present your design across four distinct data sub-views, to show the source schematic(s), board in 2D, board in 3D and Bill of Materials respectively. This view is for the latest version of the source project data, rather than a specified release from that project, and so could be considered to be a work-in-progress (WIP) view. You can review both the base design and any defined variant thereof.
You'll be able to search, select, cross-probe, and inspect components and nets throughout the design and across the various sub-views as applicable. And when viewing the board in 2D, you can even take measurements.

- Supply - allows you to interactively examine work-in-progress (WIP) BOM data extracted from the design documents, including entries for Manufacturer and Supplier parts data derived from a project's populated ActiveBOM document.
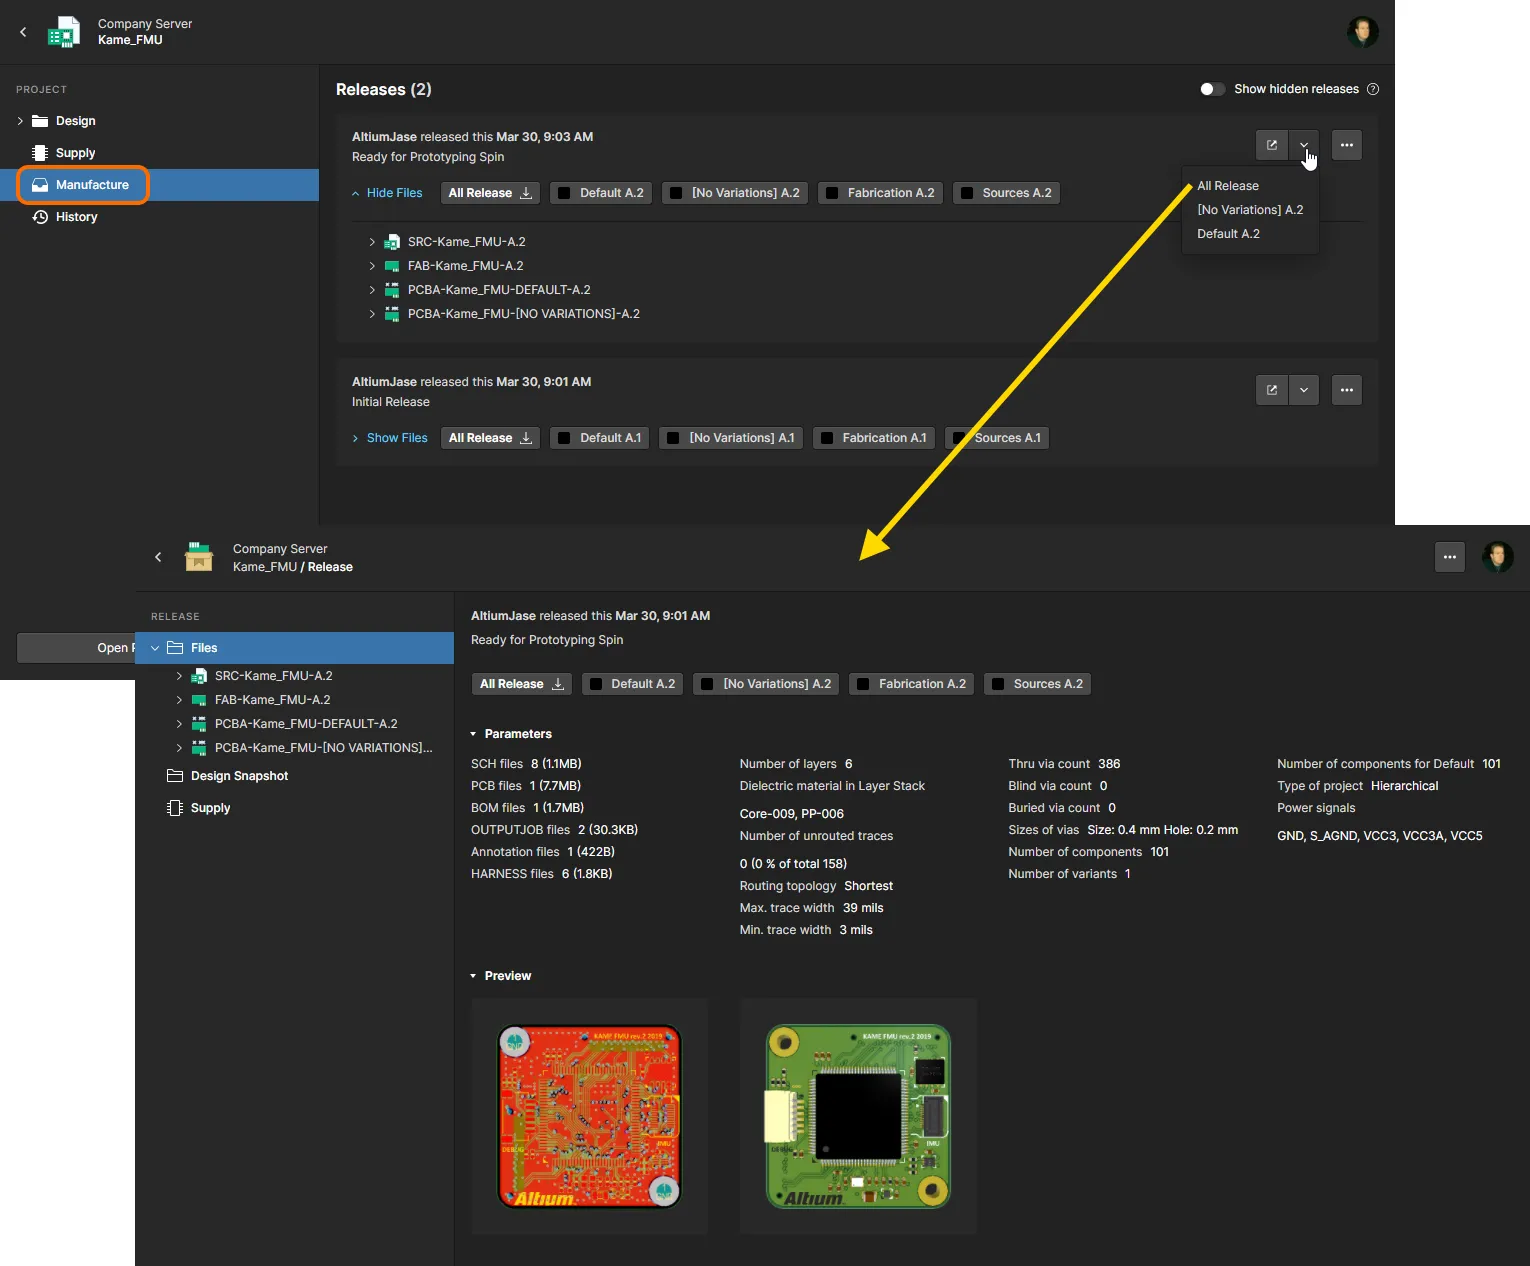
- Manufacture - view the releases for the project. Access is provided for opening the full release data, or a specific assembly package, which will be presented on a separate tab through a Manufacturing Portal. From this portal you can view and navigate the released file data, inspect the BOM, and view and comment on the snapshot of the design itself; the source for that released data. From either the Manufacture view, or through the Manufacturing Portal for a specific release, you'll have access to controls for downloading manufacturing data at various levels of granularity (from full data set(s) to individual generated output files).
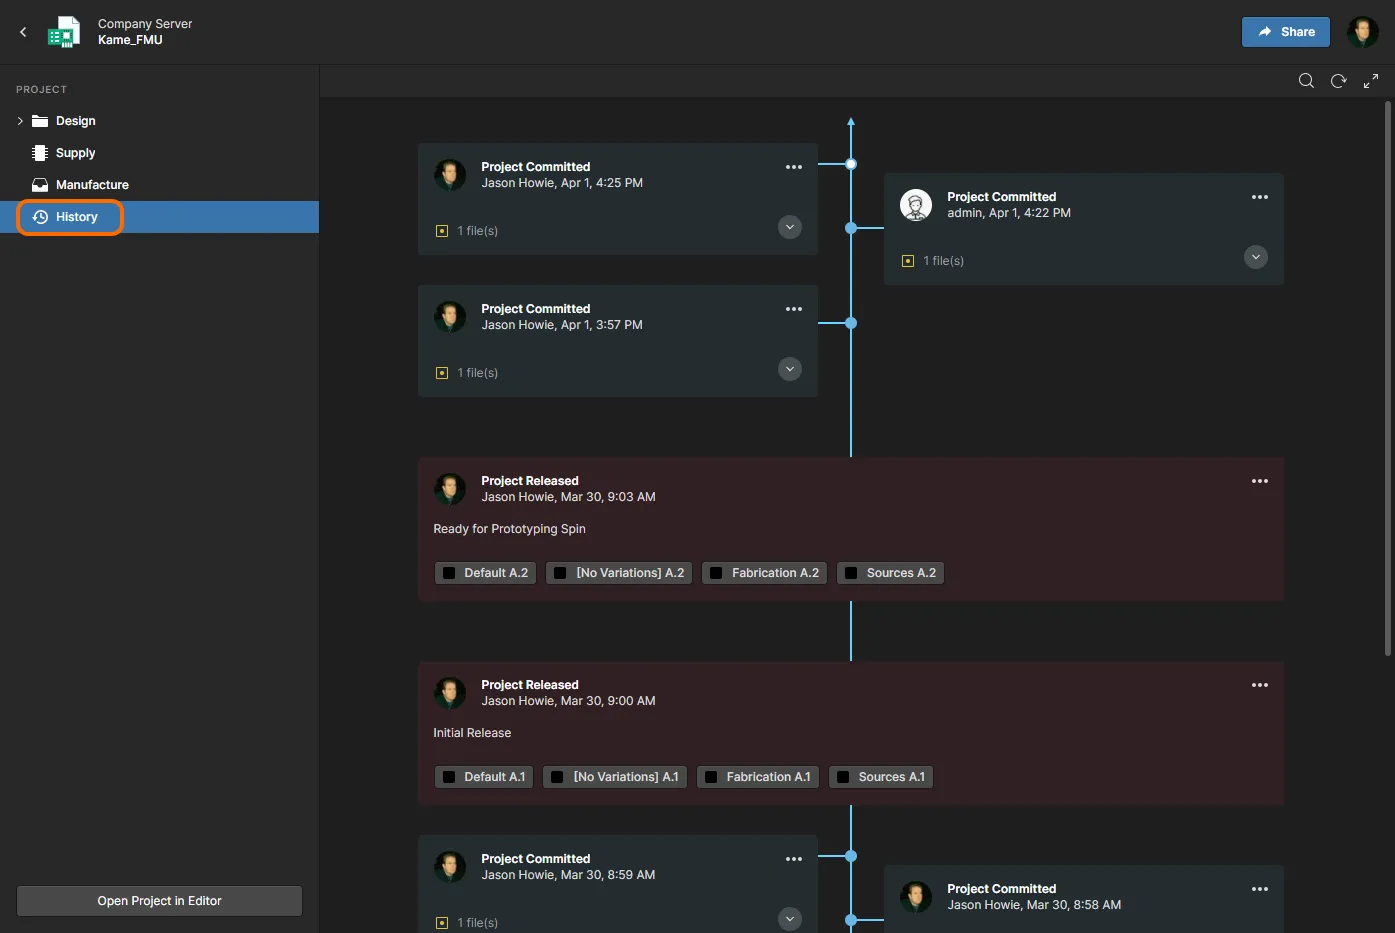
- History - browse a progressive timeline of major events relating to the project, including its creation, commits, releases, clones and MCAD exchanges. Each time a supported event happens in association with the project, that event is added to the timeline as a dedicated tile with various actions supported where applicable. For more information, see Project History.
Components
This page gives you convenient access for browsing all of the managed components that are currently stored within Concord Pro. You are able to see, at-a-glance, what (and how many) components you currently have at your disposal (and gain detailed information about each and every component).
 Browse the managed components currently available within your Concord Pro instance from the Components page of the browser interface.
When the page is first accessed this region presents a tiled array of the various component types, along with the total number of existing components of each type. From here you are able to drill down to see individual components and get detailed information about them.
Supply chain data is sourced from
Octopart. For many organizations, component supplier data is (and must be) sourced from an internal company enterprise system that provides a proprietary set of parts supplier data - which might be based on a tightly approved range of vendors and/or special pricing structures. This situation is catered for by the alternative Altium
Custom Parts Provider, which when configured for synchronization through Altium Designer, allows the supplier data from a specified database source to be mapped to Concord Pro supply chain data. This functionality requires Altium Designer 20.2 or later. For more details see
Supply Chain Database to Workspace Data Synchronization. Any number of additional customized part sources can also be configured - through Concord Pro itself. For more information, see
Configuring a Custom Database Part Source.
When browsing a specific component, you can also delete that component (provided you have editing rights). The action is actually a 'soft delete', whereby the component will be moved into the Trash area of Concord Pro. You can also opt to delete the component's related items (e.g. symbol, footprint model(s), simulation model, datasheet). Note that these can only be deleted if they are not being used elsewhere (by one or more other components). A component can be restored, or permanently deleted from the Trash page. Permanent deletion is only possible provided it is not being used on a managed schematic sheet, or within a design.
MCAD CoDesigner
Related page: ECAD-MCAD CoDesign
This page relates to ECAD-MCAD CoDesign functionality. MCAD CoDesigner synchronizes the PCB design between electrical and mechanical engineers. It works directly with ECAD and MCAD data via the MCAD CoDesigner panel on the Altium Designer side, and a corresponding panel plugged-in to your MCAD software. The latter is provided through installation (and registration to the MCAD software) of the Altium CoDesigner plugin.
The following MCAD platforms are supported when using the latest Altium CoDesigner plugins:
- Dassault Systemes SOLIDWORKS®
- Autodesk Inventor Professional®
- PTC Creo Parametric®
- Autodesk Fusion 360®
The versions of MCAD tools officially supported will depend on the version of Altium CoDesigner plugin being used. This information can be found on the
New in CoDesigner page.
 The MCAD CoDesigner page provides an overview of the area, along with links to the MCAD CoDesigner Plugins and further educational material.
The page offers the following:
- A control to play an Overview Video.
- Highlighting of which MCAD Software platforms are currently supported.
- A Link to the MCAD CODESIGNER PLUGINS section on the Downloads page of the altium.com site, for access to the plugin required to add this co-design functionality to your MCAD design software installation.
- Quick guidance on how to start collaborating from the ECAD or MCAD side - hover over the
 control.
- Links to further documentation and how-to videos. The latter is to YouTube, but the videos can also be found here within the documentation.
If your MCAD platform is not currently supported, click the Let Us Know link to access a window with which to tell us. This will help us to gauge the level of interest and help to determine which MCAD platforms to consider supporting next.
Part Requests
Related page: Part Requests
This page enables you to create and manage requests for new managed components. An engineer can simply put in a request for one or more parts to be created and get notified when that request has either been completed, and the component(s) made available, or rejected (and why). The requestor supplies as much key information to support their request as possible (manufacturer and part number(s), description(s), any relevant datasheet (PDF or URL)). Stub Component Items can even be created that the librarian can then run with (and finish off).
You'll need to specify which role (or roles) should be used to fulfill the role of Librarians for your organization. In essence, you are configuring a set of users of Concord Pro that can be assigned to a part request. This is performed by an Administrator through the Admin - Settings - Vault - Part Requests - Librarians Role page of the interface.
 Adding a new part request through Concord Pro's browser interface. Hover over the image to see the form presented to receive the details of the request.
Initially, a part request is visible to the original requestor and all members of the nominated librarian role(s). Once the request has been assigned to a particular librarian, only the requestor and that librarian will see it, and receive notifications about it.
Upon creation of a part request the requestor, members of the Librarian role, and Concord Pro administrators will receive email notifications - providing the Email Notifications feature has been enabled. This is performed by an Administrator on the Email Notifications page (Admin - Settings - Email Notifications) of the interface.
Trash
This page presents all items that have been 'soft deleted' - items that have been deleted, but not yet permanently so. The Trash is essentially a recycle bin into which any managed item within your Concord Pro instance can be moved (through a soft delete action). It is isolated from the rest of the server and so any item in the Trash is not available for use and cannot be found through searching, or through pages in the Web interface, or from within Altium Designer.
Soft deletion from within the design software is supported in Altium Designer 20.2 and later.
You will know if a Delete-based command within the Concord Pro interface or Altium Designer is of the soft delete variety, as the subsequent confirmation window will confirm that the deleted item(s) will be moved to the Trash.
 When you delete an item in Concord Pro through a soft delete action, it will be moved to the Trash. The Trash page provides the interface to this isolated area of the server.
You will only see items that you yourself have soft deleted. An administrator will see all soft deleted items in the Trash. Each item is presented in terms of the following information:
- Its content type icon
- Its name
- Its description
- Its revision
- By whom it was deleted
- The date and time at which it was deleted (sent to the Trash).
Sort by any of the columns - click on a column header once to sort in ascending order, click again for descending. Use the Search field above the listing to search across all content.
Select an item in the Trash, then use the controls at the top-right of the list to permanently delete that item, or to restore it, respectively. Corresponding commands are also available from the menu associated to the  control (at the far right of the selected item).
For a Project, only the owner or an administrator can permanently delete or restore. For any other item, you will be able to perform these actions as long as you have editing rights.
.") Select an item, then decide whether to fully restore it for use again or to permanently delete it (a 'hard delete' if you will).
Select an item, then decide whether to fully restore it for use again or to permanently delete it (a 'hard delete' if you will).
Alternatively, to empty the entire Trash in a single, batch action, click the  button at the top-left of the page. A confirmation window will appear alerting you to the fact that this action will delete all items permanently and that they cannot be restored thereafter. To proceed click the
  button.
When trying to permanently delete (hard delete) an item, you will be prevented from doing so if that item is used by a parent item - for example a component that is used on a managed schematic sheet, or within a design.
Admin-Only Interface Elements
The following sections summarize the elements of Concord Pro's browser interface that can only be accessed by Administrative users of Concord Pro - those who are part of the Administrators role. Access to these elements is through the dedicated Admin area of the left-hand navigation tree.
If signed into Concord Pro as a non-administrative user, the Admin area of the tree will be hidden.
Settings
This page provides a collection of sub-pages for configuration of options relating to various features and services provided by, and through, a Concord Pro installation.
 The Settings area - part of the admin-only pages within Concord Pro's browser interface.
When changing any settings be sure to click the

button, at the top-right of a page.
The left-hand side of the page provides a navigation tree with which to quickly access various sub-pages of settings. The following pages are available:
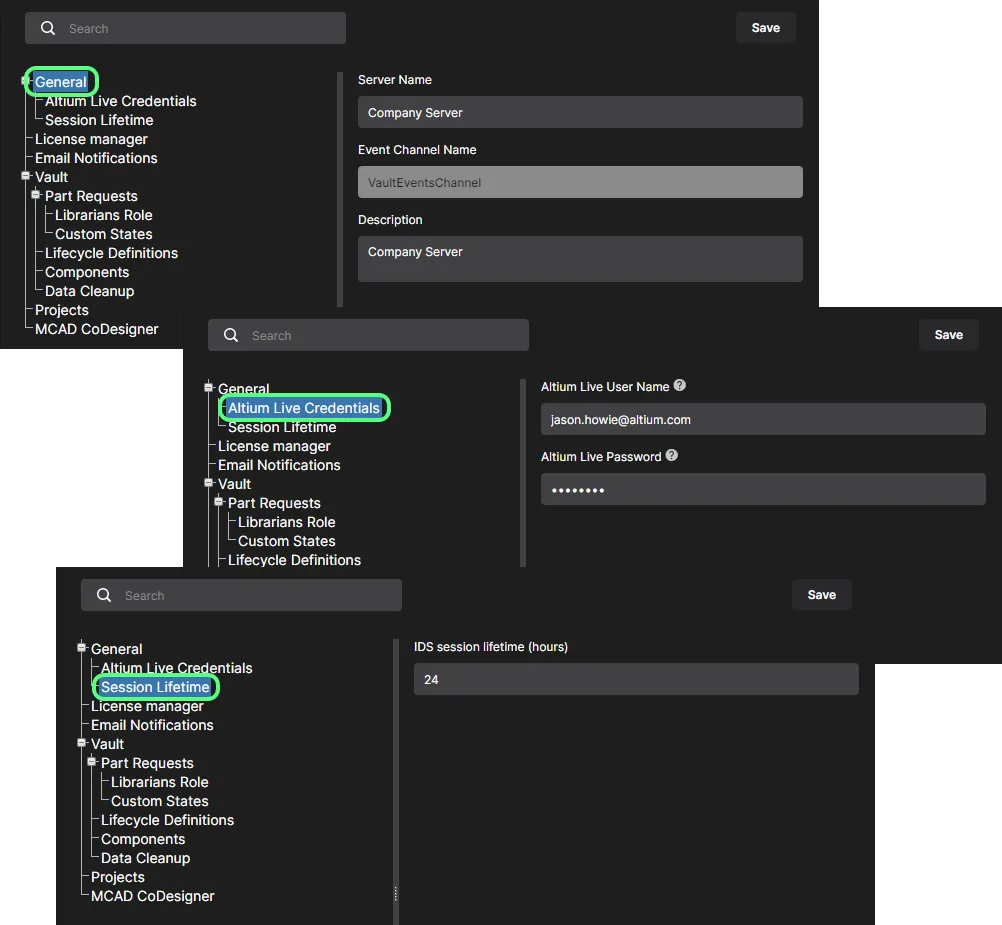
- General - use this page to change the Name and Description for Concord Pro.
- AltiumLive Credentials - use this page to enter the credentials you use to log into the Altium Cloud (AltiumLive). When using the Private License Service through Concord Pro, these credentials allow the PLS to communicate directly with your Altium account for the initial acquisition of your company licenses. Your AltiumLive credentials must also be entered in order to access and obtain initial licensing for Concord Pro itself, from the Altium Cloud.
- Session Lifetime - use this page to enter a value for the IDS Session Lifetime (in hours). This is how long a Concord Pro user has to remain connected, in a single session, when using a seat of the applicable Client Access License (Altium Concord Pro CAL). By default the session lifetime is 24 hours.
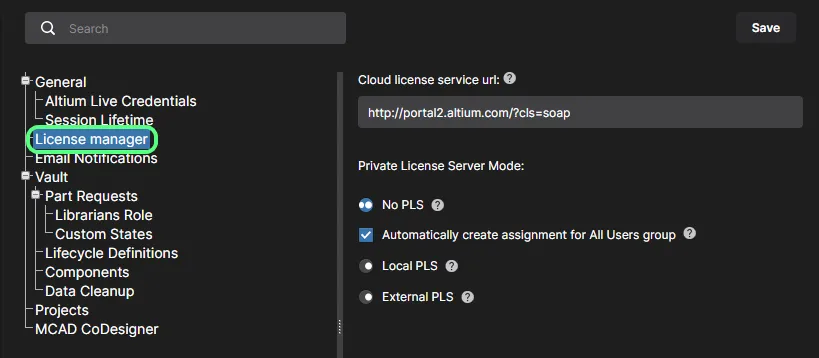
- License Manager - this page provides settings relating to using the Private License Service and selection of its mode. A pre-set suitable default value is used for the Altium Cloud portal URL (http://portal2.altium.com/?cls=soap).
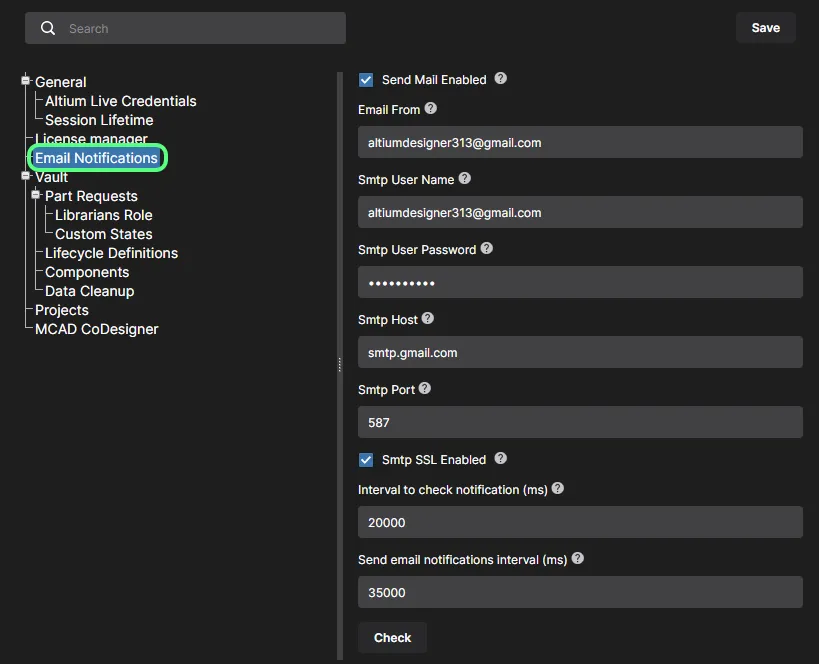
- Email Notifications - this page provides settings to enable and configure Concord Pro's email notifications feature. This facility flags a variety of events to key stakeholders relating to Components, Managed Projects and Part Requests.
- Vault - not a page, but rather a structural entry for gathering together settings related to specific functionality within Concord Pro itself.
- Part Requests - a structural page to gather the following sub-pages related to the Part Request feature:
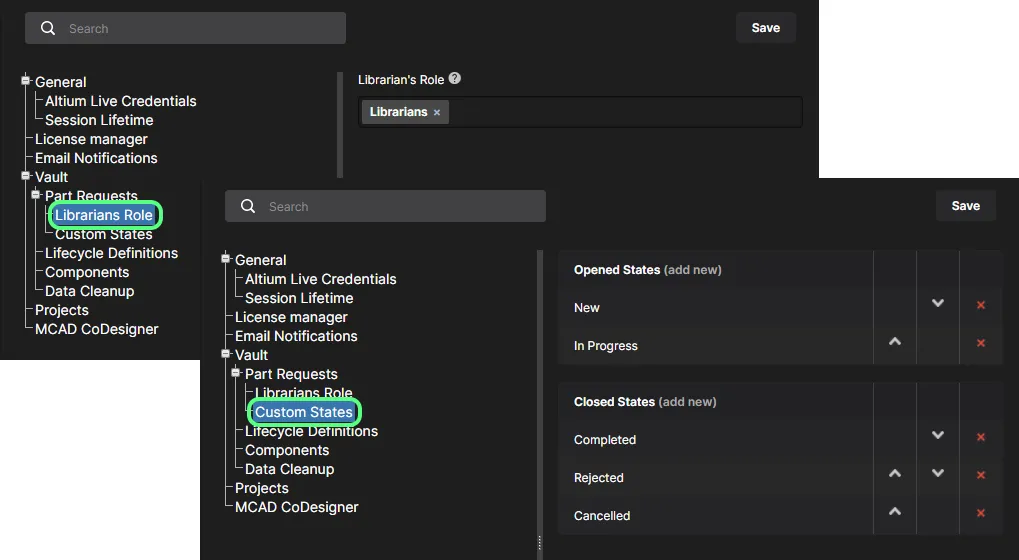
- Librarians Role - use this page to specify which role (or roles) should be used to fulfill the role of Librarians for your organization. In essence, you are simply configuring a group of users of your Concord Pro instance who can be assigned to a part request. If you installed Concord Pro with sample data, then the sample role Librarians will already be prefilled into the Librarian's Role field - remove if required.
- Custom States - use this page to customize opened and closed states for the Part Request feature.
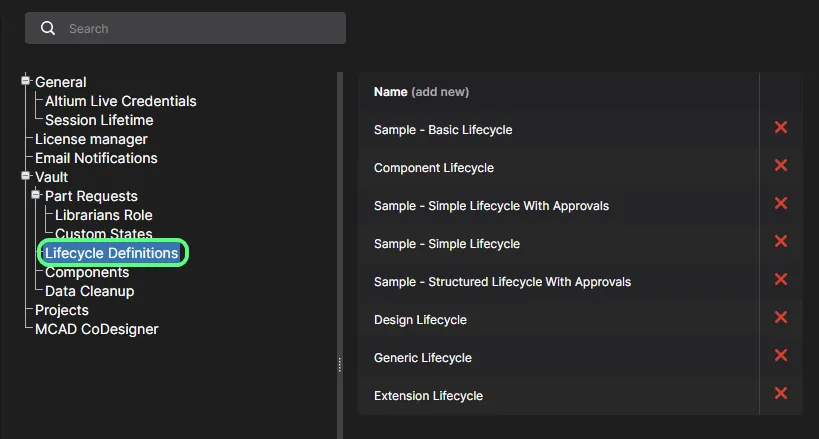
- Lifecycle Definitions - use this page to define and manage Concord Pro's lifecycle definitions, complementing the ability to do this through Altium Designer. Providing better visibility of the states and transitions involved each lifecycle is built in a graphical way, showing at-a-glance the flows involved.
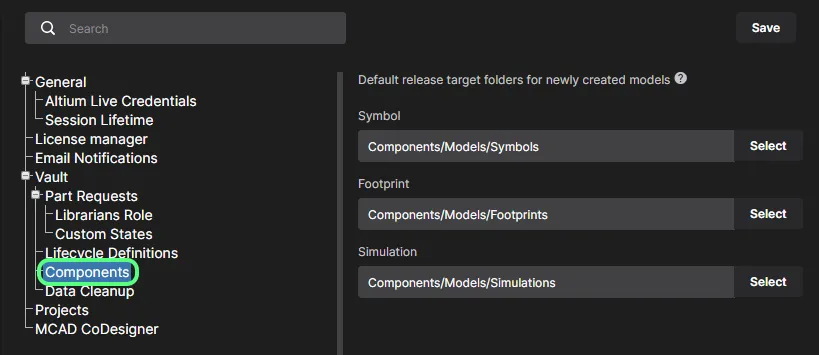
- Components - use this page to define default target folders (within Concord Pro's folder structure) in which new models should be created, when creating a new Component Item. To change a default folder, click the
 button. The Explorer window will appear with which to choose the desired new default target release folder for that model type. Once chosen click OK to close the window and return to the Components page, with the applicable field updated with the new folder path.
- Data Cleanup - use this page to quickly delete data items from your Concord Pro instance. This is particularly useful after having experimented with creating and releasing content into your server, for example when trying out the migration of unmanaged libraries and now you want to 'flush' such experimental data. This functionality works on any and all Item types in your Concord Pro instance.
Use the available checkboxes to determine whether to delete all data items (All) or specific item types. With your cleanup strategy configured, click the  button. A window will appear asking for confirmation, and alerting you to the fact that this action cannot be undone. To verify and proceed, enter the text Delete my data permanently into the field and then click Yes.

Note that child items cannot be deleted if already referenced (in use) by parent items. The parent items must be deleted first. For example if a component is being used on a managed sheet or within a managed design project, the managed sheet and/or managed project would need to be deleted first.
Remember that data cleanup is an action that cannot be undone. Be absolutely sure of the data you are deleting before performing this operation. It is advised to create a backup of your data first. Note also that data cleanup operations can take a while to process depending on the amount of data involved.
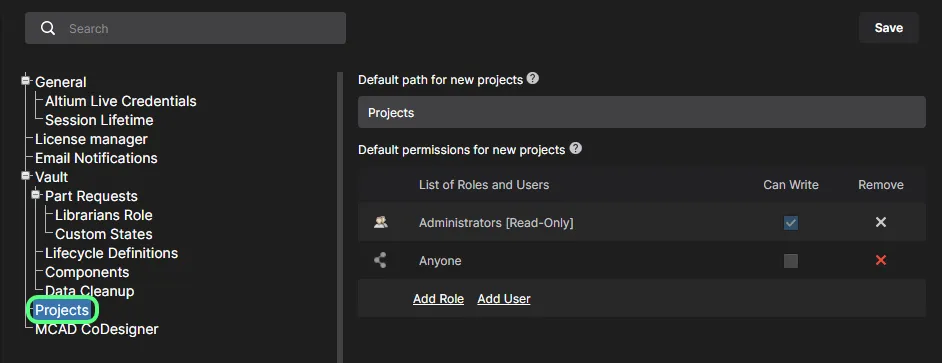
- Projects - use this page to specify the default path (within Concord Pro's folder structure) for newly-released projects. You can also define default sharing permissions for new projects, so that the right users and/or roles have access to those projects from the moment they are created.
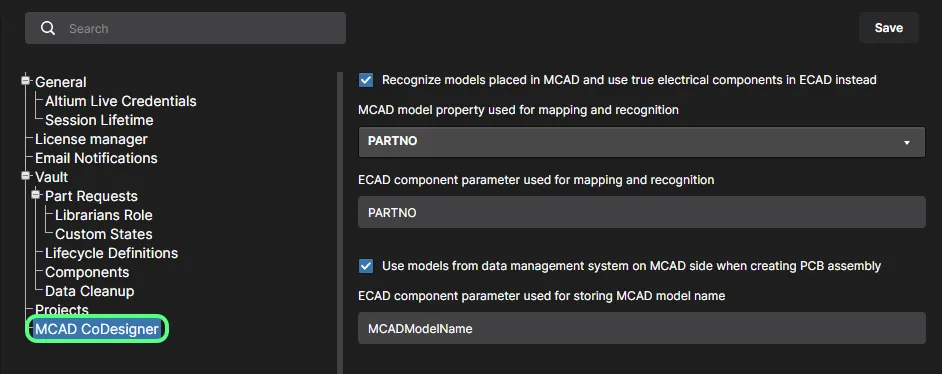
- MCAD CoDesigner - this page provides controls to enable component recognition between the ECAD and MCAD domains, when using the ECAD-MCAD CoDesign feature. This facilitates the use of native components when a design is pushed and pulled between the two domains. The following options are available.
- Recognize models placed in MCAD and use true electrical components in ECAD instead - enable this option to support use of native components when the board is being Pushed from MCAD and Pulled in to ECAD. The MCAD 3D model is linked to the equivalent Altium Designer component, so when the board is pulled into Altium Designer the MCAD 3D model can be replaced by an instance of the fully-defined Altium Designer component footprint, complete with a 3D model. Use the two sub-fields to determine the MCAD model property and the ECAD component parameter, used to identify components in the two design domains. By default, these fields are populated with the entry PARTNO. The MCAD model property can be your own custom property, or choose MCAD model name from the drop-down. The ECAD component parameter can also be your own custom parameter. These fields are required if the parent option is enabled. If one or both are left blank, the button will be disabled.
- Use models from data management system on MCAD side when creating PCB assembly - enable this option to support use of native components when the board is being Pushed from ECAD and Pulled in to MCAD. The MCAD software gets the model of the component from the MCAD's data management system (by the model’s name) and then places that component on the MCAD PCB assembly, instead of the model that came from ECAD. Use the sub-field to determine the ECAD component parameter that will be used to store the MCAD model name. By default, this field is populated with the entry MCADModelName. This field is required if the parent option is enabled. If left blank, the button will be disabled.
MCAD-to-ECAD component linking is available for all supported MCAD platforms (except Autodesk Fusion 360®). ECAD-to-MCAD native component linking is currently only supported in:
SOLIDWORKS - requires SOLIDWORKS be connected to a SOLIDWORKS PDM system. The MCAD component must be defined in the ECAD component as a parameter, in the form "<vault>:folder\folder\component.sldprt", where <vault> is the name of the PDM vault. Consult your SOLIDWORKS documentation for information on how to connect to a SOLIDWORKS PDM system. If the component is not available in the SOLIDWORKS PDM system, CoDesigner places the model transferred from the PCB editor and saved in Concord Pro instead.
PTC Creo Parametric - requires PTC Creo to be connected to a PTC Windchill® server, with the ECAD components stored in a Windchill Workspace. Consult your Creo documentation for information on how to connect to Windchill. If the component is not available in the Windchill Workspace, CoDesigner places the model transferred from the PCB editor and saved in Concord Pro instead.
CoDesigner checks these settings on startup (from Altium Designer and from the MCAD tools). Restart your design software if the settings have been changed in your server.
Users
Related page: Managing Users - Users
This page is used to create and manage a list of users; people who are to have access to Concord Pro and/or the associated technologies installed with it.
 Access and manage the users of your Concord Pro instance from the Users page of the interface.
Two administrative users are provided with a new Concord Pro installation - admin and System. The former, which is visible from the Users page, allows you to quickly get access to Concord Pro as an administrator. Once you have added other users, you can keep and edit the admin user (change its name and password for example), or delete it. The System user, which is not visible from the Users page, is used for all background tasks (including LDAP Sync and Notifications). This user is permanently online. It does not, however, use a connector license.
Only an administrative user has full access to user management controls. A non-administrative cannot see the listing of users or roles, but they are able to change the profile of their own user through the Edit User window. Access this window by clicking on the active user area at the top-right of the browser interface and then choosing Profile from the associated menu.
Roles
Related page: Managing Users - Roles
This page is used to create and manage a list of roles; roles allow you to further organize your users according to, for example, the particular section of the organization in which they are involved, or the design team they are in. Roles also make the sharing of Concord Pro content, and the configuration of other served technologies, more streamlined.
 Access and manage the roles of your Concord Pro instance from the Roles page of the interface.
Several sample roles are defined for a Concord Pro installation. This includes the role Administrators. This role gives administrative privileges to its members. Anyone who is a member of this role has complete access to Concord Pro and all associated technologies and services through its browser interface.
Sessions
Related page: Managing Users - Sessions
This page is used to quickly assess which of your users are currently signed into Concord Pro. Provision is made for an administrator to terminate a user's access to Concord Pro by effectively 'killing' their active session, thereby freeing connections to the server for use by others.
, but also the ability to terminate a session for any user currently accessing that server.") As an Administrator for your Concord Pro instance you have the ability to not only view active server sessions (connections), but also the ability to terminate a session for any user currently accessing that server.
As an Administrator for your Concord Pro instance you have the ability to not only view active server sessions (connections), but also the ability to terminate a session for any user currently accessing that server.
LDAP Sync
Related page: Managing Users - LDAP Sync
This page is used to configure and run an LDAP Sync task. This allows an administrator of your Concord Pro installation to leverage the network domain’s existing username and password credentials, so that user credentials do not have to be created manually one at a time on the Users page. When setup correctly, the Users page will automatically populate with user credentials, enabling any user listed to sign into Concord Pro using their regular corporate network username and password.
 Adding an LDAP Sync task through Concord Pro's browser interface.
When signing in to your Concord Pro instance, to use your Windows login credentials - taking advantage of Concord Pro's support for Windows Authentication - enable the Use Windows Session option (browser interface), or Use Windows Session credentials option (Sign in dialog in Altium Designer).
VCS
Related page: Local Version Control Service
This page provides the interface to the Concord Pro installation's local Version Control Service, for Design Repositories that designers in the organization can validly access and use while working on design projects.
A new installation of Concord Pro provides a single Git-based design repository for accommodating all of your managed design projects - and that's it! This avoids any setup and complexity regarding the server's local Version Control service. You have a single design repository - Versioned Storage - for all your designers to access and release into. As such, the VCS page becomes purely informational - you cannot add a new repository and the single Git repository cannot be modified in any way, nor deleted.
If you have upgraded Concord Pro from Altium Vault 3.0 then use of SVN repositories will also be enabled, so that you can continue to use your previous (and established) design flow. In this case, you can continue to create repositories through the local Version Control service (SVN-only), or connect to external repositories (SVN or Git).
 The browser-based interface to Concord Pro's local VCS service. Shown here is the single native Git repository available with a fresh installation. Hover to see examples of local and external repositories with functionality available after upgrade from Altium Vault 3.0.
Part Providers
Related page: Part Source Configuration
This page enables you to define a list of Part Sources - facilitating centralized supply chain management, with designers across the entire organization using the same approved list of Suppliers with which to source supply chain intelligence for parts used in their designs.
The following part sources are available for Concord Pro:
- Altium Parts Provider - an aggregate supplier data service that provides access to live component information from a comprehensive range of parts suppliers.
The Altium Parts Provider settings that are established in Concord Pro will override those in Altium Designer when a user signs in to Concord Pro.
- Custom Parts Provider - for situations where component supplier data is (and must be) sourced from an internal company enterprise system that provides a proprietary set of parts supplier data, which might be based on a tightly approved range of vendors and/or special pricing structures. This part source is actually configured for synchronization through Altium Designer - using a Custom Parts Provider Synchronization Configuration document (*.PrtSync) - allowing the supplier data from a specified database source to be mapped to Concord Pro supply chain data.
- Additional Customized Part Source - for situations where parts supply data needs to be accessed from a local database, such as a company’s internal parts database, Concord Pro's Custom Database Parts Provider feature offers interface connectivity for all common database systems (directly, or via an ODBC or OLE-DB interface). The connection can be established manually, through a nominated interface and connection string, or by using Concord Pro's Connection Wizard. Any number of such connections can be defined.
A database connected to by the Custom Database Parts Provider interface system must be locally available to Concord Pro – that is, the database itself must be located on the PC that hosts Concord Pro. In addition, for Altium Designer to be able to interface to any custom parts database connection, the Custom Data Synchronization option must be enabled (on the Configure Platform page (under Importers\Exporters)).
For database connectivity, the Parts Provider Synchronizer requires access to the 64-bit version of the Microsoft OLE DB Provider.
Database connectivity and problem solving
The required 64-bit version of the Microsoft OLE DB Provider is available on the host PC if:
In situations where a 32-bit version of Microsoft Access is installed however, the operating system will not accept the 64-bit Access Database Engine installation. This can be resolved using a specific installation procedure (a 'passive' install), or depending on the PC's software configuration, through other solutions.
The actual supply chain intelligence - comprising Manufacturer (and part number), Supplier (and part number), Description, Pricing and Availability - is sourced from Concord Pro's local Part Catalog and the relevant Part Source.
Each Concord Pro instance has its own dedicated Part Catalog. This is a managed local part catalog database, dedicated to the management and tracking of manufacturer parts and their associated supplier parts. The catalog is installed as a service (Part Catalog Service), provided through the Concord Pro platform, and works only with Concord Pro. The local Part Catalog stores items representative of actual Manufacturer Parts, along with one or more items representative of Supplier Parts - the incarnations of those Manufacturer Parts, as sold by the Suppliers/Vendors. Each Supplier Part is a reference to an item in a parts database - either the aggregate parts database of the Altium Parts Provider (which itself interfaces to, and gathers the parts from, enabled Suppliers), or a linked local parts database.
 Enabling required Suppliers and determining Location/Currency ranges for the Altium Parts Provider. This is the default Part Source for Altium Concord Pro. You can also use one or more internal company parts databases.
Component Sync
Related page: Component Synchronization with Enterprise Systems
This page provides the interface to the Component Sync Service. It is from here that you define the connection to an enterprise system instance, including configuration file, and enable/configure synchronization of your enterprise system components with those in Concord Pro.
Concord Pro facilitates the uni- or bi-directional synchronization of component data with your enterprise systems. A configuration file allows you to specify the direction of synchronization and therefore which parameters are mastered in which system. Component data synchronization between Concord Pro and the target enterprise system uses a built-in synchronization process which may be manually triggered or set as timed repeating event.
Altium Concord Pro does not offer full PLM integration - this level of integration is only available through
Altium NEXUS. Note also that synchronization of Part Choice data is unidirectional - from the enterprise system to Concord Pro only.
A Concord Pro installation includes a CSV Component database importer tool that can be used to bring component data into Concord Pro from a file exported from another system (PLM, ERP, or otherwise). Implemented as a configurable batch (*.bat) file, the desktop tool imports component data from a target spreadsheet file (*.csv) into the server as determined by existing server templates or a dedicated configuration file.
In addition, direct support is provided for the following enterprise systems:
- PTC Windchill® PLM (11.0 M030)
- Arena® PLM
- Oracle® Agile™ PLM
To create a new interface instance, click the  button. As many instances can be defined as required, to interface your Concord Pro installation to various different enterprise system instances. For example, your components might reside in one instance, or perhaps different divisions are using different instances (of the same or differing enterprise system). Each instance must be uniquely named and have a configuration file. To test the connection for a defined instance click the
  button, and then use the
  button to enter and validate your enterprise system connection credentials.
Sample configuration files are provided - click the Download sample configuration link (under the Configuration tab) to obtain the zip file ConfigurationSamples.zip. This zip contains basic configuration files for Windchill, Arena and Agile PLM systems. Modify these to suit your company's requirements.
 Add and configure the interface to your company's enterprise system. With a valid connection you can schedule synchronization of components between that system and your Concord Pro instance.
Synchronization of components between Concord Pro and the connected enterprise system instance - or to be more specific, their parametric data - is very flexible, and involves the following:
- Configuring the synchronization for each component type. This involves:
- Determining the direction of synchronization.
- Determining which components are involved and where new components are to be created.
- Configuring parameter mapping.
- Performing the synchronization.
The first item is handled in the configuration file used for the connected enterprise system instance. The synchronization itself can be performed on-demand from the Component Sync page (click the  button associated with an enterprise system instance) and/or can be scheduled - automated synchronization at periodic intervals, defined when configuring the connection to the enterprise system instance.
 Perform a sync on-demand, or set up automated synchronization as part of the interface configuration.
To set up scheduled synchronization requires you to provide valid credentials (for your enterprise system). If not already in place, click the
button and enter your
User name and
Password into the subsequent
PLM Credentials window. Without valid credentials, scheduled synchronization will remain in the OFF state. On-demand synchronization will also not be possible.
Licenses
Related pages: Licensing, Private License Service
This page provides the interface to obtain and manage licenses - both for the licensing of Concord Pro itself and also for serving to client machines over the local network, through the appropriately configured Private License Service (PLS).
 Use the various tabs within the Licenses area to obtain, manage and assign licensing for Concord Pro, and for serving to your local network through the PLS. And use the various reports that are available to keep an eye on license usage.
Three tabs are available:
- Licenses - provides a listing of all licenses currently available. At least two licenses will be required to actually license Concord Pro (Altium Concord Pro and Altium Concord Pro CAL). Other licenses can be added for serving through the PLS. Licenses can be acquired either From cloud (choose from a list of licenses available to your company from the Altium portal), or From file (import existing
alf license files from disk).
- Roles - provides the ability to assign licenses to roles (or groupings) of users. In Local PLS mode, the Concord Pro PLS can selectively offer software licenses that have been assigned to a specific role. By default (unless otherwise specified), all licenses acquired by Concord Pro are assigned to the All Users role, and therefore available to any user that connects to the PLS.
- Reports - the Private License Service includes a range of license usage monitoring and reporting features that can be used to audit how licenses are used within an organization. This is useful for ensuring that the best use is being made of the available license seats, for anticipating future license requirements, and to determine the usage of individual users. A range of reporting options are available, accessed by specific sub-tabs. Depending upon the type of information that's required for each report, the associated reporting filters can be applied to tailor the results to include specific Licenses, Roles, Users, and time periods. There is also an option to export the current report to disk in CSV format, compatible with Microsoft Excel and other spreadsheet applications, for administration and accounting purposes.
Status
This page provides status-related information for Concord Pro and quick access to log files. It is presented over three regions:
- Installed Services - providing version information for the current Concord Pro installation.
- Path to database and files - providing information about the installation paths for the database and data, including the type of database being used by Concord Pro.
- Logs - providing information about the installation path to log files. For each distinct service click on the associated
 icon to download a zip containing the relevant set of log files.
 The Status page provides installation details, as well as log files for the various services.
Health
Related page: Standalone Health Monitor Tool
This page provides a web-based Health Monitor. The page delivers a visual summary of the state of the host machine and the Concord Pro storage system. The page is a browser-based companion to the server's Health Monitor Tool that is available as a standalone application on the server host machine (sourced from the installation's Tools folder), but offers the advantage of being remotely accessible by administrators over the network.
 The Health page provides an instant view of the status and health of your Concord Pro installation and the system on which it is installed.
As a highlighted overview of the server status, the Health page provides distinct warning/error icons for status entries of concern. Common alerts include overdue data backups, or an active admin/admin user account (password in need of changing!).
As well as the quick visual summary of the server's health, the page also provides the following functionality:
- Ability to generate a status report for sending to Altium's Support (and ultimately Altium's Developers). To do so, click on the Generate part of the Generate status report for support team text, in the Status area of the page - the necessary reports will be generated and collated in a single Zip archive (vault_status_report_<Date>.zip) and downloaded to your browser's default download folder.
- Ability to download all log files - containing Error and Warning entries from all of the server’s available Log files, and which are normally located in the
\ProgramData\Altium\ConcordProData\logs folder. To do so click the Download all logs link, in the Logs section of the page. The files will be collated into a single Zip archive (AllLogs.zip) and downloaded to your browser's default download folder.
- Use the Clear logs link (located at the bottom of the Logs section of the page) to archive, then delete all existing log files. The archive (logs_<Date>.zip) will be stored in the
\ProgramData\Altium\ConcordProData\logs.archive folder.
- To manually refresh the status of your server click the refresh status link, in the Status area of the page. The health of your server and system will be checked and the page refreshed with the current state accordingly. The date and time reflect the last time the server health was checked.
Note that after initial install of Concord Pro, initial check of server health takes about 5 minutes after accessing the Health page. You can perform a manual refresh to perform the check sooner. Subsequent automatic checking is carried out every 4 hours.
The Concord Pro installation also includes a Health Monitor that can be launched as a standalone tool - on the computer hosting Concord Pro - using the desktop shortcut that is created when Concord Pro is installed. Alternatively, the Health Monitor tool can be found in the
\Program Files (x86)\Altium\Altium Concord Pro\Tools\HealthMonitor folder as the
avhealth.exe executable. Note that the folder also includes a simplified command-line tool:
avConsoleHealth.exe. In this standalone variant, the Health Monitor operates as an independent entity that queries Concord Pro and its host system, and is therefore able to deliver crucial data and information even in the unlikely event that Concord Pro is not fully functioning. For more detailed information regarding this standalone tool, see
Health Monitor.
Explorer
Related page: Managing Content Structure & Access
This page gives you access to the structure of Concord Pro and is similar in presentation and layout to that of the Explorer panel in Altium Designer. From here, you will be able to browse the folders and Items within Concord Pro. And although you can't create or edit Items from within the browser interface (you can remove them), you are able to create and edit folders, and so build Concord Pro's structure without having to be connected to it through Altium Designer.
You can also define folder-level and Item-level sharing from this interface - controlling who is able to see what content in Concord Pro and, at the folder level, whether other users can simply view a folder and its content, or also edit it (effectively releasing/committing/uploading design data into it). A single Concord Pro installation can be partitioned into various effective 'zones' of content, but with controlled permissions the content can be made selectively visible, or hidden, as required - giving the right people, the right access, to the right data.
Content can also be downloaded from Concord Pro directly from this interface.
 Browse and define the structure of your Concord Pro installation, as well as defining access and being able to download content.
Concord Pro Administrators will be able to see and manage all server content. For a shared user of Concord Pro (non-admin), only those folders that have been shared - i.e. the user has permissions to access - will be accessible when the user signs in to that instance of Concord Pro.
