BOM Verification
ActiveBOM includes a comprehensive set of BOM checks that are automatically performed each time the BOM is updated.
BOM Status
Each BOM Item is checked for violations, and its status is displayed in the BOM Status column. This column is always visible on the right side of the BOM Items list, displaying an icon that indicates that item's status. Note that a BOM Item can fail more than one of the BOM checks; the icon indicates the most severe failure.
BOM Status Icons:
-
 Clear - component has solutions, these solutions have suppliers with sufficient stock, and at least one solution has been ranked.
-
 Warning
-
 Error
Error
-
 Fatal Error
Hover over the icon for a summary of that part's status. Alternatively, enable the display of the detailed BOM Status column to display detailed information. The column can be enabled either via the ActiveBOM Properties panel, which includes a handy search box or by right-clicking in the column header area of the BOM Items list and then choosing the Select Columns command.
Configuring the BOM Checks
The BOM Items are automatically checked for:
-
Violations associated with Design Items – this includes tests such as parts whose BOM parameters do not match the library parameters (ambiguous parameters), and duplicate designators.
-
Violations associated with Part Choices – this includes tests such as an unranked MPN (system assigned ranking only), no suppliers, or a missed target price.
The severity level (report mode) of each BOM check is configured in the BOM Checks dialog. Click the  button below the BOM Checks detected violations list in the Properties panel to open the dialog.
To essentially disable a specific check, set its Report Mode to No Report.
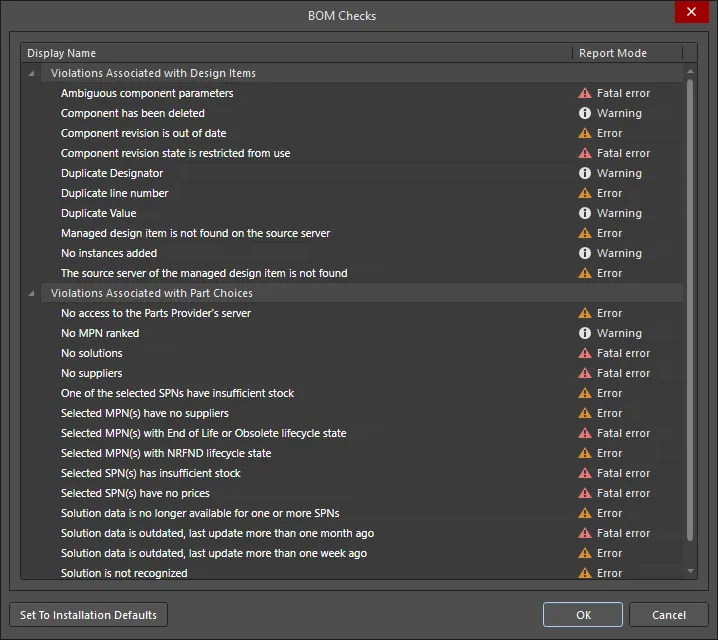
The BOM Checks dialog is used to configure the report mode for each of the automatic BOM Checks.
Filtering the BOM Items List by BOM Status
The Properties panel displays a list of detected BOM check violations that are present in the current BomDoc. Click the Filter icon (as shown below) to filter the main BOM Items list so that it only displays those BOM Items that fail that BOM check. Note that a BOM Item can fail multiple BOM checks.
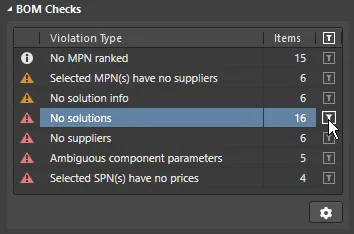
Click to filter out all BOM Items except those that fail this BOM check. Click the Gear icon to configure the BOM Checks.
Use the Filter feature to quickly identify all BOM Items that fail a specific BOM Check.
Generating a BOM
The BOM can be generated directly from the ActiveBOM editor. Select the Reports » Bill of Materials command to open the Report Manager dialog and generate the BOM.
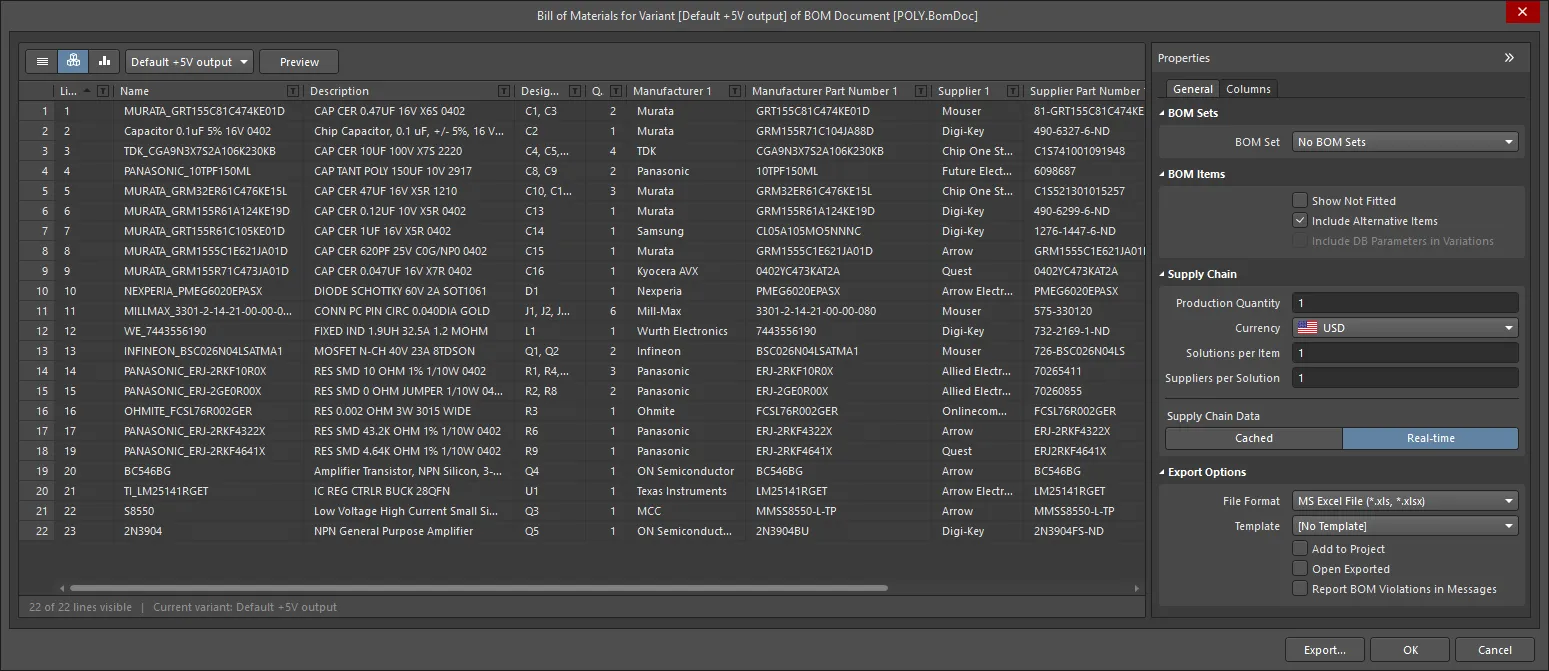
The Report Manager presents the BOM data as it will be output. From ActiveBOM it is used to configure the output format and select a template.
The Report Manager is the standard BOM output setup dialog, the same dialog that is opened when Bill of Materials is selected from the schematic or PCB editor's Report menu, or when a BOM is configured in an OutputJob.
-
The Report Manager shares many features with the ActiveBOM interface, simplifying the process of configuring the BOM.
-
If there is an ActiveBOM document (BomDoc) in the project then the layout settings defined in it, are automatically applied in the Report Manager.
-
BOM Sets defined in the ActiveBOM document are available, easily switch from one BOM layout to another.
-
Excel-format files can be generated, without requiring Microsoft Excel® to be installed (select the Microsoft Excel File (*.xls, *.xlsx) option).
To learn more about configuring the Report Manager, refer to the page BOM Configuration in the Report Manager.
Mapping Design Data into the BOM
Design data can be passed from the board design process into an Excel Bill Of Materials, by including Field and Column declarations in the Excel template that is applied to the BOM during creation.
-
Fields - Field declarations are used to pass system, document and project parameters into the BOM, such as filenames, quantity, currency, and so on, that need to be displayed once in the BOM. The Field declaration is replaced by the passed value, as shown in the image below.
-
Columns - Column declarations are used to pass information that appears in all BOM Items, such as the: designator, description, user-defined parameters, and so on. This can also include line numbers, PCB location data, and custom column data entered into the BomDoc. The Column declaration is replaced by the ColumnName string, with each row below being populated by that column value for a BOM item, as shown in the image below.
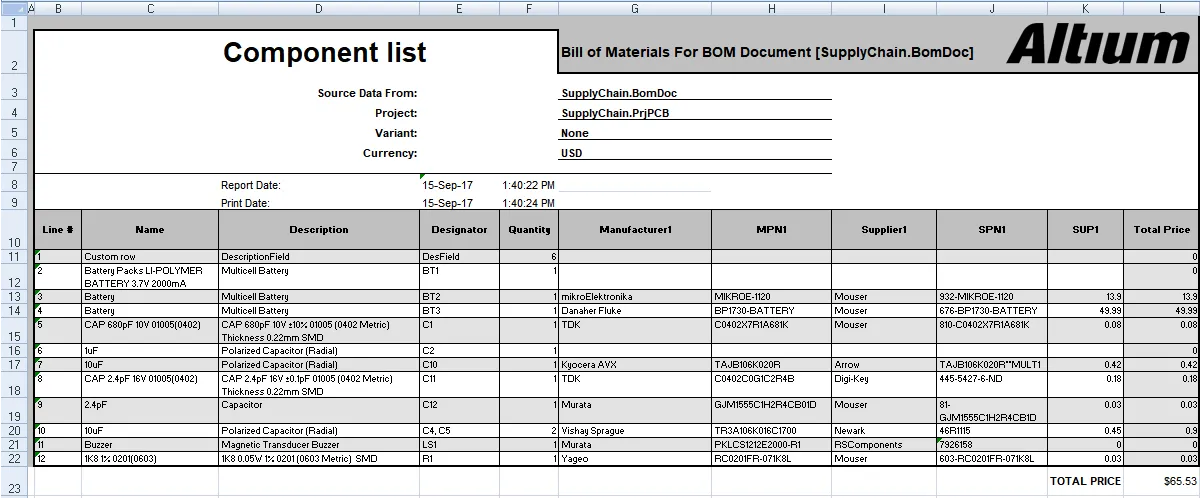
Design data mapped into an Excel spreadsheet, by defining them in the Excel template.
To learn more, refer to the Mapping Design Data into the BOM section of the BOM Configuration in the Report Manager page.
Comparing the Current BOM with an Earlier Revision
It's not uncommon for components to change between design releases. To ensure that the process has been completed correctly, many designers like to compare the BOM from the current project with the BOM from a previous revision of the project. If the project is a Workspace project and includes an ActiveBOM BOM document (*.BomDoc), this can be done using the BOM Compare feature.
The BOM Compare report displays what has changed between the current design, and the selected previously released revision. The report can be configured and generated in the following ways:
-
From an ActiveBOM BomDoc, click Reports » BOM Compare to open the Bom Compare version of the Report Manager dialog. Configure the report as needed then click Export.
-
From the schematic editor, click Reports » BOM Compare to open the Bom Compare version of the Report Manager dialog. Configure the report as needed then click Export.
-
From the PCB editor, click Reports » Project Reports » BOM Compare to open the Bom Compare version of the Report Manager dialog. Configure the report as needed then click Export.
-
From an outjob, right-click on [Add New Report Output] under the Report Outputs entry then choose BOM Compare. To configure the report, right-click on the newly-added BOM Compare entry then choose Configure to open the Bom Compare version of the Report Manager dialog. Configure the report as needed then click Export. You also can select the desired output container then generate the report.
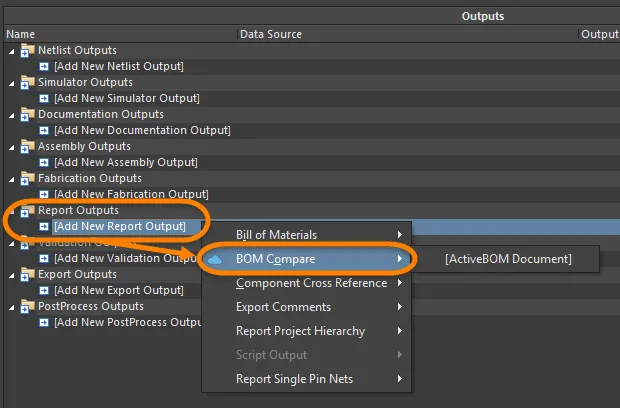
A BOM Compare can be performed from a number of places, including an OutputJob.
BOM Compare detects differences (delta) between the component items in the current design against the chosen released revision, creating a report listing only the component items that are different. It compares all parameters, excluding only dynamic parameters such as price and stock levels.
You can configure the columns that are visible in the BOM Compare report in the Report Manager.

The BOM comparison opens in the Report Manager, configure the columns as required.
Options and Controls of the BOM Compare Report Dialog
View Mode
There are three view modes available to display the list of Items. Select the required mode using the buttons located above the grid:
-
 Flat view - click to displays a row for every component.
-
 Base view - click to display a row for each unique component in the project. The Designator column lists the designators of all components of this type.
-
 Consolidated view - click to use when the project includes variants to display a Consolidated BOM for all variants.
The default grouping for the Base and Consolidated views is by the component ItemID for managed components or Library Reference for unmanaged components. In the BomDoc, this can be refined by enabling additional or alternative parameters in the
Component Grouping dialog, which is accessed from the BomDoc's
Properties panel. If the
Report Manager is using a BomDoc as the source, it is possible to generate a single BOM for all variants. This is referred to as a Consolidated BOM, to display this, set the
View Mode to
Consolidated View.
Variant
If there are variants defined in the project, they will be listed in the drop-down; choose the required variant. If Consolidated view is enabled, this control is disabled.
To learn more about the different types of variations, refer to
Design Variants.
Preview
Click  to export and open the report in an external application associated with the file type based on the current settings of the File Format and Template options in the Properties panel.
General Tab
The main region lists all of the components.
Revisions
Use the drop-down to select the desired revision state. The revision state chosen will be reflected in the grid.
Bom Items
-
Show Not Fitted - enable this option to display the Not Fitted Items in the grid.
Components defined as Not Fitted for the chosen variant are removed unless the Show Not Fitted option is enabled. To keep components that are Not Fitted in the BOM and explicitly mark them as such, enable the Show Not Fitted option and enable the Fitted column in the Columns tab of the dialog. For each component, an entry in this column reflects whether each component is Fitted or Not Fitted for the chosen variant. The value entered into the Quantity column for a component that is Not Fitted on the chosen variant is zero (0).
-
Include Alternative Items - enable this option to include alternate items in the BOM. The Alternative Item is displayed on a new line below the original part.
-
Include DB Parameters in Variations - if there are database components that have been placed via a DbLink/DbLib/SVNDbLib file and those components are varied in a design Variant, enable this option to update the database parameters when the selected variant is changed.
Export Options
-
File Format - select a format from the drop-down list. The following file formats are supported:
-
CSV (Comma Delimited) (*.csv)
-
Tab Delimited Text (*.txt)
-
MS-Excel (*.xls, *.xlsx *.xlsm) (uses Microsoft Excel)
-
Generic XLS (*.xls, *.xlsx, *.xlsm) (uses a built-in XLS-format file generator, so that this format can be generated without having Microsoft Excel installed)
-
Portable Document Format (*.pdf)
-
Web Page (*.htm, *.html)
-
XML Spreadsheet (*.xml)
-
Template - after selecting a file format, use the drop-down to choose a template format to use for exporting. The options include file-based and managed templates.
-
Add to Project - enable to have the generated report added to the project after it is created.
-
Open Exported - enable to open the relevant software application, e.g., Microsoft Excel, once the exported file has been saved.
Columns Tab
This tab is used to configure which parameters are displayed for each BOM Item and the data sources that are available for those parameters.
-
Columns - list of all available sources of part information available to ActiveBOM. The Columns region can be sorted by clicking on any of the heading fields, including the Visibility (
 ) and Source columns.
-
Visibility - click on the visibility icon in the left column to control the visibility of that column in the main BOM Items grid.
-
Source - displays an icon to show from where that parameter is sourced:
-
ame - displays the name of the property/parameter as defined in the source document or as entered for a user-created BomDoc column.
-
Alias - if required, an alias can be defined in the source BomDoc to rename a column.
Additional Controls
-
Export - click to generate the report. A standard Windows dialog opens in which you can name the report.
Right-click Menu
-
Preview - click to generate a preview of the report based on the current settings of the File Format and Template options.
-
Copy - use to copy all or selected data.
-
Copy With Header - use to copy and paste the selected data into an external spreadsheet such as Microsoft Excel.
-
Best Fit - merges the contents from the Name and Descriptions columns together so they are closely placed with no excess room between each column.
-
Best Fit All Columns - merges the contents from all columns together so they are closely placed with no excess room between each column.
-
Restore from <.BomDoc> - use to restore from the stated BomDoc.
-
Change PCB Document - use to switch to another PCB document.
The default columns displayed in the Report Manager dialog include:
-
CompareState
-
Line number
-
Name
-
Description
-
Designator
-
Manufacturer Part Number 1
-
Qty
Dynamic data such as price and stock are not compared.
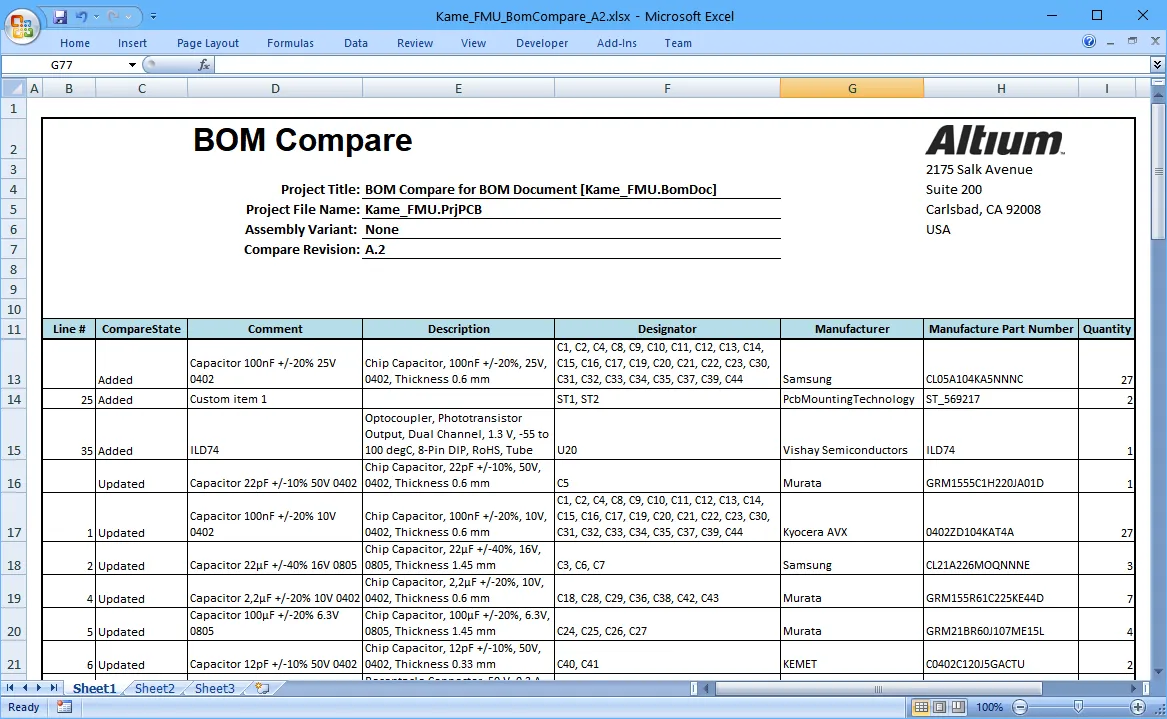
An example of a BOM Comparison report with an Excel template applied.
Learn more about configuring an Excel template for BOM or BOM Compare data.