Parent page: Server Items
Altium NEXUS, in conjunction with your managed content server, caters for the ability to create and manage Designer Preferences Items in that server. Such Items are created through release of the currently defined preferences, in Altium NEXUS's Preferences dialog. Once a Preferences Item has been created (and data released into a revision of it), and its lifecycle state set to a level that the organization views as ready for use at the design level, it c an be reused in future board-level design projects.
In addition, a managed Designer Preferences Item can be used as a configuration data item in one or more defined Environment Configurations. An environment configuration is used to constrain a designer's Altium NEXUS working environment to only use company-ratified design elements. Environment configurations are defined and stored within the Team Configuration Center - a service provided through the NEXUS Server installation, and the facilitator of this concept of Environment Configuration Management.
Only Administrators for your managed content server can release preferences to, and manually load managed preferences from, that server.
Folder Type
When creating the folder in which to store a Designer Preferences Item, you can specify the folder's type. This has no bearing on the content of the folder - releasing preferences will always result in a Designer Preferences Item. It simply provides a visual 'clue' as to what is stored in a folder and can be beneficial when browsing a server for particular content. To nominate a folder's use as a container for Designer Preferences Items, set its Folder Type as Altium NEXUS Preferences, when defining the folder properties in the Edit Folder dialog.

Specifying the folder type - its intended use - gives a visual indication of the content of that folder when browsing the server.
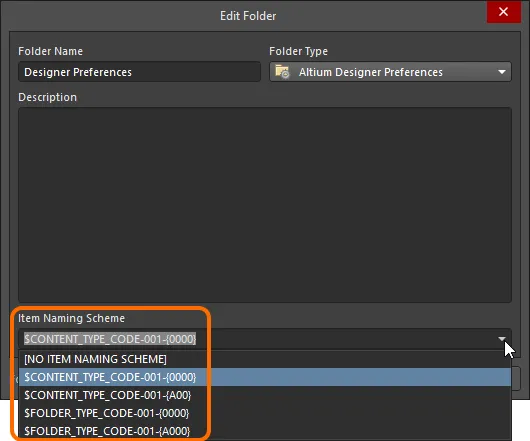
Item Naming Scheme
Another important aspect of the parent folder is the Item Naming Scheme employed for it. This defines the format of the unique ID for each Item created in that particular folder. Several default example schemes are available, utilizing the short-form code for either the folder type (ADPC - Altium NEXUS Preferences Catalog) or the content type (PREF - Preferences):
- $CONTENT_TYPE_CODE-001-{0000} - for example, PREF-001-0001.
- $CONTENT_TYPE_CODE-001-{A00} - for example, PREF-001-A01.
- $FOLDER_TYPE_CODE-001-{0000} - for example, ADPC-001-0001.
- $FOLDER_TYPE_CODE-001-{A000} - for example, ADPC-001-A001.
Using a default naming scheme, the software will automatically assign the next available unique ID, based on that scheme, having scanned the entire server and identifiers of existing Items. This can be a great time-saver when manually creating Designer Preferences Items.
A custom scheme can also be defined for a folder, simply by typing it within the field, ensuring that the variable portion is enclosed in curly braces (e.g. DESIGN_PREFS-001-{0000}).
The Item Naming Scheme of the parent folder is applied to the Unique ID for each Item
created within that folder.
The Item Naming Scheme employed for the parent folder can be changed at any time. The modified scheme will then be applied to any subsequent newly-created Items within that folder.
Item Type
When creating the target Designer Preferences Item in which to store your currently defined software preferences, ensure that its Content Type is set to Altium NEXUS Preferences, in the Create New Item dialog. If you are creating the Item in an Altium NEXUS Preferences type folder, this Item type will be available from the right-click context menu when creating the Item.

Creating a Designer Preferences Item within an Altium NEXUS Preferences folder - the correct Content Type is available on the context menu.
Item Lifecycle Definition and Revision Naming
When defining the Designer Preferences Item, in whose revisions preferences data is released, be sure to specify the type of lifecycle management to be used for the Item, and the naming scheme employed for its revisions, respectively.
Control over which Item types can use a particular lifecycle definition or revision naming scheme, can be defined and enabled at a global level from within the Content Types dialog, when defining each schema. The default schemes assigned for use by a Designer Preferences Item are: Generic Lifecycle and 1-Level Revision Scheme, respectively.
Once currently defined software preferences have been released into the initial revision of a Designer Preferences Item, these schemes cannot be changed for that particular Item.
Specify the required schemes in the Create New Item dialog, using the Lifecycle Definition and Revision Naming Scheme fields respectively.
If the option to control use of lifecycle definitions and revision naming schemes per content type is enabled for any definitions/schemes, and the Designer Preferences Item type is not set to use a particular definition/scheme, then that definition/scheme will not be available in the applicable drop-down list.

Selecting the Lifecycle Definition and Revision Naming schemes for a manually created Item.
Observing standard revision naming schemes and lifecycle definitions, across the various types of design item in a managed content server ensures smooth, consistent management of those items.
It is a good idea to add a Name and Description as part of the Item's definition. This information is used when searching the server and enables quick identification of what a Designer Preferences Item offers.
Releasing Preferences
So far, we've discussed the support for a Designer Preferences Item in the server, in terms of related folder and item types. Releasing your current software preferences into the revision of such an item can be performed in a streamlined way.
While you can upload a preferences file (*.DXPPref) to a revision of a Designer Preferences Item - using the Item Revision's right-click Upload command in the Explorer panel - this is not the best method, since you will not have the opportunity to control, on release, how each preference is to be applied, when reusing that revision at a later stage. As such, this method will not be explored in this document.
Only Administrators for your managed content server can release preferences to that server.
You can save the currently defined preferences for Altium NEXUS, to your managed content server, directly from within the Preferences dialog (click on the  control at the top-right of the workspace). Click the drop-down arrow associated to the
  button at the bottom of the dialog, and choose the Send to server command from the menu. The Choose Item dialog will appear - use this to choose the next planned revision of an existing Designer Preferences Item, or create a new Designer Preferences Item (and initial planned revision) on-the-fly.
 Saving the currently defined preferences for your active instance of Altium NEXUS, to a planned revision of a target Designer Preferences Item, in a managed content server.
After choosing the required target Item Revision, click OK - the Edit Revision dialog will appear, in which you can change Name, Description, and add release notes as required. Clicking OK to proceed will present the Release preferences dialog. This dialog is used to manage the way in which the range of Altium NEXUS Preferences are released to the targeted revision of the Designer Preferences Item.
 Edit the revision as required, including adding release notes, then proceed to define how the preferences are released, through the Release preferences dialog.
The dialog presents an entry for each of the pages of options found in the Preferences dialog, along with entries for the following range of additional (and useful!) Altium NEXUS settings:
- Customizations (under System) - user interface customizations (menus, shortcuts, buttons etc).
- Item Manager (under System) - Item update settings.
- Vault Explorer - settings relating to the Explorer panel.
- View Configurations (under PCB Editor) - layer colors and activation, custom display configurations.
- Snippets Folders (under PCB Editor) - target folders for design Snippets.
- LayerStack Manager - settings relating to the Stackup Editor.
- Material Library - settings related to the materials library, used when defining a layer stackup in the Stackup Editor.
The dialog offers three applicable modes - Apply Modes - for how preferences will be applied to Altium NEXUS when the revision of the managed Designer Preferences Item is loaded from the server:
- Apply and Lock - the preferences/settings will be loaded in Altium NEXUS as read only (un-editable) options. They will return to an editable state when the user is no longer signed in to the server.
- Apply First Time - the preferences/settings will be loaded in Altium NEXUS as initial settings, which can be edited by the user.
- Do Not Apply - the preferences/settings will not be loaded in Altium NEXUS, allowing the existing settings to remain.
The distinction between the two Apply modes (above) is most useful when a revision of a managed Designer Preferences Item will be added to an
Environment Configuration, where the preferences will be automatically applied when a user signs in to the server, and chooses to use that configuration.
All of the additional settings, with the exception of Customizations, can only be set to Apply First Time, or Do Not Apply.
The Apply Mode can be defined:
- For an individual entry, by clicking within the corresponding Apply Mode cell and choosing the required mode from the drop-down menu.
- For all entries in an expandable section/category, by clicking within the corresponding Apply Mode cell for that section's/category's entry and choosing the required mode from the drop-down menu.
- For all entries in a single sweep, by using the menu associated to the Apply button, at the bottom-right of the dialog.
 The mode in which preferences/settings are released will determine their accessibility when
later reusing the revision of the managed Designer Preferences Item.
An entry of Custom at a section/category level simply means that the child entries are at differing mode levels.
Once you have defined the modes as required click OK - the release will proceed, with the preferences stored in the revision of the target Designer Preferences Item, as seen back in the Explorer panel. The released data stored in the revision consists of configuration settings files for preferences pages, and associated settings files for application look and feel, all tidily contained in a single zip file - preferences.zip.
 Browsing the released revision of the targeted Designer Preferences Item, back in the Explorer panel.
Reusing a Managed Designer Preferences Item
Once your Altium NEXUS preferences/settings set has been released to a managed content server, and its lifecycle state set to a level that the organization views as ready for use at the design level, that set of preferences/settings can be reused in future board-level design projects.
When you are signed in to your managed content server, you are free to manually reuse the revisions of any Designer Preferences Items that have been shared with you. The ability to load preferences stored in a local file (*.DXPPref) also remains available, should you need to use this.
Only Administrators for your managed content server can manually load managed preferences from that server.
If you do not sign in to your managed content server you can still work with Altium NEXUS (under your valid Altium NEXUS License), but you will not be able to access your organization's managed content server, or any other services it provides. You will therefore not be able to reuse any managed Designer Preferences Items. You will only be able to use file-based preferences defined locally.
To load a revision of a managed Designer Preferences Item from your managed content server to Altium NEXUS, choose the Load from server command from the Load drop-down menu in the Preferences dialog, and then choose the desired Item Revision through the Choose Item dialog (essentially an incarnation of the Explorer panel).
 Manually choosing a revision of a Designer Preferences Item, whose defined preferences/settings are to be applied to Altium NEXUS.
After clicking OK, the Load preferences from Vault dialog will appear. The dialog reflects the exact setup that you defined for each preferences/settings entry - through the Release preferences dialog - when the revision was released.
 Check, and adjust if necessary, the preferences/settings that will be loaded from the server,
using the Load preferences from Vault dialog.
-
 - entity is either set to Apply and Lock or Apply First Time.
-
 - entity is set to Do Not Apply.
The

icon simply reflects the custom nature of a section/category (the child entries are at differing Apply mode levels).
Click OK to have the preferences, as defined in the Item Revision, applied to your instance of Altium NEXUS. Should you wish, you can make changes - overriding on-the-fly - by toggling the Apply state for an entity. Note that if you enable an entity that was set as Do Not Apply, it will become Apply First Time.
The preferences will load with a dialog indicating progress. A final dialog will appear after the process is finished, alerting you to the fact you may need to restart Altium NEXUS for changes to menus, toolbars, or locale to take effect.
A Preferences page set to Apply and Lock during the release, in the Release preferences dialog, will be set to read-only when the revision of the managed Designer Preferences Item is loaded in Altium NEXUS. This is indicated by the symbol  displayed at the top-right of the Preferences page, and also the symbol
  to the right of the page's entry in the main tree (at the left of the Preferences dialog).
 Preferences that have been released as Apply and Lock will be read-only for the current session when reloaded in Altium NEXUS.
Such pages will remain locked while the user is signed in to the server, for only that session.
Preferences that were set to Do Not Apply during release are unaltered in Altium NEXUS when the configuration is loaded.
Reuse as Part of an Environment Configuration
A released preferences set can also be used as a configuration data item in one or more defined Environment Configurations. An environment configuration is used to constrain a designer's Altium NEXUS working environment to only use company-ratified design elements. Environment configurations are defined and stored within the Team Configuration Center - a service provided through the NEXUS Server installation.
Once you have signed in to the NEXUS Server, and chosen (if applicable) from the selection of environment configurations available to you, Altium NEXUS will be configured, with respect to use of preferences. If the chosen environment configuration has a defined Designer Preferences Item revision, then that is applied straight away. If the chosen environment configuration applicable to you does not have a Designer Preferences Item revision specified, then preferences will remain manually definable. In other words, you are free to manually reuse a revision of a managed Designer Preferences Item, or use a locally saved preferences file. For more information, see Environment Configuration Management.
 When you sign in to the NEXUS Server and choose an applicable environment configuration, the preferences defined in the revision of the managed Designer Preferences Item specified for that configuration, will be loaded directly.
Under the enforcement of an environment configuration that includes a revision of a managed Designer Preferences Item, Altium NEXUS’s existing preferences settings will be replaced by those enabled in that revision - those that were set to Apply First Time, or Apply and Lock. Preferences that were set to Do Not Apply are left unaltered when the configuration is applied and the managed preferences loaded.
If preferences were set to Apply First Time when originally released to the Item revision in the server, they will only be applied once when those managed preferences are subsequently loaded in Altium NEXUS. When the signed in user then changes those preference options, they will not be overwritten the next time the user signs in to the server.
A Preferences page set to Apply and Lock during the release, in the Release preferences dialog, will be set to read-only when the revision of the managed Designer Preferences Item in the environment configuration is loaded in Altium NEXUS. This is indicated by the symbol displayed at the top-right of the Preferences page (in the Preferences dialog), and also the symbol to the right of the page's entry in the main tree (at the left of the dialog). Note that the preferences management menus (at the bottom of the dialog) are disabled, with the exception of the Save commands.
 An example of preferences loaded through an applied environment configuration. This page was released to the server with the Apply and Lock mode and so is read-only. Notice also the controls to load/import preferences are unavailable, as too is the ability to set a page to defaults.
Updating a Designer Preferences Item
If you need to change the preferences set stored in a Designer Preferences Item, make changes to the active preferences as required, then send those preferences to the next planned revision of that Item.
Downloading a Preferences File
Download the Preferences zip file (preferences.zip) stored in a revision of a Designer Preferences Item, by right-clicking on that revision and choosing the Operations » Download command from the context menu. The file will be downloaded into a sub-folder under the chosen directory, named using the Item Revision ID. The file can be found in the Released folder therein. The zip includes:
- A configuration settings file (*.ini) for each preferences page whose Apply Mode (on release of the revision) was set to Apply First Time, or Apply and Lock.
- Files relating to any of the additional settings whose Apply Mode (on release of the revision) was set to Apply First Time. These could include, for example:
- Object defaults (ADVPCB.DFT, Sch_DefPrimitives.dft, Sch_DefPrimitives.MMsdft, PcbDrawing_Primitives.xml)
- 2D and 3D view configuration files (*.config_2dsimple, *.config_3d)
- PCB Color templates (*.PCBSysColors)
- DXP.RAF
- DXP.RCS
- UserTools.TLT
Access the Download command from the top-level entry for a Designer Preferences Item itself, to download the preferences file stored in the latest revision of that Item.
Click the Explore button in the Download from Server dialog, to quickly explore to the download folder.
