
Richieste di componenti legacy
Le organizzazioni che impiegano un addetto dedicato alla libreria componenti possono formalizzare il processo di aggiunta di nuove parti di libreria quando necessario utilizzando le funzionalità del Workspace
Disponibili come workflow avanzato basato su processi oppure come semplice configurazione basata su documenti, le Richieste Parte consentono agli utenti (tipicamente gli ingegneri) di raccogliere e inviare i dettagli della parte necessaria a uno specificato
Tra gli approcci avanzato e base alle Richieste Parte, questo documento esamina il metodo più semplice
Configurazione delle Legacy Part Requests
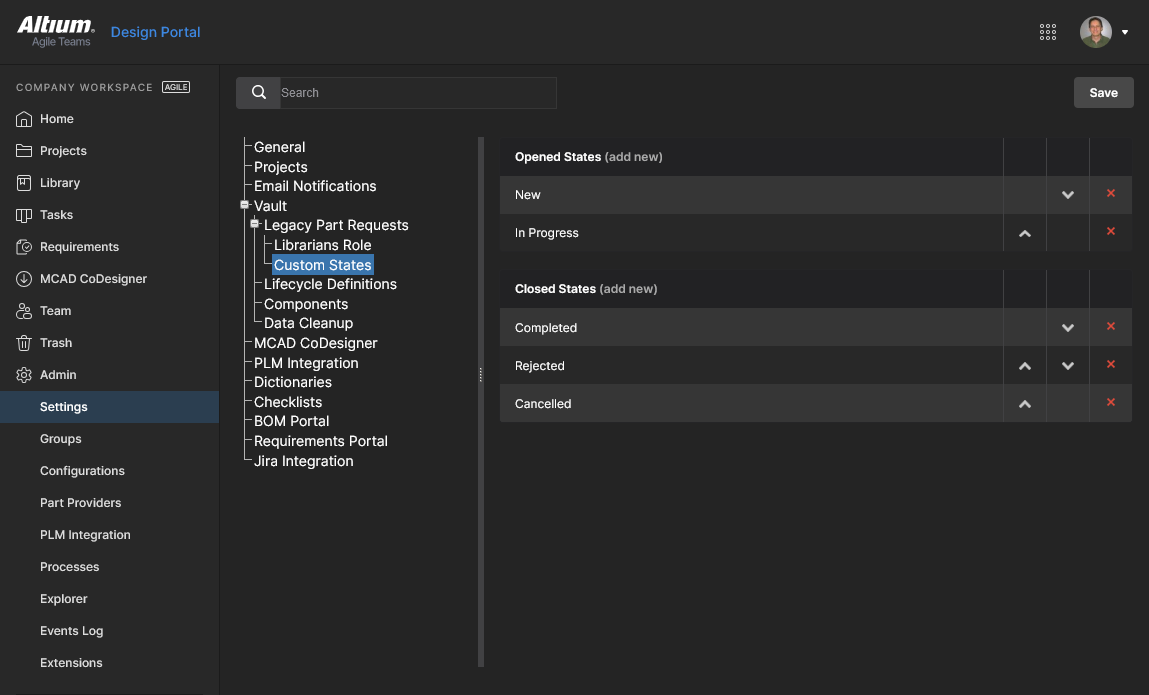
La funzionalità Legacy Parts Request, che non è disponibile per impostazione predefinita, viene abilitata nella Workspace Admin – Settings page. Questa pagina fornisce anche l'impostazione per specificare i bibliotecari che riceveranno e potranno elaborare le Richieste Parte, nonché l'impostazione di configurazione per gli stati di avanzamento della Richiesta Parte (In ProgressCompleted
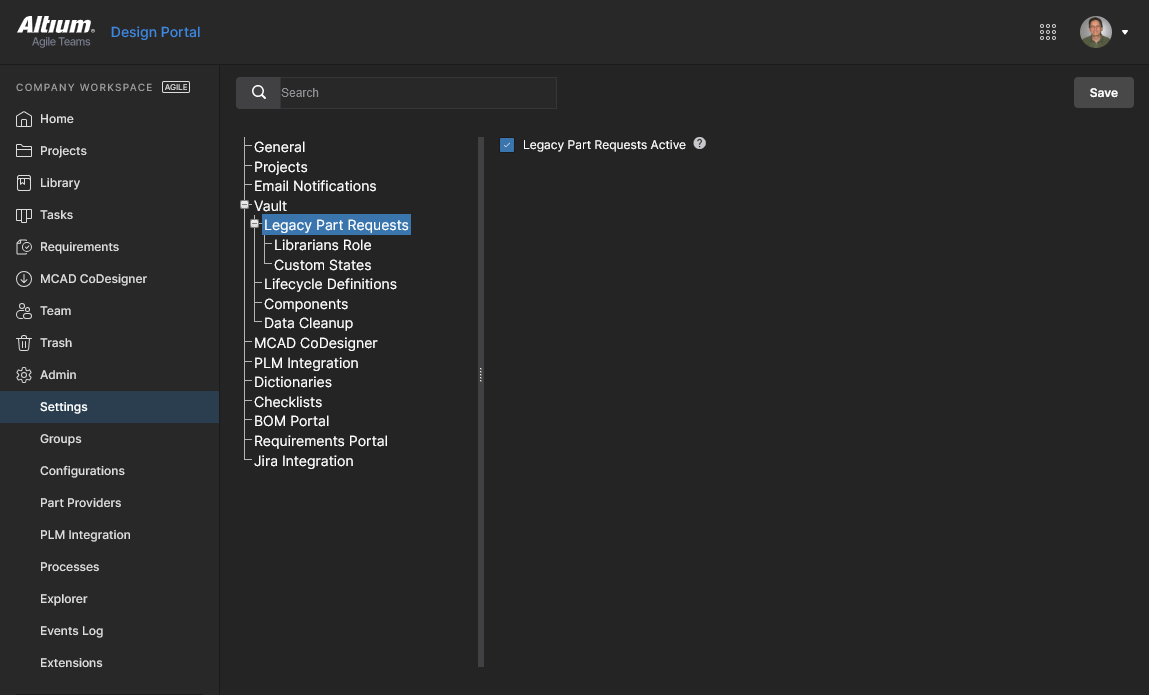
Iniziare abilitando la casella di controllo  per confermare, quindi aggiornare la vista del browser per visualizzare la funzionalità nella voce
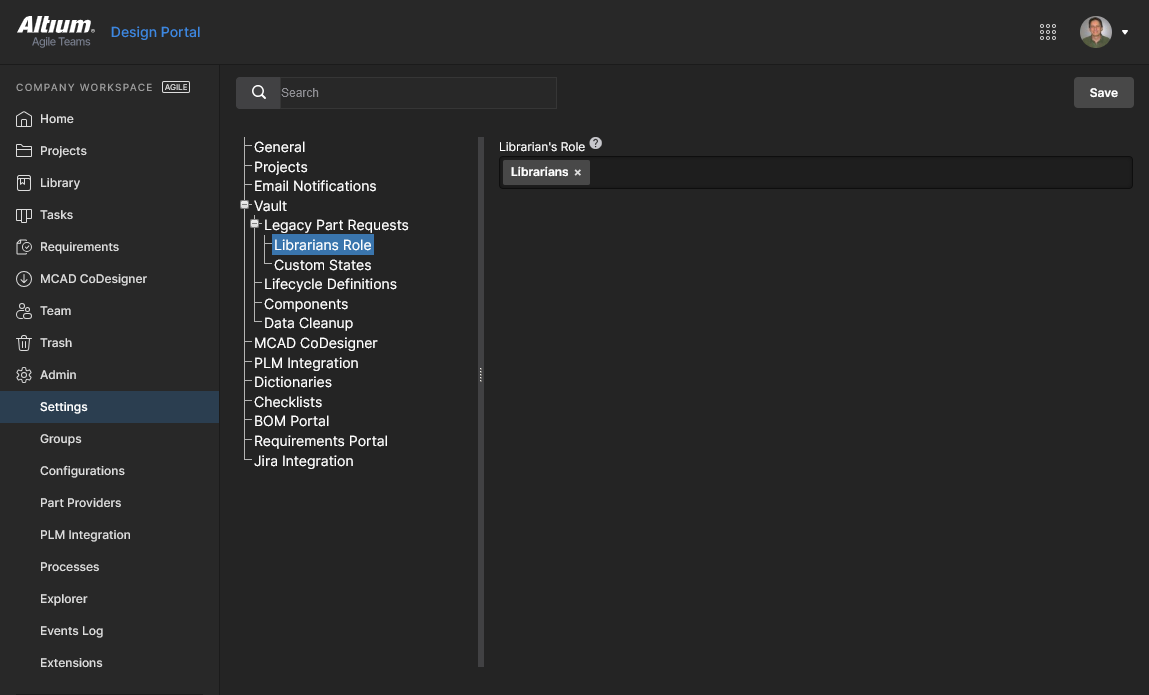
Accedere all'impostazione corrente per confermare. Per informazioni correlate, vedere la pagina Managing Workspace Membership.
Creazione di Richieste Parte
Le Richieste Parte possono essere create e gestite tramite la pagina
Aggiunta di una nuova richiesta
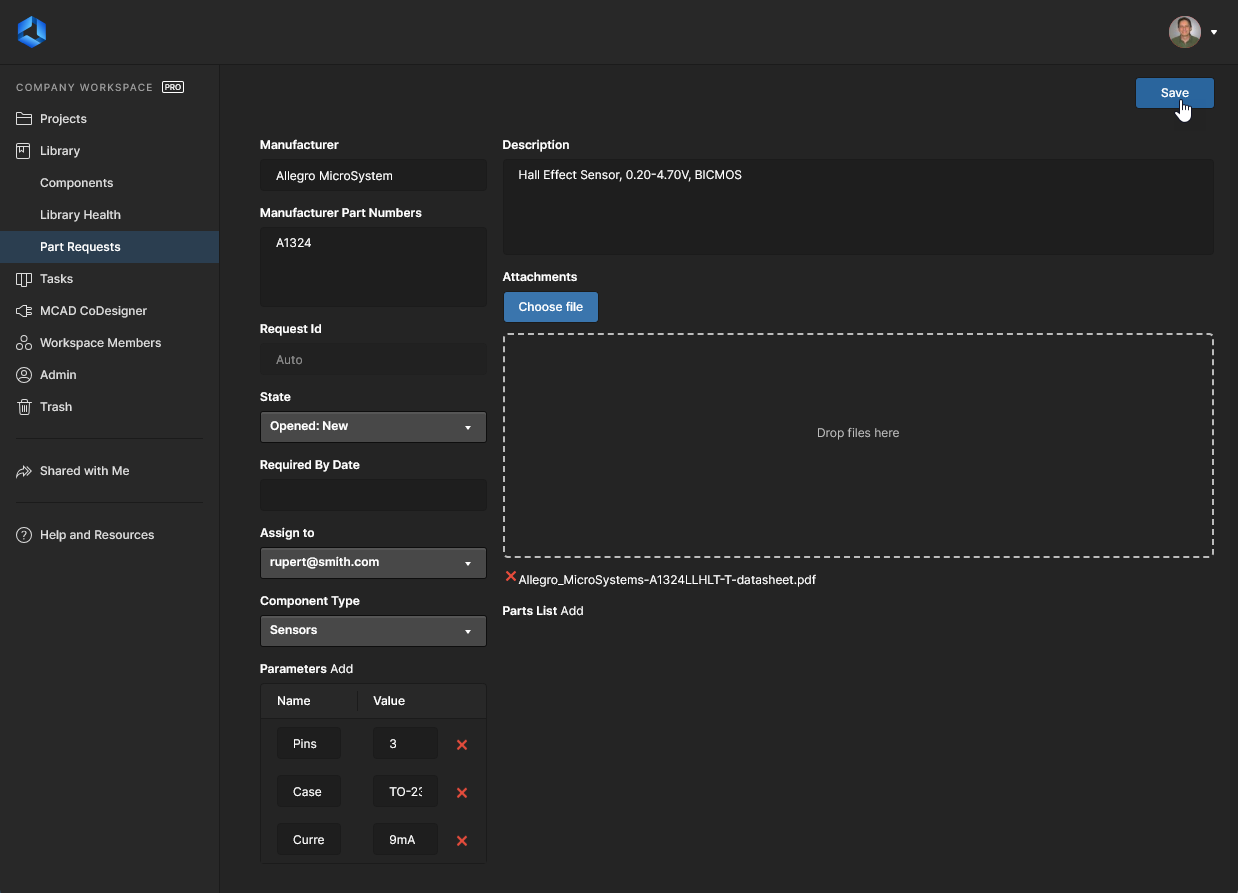
Per aggiungere una nuova richiesta parte, fare clic sul pulsante  in alto a destra nella pagina. La pagina cambierà per presentare il modulo della nuova richiesta parte, come mostrato nell'immagine seguente e descritto successivamente.
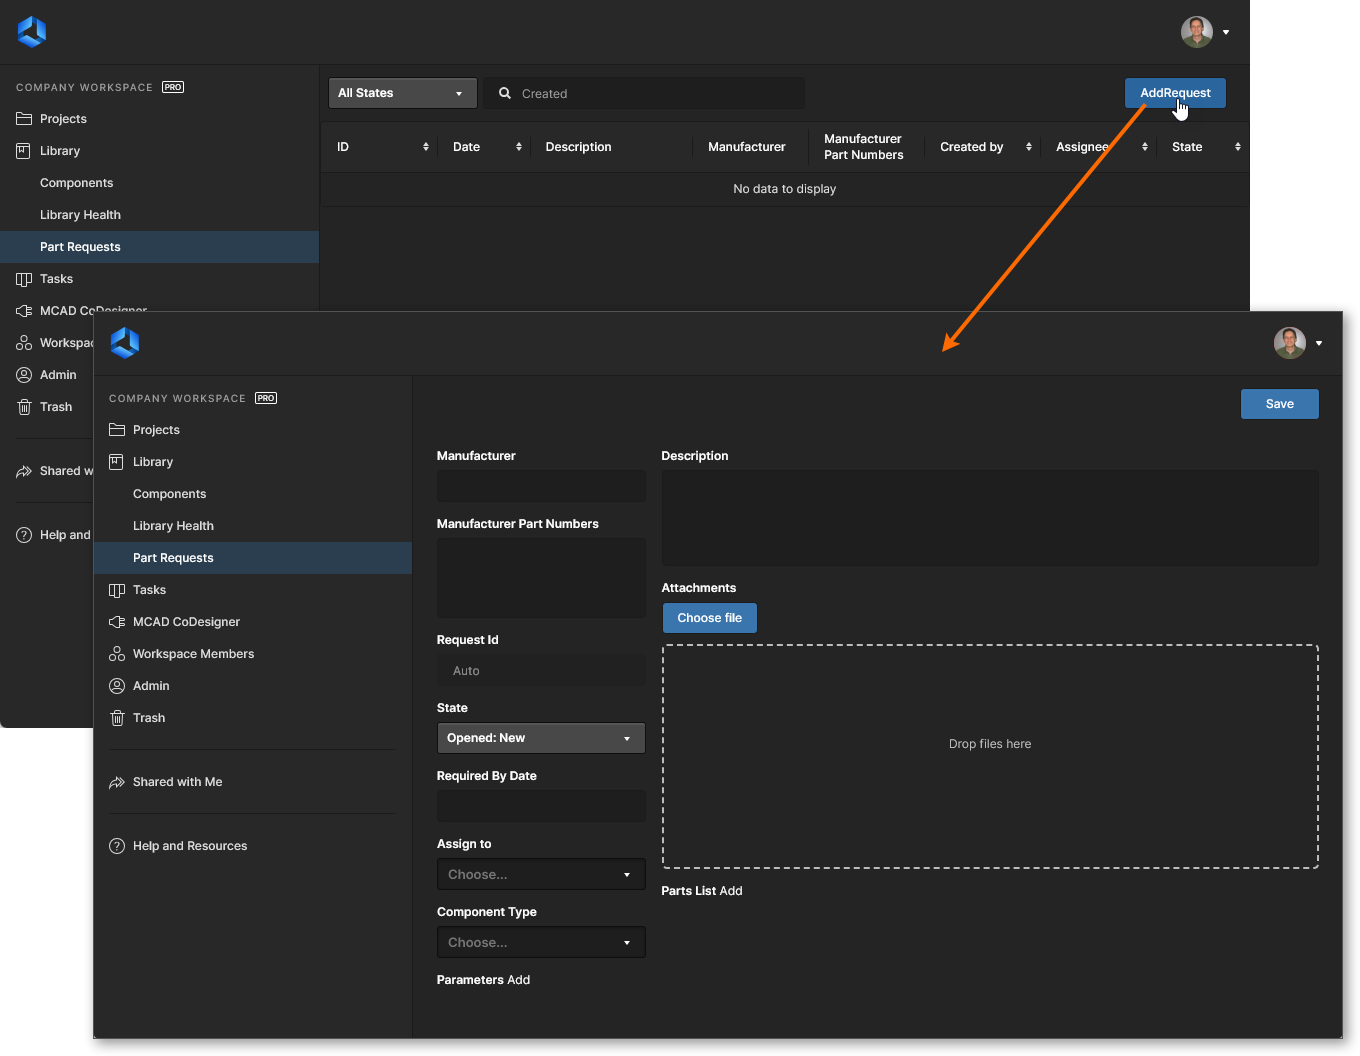 Aggiunta di una nuova richiesta parte tramite la pagina
Usare i controlli nella pagina per fornire quante più informazioni possibili:
-
Manufacturer – questo è un campo obbligatorio per indicare al bibliotecario chi produce effettivamente la parte. -
Manufacturer Part Numbers – questo è un campo obbligatorio che indica al bibliotecario il/i numero/i di parte specifico/i delle parti che si desidera vengano create. Più numeri di parte devono essere separati da una virgola (,).
-
Request Id – viene generato automaticamente un ID e assegnato alla richiesta, consentendo agli utenti di monitorare facilmente l'avanzamento della richiesta. -
State – questo campo viene utilizzato per specificare lo stato della richiesta. Le opzioni sonoOpened: NewOpened: In ProgressClosed: CompletedClosed: RejectedClosed: Cancelled
-
Required By Date – usare questo campo per specificare la data entro la quale si desidera che il/i componente/i siano pronti. Facendo clic all'interno del campo verrà visualizzata una finestra calendario con cui specificare la data richiesta. -
Assign to – questo campo mostra quale bibliotecario sta attualmente lavorando alla richiesta. Il campo a discesa elenca tutti gli utenti del Workspace che fanno parte del/dei gruppo/i del Bibliotecario designato.
-
Component Type – questo campo può essere usato per specificare il tipo di componente richiesto. L'elenco a discesa includerà tutti i tipi attualmente definiti nella pagina Data Management – Component Types page della finestra di dialogoPreferences . -
Parameters – quest'area può essere usata per aggiungere un insieme di parametri specifici richiesti per la/e parte/i. Fare clic suAdd e utilizzare i campi successivi per fornire un nome e un valore per il parametro. Se non vengono specificati parametri, il bibliotecario probabilmente farà riferimento all'aggiunta dei parametri presenti in una scheda tecnica correlata per quella parte, in conformità con la policy dell'organizzazione. -
Description – questo campo può essere usato per fornire una descrizione dettagliata della parte (tipicamente presa dalla scheda tecnica del produttore). -
Attachments – quest'area può essere usata per allegare qualsiasi file utile relativo alla parte richiesta, ad esempio una scheda tecnica PDF, un'immagine o un documento. Fare clic sul pulsante per individuare il/i file tramite una finestra di dialogo standard, oppure trascinare il/i file nell'area indicata.
-
Parts List – usare quest'area per specificare eventuali Component Item esistenti nel Workspace, creati come componenti stub temporanei. Fare clic suAdd e cercare l'Item richiesto di conseguenza. Il bibliotecario potrà quindi usarlo per soddisfare la richiesta. Se non esiste alcuna parte stub, il bibliotecario creerà semplicemente un nuovo Component Item nel Workspace, insieme ai necessari domain model Items.
Una volta definite tutte le informazioni richieste – essenzialmente  in alto a destra del modulo per creare la richiesta. Una volta salvata la richiesta, verranno presentati tutti i suoi dettagli.
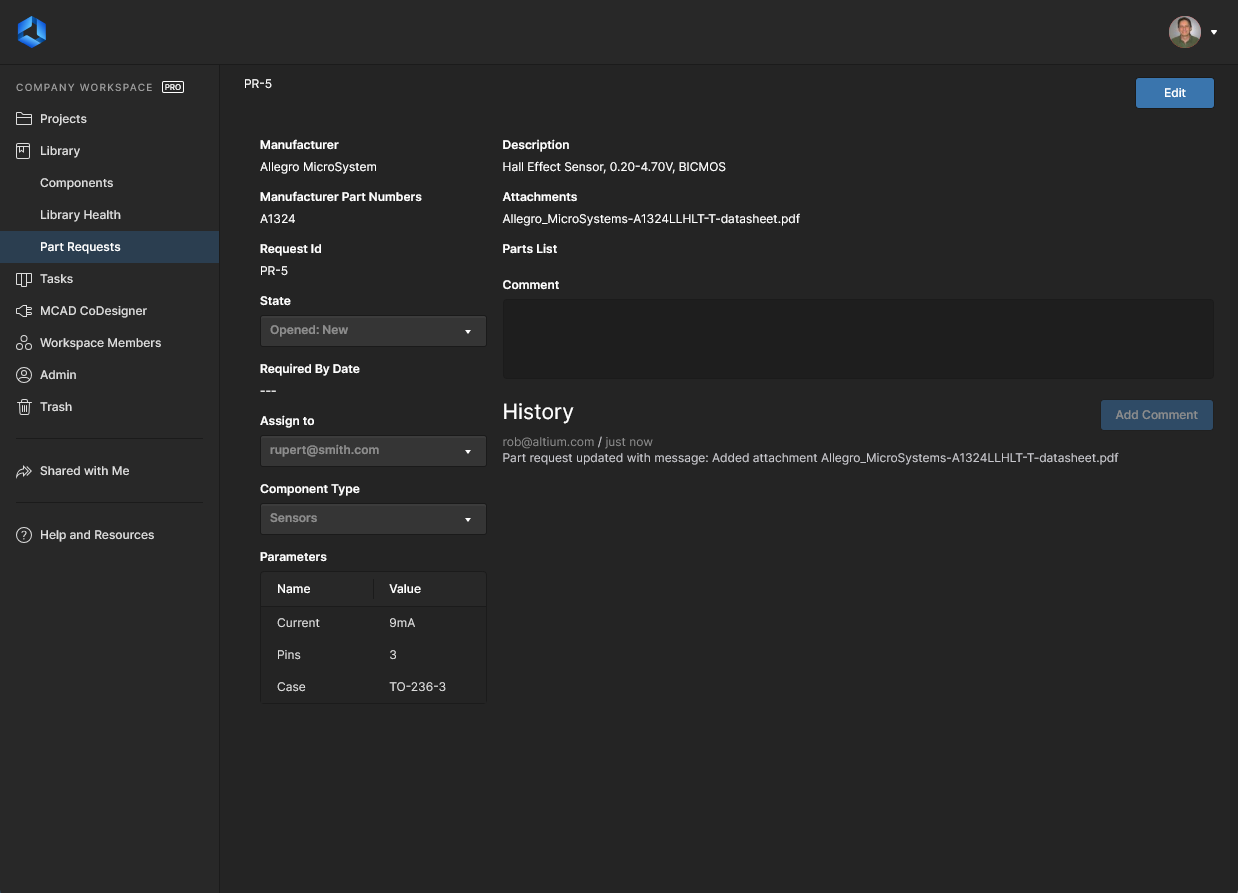
La Richiesta Parte salvata, che include i dettagli completi della parte appena aggiunta. Utilizzare il pulsante  per apportare eventuali modifiche.
Si noti che, oltre alle informazioni fornite durante la creazione della Richiesta Parte, viene visualizzato quanto segue:
-
Request Id – il titolo assegnato dal sistema alla richiesta, nel formatoPR-n (dove n è il successivo identificatore intero disponibile). -
Comment – usare questo campo per commentare la richiesta. Ciò consente una comunicazione bidirezionale tra il richiedente e il bibliotecario. Ad esempio, il richiedente potrebbe modificare qualcosa dopo l'invio originale e doverlo segnalare al bibliotecario che sta lavorando sulla parte. Oppure il bibliotecario potrebbe richiedere informazioni aggiuntive o una conferma su qualche aspetto della parte. Dopo aver scritto il commento, fare clic sul pulsante per inviarlo. Qualsiasi commento comparirà nella sezione
 History della pagina e anche nel flusso informativo quando si visualizza la richiesta parte in Altium Designer tramite il pannelloExplorer . -
History – un flusso continuo di eventi relativi a questa richiesta.
Visualizzazione delle Richieste Parte
In qualsiasi momento, un utente può visualizzare le richieste parte di cui è stato responsabile dell'avvio (Requestor), oppure di cui è responsabile della lavorazione (Librarian). Questa operazione può essere eseguita dalla pagina
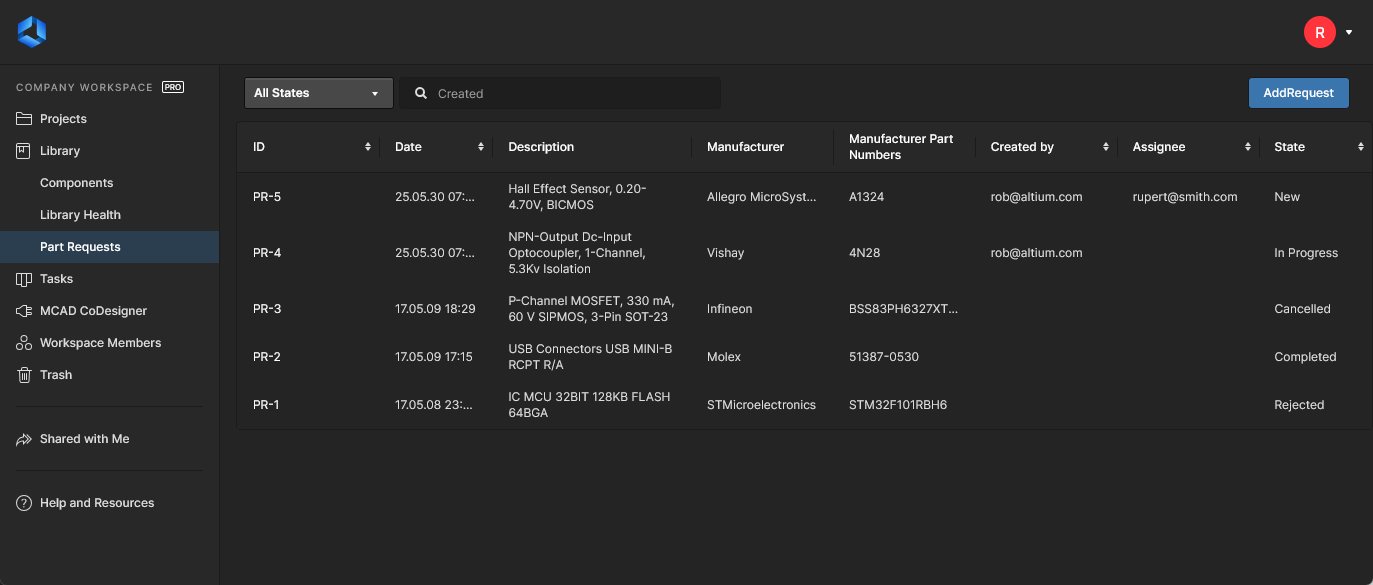 Elenco riepilogativo principale delle Richieste Parte: vi si può accedere in qualsiasi momento facendo clic sulla voce
A questo livello di riepilogo, ogni richiesta parte è elencata in termini delle seguenti informazioni fornite:
-
ID – un identificatore sequenziale automatico fornito dal sistema. -
Date – la data di creazione della richiesta. -
Description – informazioni aggiuntive fornite quando la richiesta viene creata o modificata. -
Manufacturer – un identificatore chiave della parte per la richiesta. -
Manufacturer Part Numbers – l'altro identificatore chiave della parte. -
Created by – l'autore originale della richiesta (il Requestor). -
Assignee – il Librarian che sta attualmente lavorando sulla richiesta parte. -
State – lo stato corrente della richiesta, come fornito quando la richiesta viene creata o modificata.
 : fare clic sul controllo o sul nome della colonna.
È possibile accedere alla pagina dettagliata di una richiesta parte facendo clic sul relativo ID.
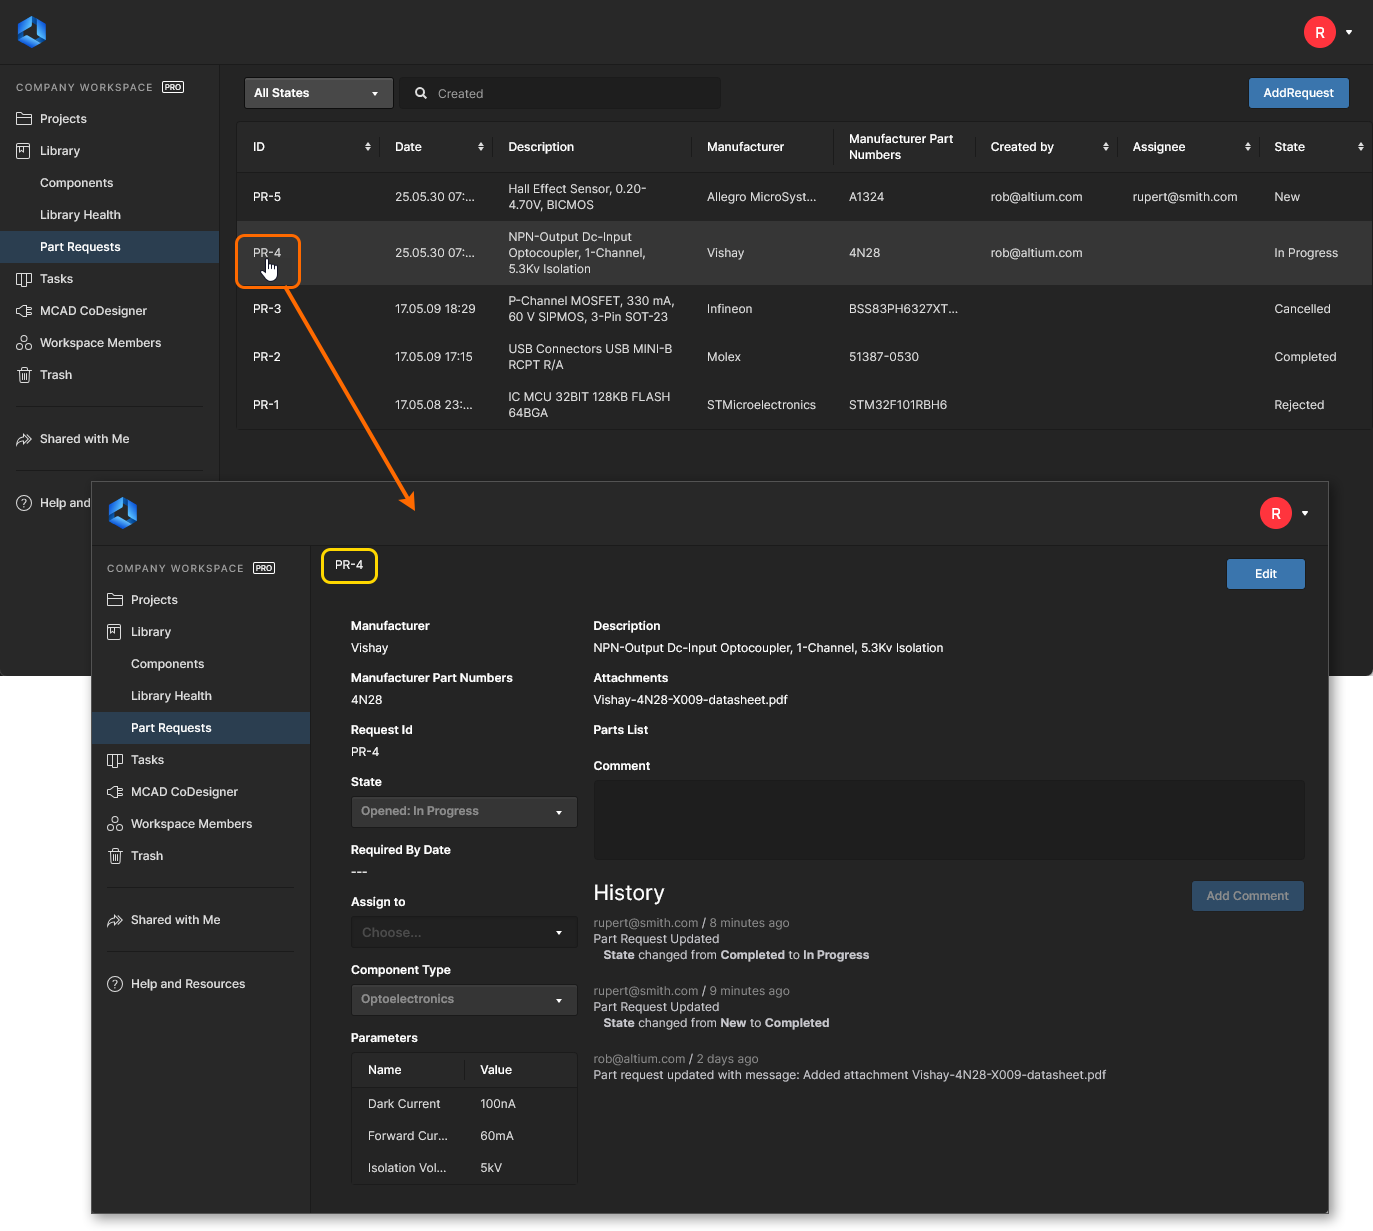 Accesso alla pagina dettagliata di una richiesta parte dalla pagina principale
Modifica di una Richiesta Parte
Per modificare una richiesta parte, accedere alla relativa pagina dettagliata, quindi fare clic sul pulsante  in alto a destra della pagina. Si noti inoltre che è disponibile un campo
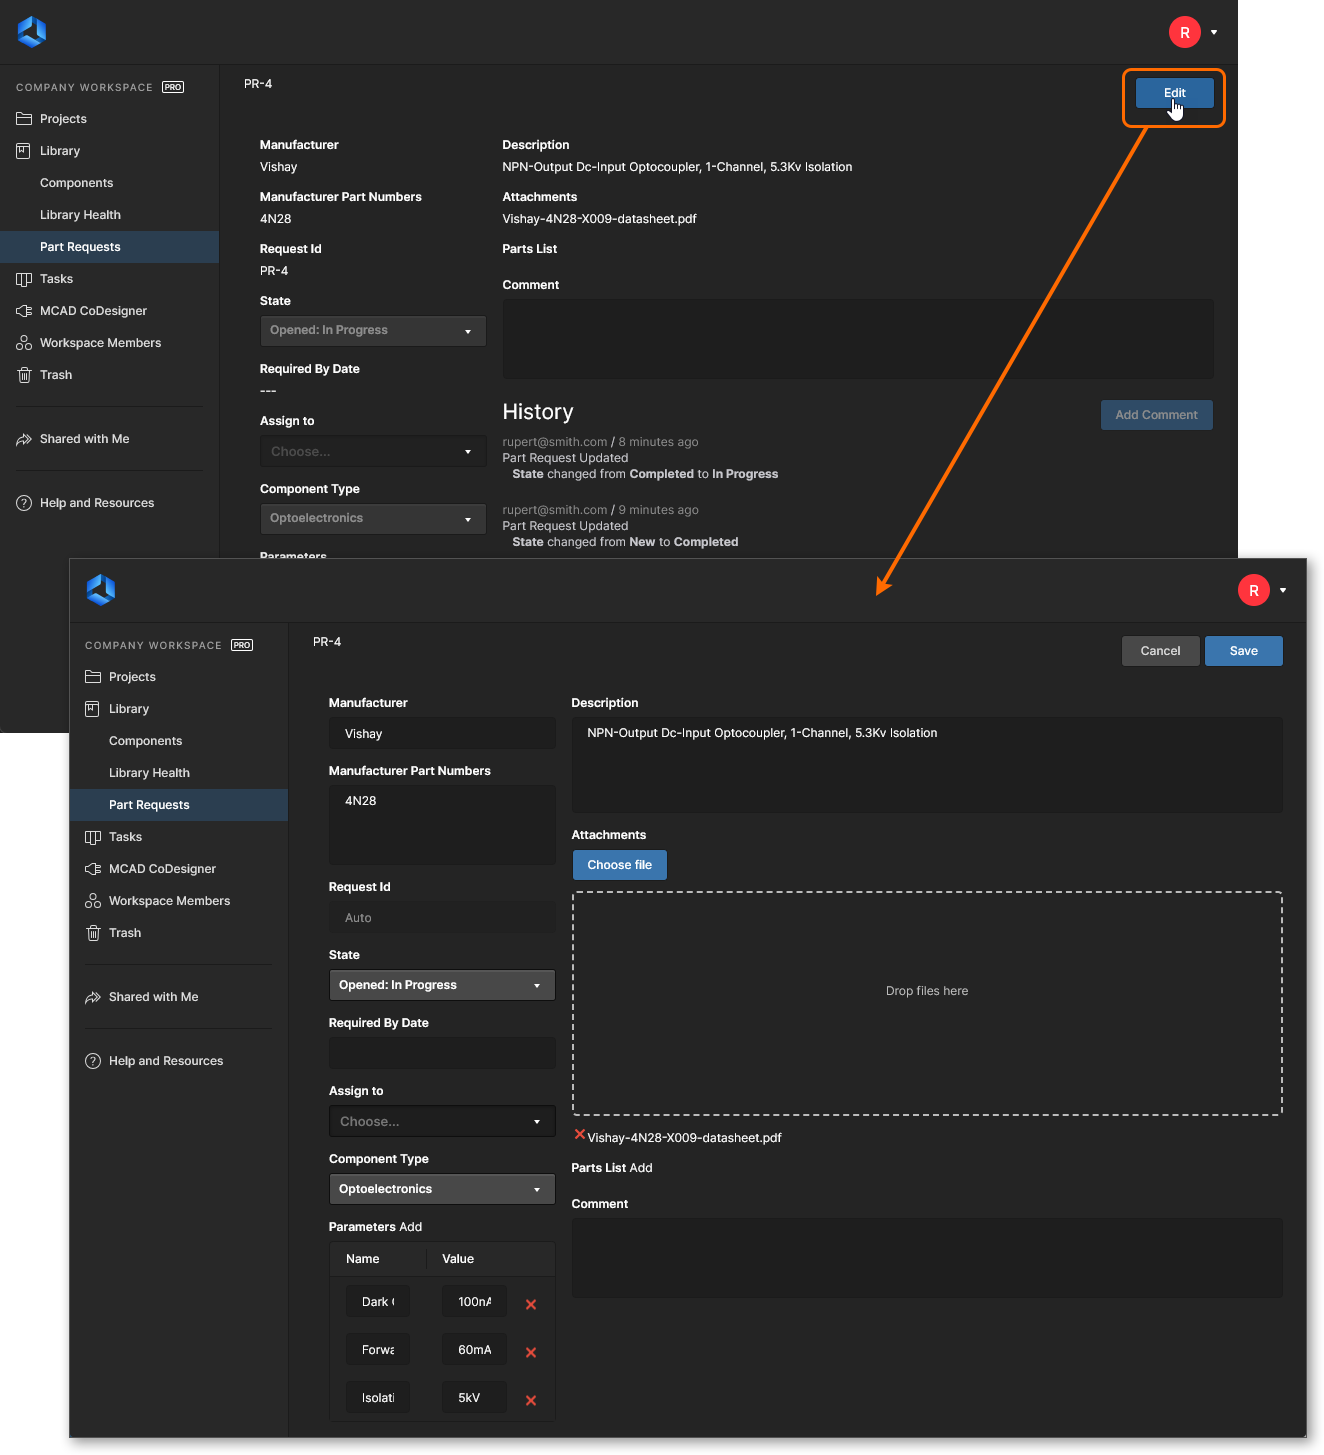 Accesso al modulo con cui modificare una richiesta parte esistente.
Apportare le modifiche necessarie, quindi fare clic su  . Per uscire senza apportare modifiche, fare clic su
  .
.
Notifiche
Alla creazione di una richiesta parte, il richiedente, i membri del gruppo Librarian e gli amministratori del Workspace riceveranno notifiche email, a condizione che la funzionalità Email Notifications sia abilitata. Questa operazione viene eseguita da un amministratore nella pagina
Personalizzazione degli stati
Una volta inviata la richiesta per una nuova parte, esistono diversi stati in cui può infine entrare. Per impostazione predefinita, vengono forniti i seguenti stati:
-
Opened States – stati in cui la richiesta è attualmente ancora "attiva":-
New -
In Progress
-
-
Closed States – stati in cui la richiesta è stata considerata risolta e quindi "chiusa":-
Completed -
Rejected -
Cancelled
-
Per soddisfare i requisiti di diverse organizzazioni, gli stati sono personalizzabili. È possibile:
- Modificare i nomi degli stati predefiniti.
- Aggiungere stati aggiuntivi (denominati secondo necessità).
-
Modificare l'ordine degli stati (come appariranno nel relativo menu a discesa
State durante la creazione/modifica di una richiesta parte).
Questa operazione viene configurata da un amministratore nella pagina
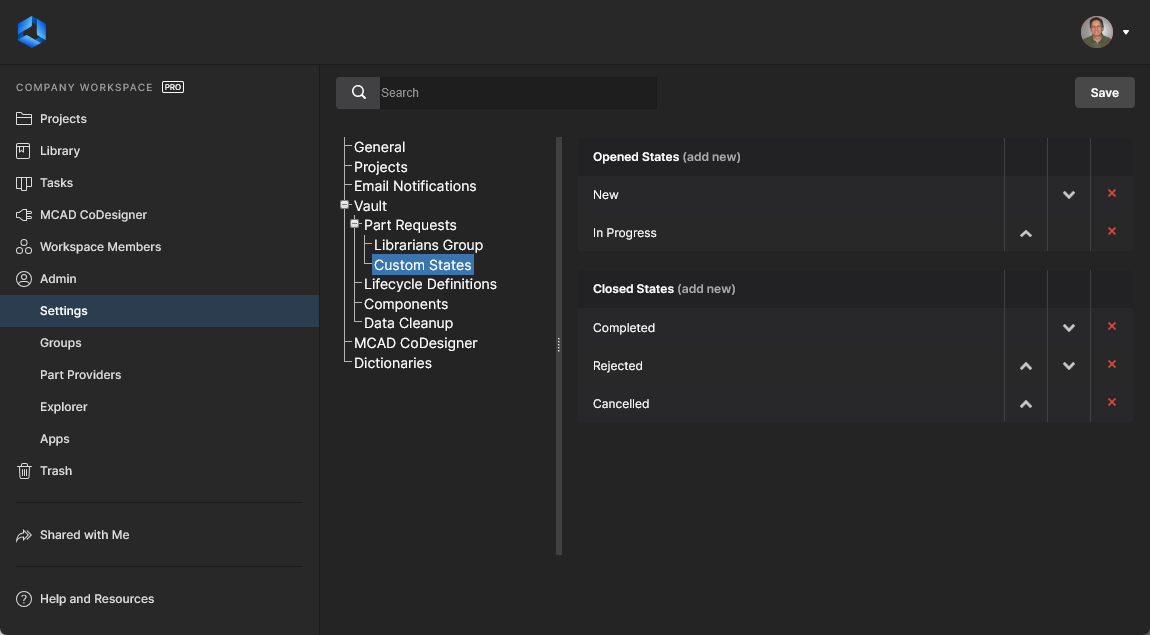 La pagina
Apportare le modifiche come segue:
-
Per modificare il nome di uno stato esistente, fare clic sul suo nome. Apparirà la finestra
Custom State Name in cui eseguire l'operazione. -
Per aggiungere un nuovo stato, fare clic sul controllo
add new , associato al tipo di stato (aperto o chiuso). Utilizzare la finestraCustom State Name per assegnare allo stato la denominazione richiesta. -
Per modificare l'ordine degli stati, utilizzare i controlli Move Up (
 ) e Move Down (
 ), ove applicabile (e disponibili).
-
Per rimuovere uno stato, fare clic sul relativo controllo
Remove ( ).
).
 Localizzato tramite A