
Configuring Sign-in Authentication
The Company Dashboard Authentication page allows Company Account Administrators to configure and enable Single Sign-On (SSO) capabilities for your Company Account and includes support for SCIM (System for Cross-domain Identity Management) user and group provisioning, which automates the exchange of identity data between your company and its Identity Provider (IdP).
This backend configuration system allows Company Account administrators to establish, test, enable and disable the SSO capability for company users. The SSO option is available when signing in to Altium Designer, your Altium account, and an Altium Workspace. When set up for Company Account users, SSO offers the convenience of signing in to Altium software and services using the same set of credentials that apply to your company-wide systems.

SAML Single Sign-On
When configured and enabled in the Dashboard, the SSO system establishes authorized identities from your company's nominated Identity Provider (IdP), for example Okta, OneLogin, etc, with the ID assertion communications based on the standardized Security Assertion Markup Language (SAML 2.0). The SSO sign-in interface for your company, if not already in place, is usually based on a template or example provided by the IdP – this instigates the SAML-based authentication assertion exchanges and provides access to company services.
In its default state, the Dashboard Authentication page shows the preconfigured URLs for the AltiumLive SSO service (1. Altium metadata configuration), and the option to upload or manually enter your IdP's authorization connection data (2. SAML Identity Provider Configuration).

Note that the Altium metadata configuration entry includes provided identity information for your organization’s Altium SSO service:
-
Entity ID – used as the IdP response target URL. This can include a GUID suffix that identifies a specific Organization (such as a region/department) under your company’s Altium Account - see Multiple Organizations with one SSO Provider below.
-
Single Sign On URL – used by the IdP to identify the applicable Altium SSO URL. When configuring SAML SSO for an Altium GovCloud sign-in service, choose its associated SSO assertion URL from the entry’s drop-down menu.
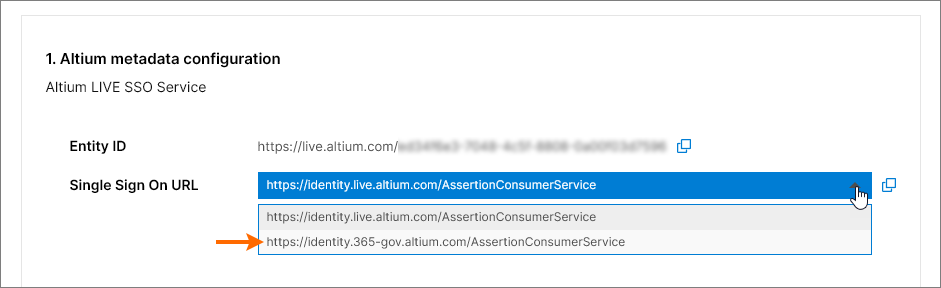
These URLs are copied (![]() ) into the Identity Provider interface to enable the generation of SAML metadata for your company’s SSO service. This configuration code (usually available as XML data) is then uploaded or copied into the SAML Identity Provider configuration entry. See below for more information.
) into the Identity Provider interface to enable the generation of SAML metadata for your company’s SSO service. This configuration code (usually available as XML data) is then uploaded or copied into the SAML Identity Provider configuration entry. See below for more information.
Identity Provider Integration Examples
Expand the collapsible section below for a step through example of the integration process for a typical Identity Provider (OneLogin):
OneLogin Identity Provider integration example guide
Integration with OneLogin as the identity provider
Adding a SAML Application:
-
Login into OneLogin as an administrator.
-
Select Applications and then Add Apps.

-
Search for 'SAML' and select the SAML Test Connector (Advanced) IdP application option.

-
Specify an application name (Display Name). This is for display purposes only.
-
Click the Save button.

-
Copy (
 ) the Entity ID and Single Sign On URL (Assertion Consumer Service) entries from the Altium Sign-On Settings section of the Company Dashboard Authentication page. In the OneLogin application setup:
-
Paste the Entity ID (service provider name) as the Audience (EntityID) URL.
-
Paste the Single Sign On URL (Assertion Consumer Service) as the ACS (Consumer) URL Validator.
-
Also paste the Single Sign On URL (Assertion Consumer Service) as the ACS (Consumer) URL.
-
The RelayState, Recipient, Single Logout URL and Login URL fields may be left blank.
-
-
Ensure that the SAML nameID format option is set to Email, and the SAML signature element is set to Both. Click the Save button to confirm the settings.

-
Click the More Actions button and then the SAML Metadata menu option to download the Identity Provider SAML metadata as an XML file.

-
This metadata file will be uploaded in the Authentication page of the Company Dashboard to configure the OneLogin SSO service – see below.
-
If the preference is to set up the OneLogin SSO service manually in the Company Dashboard, the required parameters can be found by selecting the SSO menu option in the OneLogin application interface.

-
-
The follow-up steps would be to add users, and assign the application to those users.
Expand the collapsible sections below for step-through examples of the integration and provisioning process for a typical Identity Provider (Okta):
Okta Identity Provider integration example guide
Integration with Okta as the Identity Provider
Adding a SAML Application:
-
Sign in to Okta as an administrator.
-
Click the Admin link/button and then the Add Application button under company Applications.

-
Click the Create New App button.

-
Select SAML 2.0 as the Sign-on method.

-
Specify an App name. This is for display purposes only.

-
Copy (
) the Single Sign On URL (Assertion Consumer Service) entry from the Altium Sign-On Settings section of the Company Dashboard Authentication page and paste it into the Okta SAML Settings Single sign on URL field.
-
Copy (
) the Entity ID entry from the Altium Sign-On Settings section of the Company Dashboard Authentication page and paste it into the Okta SAML Settings Audience URI field.
A Default RelayState entry is not required.

-
Set the remaining fields as follows:
-
The Name ID format is
EmailAddress. -
The Application username is (Okta)
Email. -
In the ATTRIBUTE STATEMENTS section, set the Name field to:
http://schemas.xmlsoap.org/ws/2005/05/identity/claims/emailaddressand the Value to:user.email

-
-
Click the Next button and select the ..Okta customer adding an internal app option.

-
Click the Finish button.

-
Click the Identity Provider metadata link and save the metadata XML to your computer, or click the View Setup Instructions button for manual setup options.
-
In the SAML Identity Provider configuration section of the Company Dashboard Authentication page, upload the saved metadata XML file or use the enter manually link to set up the individual sections – see below.
-
Okta SCIM Provisioning example guide
SCIM Provisioning Integration with Okta as the IdP
Adding SCIM (System for Cross-domain Identity Management) Integration:
-
In the Okta Admin Console select the General tab, and set SCIM as the provisioning method.

-
Select the Provisioning tab and click the Edit button.

-
In the settings edit mode, select all provisioning actions (Import.. and Push.. options), and HTTP Header as the Authentication mode.

-
Copy (
) the Base URL entry from the Provisioning section of the Company Dashboard Authentication page and paste it into the Okta SCIM Connector base URL field.
Copy (
) the API Token entry from the Provisioning section of the Company Dashboard Authentication page and paste it into the Okta Authorization field (under HTTP HEADER).

-
Specify
userNameas the Okta Unique identifier field for users.
-
Click the Test Connector Configuration button (see above) and ensure that the connection is working. If the configuration test is successful, close the Test window and then save the configuration (
 ).
).

-
Select To App in the navigation tree on the left, and then the Edit option.
Enable the Create Users, Update User Attributes, and Deactivate Users options, and then click Save.

Users, Group provisioning and de-provisioning:
-
Select the Push Groups tab and then click the Refresh App Groups button.

-
Select the Directory » Groups page option from the main menu.

In Groups, you should see both the application Groups and Workspaces as group entries.

-
Create 'native' Okta groups with the same name as the application group(s)/workspace(s) – in this example, the imported Administrators and Workspace groups.

-
Select a created Okta group and then click the Manage Apps button. In the Assign Applications to <group name> window, assign the SCIM Application to the group and click
 when finished.

-
Go back to the Groups page and select the Push Groups tab. Select the Find groups by name option from the Push Groups button menu.

-
Enter the group name (here,
Group Administrators) and then choose the Link Group option to link it with the application group. Save that link configuration ().

Managing Users and Groups
You should now be able to add members to, or remove members from, the existing application group(s).
-
Create a new Okta user (Directory » People, then select Add Person). Ensure that the user has a unique email address that does not exist in AltiumLive.
-
Add the new user to an Okta Group that is assigned to the SCIM application (Directory » Groups, select a group, then use Assign People).
-
Check that the user appears in the Company Dashboard.
To create a new user group through the SCIM application, create a new Okta group in the Groups page (![]() ), and then under the Push Groups tab, find the new group name and choose the Create Group option (rather than 'Link Group').
), and then under the Push Groups tab, find the new group name and choose the Create Group option (rather than 'Link Group').

The configured SCIM application should allow you to:
-
Change a User's firstname / lastname, and email.
-
Change a Group's membership.
-
Change a Group's name.
-
Create a group.
-
Delete a group – unlink the group under Push Groups with the delete from app option.
-
Activate or Deactivate a user – an activated user will receive an activation email.
Workspaces look similar to user Groups in Okta, but only support membership management. You cannot create a new workspace or rename an existing one.
After adding or removing a user from a Workspace group, you can check the result through the Altium 365 Workspace interface.

-
The new SCIM user should be able to log in using SSO
-
The new SCIM user should be automatically invited into the Workspace.
-
An Email invitation will not be sent to the user.
Expand the collapsible section below for a step through example of the integration and provisioning process for Microsoft Entra ID as an Identity Provider:
SAML login with Microsoft Entra ID
Integration with Microsoft Entra ID
SAML Application:
-
Sign in to the Microsoft Entra admin center.
-
Select Identity and then the Enterprise applications option.

-
Create your own application.

-
Select Users and groups and then Add user/group.


-
Select Single sign-on, Step 1, and then Edit.


-
Copy (
) the Entity ID and Single Sign On URL entries from the Altium Sign-On Settings section of the Company Dashboard Authentication page. Paste the copied strings into the Entity ID and Assertion Consumer Service URL fields in the Microsoft Entra app SAML Configuration area. Make sure the Default boxes are checked for these fields, and then save the configuration.

-
Download the created Federation Metadata XML.

-
Upload the Federation Metadata XML to the Company Dashboard Authentication page (the 2. SAML Identity Provider configuration region of the Altium Sign-On Settings section) and then test the SAML integration connection.
Provisioning:
-
In the Microsoft Entra app management screen, select Provisioning in the left panel and then the Get started button.
-
Set Provision MODE to
Automatic. -
Copy (
) the Base URL and API Token entries from the Provisioning section of the Company Dashboard Authentication page and paste them into Tenant URL and Secret Token fields, respectively.

-
Click the Microsoft Entra Provisioning Test Connection button, and if the credentials are successfully authorized, Save the configuration.

-
In the Mappings section, there are two selectable sets of attribute mappings – one for Group objects and one for User objects.

-
Select each mapping to review the attributes that are synchronized from Microsoft Entra ID to your app. The attributes selected as Matching properties are used to match the users and groups in your app for update operations. Select Save to commit any changes.

You can optionally disable syncing of group objects by disabling the Groups mapping.
-
Under Settings, the Scope field defines which users and groups are synchronized. Select Sync only assigned users and groups (recommended) to only sync users and groups assigned in the Users and groups page.

-
Once your configuration is complete, set the Provisioning Status to On.

-
Select Save to start the Microsoft Entra provisioning service.
Expand the collapsible section below for a step through example of the integration process for JumpCloud as an Identity Provider:
SAML SSO Configuration with JumpCloud
Integration with JumpCloud as the Identity Provider
-
In the JumpCloud interface, select SSO from the navigation tree, and then the Add New Application button on the SSO page.

-
Enter '
saml' in the configuration window Search to locate and then install the Custom SAML App.
-
Name your instance of the Custom SAML App – in this example, the label is '
Altium'.
-
Switch to the SSO tab in the JumpCloud configuration interface. Copy (
) the Entity ID and Single Sign On URL entries from the Altium Sign-On Settings section of the Company Dashboard Authentication page and paste them into SP Entity ID and Default URL fields, respectively.

-
Enter the JumpCloud endpoint IDP URL and enable the Declare Redirect Endpoint option.

-
Switch to the Identity Management tab in the JumpCloud interface. Copy (
) the Base URL and API Token entries from the Provisioning section of the Company Dashboard Authentication page and paste them into Base URL and Token Key fields, respectively. Also enter a suitable test email address.

-
Perform a Test Connection, which will show a confirmation message at the top right of the page (as shown below).

-
Turn off (uncheck) the Group Management option and then Activate the configuration.

-
Back in the JumpCloud interface SSO tab, use the Export Metadata option to download the resulting SAML metadata XML file.

-
In the Company Dashboard Authentication page, import the downloaded metadata XML file and then invoke an Integration test with the Test Sign On button. A successful integration test result should then be displayed. After the connection confirmation you can enable the Altium Sign-On Settings option and then the SSO option in the Authentication methods section.
Expand the collapsible section below for a step through example of the integration process for Microsoft AD FS as an Identity Provider:
SSO SAML Authentication with Microsoft AD FS
SSO SAML Authentication with Microsoft Administrative Domain Federated Services (AD FS)
Follow the steps outlined below to set up your Altium 365 organization log-in to use your AD FS instance for SSO authentication.
Prerequisites
-
Administrative access to the organization’s Company Account in Altium 365.
-
Administrative access to the AD FS instance.
Setting up AD FS
-
Open the AD FS Management application (usually Start → Windows Administrative Tools → AD FS Management).
-
Navigate to Relying Party Trusts and click the Add Relying Party Trust... option (1).
-
In the pop-up window make sure to select Claims aware (2) and click Start (3).

-
In the Select Data Source step select Enter data about the relying party manually (1) and click Next (2).

-
Provide a display name for the trust. This example uses
AltiumLivefor the display name.
-
Depending on your security configuration, you may specify an optional token encryption certificate. For the purposes of this guide we will not use one.

-
In the Configure URL step make sure to select the Enable support for the SAML 2.0 WebSSO protocol option (1) and input
https://identity.live.altium.com/AssertionConsumerServiceinto the Relying party SAML 2.0 SSO service URL: field (2). Click Next (3).
-
In the Configure Identifiers step provide an identifier for this trust into the input field (1). The identifier must be taken from the Entity ID entry located in the SAML Single Sign-On region of the Dashboard Authentication page. Make sure click the Add button (2).

The result should look like the following. Click Next.

-
Depending on your security configuration, you may choose optional access control policies in the next step. For this example we will not select any additional policies and continue with the
Permit everyoneoption.
-
Review the configuration and select Next.

-
Not all settings are available while setting up the trust. To allow
SHA-1to be used as the secure hash algorithm, right-click on the name of the Relying Party Trust you have just added and select Properties.
-
In the properties window select the Advanced tab (1) and set
SHA-1as the secure hash algorithm (2). Click OK to save changes.
-
Back in the AD FS Management window select the Relaying Party Trust you have added and select the Edic Claim Issuance Policy... option.

-
In the Edit Claim Issuance Policy window select Add Rule...

-
In the Choose Rule Type step of the wizard make sure that Send LDAP Attributes as Claims is selected, then click Next.

-
Provide a Claim rule name (1), select
Active Directoryas the Attribute store (2), and select an LDAP Attribute (3) from the ID which contains the username for the Altium Account. This attribute must be mapped to Name ID in the Outgoing Claim Type (3). Click Finish (4).
-
Ensure the claim issuance policy is saved by clicking OK.


This concludes the setup of AD FS.
Setting up Altium 365
-
Access the Company Dashboard Authentication page and upload the
FederationMetadata.xmlfile you have downloaded previously (see the Dashboard SSO Configuration section below for more information). The configuration should be imported, and the values of X509 Certificate, Identity Provider Issuer and IdP Single Sign-On URL should be visible. Click the Test Sign On button to test the setup. -
In the sign-on screen, provide user credentials as per your organization’s requirements and click Sign in.

-
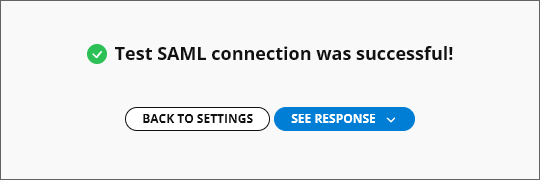
The assertion will be sent back to Altium 365. If the screen shows a Test SAML connection was successful! message, then the configuration has been completed correctly. You can view the SAML response by clicking the See Response button. Click Back to Settings to return to the Authentication page.
-
On the Authentication page, enable Altium Sign-On Settings and SSO options.
This concludes the setup. From this point on users in your organization should be able to log in to Altium 365 using your organization’s AD FS as the SSO IdP.
Expand the collapsible section below for a step through example of the integration process for AWS IAM Identity Center as an Identity Provider:
SSO SAML Configuration with AWS IAM Identity Center
SSO SAML Configuration with Amazon Web Services (AWS) Identity Access Management (IAM) Identity Center
-
Go to the IAM Identity Center and add a Custom SAML 2.0 Application (Add Application).


-
Copy (
) the Entity ID and Single Sign On URL entries from the Altium Sign-On Settings section of the Company Dashboard Authentication page and paste them into the AWS metadata URL settings. Confirm the settings with Submit.

-
Download the metadata file from the IAM Identity Center metadata area.

-
Go to Edit attribute mappings.

-
Add
${user:email}and the Format asunspecified.
-
Create new users in AWS – the names of the users should be in a format
user@domain.com.Assign the application to the created users or a group.

-
The Provisioning option in the Company Dashboard Authentication page should be turned off.
Currently, automatic outbound provisioning via SCIM is not supported by AWS.
-
Ensure that the same users exist on both the Altium and IAM sides. Users should be named following the format
user@domain.com.
-
On the Company Dashboard Authentication page, upload the XML file you have downloaded previously (see the Dashboard SSO Configuration section below for more information). Click the Test Sign On button to test the setup.
-
Then you will be redirected to the AWS login page. Enter your AWS user credentials. You should be redirected back to the Dashboard and see the Test SAML connection was successful! message.
-
After a successful test, enable Altium Sign-On Settings and SSO options.
Dashboard SSO Configuration
To configure the SSO system in the Dashboard (if not already completed), use the ![]() button on the Authentication page to locate and upload the SAML IdP configuration XML file generated by your company's IdP – see IdP integration examples above. Alternatively, use the enter manually link to add the individual elements (security certificate and URLs) of the configuration.
button on the Authentication page to locate and upload the SAML IdP configuration XML file generated by your company's IdP – see IdP integration examples above. Alternatively, use the enter manually link to add the individual elements (security certificate and URLs) of the configuration.
An uploaded IdP XML file is parsed by the system to extract the main configuration fields (X509 Certificate, Identity Provider Issuer URL, and IdP Single Sign-On URL), which can be manually edited if required (![]() ).
).

SSO is not enabled until an Integration Test is run, which is invoked by the ![]() button. This verifies the SSO identity process and your company's SSO sign-in, and then provides a confirmation message that includes the option to inspect the SAML authorization result code (
button. This verifies the SSO identity process and your company's SSO sign-in, and then provides a confirmation message that includes the option to inspect the SAML authorization result code (![]() ).
).
Back in the Authentication page, the configuration validity check is reported as successful and the Company Account's Single Sign-On capability can be enabled (![]() ). If SSO is subsequently disabled, either manually or in response to a configuration change, the
). If SSO is subsequently disabled, either manually or in response to a configuration change, the ![]() button becomes available so the test process can be repeated.
button becomes available so the test process can be repeated.

Multiple Organizations with one SSO Provider
If your company has more than one Altium Organization under the company’s Altium Account – say, an Organization for each global region – then a single SSO Identity Provider can be used to manage SSO Authentication for the entire company using an extended Dashboard Entity ID format.
The Entity ID format (by default https://live.altium.com) is extended with a GUID suffix generated for the current Organization. This enhanced URL format can be then used for a specific SSO Provider Application associated with that Altium Organization. Other Organizations under your company’s Altium Account, with different GUID Entity ID suffixes, can be linked to different SSO Applications under the same SSO Identity Provider. In practice this means that SSO Sign-in Authentication for the entire company can be managed within one SSO Identity Provider.
 The extended Entity ID, associated with the current Dashboard Organization. can be assigned to a specific SSO Provider Application.
To enable the extended Entity ID for an active SAML SSO configuration:
-
Disable Altium Sign-On Settings.
-
Refresh the page to trigger a regeneration of the Entity ID URL to its extended format:
https://live.altium.com/XXXXXXXXXX. The current Organization now can be specifically identified through its extended Entity ID. -
In the Identity Provider’s application management interface, change the application's Entity ID reference – typically called a variation of 'Audience' or 'Entity'– to the new extended version copied from the Altium Dashboard. Save the settings.
-
Activate the Dashboard Integration test and re-enable Altium Sign-On Settings.
This process can be repeated for your company’s other Altium Organizations, which should be linked to their own dedicated Application within the SSO Identity Provider. As an example reference, in the Microsoft Entra ID setup guide included here, a named Application is created at step 3 and the Identifier (Entity ID) is added at step 6.
Authentication Methods
Along with providing a setup interface for configuring Altium SSO connectivity, the Dashboard Authentication page also provides global and individual control over the full range of user sign-in options – namely; traditional Email/Password, Google®, Facebook®, and Renesas sign-in, and Single Sign On via your organization's Identity Provider. The options enabled in the Authentication methods section of the page determine the sign-in methods available to all your organization's Company Account users.


Sign-in options can be configured for an individual user by editing the settings in their Dashboard Altium Account entry. Select the ![]() button on the user's Dashboard Users page to access their sign-in override options. These settings, when edited with the Override Authentication methods option enabled, will take precedence over the global sign-in settings on the Authentication page for this user only.
button on the user's Dashboard Users page to access their sign-in override options. These settings, when edited with the Override Authentication methods option enabled, will take precedence over the global sign-in settings on the Authentication page for this user only.
The Authentication Override settings might be used where SSO is the enforced sign-in method for an organization (all other options are disabled, globally), but an individual user requires a specific type of sign-in access – email/password only, for example.


Here, the Google Authentication method is disabled for this member. Confirm the new settings with the ![]() button.
button.

Individual user sign-in methods that have been specified with the Override Authentication methods settings (as above) can be restored to their defaults with the Reset users overrides option in the Authentication methods section of the Authentication page. This will reset the individual sign-in settings for all users to the global authentication methods that are currently selected on the Authentication page.


Confirm the Authentication methods reset process with the confirmation dialog’s ![]() button.
button.

2-Step Verification Configuration
Group administrators of a Company Account can configure 2-step verification to provide an additional layer of security so the users can confirm their identity when they try to sign in to their Altium accounts using the email/password credentials. The additional verification method can be set to sending a one-time password (OTP) to an email or to generating an OTP in an authenticator application, such as Google Authenticator or Okta Verify. 2-step verification can be enforced for all users in the Company Account, or individual users can configure 2-step verification for their accounts.
Configuring 2-step verification on the Company Account level is performed by a Group Administrator of the account in the 2-Step Verification region of the Dashboard Authentication page. To do this, enable the Enforce 2-Step Verification option and select the required Method, either OTP via Email or OTP via Authenticator App. If the OTP via Authenticator App option is selected, choose the required App from the drop-down:
-
Okta – select this option to use the Okta Verify application.
-
Google – select this option to use the Goggle Authenticator application.
-
Other – select this option to use an authenticator application other than Okta Verify or Google Authenticator, for example, Microsoft Authenticator.
Optionally, set a link in the Instructions Link (Optional) field (this link will be shown on the 2-Step Authentication page when a user tries to sign in).


When enforcement of 2-step verification is enabled and the OTP via Authenticator App method was chosen, the user will need to make the final configuration when trying to sign in for the first time. It will be required to add an authenticator code to the preferred authenticator application by scanning the provided QR code using the application or by entering the secret key. After that, the code generated by the application needs to be entered in the Enter code field. After clicking Continue, a number of recovery codes will be provided that can be used in the case when access to the authenticator code in the application is lost. These codes should be stored in a safe place. Click Done to complete sign in to the Altium Account.

Alternatively, if enforcement of 2-step verification is not enabled on the Company Account level (the Enforce 2-Step Verification option is disabled on the Dashboard Authentication page), 2-step verification can be configured on the Altium Account level. When signed in to your Altium Account, access your profile (by clicking your user avatar/image at the top right of your browser window and selecting My Profile in the drop-down menu) and open the Authentication page. In the 2-Step Verification region of the page, enable the Enable 2-Step Verification option and select the required Method, either OTP via Email or OTP via Authenticator App.
-
If the OTP via Email method was chosen, code verification emails will be sent to your profile email.

-
If the OTP via Authenticator App method was chosen, select the required App from the drop-down (Other, Okta, or Google). In the window that appears, complete setting up the application as described above.

If a user's Altium Account is a part of a company’s Altium Account and the 2-step verification is not yet configured for the Altium Account, the user will be suggested to configure 2-step verification for their Altium Account when they sign in using their email and password even if enforcement of 2-step verification is not enabled on the Company Account level. Select the preferred Method and follow further steps to configure 2-step verification (configuration is performed similarly as described above). Alternatively, click Remind me in a week to postpone configuration of 2-step verification.

 ).
).Device-based Authentication
Users can configure device-based authentication method supported by their device (such as Windows Hello or Face ID) when logging in to the Altium Account.
To configure device-based authentication, click the fingerprint button when using the Altium Sign In page (https://auth.altium.com/).

On the next step, complete the sign in using your password and click Continue.

Depending on your device, you will be provided with steps to complete configuration of the applicable authentication method. When completed, enter the desired Device Name and click Done.

Next time when you choose to sign in using device-based authentication (by clicking the fingerprint button on the Altium Sign In page), you will be suggested to use the configured method to sign in.
The configured device-based authentication methods can be found in your profile. Access your profile (by clicking your user avatar/image at the top right of your browser window and selecting My Profile in the drop-down menu) and open the Authentication page. The configured methods will be listed in the Authentication methods region of the page. To remove a configured method, use the Unlink account control in its entry.

Linking a Renesas Account
You can also link your Altium account to your Renesas account to use the latter when logging in to the Altium account. To do that, access your profile (by clicking your user avatar/image at the top right of your browser window and selecting My Profile in the drop-down menu) and open the Authentication page. In the Authentication methods region of the page, click the Link account control in the Renesas tile.

Use the subsequent pages to sign in to your Renesas account and link it to your Altium account. Once the Renesas account is linked, its tile will appear on the Authentication page with the Unlink account control that can be used to remove the link between the accounts.

If allowed by global and individual settings for authentication methods (learn more), the linked Renesas account can be used when signing in to your Altium account.
