
Configuring and Administrating Your Workspace

Altium Essentials: Workspace Folder Structure
This content is part of the official Altium Professional Training Program. For full courses, materials and certification, visit Altium Training.
Your connected Workspace can be configured to provide the best productivity and work consistency for the entire design team. Some Workspace configuration aspects can be set up directly from Altium Designer, including:
- Managing Workspace folder structure
- Creating and managing the Workspace content
- Managing global-level operation permissions
- Managing access to the Workspace content
- Managing Revision Naming Schemes
- Managing Lifecycle Definitions, etc.
The Explorer panel provides a direct interface to your connected Workspace. From the Explorer panel, you can perform many activities, including:
- Creating and managing the organizational structure used in the Workspace.
- Creating any number of Items, each representative of a design object.
- Direct editing and placement of Item Revisions.
- Reviewing and managing the lifecycle of Item revisions.
- Interrogating the usage of a particular Item revision (Where-Used).
- Browsing and managing Part Choice information for Workspace Components.
- Downloading stored data, including data generated through the release of board design projects.

The Explorer panel gives access to data stored in a Workspace.
The Explorer panel becomes your trusty right-hand, presenting a collection of features that can really enhance your productivity when working with the Workspace through Altium Designer.
Notes on working with the Explorer panel:
-
While the majority of your day-to-day working with your Workspace will be through the Components panel or Explorer panel, there will also be occasions when you need to interact with the Workspace through its browser interface – especially for administrative purposes. For more information, see Exploring the Browser-based Interface (Altium 365 Workspace, Enterprise Server Workspace).
-
When working with Workspace components in the Explorer and Components panels, it is important to note that:
-
The content of Component Folders in the Explorer panel is determined by what has been copied/imported into that folder.
-
The content of component Categories in the Components panel is determined by Component Type parameter setting of each component.
-
-
Besides the standard ways of accessing a panel (from the Panels button at the bottom right of the design space or the View » Panels menu), the Explorer panel can also be accessed by clicking the Active Workspace control at the top right of the design space when actively connected to a Workspace (e.g.,
 for an Altium 365 Workspace or
  for an Enterprise Server Workspace) and clicking the entry of the currently connected Workspace highlighted in the associated menu (and distinguished by the
  /
/  icon).
-
A variation of the Explorer panel that is essentially a 'trimmed-down' version and titled Choose Item is opened in some instances, for example, when you need to choose a model or template. For example: from the Schematic editor when using the Choose manually command from the right-click menu of the Item Manager dialog.
-
When performing a search in the panel, the results default to showing the latest version only.
Choosing the Browsable Workspace
The Explorer panel can only interface to one Workspace at a time. The field at the top-left of the panel indicates the currently active Workspace – the Workspace whose content you will be able to browse and modify. To select a different Workspace, click on the Workspace name and choose a different Workspace from those currently connected.

Access controls for changing the browsable Workspace.
If you are signed in to your Altium account and are attempting to open the Explorer panel but you are not currently connected to a Workspace, the panel will present a list of known Workspaces, which you may choose from to connect and ultimately view the contents of the panel.
If you are not signed in to your Altium account nor connected to a Workspace, you will be asked to sign in with your Altium account or register one to view the contents of the panel. Select Sign in to open the Sign In dialog, where you can sign in to your Altium account. Select register to be redirected to the Altium 365 registration page, where you may register or sign in with your Altium account credentials.
The Content Vault replaced with Manufacturer Part Search dialog opens if Learn more is selected from the Looking for Altium Content Vault? window in the top-left corner.
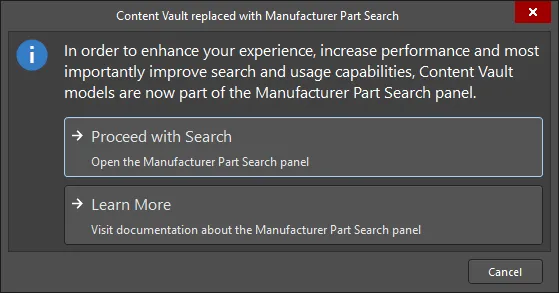
As the dialog states, items in the Content Vault are now part of the Manufacturer Part Search panel. Click Proceed with Search to open the panel and search for the required item. You can read about the Manufacturer Part Search panel by clicking Learn More.