
Managing Item Revision Lifecycle
Another important aspect of an Item-Revision is its Lifecycle State. This is another identifier that can be used to quickly assess what stage that revision has currently reached in its life, and what designers are therefore authorized to do with it. Where the Revision reflects design changes made to the Item, the Lifecycle State reflects the state of the item from a business perspective, such as Planned, New From Design, For Production, Obsolete, and so on.
Initially, an Item-Revision will be in the Planned state – ready to receive (and store) the data generated by the applicable save/upload/release process. Once that process is complete, that revision is closed (data cannot be saved/uploaded/released to that same revision again), and the Lifecycle State is set to the next applicable state. While the data for this Item-Revision can not be modified, the Lifecycle State can be changed to reflect just where that Item-Revision is, in terms of its useful life.
Your Workspace provides different types of lifecycle management – from basic management, through simple management including states and state transitions, to fully structured management, where the states and state transitions are organized into distinct stages, with a link between those stages and the Revision ID. Based on these different lifecycle management strategies, a number of standard Lifecycle Definitions are defined, from which you can choose to model the state transitions that an Item-Revision may undergo over time.
An Item-Revision's lifecycle is managed manually and in accordance with company policies and practices. Consider a revision of a PCB Fabrication Data Item, containing the data to physically fabricate a bare board. Once the development team is happy with it, the Lifecycle State of that revision might be elevated to a state such as In Prototype and, all being well with the subsequently manufactured prototype, would then proceed to an In Production state. At a later date, another revision of the same Item might be needed (another box!) to introduce better functionality. Once released, this second Item-Revision would progress through prototyping to production, while the lifecycle of the previous Item-Revision passes through deprecation and finally to obsolescence. The point is that the lifecycle information shows how the contents of the 'Item-Revision box' can, or rather are, being used.

Example showing the 'life' of an Item-Revision. The revision was at one time authorized to go for prototype and on to production, but subsequently became deprecated and is now obsolete.
In respect of Workspace components, lifecycle management makes the concept of component certification available as the components are formally revised and lifecycle-managed. This allows the organization to specify the state of its components and what they can be used for (design, prototype, production, etc). From a design perspective, this results in the creation of the Workspace library, containing a formal collection of components that have been company-approved for use in each new design project embarked upon within that company.
The beauty of using certified components in your designs is that when it comes time to change the lifecycle state of your board design, the integrity of the design becomes greater still, since a design can only be released to "Prototype" or "Production" provided the components it uses are also in a corresponding state. Put another way, you wouldn't start to produce that assembled board if the components are only at a "Design" stage!
And, if we take this to the finest level of granularity in the component management arena itself, the system will flag any attempt to promote the lifecycle state of a component in the Workspace if its referenced domain models are not in a corresponding correct state to be able to do so. In other words, a parent component cannot be further in its lifecycle than its child models.

Design using components that have been certified for use.
Browsing Item Revision Lifecycle History
The revisions of an Item and their lifecycle history can be browsed and managed from the Explorer panel and the detailed Item view. In the Explorer panel, change to the Lifecycle aspect view tab for the selected Item-Revision. To access release data, switch to the Preview aspect view tab.

Access revision and lifecycle data for an Item directly through the Explorer panel, by selecting an Item-Revision and using the Lifecycle aspect view tab. Switch to the Preview aspect view tab to see release data for that revision of the Item.
Commands for the Lifecycle View

Right-click on a lifecycle state cell - in either the detailed Item view or the Explorer panel - to access the following commands:
- Place <Revision> – use this command to place an instance of the currently selected Item Revision, where such placement is supported. For example, placement of a revision of a Component or Managed Sheet onto an active schematic sheet. The symbol for the component, or the managed sheet symbol, will appear floating on the cursor, ready for placement.
- View Revision Properties – use this command to access the Properties for Item Revision dialog, which provides a listing of properties associated with the parent Item of the selected Revision. Other properties are also listed, such as parameters for a component, or the parent design and configuration for a released board design Item.
- Edit Revision - this command is only available where the item revision is in the Planned state. Use it to access the Edit Revision dialog, from where you can make changes to the revision before any data is release into it.
- Delete Revision – use this command to delete the selected Item Revision. Note that you must delete Items from the 'top-down'. That is, you cannot delete a child Item Revision that is used by a parent Item; you first need to delete the parent Item.
-
Promote <item to State> – use this command to promote the Item revision to its next Lifecycle State, which may also transition it to the next Lifecycle Stage.
-
Rollback <item to previous State> – revert the Item revision's Lifecycle state back to its previously assigned state. Say, from
Productionback toPrototypewhen theComponent LifecycleDefinition applies. -
Make <item unusable> / Abandon <item> – use this command to change the Item revision Lifecycle State to
Abandoned,Obsolete,Deprecated, etc, rather than promoting it to the next higher level. This would be anObsoletestate for theComponent Lifecycledefinition, for example. -
Establish Planned Revision - <level for Item ID> – use this command to create the next revision level for the Item, which will be in the initial
PlannedLifecycle state. The Create Revision dialog will open that provides all controls necessary to fully define the Item revision. -
Establish Planned Item – use this command to create a new Item based on the currently selected Item-Revision, in the initial
PlannedLifecycle state. The Create New Item dialog will open ( with the selected Item-Revision set as an Ancestor Revision) that provides all controls necessary to fully define the Item.
 Edit Revision dialog
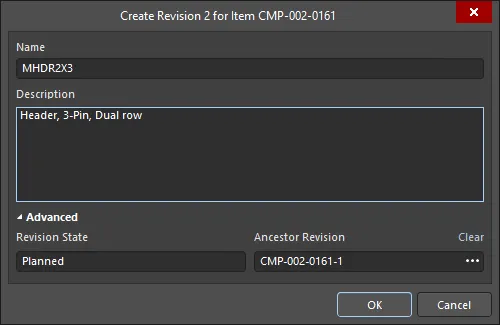 Create Revision dialog
When a state transition command is selected, the State Transition Validation dialog opens. The dialog provides details regarding errors detected, Workspace location, states of item revisions after transition, stage, and the status of the transition. The name of the dialog will vary depending on the current lifecycle state of the selected item.

Different iterations of the State Transition Validation dialog
Options and Controls of the State Transition Validation Dialog
-
Item Revision - click to open the Properties for Item Revision dialog, where you may view the item's properties, values, revision details.
-
Vault - lists the Workspace in which the item resides.
-
State - click to open the Lifecycle Definition dialog, where you may modify the item's state attributes (color, transitions, applicability, visibility), add new states to the definition, remove any unused states, and link stages to revision levels (where applicable).
-
Stage - lists the stage type and number of the given item.
-
Status - lists the status of the transition.
-
State change note - used to attach a note to the item(s) being changed.
Additional Controls
-
BOM tab - lists items that participate in the transition.
-
Where Used tab - lists child items that are used within a Workspace parent item, such as a project or schematic sheet.
-
Revision Transitions - displays the current item revision state, alongside an arrow that points to the next anticipated state.
-
Errors - displays the details regarding errors detected.
Batch Lifecycle State Changes
All of the design Items stored in your Workspace have a Lifecycle State. The lifecycle state is used to reflect the readiness of that Item for use, for example, an Item might be New From Design, In Production, or Deprecated. The lifecycle state of multiple Items can be changed in a single batch process.
To perform a batch change:
-
Select the required Items in the Explorer panel.
-
Right-click and choose the Operations » Change state command from the context menu.
-
The Batch state change dialog will open. The Next State column will default to the next lifecycle state for each Item involved. This can be changed on an individual Item basis. Alternatively, the standard Windows Ctrl+click or Shift+click techniques can be used to select multiple entries in the dialog. The last cell selected will display the down arrow, use this to quickly set the required state across all selected Items.
-
Once the Next State has been set as required, click the Process button to effect the lifecycle state changes.
-
A Confirm dialog will appear, enter a comment if required (this is stored as part of the Item History) and click Yes to complete the batch lifecycle state change.
 Batch state change dialog
An example of quickly changing the lifecycle state of two components.
Options and Controls of the Batch state change Dialog
-
Grid - displays information about the selected items designated to be updated in the batch process. Click on the link for an item under the Next State column to access a drop-down from which you can select an alternate Next State option.
-
Add - select to open the Choose Item Revisions dialog to add additional items.
-
Remove - select to remove selected items.
-
Process - click to change the Lifecycle state of all the listed items. A confirmation dialog will open; enter a comment if required (this is stored as part of the Item History) then click Yes to complete the batch Lifecycle state change.
Right-click Menu
-
Load linked
- Load Children - select to load Lifecycle state information from an item's children into that item.
- Load Parents - select to load Lifecycle state information from an item's parents into that item.
- Add - select to open the Choose Item Revisions dialog to add additional item(s).
- Remove - select to remove selected items.
- Validate transitions - select to validate the status of all items. If an item fails validation, the reason will be listed under the Status column. If an item passes validation, the Status changes to Valid.
- Columns - use the sub-menu to select or deselect columns to display.