
Defining the Substacks - Standard Mode
Updated: October 08, 2026
At a Glance
This article explains how to define substacks for a PCB when working in Standard Rigid-Flex mode in Altium Designer. It outlines the difference between Standard Rigid-Flex and Advanced Rigid-Flex modes, clarifies how board regions are created and managed in each mode, and walks through the basic process of creating a new flex substack in the Layer Stack Manager. If you want a clearer understanding of how to set up the required layers and configure a flex substack correctly in this mode, this guide will help you follow the process with confidence, keep reading.
- Learn how Standard Rigid-Flex mode differs from Advanced Rigid-Flex mode, especially in how board regions are defined.
- See where to access the Substack Selector in the Layer Stack Manager and how to add or delete a substack.
- Understand the basic steps to configure layers, enable flex settings, and add extra layers such as Coverlay for a flex substack.
- Learn how Standard Rigid-Flex mode differs from Advanced Rigid-Flex mode, especially in how board regions are defined.
- See where to access the Substack Selector in the Layer Stack Manager and how to add or delete a substack.
- Understand the basic steps to configure layers, enable flex settings, and add extra layers such as Coverlay for a flex substack.

When the standard rigid-flex mode is selected in the Layer Stack Manager, the Substack Selector will appear in the display (as shown below), as well as buttons to add a new substack and delete the current substack.

The first step is to configure the layers required in the rigid-flex design.
Creating a new Flex substack:
- Configure the layers required across the entire rigid-flex board, and Name the stack in the Properties panel. Learn more about working in the Layer Stack Manager.
-
Click the
 button to add a new substack, as shown above.
- Check or clear the Checkbox for each layer so that only layers required in this flex substack are enabled.
- Enable the Is Flex checkbox and Name the substack in the Properties panel.
- To add additional layers, such as a Coverlay, right-click on the layer in the main editing window and select the required command from the context menu.
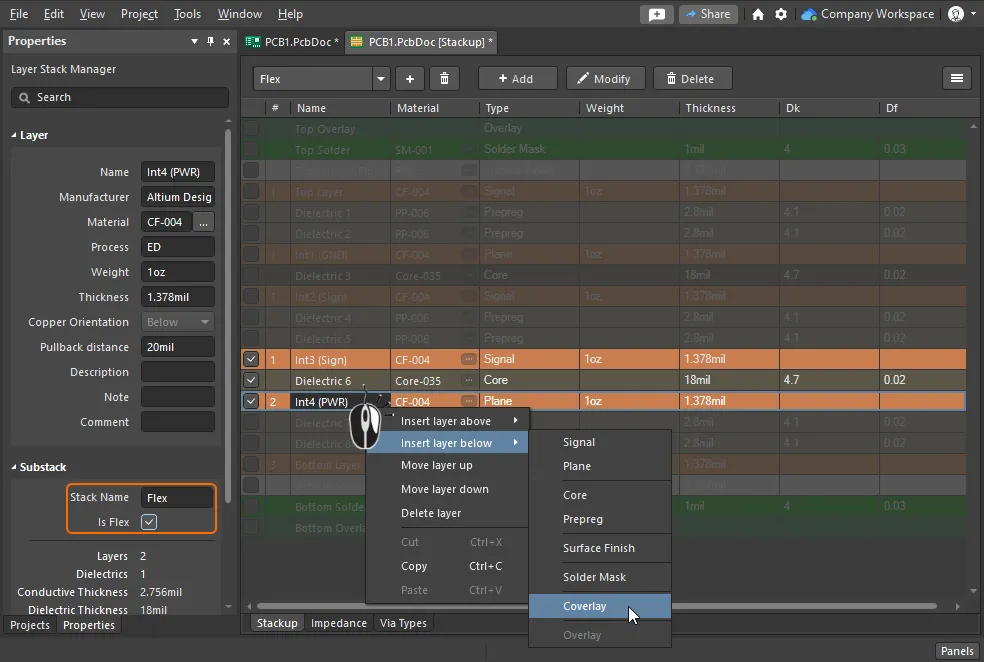
Enable/disable the layer checkboxes to configure the layers required in the flex substack, then add any additional layers needed in this substack.