Altium Designer, in conjunction with your connected Workspace, offers the ability to update components in an existing board design to use components that reside in that Workspace. The components sourced from database and file-based libraries can be individually updated to Workspace components, or batch updated using automated Parameter matching through the Altium Designer Item Manager.
Using a highly configurable rule system to target suitable components in the Workspace, the Item Manager dialog provides a fast and effective way to convert the current PCB project to one that uses Workspace Components.
The Item Manager provides two key abilities in relation to components and sheets of re-usable schematic circuitry in a board design project:
-
Migration – firstly, it allows the conversion of a design project from using components and schematic sheets based on traditional approaches to using Workspace entities (components and managed sheets). In this respect, it can be thought of as providing a 'convert to using Workspace data' function.
-
Synchronization – secondly, once a design has been converted to using Workspace content, the Item Manager provides a simple way to synchronize the content used in the design to any corresponding source content in the Workspace that has been updated. In this respect, it can be thought of as providing an 'update from Workspace data' functionality.
By way of background, note that an individual component in a design can be updated to a Workspace component directly from the Properties panel in the Schematic Editor. To do so, select the component on the schematic sheet and then use the panel's Source drop-down menu to choose a Workspace as the component data source – you need to be connected to the Workspace for access. The subsequent Component source dialog provides the option to select a target component from the Workspace or simply link the component to the Workspace while retaining or replacing the component identifier (Design Item ID).
If the Workspace component has been selected, the accessed component data will replace the existing component and models, and update the component parameters. The panel will also indicate the component's current lifecycle state and revision status, as shown below.

A local component can be converted to a Workspace component on an individual basis, or in bulk using the Item Manager. Here you can see the original component. Hover over the image to see the component switched out for its Workspace counterpart.
Alternatively, components can be replaced through the project's ActiveBOM document (BomDoc).
While this would be a laborious approach to updating all of a design's local components to Workspace components, in even a small-scale board design, the Item Manager provides a simple and automated conversion method that uses advanced parameter matching (Automatching) and a bulk update approach. A typical application of the Item Manager would be to update an existing board design to use Workspace components and managed schematic sheets that have been migrated to a Workspace from company libraries.
Accessing the Item Manager
The Item Manager dialog is accessed from the main Tools menu from an active schematic document (Tools » Item Manager) and presents all components and sheet symbols found in the active board design project.
To be able to match the design components to potential Workspace components, you need to be connected to a Workspace. If you are not connected, the Automatch feature will not be available and manual matching will use cached Workspace component data.
Select the dialog's lower Unmanaged or Components tab to populate the list of components in the current design. In essence, the left section of the dialog shows component settings of the active project (Current Settings), while the right section lists how they will change (New Settings) when suitable Workspace components from the Workspace have been assigned. The New Settings region has the same fields as the Current Settings region. To view and access sheet symbols, select the Sheet Symbols tab.
.")
Access the Item Manager from the Schematic Editor's main Tools menu. The dialog will auto-populate with the current design components (and schematic sheets).
The way in which component data is presented in the Item Manager dialog is highly configurable, based on the data columns that are enabled and/or grouped. This allows the list of design content and their associated system/user parameters to be shown in a way that matches specific approaches to component identification – all item parameters, such as proprietary company part numbers, for example, can be displayed as needed.
To locate a listed component in the design documents, right-click on its entry in the Item Manager and select Cross Probe from the associated context menu.
Columns
To configure which columns are presented in the Item Manager, right-click in the dialog's column heading area and select Columns » Select Columns from the context menu. The Select columns dialog will offer all available parameters, including those specifically from the local design ([Current Settings]) and the content in the Workspace ([New Settings]). Use the 'eye' control to the left of an entry to display the column ( ) or not (
 ).
).

The columns that are shown, and their order, can be configured to suit your Workspace/library systems and preferences.
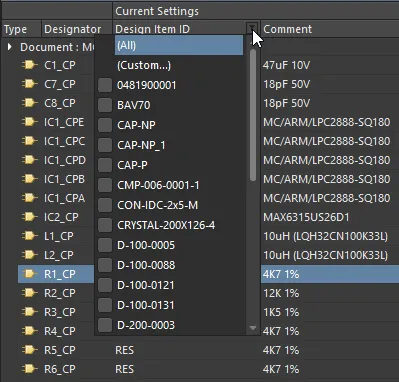
Hover over a column heading to expose its filter icon which when selected, allows the listing in the Item Manager to be constrained to specific entry types or to a custom-created filter.
Grouping
To group the listed content data by a particular parameter column, such as component type category or schematic document, etc., drag the desired column heading entry to the dialog's upper title row (as indicated by the hint text). The content list will reconfigure to group its entries by the assigned parameter column.

Any data column heading can be dragged to the dialog's top row to group the listed entries by that parameter.
Options and Controls of the Item Manager Dialog
-
Type – displays the icon of the entity.
-
Designator – displays the Item designator.
-
Item – displays the Item-Revision ID and Item name (for Workspace entity), Design Item ID (for a non-Workspace component), or file name (for a non-Workspace sheet symbol).
-
Document – displays the document in which the Item is located.
The middle section of the dialog shows component settings of the active project (Current Settings), while the right section lists how they will change (New Settings) when a suitable Workspace component or managed sheet has been assigned. The regions are described in detail below.
Current Settings
For each design entity, listed in terms of its designator, the following information is presented in this region of the grid:
-
Design Item ID – displays the Item-Revision ID (for a Workspace entity) or Design Item ID (for a non-Workspace component). For a non-Workspace sheet symbol, this field is blank.
-
Name – displays the comment (for a component) or the file name (for a sheet symbol).
-
Lifecycle State – the current lifecycle state of the revised component or managed schematic sheet revision. The Items that have been soft-deleted will have the state Deleted. The non-Workspace entries will have the state [Not Managed].
-
Revision Status – if the revision is in an applicable state (allowed for use in designs), this field reflects that the revision is the latest (Up to date) or not (Out of date). The Items that have been soft-deleted will have the status Deleted. For non-Workspace entries, this field is blank.
-
From – the source Workspace or library from which the entity in the design was placed. For a non-Workspace sheet symbol, this field is blank.
New Settings
This region presents information about the proposed change. It has the same fields as the Current Settings region, but these fields carry slightly different meanings when dealing with Workspace content:
-
Revision HRID – displays the Item-Revision ID.
-
Name – the name of the Item.
-
Lifecycle State – the current lifecycle state of the chosen component or managed schematic sheet revision.
-
Revision Status – the current revision status of the chosen component or managed schematic sheet revision.
-
From – the name of the source Workspace in which the chosen component or managed schematic sheet resides.
-
Footprint – the name of the associated footprint. For a sheet symbol, this field is blank.
For multiple instances of the same component used in a design, you can select a group of components and manually choose the required Workspace. The choice will be applied to all components in the selection. Standard multi-select features (Ctrl+Click and Shift+Click) can be used to select groupings.
Grid Region Additional Commands
Right-Click Menu
-
Update to latest revision – use to update the currently selected Item to the latest revision.
-
When selecting this command for a multipart component and not all parts of this component are selected, you will be prompted to update all the parts. Click Yes in the Confirm dialog that opens to continue.
-
When selecting this command for a managed schematic sheet and multiple instances of it referencing the same Managed Schematic Sheet Item revision are placed on the schematics, you will be prompted to update all these instances if not all of them are selected. Click Yes in the Confirmation dialog that opens to continue.
-
Automatch – click to open the Automatching Items dialog.
-
Choose manually – use to open the Replace Component dialog or the Choose Managed Sheet dialog, which provides direct access to available Workspace content.
You also can double-click an item in the grid to manually choose an Item.
-
When selecting this command for a multipart component and not all parts of this component are selected, you will be prompted to update all the parts. Click Yes in the Confirm dialog that opens to continue.
-
When selecting this command for a managed schematic sheet and multiple instances of it referencing the same Managed Schematic Sheet Item revision are placed on the schematics, you will be prompted to update all these instances if not all of them are selected. Click Yes in the Confirmation dialog that opens to continue.
-
Refresh – use to refresh the information in the grid region.
-
Cross Probe – use to cross probe and locate the Item in the appropriate schematic.
-
Show in Explorer – use to show the Item in the Explorer panel.
-
Export – use to export the item report using the Export for dialog.
Tabs
Use the tabs at the bottom of the grid region to populate ("filter") the region with the following specific content in the current design:
-
All – display all the content in the current design.
-
Unmanaged – only display content that is local in the current design (i.e. they have not been placed from a Workspace).
-
Managed – only display Workspace content in the current design.
-
Components – only display components in the current design.
-
Alternate Components – only display any alternate components in the current design.
-
Sheet Symbols – only display sheet symbols in the current design.
-
Ambiguous Items – only display any ambiguous items in the current design.
-
Ambiguous Footprints – only display any ambiguous footprints in the current design.
To resolve any ambiguous Items, generally caused by multiple matches, select the Ambiguous Items or Ambiguous Footprints tab and make a suitable choice from the Not selected menu in the dialog’s New Settings section. Note that multiple matches, and therefore the available choices, can be referencing different revisions of the same component. When the issue is resolved (no longer classed as ambiguous), the component will move to the Managed/Components tab lists.
Additional Controls
Migrating to Workspace Design Content
Assuming that the connected Workspace is populated with collections of components and managed schematic sheets, the current board design project can be converted to using these content where a suitable match is available. The local-to-Workspace matching can be performed manually, or as an automated process through the Item Manager based on configurable parameter matching. When complete, the local component definitions will be updated to their Workspace counterparts.
The Workspace that is accessed as the source of the Workspace content is specified in the Item Manager Options dialog accessed by clicking the  button at the bottom-left of the Item Manager. Use the dialog's Source Server drop-down menu to select an available Workspace – you must be connected to a Workspace for it to be available as a source.
See the Update Options section below for more information on the Item Manager Options dialog.
Manually Choosing Workspace Content
To manually replace a local component (or schematic) with a Workspace version, select its entry in the Item Manager list and then Choose manually from its right-click context options. You also can double-click an item in the grid to manually choose an item. In the subsequent Replace Component dialog, browse and select a suitably matched Item in the Workspace (the latest revision of that Item will be used).

An example of manually choosing a Workspace component to use as the source for the existing design component in a design.

An example of manually choosing a Workspace component to use as the source for the existing design component in a design.
When the dialog is closed (OK), the selected Workspace component information will populate the entry's New Settings region in the list. Note that since the entry is now a pending Workspace entity, the updated entry is transferred from the listing under the Unmanaged tab to the list under the Managed tab.

Details regarding the chosen Workspace Item appear in the New Settings region of the grid, listed under the Managed tab.
The
New Settings region simply presents information about the
proposed change. The process is completed through the execution of an Engineering Change Order (ECO) – see
Applying the Update.
For multiple instances of the same component used in a design, you can select a group of components and manually choose the required Workspace Item – the choice will be applied to all components in the selection. Standard multi-select features (Ctrl+Click, Shift+Click) can be used to select the grouping.
-
When selecting the Choose manually command for a multipart component and not all parts of this component are selected, you will be prompted to update all the parts. Click Yes in the Confirm dialog that opens to continue.
-
When selecting the Choose manually command for a managed schematic sheet and multiple instances of it referencing the same Managed Schematic Sheet Item revision are placed on the schematics, you will be prompted to update all these instances if not all of them are selected. Click Yes in the Confirmation dialog that opens to continue.
Automatching Components
To automate the process of choosing matching Workspace content, the Item Manager provides a configurable auto-matching capability that attempts to match each local design component with a component in the connected Workspace. When a match is found, that Workspace component will be proposed for the update.
The key to the Item Manager's automatic parameter matching capabilities is the update rules and options available in the Item Manager Options dialog, accessed from the Item Manager dialog's button. The configurable rules determine which component parameters in the active (local) design are matched to the parameters of all Workspace components in the selected Source server.

Create simple or complex rules to accurately match local components to suitable components in the Workspace.
How effective these rules are in achieving a local-to-Workspace component match will depend upon the available component parameters, which will be specific to company systems or individual preferences. In the simplest but perhaps unlikely scenario, the Comment or Component Name parameter entries may match between the local and equivalent Workspace components. In the ideal case, however, both the local and Workspace components will share a company reference or manufacturer part number parameter.
To create such a part number rule, for example, select and modify an existing rule (which can also be renamed) or use the  button to create a new rule – a rule must be selected (checked) to be edited. Note that the Local Parameter and Server Parameter selection drop-down lists are independent, which allows differently named parameters to be nominated – in the below example, the local
 Libray Reference parameter and the Workspace Part Number parameter represent a company part reference number.

Complex, multi-parameter rules require that all nominated component parameters match those in a Workspace component.
Running a part/reference number matching rule such as above is likely to create a near-complete match between the local and Workspace components. With the rule established, the matching process is initiated by the  button in the Item Manager dialog.
To instigate the automatch process for an individual component, right-click on the component entry in the Item Manager dialog and select Automatch from the context menu. Alternatively, use the Choose Manually option to browse and select a specific component in the Workspace as a match.
The subsequent Automatching items dialog will indicate positive matches with the  status icon and include a reference to the name of the successful rule.

An example of achieving a successful local-to-Workspace match for many components using a single rule based on a common part number.
When a match cannot be found, the entry will appear with the  status icon, be in red text, and a reference included indicating the reason for the error or matching failure – a different or additional Rule will need to be created to achieve a successful match for those components. Also note that a rule may detect more than one Workspace component as a match, which is considered as a successful result but requires manual intervention to resolve. This conflict is regarded as an 'ambiguous' result, and can be resolved in the Item Manager dialog – see below.
When the automatch process is complete, close the Automatching items dialog (OK) to populate the Items Manager dialog with the proposed new component settings. The pending Workspace content that will be applied to matched entries are listed in the New Settings region under the dialog's Managed tab, or under the Components tab along with content that have not been matched.
If you have the Auto apply if all success option enabled in the Automatching items dialog, then if matches for all components are found the dialog will close automatically, and the Items Manager dialog populated directly with the proposed new component settings.

The pending changes to Workspace content are detailed in the dialog's New Settings region.
To resolve any ambiguous content, generally caused by multiple matches, select the Ambiguous Items (or Ambiguous Footprints) tab and make a suitable choice from the drop-down menu of the Revision HRID cell in the dialog’s New Settings section (which displays as <Not selected> by default). Note that multiple matches, and therefore the available choices, can in fact be referencing different revisions of the same component. When the issue is resolved (no longer classed as ambiguous) the component entry will move to the Managed/Components tab lists.

Where a rule detects more than one match the Ambiguous Items tab offers the capability of nominating a choice. More than six matches will result in a rule error.
-
Automatching can also be applied to specific list entries or groups of entries. Select multiple entries (using standard Shift+Click/Ctrl+Click techniques) and then Automatch from the right-click context menu to match just those entries, or when the listing is arranged in Groups, right-click on a group heading entry and select the Automatch command to apply the process to just that group.
-
When using the component automatching feature, if a Component Item has multiple revisions, the first revision detected will be used. This means the proposed Item Revision is out of date to begin with. This situation will be reflected back in the Item Manager, through the Lifecycle State field in the New Settings region. So if the proposed Item Revision is not suitable, and is not dealt with through the Automatching items dialog; it can still be modified through the manual choosing process back in the Item Manager.
Advanced Matching Rules
As outlined above, Item Manager rules establish parameter matches between the local project components and Workspace components. Any number of rules can be created, and these work on descending priority basis. If the first (top) rule fails, then the next rule is applied – effectively a sequential Boolean OR relationship. A rule is active only when its associated checkbox is enabled.
When the automatch process is run, the State Notes column in the Automatching items dialog indicates which rules have failed in finding a match. In this case, a different or new rule is required to satisfactorily match the available parameters.

While basic rules may fail to find a match for all components, more specific parametric rules can be created to achieve a fully matched result.
Use the Item Manager Options dialog’s Add Rule button to create a new rule, and the associated  to apply multiple parameter matching conditions. Click
  to remove the selected value. As each parameter condition is added the rule becomes increasingly specific, and all conditions need to be satisfied before the rule match succeeds – effectively a Boolean AND condition. Click the Remove button to remove the selected matching rule.
Taking the example shown here, where (say) the components cannot be matched by part/reference number parameters, a new rule can be created to match suitable specifications for the listed unmatched capacitors shown above.

Rules operate in top-to-bottom sequence until a match is found. Multi-parameter rules must satisfy all conditions for a match.
When a rule succeeds in finding a match, the automatching process immediately moves on to the next component in the list. It will only try the next available rule if the previous one has failed.
Update Options
The Item Manager Options dialog provides a range of content updating options that can be used to further refine how automatched Workspace components are applied to the current board design.
The Matching rules region displays the current rules defined for matching. Refer to the Automatching Components section to learn more.

The Item Manager's Update options provide a flexible way to determine which parameters are updated, and under what conditions.
The options are applied to the current design via the ECO process, and behave as follows:
-
Update ‘Lock Designator’ field – when checked, the local component’s Locked state for the Designator field will be overwritten by its state in the linked Workspace component.
-
Update ‘Lock Part-ID’ field – when checked, the local component’s multi-part device ID selector’s Locked state will adopt that of the linked Workspace component.
-
Update Parameters – check to allow a component’s parameters to be updated to those in the linked Workspace component. Enables the below options.
-
 button – opens the Library Update Settings dialog (see below).
-
Preserve parameter location – when checked, the position of a visible parameter on the schematic sheet remains unchanged, rather than reset to the default position of the linked Workspace component.
-
Preserve parameter visibility – when checked, the Visible status of a parameter remains unchanged, rather than adopting that of the linked Workspace component.
The Library Update Settings dialog includes a list of all available parameters, for all components, in the current board project (right-click to access mass on/off functions). Those parameters checked in the list will be updated when a local component is replaced with/updated to a Workspace component – the behavior of that update is determined by the options outlined below.

Which component parameters are updated can be precisely specified. Right-click to checking options.
The parameter replacement (or addition) behavior is determined by the lower two options in the dialog:
-
Library parameters not in sheet – sets the update behavior when a Workspace component (Library) parameter does not exist in the local (Sheet) component.
-
Add – the parameter is added to the component during the update.
-
Do not add – the parameter is not added to the component during the update.
-
Add if not blank – the parameter is only added to the component during the update if it has valid data (its Value entry is not blank).
-
Sheet parameters not in library – sets the update behavior when a local (Sheet) component parameter does not exist in the linked Workspace component (Library).
-
Remove – the existing (local) parameter is deleted from the component during the update.
-
Do not remove – the existing parameter is not deleted from the component during the update.
-
Remove if blank – the existing parameter is deleted from the component during the update if it does not have valid data (its Value entry is blank).
Applying the Update
The proposed changes that have been set up in the Item Manager are applied to the current board design by generating and executing an Engineering Change Order (ECO). Select the range of listed components you wish to update, and then the desired ECO option from the  button menu – the options are:
-
Generate ECO – use this command to generate and execute an ECO through the Engineering Change Order dialog. Within the dialog, you can browse the actions that will be taken to implement those changes and disable any actions as required. When satisfied, execute the ECO and the changes will be applied.
-
Apply ECO – use this command to directly create and execute an ECO 'quietly' (without the Engineering Change Order dialog appearing).
, which can be run quietly, or through a dialog (as shown).")
Changes are implemented through use of an Engineering Change Order (ECO), which can be run quietly, or through a dialog (as shown).
The executed ECO process will update the project components accordingly, which will then be listed in the Item Manager dialog as currently up-to-date Workspace components. Note that the previous icon for each entry ( ) has changed to indicate the reference to a Workspace component (
 ).
).

The Item Manager showing the new current settings for the design content in the PCB project. Previously local design components have been fully replaced with Workspace components.
In the schematic editor, the updated components are linked to their matched components in the Workspace – the active link information will detect a change in the Workspace component's revision state when/if it is subsequently updated. Select a component in the design space and note its Source and associated information in the Properties panel.

Example showing the successful replacement of a local component, where the Properties panel shows the Workspace source and revision state of the replacement component.
Synchronizing to Changed Workspace Content
During the course of product development, it is very likely that changes will occur in the design's source components or managed schematic sheets. For example, component models may be updated to a new drawing standard, or component definitions may have been updated to add new parameters. Any such changes made to the Workspace components and managed sheets used in a design need to be detected and made to flow through to any affected schematic sheets.
Detecting when Updates are Required
For an individual selected component or sheet symbol, appropriate Component or Sheet Symbol mode of the Properties panel will provide an immediate indication that an object is out of date relative to its Workspace source data. Use the associated  or
or  button to update the data for that object from its source Workspace.

The out-of-date state of a component or managed schematic sheet is indicated in the Properties panel when the object is selected. A button for updating the selected object to its latest revision is provided.
As well as being used to detect and manage components and schematic sheets that are currently non-Workspace entities (indicated as [Not Managed] and not sourced from a Workspace), the Item Manager is also used to detect and manage all content that is out of date.
When the Item Manager is opened it automatically detects and lists all components and managed schematic sheets (indicating if they are sourced from a Workspace or not), and then compares the Item-Revision of each Workspace content on the schematics against the available revisions of that content in the Workspace. If there is content that has a newer revision available in the Workspace, that is flagged as Out of date in the Item Manager's Revision Status column.

Note any components and managed schematic sheets that have been detected as being Out of Date, select them, and then right-click to perform an Update.
There are a number of controls that can be used to help organize and sort the content in the Item Manager. For Workspace components, select the dialog's Managed or Components tabs and disable any applied column grouping to display all out-of-date components in a single list. Also, click on the Revision Status column header to sort by that column, which causes all content that is Out of Date to be clustered together, ready to be updated.
Updating the Content
To bring the out-of-date content up to date, it must be selected, and then the Update to latest revision command applied from the right-click context menu. The New Settings region of the dialog will then show the detail of each new Item-Revision.
Once changes have been set up as required, those changes need to be implemented. This is done through an Engineering Change Order (ECO). The drop-down menu associated with the ECO button, at the bottom of the Item Manager, provides two ways in which to effect an update:
-
Generate ECO - use this command to generate and execute an ECO through the Engineering Change Order dialog. Using the dialog, you are able to browse the actions that will be taken to implement those changes. You can disable any actions as required - you always have full control of what gets changed. When ready, execute the ECO and the changes will be effected.
-
Apply ECO - use this command to directly create and execute an ECO quietly - without the Engineering Change Order dialog appearing.
 and managed schematic sheet(s) back in the design.")
Select the out-of-date content and use the Update to latest revision right-click command to load the New Settings region with the updated revision details. Then apply the update – through an ECO – to the component(s) and managed schematic sheet(s) back in the design.
Note that during a revision update (synchronization), the Item Parameters will be updated as defined by the current
Update Options settings in the
Item Manager Options dialog (accessed from the Item Manager's
button) – see
Update Options, above.
-
When updating a multipart component and not all parts of this component are selected, you will be prompted to update all the parts. Click Yes in the Confirm dialog that opens to continue.
-
When updating a managed schematic sheet and multiple instances of it referencing the same Managed Schematic Sheet Item revision are placed on the schematics, you will be prompted to update all these instances if not all of them are selected. Click Yes in the Confirmation dialog that opens to continue.
Verification that replacement has indeed been successful can be performed at the individual component/sheet symbol level within the schematic sheets of the board design project. Access the Properties panel for a selected item, which will now show a link back to the corresponding source managed Item. Alternatively, verification can be performed quickly back in the Item Manager, which updates to reflect the new settings for the items in the board design project, in the Current Settings region of the grid.
Item Manager Report
Before committing to a component update or change process in the Item Manager, it may be prudent to generate a snapshot of the current listing information using the dialog's Export function. To do this, right-click anywhere in the Item Manager and select Export from the context menu, and then navigate to a suitable location and name the report as required. The report is generated as an HTML file and presented with the same layout as the current Item Manager display.

Select Export from the right-click menu to generate a report from the Item Manager. The report is generated in HTML format and represents a snapshot of the complete Item Manager listing.
