
数据采集支持
父页面: Altium 365 工作区
Altium 支持组织从源服务器复制所需内容,并将其传送到第二个目标服务器的能力——这个过程简称为服务器数据获取。例如,这允许您快速从托管在 Altium 365 基础设施平台上的工作区获取数据,并将其传送到您的现场服务器。
通过获取设计内容,所有权坚定地归接收服务器团队所有,他们可以自由地对内容进行修改和维护——在他们的服务器中——按照他们希望的方式进行。通过保持获取的数据与其原始来源之间的链接,可以对数据进行智能处理,包括当任何复制内容的来源更新时进行通知。因此,例如,如果在后续过程中,源服务器中的设计项目的修订版发生了变化,目标服务器有能力更新到那个修订版,重新与“母舰”同步。无论目标服务器中的项目是否有额外的发布,总是有可能恢复到源服务器的先前修订版——所有这些都是通过保持与项目原始来源的链接,或起源来实现的。 数据获取通过Altium 365基础设施平台作为一项服务提供。数据获取 - 概念概述
下图提供了数据采集概念的更高层次、图形化的说明。所描述的数据采集原则,无论采集的数据类型如何,都是相同的。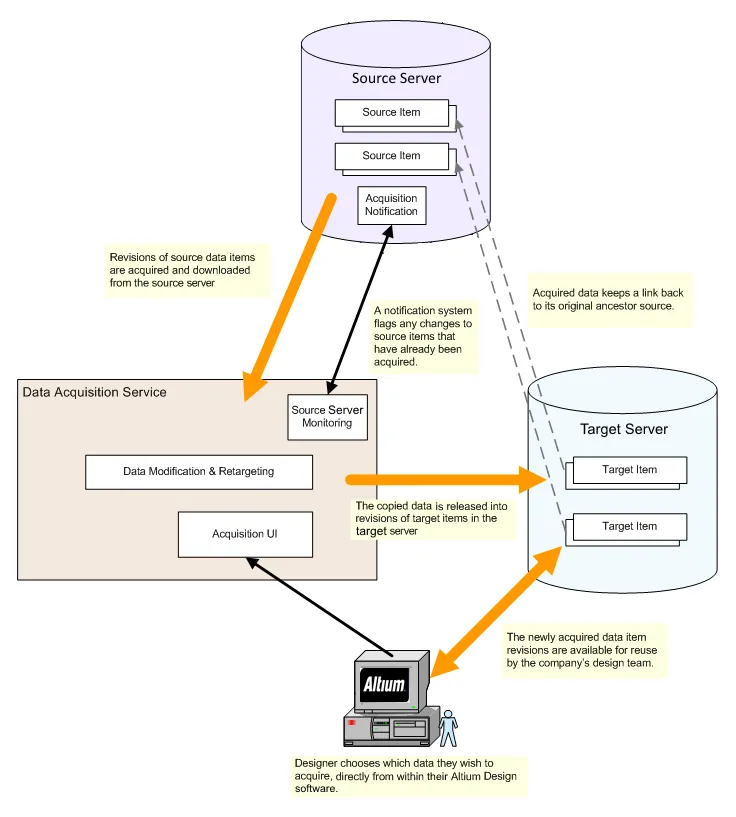
服务器数据采集的概念。 请注意,将接收内容数据的工作区(目标工作区)必须能够连接到源工作区。这意味着企业服务器不能作为内容数据的来源供Altium 365工作区使用,因为后者不能连接到前者——前者位于本地LAN/WAN中,没有暴露在互联网上。 实际上,这意味着内容车(Content Cart)数据可以在Altium 365工作区之间、企业服务器工作区之间以及从Altium 365工作区传输到企业服务器工作区。在这些情况下,接收/目标工作区可以“看到”并连接到源工作区,而一个Altium 365工作区目标不能看到并连接到位于封闭本地网络中的工作区。 工作区之间的数据获取摘要:
| 源 | 目标 | 支持 | |
| Altium 365工作区 | → | Altium 365工作区 | |
| Altium 365工作区 | → | Altium 企业服务器工作区 | |
| Altium 企业服务器工作区 | → | Altium 365工作区 | |
| Altium 企业服务器工作区 | → | Altium 企业服务器工作区 | |
可获取的项目
使用数据获取功能,可以从源服务器获取以下类型的项目,并导入到目标服务器:
- 3D 模型
- Altium Designer 偏好设置
- 组件(包括相关的部件选择)
- 组件模板
- 数据表
- 印刷电路板封装
- 管理的原理图页
- 输出作业
- 原理图模板
- 脚本
- 仿真模型
- 符号
在获取数据时需要考虑的事项:
- 只有在源服务器中处于已发布状态的数据项才能被获取。
- 只获取源项的选定修订版,而不是该项可能存在的所有修订版。
-
获取源组件或管理的原理图表项的修订版时,所有链接的子项也将被获取:
- 组件项 – 适用的修订版包括以下链接的子对象:符号项、封装项、3D模型项、仿真模型项、数据表项、组件模板项。
- 管理的表项 - 适用的修订版包括以下链接的子对象:组件项、符号项、脚印项、3D模型项、仿真模型项、数据表项、组件模板项、原理图模板项。
- 获取的源项目修订版的生命周期将假定为初始的“发布后”状态,这由目标项目分配的生命周期定义决定。源项目修订版的任何生命周期历史都将被忽略。
- 如果出于任何原因,无法获取所选源组件/管理的原理图表项的子项,则不会继续获取该所选组件/管理的原理图表项。
获取用户界面
相关页面:使用内容购物车
获取操作是通过内容购物车对话框执行的。可以从Altium Designer的资源管理器面板内访问此对话框。当您浏览希望获取数据的源服务器时,右键点击您希望获取的项目修订版,然后从上下文菜单中选择操作 » 添加到内容购物车命令。您可以添加一个或多个选定的项目修订版,甚至可以添加一个项目文件夹(这将使购物车加载该文件夹中所有项目的最新修订版)。

“内容车”对话框 - 从源服务器获取数据的指挥中心。
使用内容车来获取你需要的所有数据内容。从源服务器获取数据项的过程是直接的,可以总结为以下几个步骤:
- 源服务器会自动确定为当前活动服务器,但可以通过左上角的浏览器面板中可用的选择器菜单更改为另一个已连接的服务器。
- 使用内容购物车的目标服务器名称下拉菜单(以蓝色高亮显示)从列表中选择另一个目标服务器,该列表填充了当前已连接的服务器 - 选择服务器管理选项以启用/禁用服务器连接。对于组件,目标也可以指定为本地保存的集成库文件(IntLib)。
-
原始项目修订在主网格中列出。可以向购物车添加任意数量的额外项目修订。为此,请点击对话框右上角的添加更多项目控件,并选择选择条目以访问选择项目对话框(浏览器面板的一个实例)。从这里,您可以浏览源服务器以获取更多项目,一次添加一个或使用标准的多选工具批量添加。或者,选择手动添加条目以访问添加新项目对话框。此对话框允许您粘贴您需要的外部项目列表(每行一个项目),然后可以在源服务器中使用选定的搜索标准(GUID、项目 ID、名称或MPN)搜索这些项目。如果您决定最终不获取某些项目修订,请选择并从列表中移除项目修订(点击
 按钮)。
按钮)。
- 点击内容购物车对话框右下角的更改设置控件以访问内容购物车结构对话框。从这里,您可以为特性支持获取的每种数据项类型定义默认选项。这包括在目标服务器中指定一个默认文件夹,以及默认的生命周期定义、项目和修订命名方案,以及一个起始索引。您还可以添加注释,当浏览您获取的内容时,这可以为他人提供有关获取的有用信息。
-
选择了所需的源项目后,点击
 按钮。这将为获取准备目标服务器,检查所选项目修订的状态(以防它们之前已被获取)、父子链接,并提出所需的操作,对于新的获取,将是
传输新的修订和项目。虽然在这个准备阶段应用了之前指定的默认获取选项,但可以根据需要单独修改提议的目标项目的属性。为此,请在列表中选择一个项目,然后点击 按钮。
按钮。
-
准备完成后,点击
 按钮将继续进行获取。将出现一个初始确认对话框 - 点击是以继续在源服务器和目标服务器之间传输内容。一个次级确认对话框将确认获取的结果 - 通过浏览器面板浏览目标服务器中获取的项目。
获取的数据点回指其原始来源。可以通过将目标项目修订版的视图标签页从原始视图标签页更改,来查看这种祖先链接信息。
获取机制
作为背景,以下部分提供了更多关于数据获取功能所采用的基本程序流程以及管理数据获取时遇到的一般情况的洞察。
基本程序流程
下图更详细地查看了从源服务器获取数据的机制。它展示了所涉及的程序流程,本质上是在指定的源服务器和目标服务器之间复制所选版本的源项。

从源服务器获取数据并将其传输到目标服务器的机制。
如图所示,该程序本质上分为三个不同的阶段,确保数据在服务器之间传输时保持其完整性:
- 下载 – 首先下载所选版本的源项目(在源服务器中)。
- 修改 & 重新定向 – 数据会自动修改以适应定义的本地偏好设置(针对目标服务器),同时可靠地保留获取的价值。
- 发布 – 数据被发布到目标服务器中(在本例中,发布到现有目标项目的一个新版本中)。目标版本保持与其起源的链接,一个指向其祖先源项目版本的指针。
管理获取的数据
在前一节中,看到了获取数据的基本流程。为了有效管理数据的获取,跟踪源项目和获取项目的相对历史,以便通过获取管理界面为设计师提供相关的获取操作。
以下部分将探讨在管理数据采集时遇到的一般情况。在每种情况下,所获取数据的状态——就目标项目及其任何修订而言——都与其原始来源项目及其修订进行了比较。完全新的采集
在这种情况下,之前没有采集过源项目的任何修订。要将源项目的一个修订采集到一个新目标项目的初始修订中。新目标项目及修订是作为采集设置的一部分创建的。 
场景1 - 将数据获取到新目标项的初始修订版中。
获取后续修订版
在这个场景中,源项目的一个修订版之前已被获取。随后,源项目被修改,导致了一个更新的修订版的出现。在这种情况下,将创建现有目标项的一个新修订版,以获取更新的源项目修订版。

场景2 - 获取之前已获取源项目的后续版本。
已存在
在这个场景中,源项目的最新修订版已经被获取了 - 没有更多需要获取的。

场景3 - 已获取所需的源项目修订版,无需进一步操作。