Parent page: More about Collaborative Design
Human error, poor design decisions, incomplete supply chain checks - there are many issues that can, and do, occur during the design and development of an electronic product. To avoid errors such as these validation check points are needed; such as design reviews and sign-off check lists.
Every organization that develops electronic products has systems in place to manage the flow of work through their organization. For a sole operator it could be following a sequence of steps that have been learned through experience. In a small company it might be informal peer-to-peer design reviews at agreed points in the development cycle. For a larger company it might be a series of review checklists that are signed off at critical stages, or request forms that are filled out when a new component needs to be added to the company database, using in-house developed forms and databases to manage and store the results.
The challenge with using a separate workflow management system is keeping it connected and in-sync with the design data. Ideally, the workflow management process will be tightly coupled to the design process, reducing the chance for human error and insuring that the history it captures can be reviewed against the history of the design documents.
Modeling the Workflow Processes in Electronic Design
An excellent way to model any workflow process is as a diagram. A good diagram will show all of the steps in that process and their sequence, it will include key decision points, and the paths to follow for all possible outcomes.
What a flat diagram, like a Visio® diagram lacks, is a way of capturing the detail behind each step, or a way of connecting into the broader company systems and design tools. It also lacks a way of building accountability into the process, unlike a checklist that must be signed off before the design can proceed. Another big challenge with capturing a process in a diagram is that the detail that is considered to be important, is often different from one organization to the next. To satisfy these requirements you need to move beyond the Visio diagram and the checklist typed up in Word®.
Altium NEXUS solves these challenges using diagram-based workflows. Each Workflow that is used to implement a particular design process is created as part of a Process Definition. It can therefore be referred to as that process's underlying Workflow, or simply a Process Workflow. By using a diagram approach - capturing the workflow graphically - you are able to see, at-a-glance, where in the workflow a process currently sits, and who now has the next task in order to continue progress of that process.

Behind each Task element in that diagram, the diagram creator builds user-interaction by crafting user forms. The forms can be used to: provide information to the designer about the purpose of this workflow diagram; require information to be entered, or files attached; select an option from a dropdown list; and so on.
A workflow diagram can capture:
- Who is involved (e.g. admin, design engineer, anyone from the librarian group, etc)
- What actions needs to be taken, and in which order
- What data needs to be provided (name, description, attachments, etc)
- What are the decision points (e.g. approvals, assignments, etc)
The User Form presents as a dialog in Altium NEXUS when the designer starts a workflow process, such as a part request or design review, or when they are specifically tasked with an action in a workflow process. The images below show the form design for initiating a design review (on the left), as it is designed in the NEXUS Server, and that form as it presents as a dialog in Altium NEXUS.
 for the designer to complete when that design review process is initiated.") The user form for a design review shown on the left, designed in the NEXUS Server as part of the initiated processe's underlying workflow definition. It presents in Altium NEXUS as a dialog (on the right) for the designer to complete when that design review process is initiated.
The user form for a design review shown on the left, designed in the NEXUS Server as part of the initiated processe's underlying workflow definition. It presents in Altium NEXUS as a dialog (on the right) for the designer to complete when that design review process is initiated.
Processes - Quick Tips
- Process definitions are created and managed in the Processes area of the NEXUS Server's browser interface - you must be an Admin to create or edit a Process.
- The Processes page of the NEXUS Server's browser interface presents four tabs. The Browser tab is used to centrally browse all processes, across all process themes. By default, the upper region of the tab presents all Active (running) processes. Switch to viewing all Closed processes (e.g. completed, rejected, or terminated) using the drop-down field above the list. Use the other tabs - which gather together processes into specific themes - to view, create, and manage process workflows that are to be used when requesting a new managed part, performing design reviews and publishing to a PLM system, or creating new design projects, respectively.
- Predefined process workflows are included with your Server installation. Some of these are activated for use out-of-the-box. Use these, modify them, or create your own as required, to suit the needs of your company. Others are samples - these cannot be activated and used as is. Each of these is therefore more like a 'template' - edit to suit your company's requirements, name, and save as a new process definition, which you can then activate and use, along with all other definitions.
- Once the required set of process definitions for each available process theme are crafted as required for your company, those definitions that are activated will be available for use by all users once they are signed into the Altium NEXUS Server. Activated processes are then accessed through the relevant page of the NEXUS Server's browser interface, or relevant menu in Altium NEXUS. Refer to the Using a Process section to learn more.
- As well as the initial form that presents when an instance of an activated process is started, each Task in the workflow also has a form. These present as Tasks in the Tasklist panel, for the designer that the task is assigned to (or can claim as a candidate). Click on the Task in the upper section of the panel to open the user Form, the Diagram can also be accessed from the same dialog. More on this in the Monitoring the Tasks section.
Creating and Editing Processes
Main articles: Creating & Managing Processes
Processes, and their Workflows, are created and managed through the Processes area (Admin - Processes) of the Altium NEXUS Server's browser interface.
You must be signed in as an Administrator for your Altium NEXUS Server, in order to see the Processes area of the interface.
 Accessing the Processes area of the NEXUS Server's browser interface - command central for working with processes and their associated workflows.
As well as the supplied template process definitions, user-defined process definitions can also be created, allowing you to model that process to the depth and detail required by your organization. To help organize and manage processes, they are grouped into themes. A theme is a set of processes that model the same type of workflow, for example: new Project Creation, new Part Requests, or Design Reviews.
Existing processes are edited and new ones created using a powerful Process Workflow Editor - affording the flexibility for you to build processes with workflows that can be as simple, or as complex as needed, and in-line with your company's requirements. To access the editor and create a new process definition, make active the tab for the theme in which you want to create your new process, then click the  button at the top-right of the page.
 Accessing the Process Workflow Editor. Ensuring the desired process theme is made active before access will ensure the new process definition will be set to the right theme type.
Any Administrator can modify any user defined process definition, irrespective of who originally created that definition, and save and deploy it as the next version. To do so, click the

control for the process definition you wish to modify. The workflow diagram for this version of the process definition will be presented in the
Process Workflow Editor, as a starting point from which to work.
Give your new process definition a meaningful name, then build the workflow graphically, and define the required aspects of each element in that flow.
For user tasks, a User Form Editor is used to fashion the required form that will be presented to the user, to take their input when they are given a task at the relevant point along the workflow.
 The powerful Process Workflow Editor provides the flexibility for you to build processes with workflows that can be as simple, or as complex as needed, and in line with your
company's requirements.
Once a process has been defined as required, click the  button to have it added to the list of available processes for that process theme. The new process definition will be activated ready for use.
The Editor will flag any issues with your workflow diagram that are preventing it from being saved and deployed - for example a diagram must have a Start event, and at least one End event defined. And a User Task must have at least one Form field and an Assignee.
Each time a process is edited and saved, a new version is created. Use the Latest/All dropdown to access an older version. To abort editing a process, click the browser back button, or click on the main Processes entry in the left-hand navigation tree.
The Elements of a Process Workflow Diagram
Main article: Defining a Process Workflow - The Workflow Diagram
The workflow diagram presents like a flow-chart, drawn from a set of shaped objects, called elements. Each element represents a type of action or event that is to occur at a point in time. The sequence of events is from left to right, apart from the output from a decision Branch, which can flow from right to left.

These elements are available from the palette at the top of the main editor workspace.
 The palette of elements that displays at the top of the Process Workflow Editor.
Capturing the Data and Events in the Workflow Diagram
Main article: Defining a Process Workflow - Building a Form
Once the process workflow has been designed, the data required to fully detail that process is captured in one or more User Forms. The User Form can carry information about that stage of the process, require the user to select an option or enter feedback, link to related information (such as a datasheet), and so on.
User Forms are created for the Start element and for each of the Task elements. When one of these types of elements is clicked on in the diagram, the current user form settings are displayed in the pane to the right, or if the form has not yet been defined, a Create Form button is displayed.
 A User Form is created for the Start element and each Task element in a process diagram.
Notes on Building a Form
When data is added to a Form, that data becomes available for use in other Forms created in that workflow process.
Using a Process
Related pages: Publishing to a PLM, Requesting a New Managed Part
Once the required set of process definitions for each available process theme are crafted as required for your company, those definitions that are activated will be available for use by all users once they are signed into the Altium NEXUS Server. The following sections take a look at where a designer can access, and start these active processes - both through Altium NEXUS, as well as the Altium NEXUS Server's browser interface.
Administrators for the Altium NEXUS Server can start a new instance of any activated process definition - directly from the corresponding process theme tab within the
Processes area of the NEXUS Server's browser interface - by clicking the

control.
Part Requests
Related page: Requesting a New Managed Part
From within Altium NEXUS, activated process definitions that are part of the Part Requests theme can be accessed in two places.
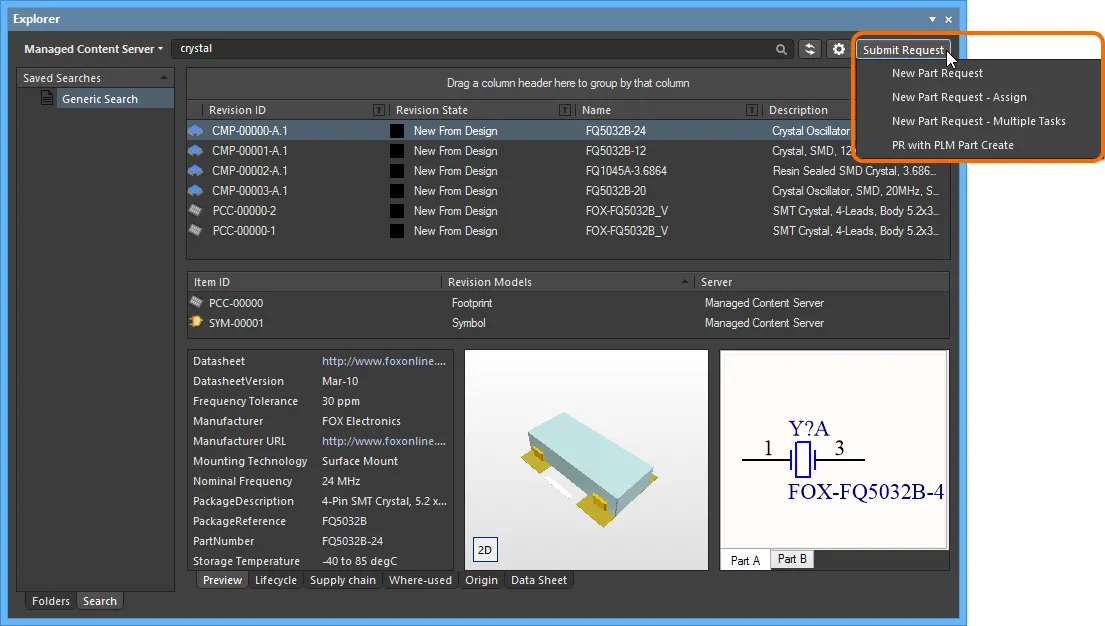
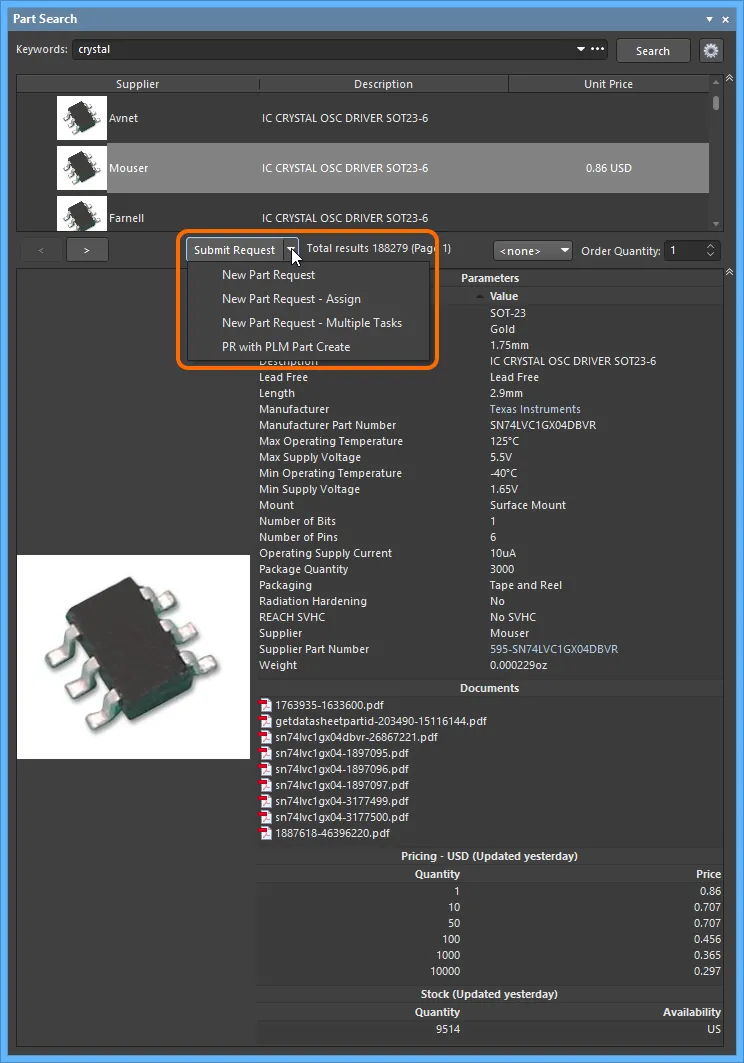
In both cases, the  button, when pressed, will present the active part request process definitions available to choose from. Requesting a part through the Part Search panel provides the added benefit that it will auto-fill key information for you, including all data sheets and parametric information.
If no active process definitions are available for the Part Requests process theme, the
button will not be shown. You may need to sign out of the NEXUS Server, and back in again to refresh.
From the Altium NEXUS Server's browser interface, activated process definitions that are part of the Part Requests theme can be accessed from the Part Requests page, by clicking the  button at the top-right of the page.
 Accessing activated Part Requests definitions from the Part Requests page of the NEXUS Server's browser interface.
If no active process definitions are available for the Part Requests process theme, the
button will be unavailable. If only one process definition exists, the button will not appear with drop-down functionality, and will start that process immediately upon being clicked.
Project Activities
Related pages: Publishing to a PLM
Activated process definitions that are part of the Project Activities theme can be accessed in various places.
Design Review and Standard PLM Publishing
From within Altium NEXUS, activated design review and standard PLM publishing process definitions - that are part of the Project Activities theme - can be accessed in two places.
- From the Project » Project Activities sub-menu for the active project.
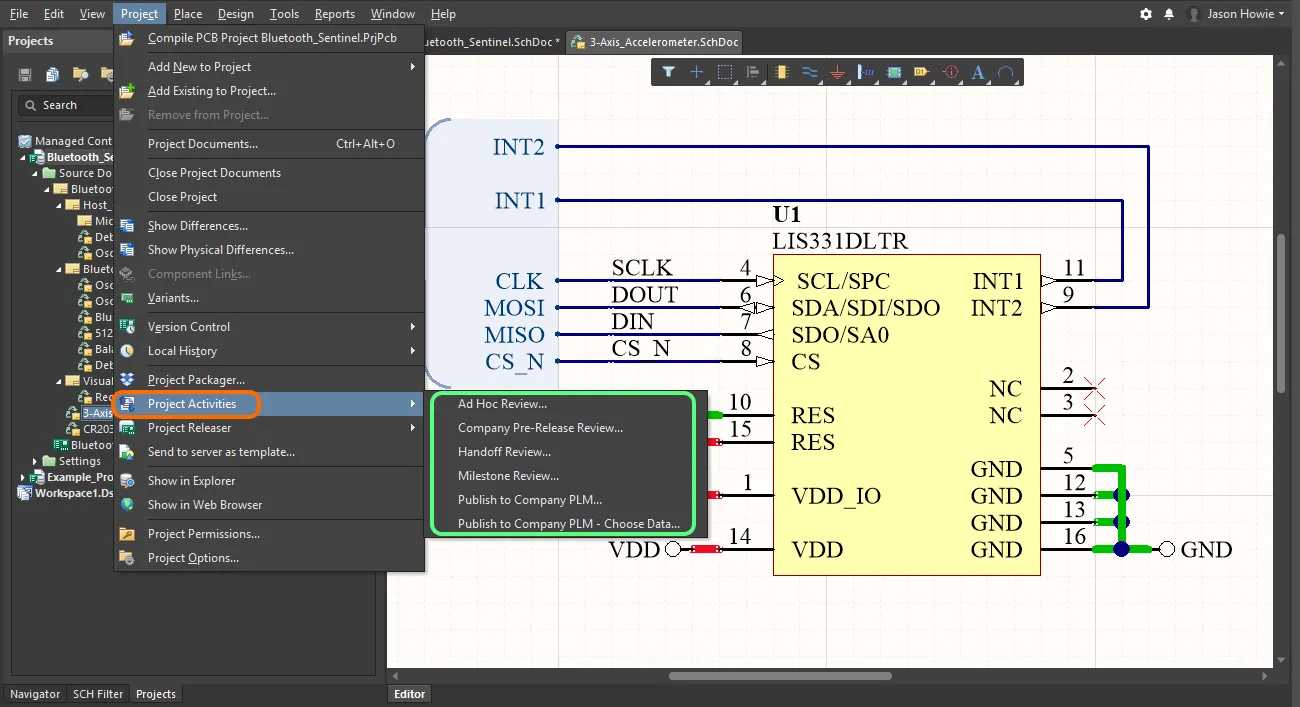
- From the Project Activities context sub-menu, accessed by right-clicking on the entry for the design project in the Projects panel.

If no active design review and standard PLM publishing process definitions are available for the Project Activities process theme, the menus will not be visible.
From the Altium NEXUS Server's browser interface, activated design review and standard PLM publishing process definitions - that are part of the Project Activities theme - can be accessed from the detailed view for a managed project, by clicking the  button.
 from the detailed view for a managed project, within the Projects area of the NEXUS Server's browser interface.") Accessing activated Project Activities definitions (design review and standard PLM publishing) from the detailed view for a managed project, within the Projects area of the NEXUS Server's browser interface.
Accessing activated Project Activities definitions (design review and standard PLM publishing) from the detailed view for a managed project, within the Projects area of the NEXUS Server's browser interface.
If no active design review and standard PLM publishing process definitions are available for the Project Activities process theme, the
button will not be shown. If only one process definition exists, the button will not appear with drop-down functionality, and will start that process immediately upon being clicked.
PLM Publishing through the Project Releaser
From within Altium NEXUS, the process for publishing to a PLM instance as part of the Project Releaser can be accessed from the Project » Project Releaser sub-menu for the active project.
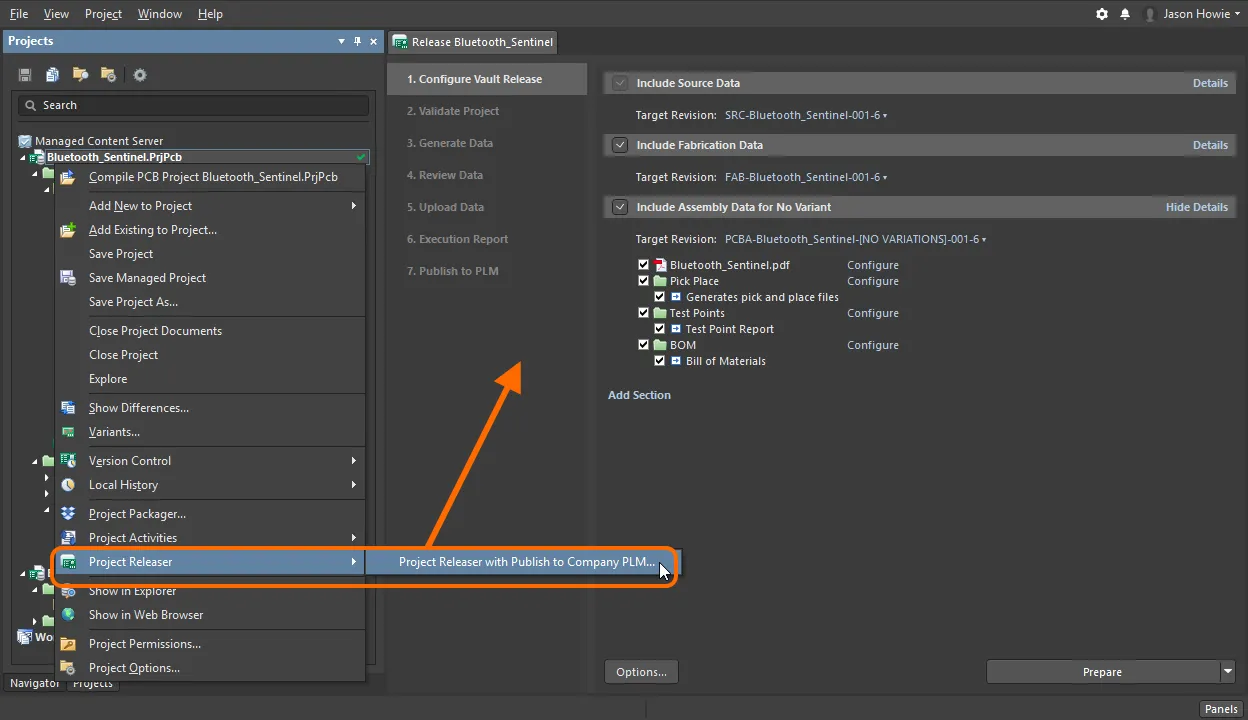
Also accessible from the
Project Releaser context sub-menu, accessed by right-clicking on the entry for the design project in the
Projects panel.
Project Creations
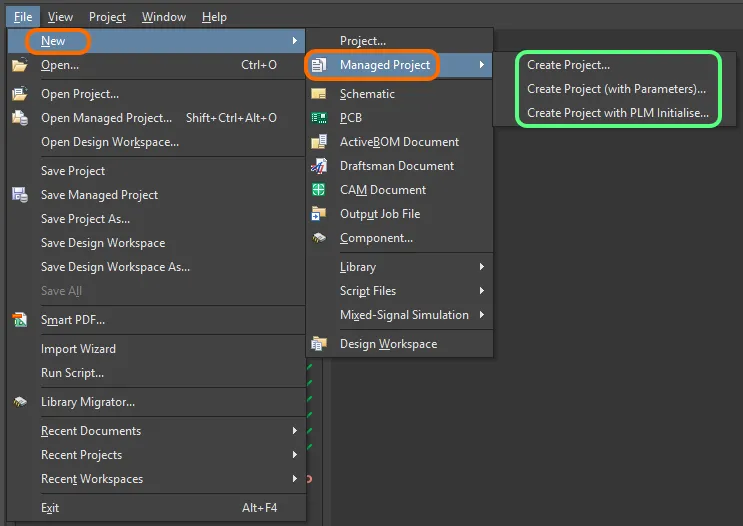
From within Altium NEXUS, activated process definitions that are part of the Project Creations theme can be accessed in four places:
- From the main File » New » Managed Project sub-menu.
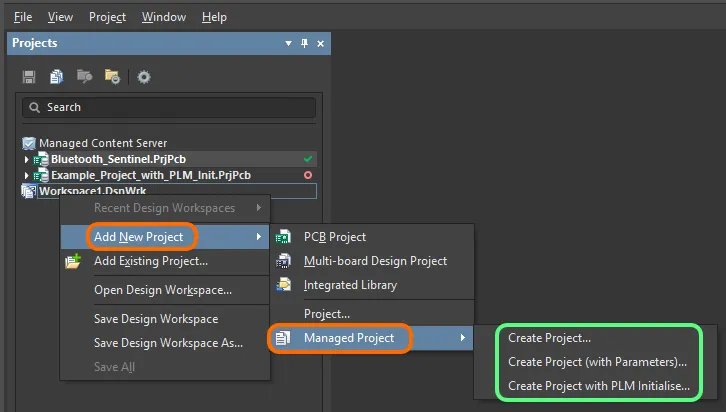
- From the Add New Project » Managed Project context sub-menu, accessed by right-clicking on the entry for the design workspace (*.DsnWrk) in the Projects panel.
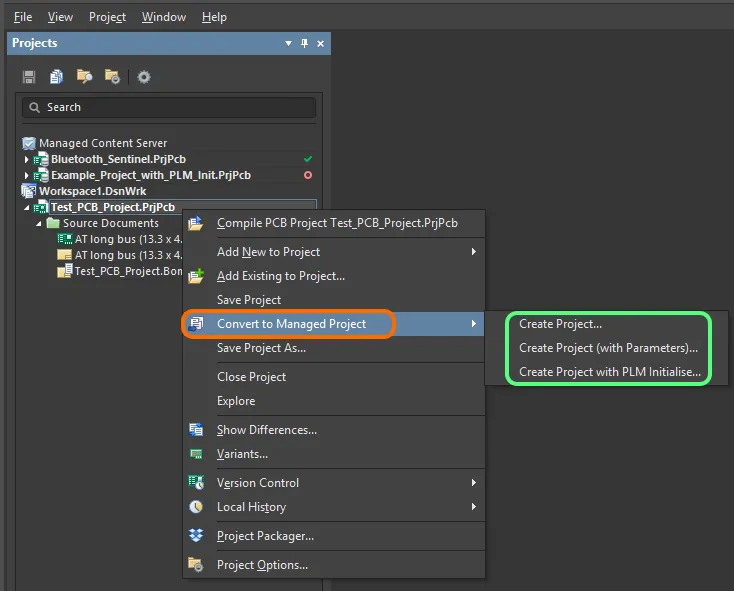
- From the Convert to Managed Project context sub-menu, accessed by right-clicking on the entry for an unmanaged project in the Projects panel.
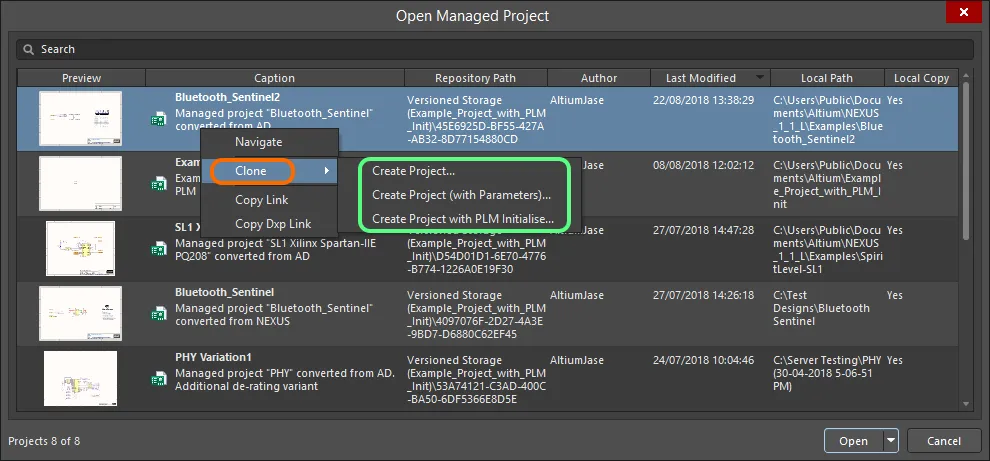
Note that when at least one process definition for the Project Creations process theme is active, the ability to create a new managed project (
Project Kind =
Managed) through the
New Project dialog (
File » New » Project) is disabled.
Regular and
VCS type projects can be created as normal through this dialog.
If no active process definitions are available for the Project Creations process theme - which is the default case for a fresh installation of the Altium NEXUS Server - the menus will not be visible, and you will be able to create a managed project through the New Project dialog as usual.
From the Altium NEXUS Server's browser interface, activated process definitions that are part of the Project Creations theme can be accessed in the following places:
- From the main Projects page of the interface, by clicking the
 button.
 Accessing activated Project Creations definitions from the main Projects area of the NEXUS Server's browser interface.
- From the detailed view for a managed project, by clicking the
 button.
 Accessing activated Project Creations definitions from the detailed view for a managed project, within the Projects area of the NEXUS Server's browser interface.
If no active process definitions are available for the Project Creations process theme - which is the default case for a fresh installation of the Altium NEXUS Server - the

button will provide basic project cloning functionality. This is not related to the process workflow functionality.
Monitoring and Actioning the Tasks
Related pages: Working with Tasks, Tasklist panel
When a user is signed into the Altium NEXUS Server through Altium NEXUS, their current list of tasks (or unassigned tasks which they can claim as a candidate) will be available through the Tasklist panel. Clicking on a task's entry will access a dialog containing the form and diagram of the associated process workflow - use the form to fulfill the task and submit, so that the process can flow to the next relevant stage.
Tasks that you have been assigned, are distinguished by the

icon. Unassigned tasks for which you are a candidate, are distinguished with the

icon. When you click such a task, the subsequent form provides a
button - click this to take on the task, without having to go to the browser interface to claim it.
, when accessed from the Tasklist panel in Altium NEXUS.") Example form for a user task associated with a design review process (Milestone Review), when accessed from the Tasklist panel in Altium NEXUS.
Example form for a user task associated with a design review process (Milestone Review), when accessed from the Tasklist panel in Altium NEXUS.
Tasks can also be browsed from the Tasks page of the Altium NEXUS Server's browser interface. The page presents active (outstanding) tasks for the signed-in user, or tasks that have not yet been assigned, but for which they are a candidate (e.g. are part of a role that has been specified for the assignee).
For a standard (non-admin) user, the list of tasks is automatically filtered so that only tasks requiring their attention, or which they can claim as a candidate, are listed. Each task is a specific stage reached within an associated process workflow. For an administrative user, a filter control is available at the top of the listing of tasks. Use this to quickly switch between viewing all your tasks (My tasks) and all tasks across all users (All tasks). An administrator can also browse all outstanding tasks - from a process workflow perspective - from the Browser tab of the Processes page.
 Accessing the Tasks area of the NEXUS Server's browser interface, from where you can see instantly what tasks require your attention.
