
Workspace Projects
This document is no longer available beyond version 5.0. Information can now be found here: Projects in Altium On-Prem Enterprise Server for version 8.1
Parent page: Altium Concord Pro
Altium Designer, in conjunction with your Concord Pro Workspace, brings support for Workspace Projects. Workspace projects target the development stage of the project lifecycle, simplifying the creation and ongoing workflow for version-controlled projects. Centralized storage under the control of the Workspace also enables this feature to be a foundation for other collaborative services.
Some key benefits to using Workspace projects are:
- Simplified storage. No need to make decisions about storage locations. Backup and other basic services are taken care of.
- Foundation for collaborative features.
- Enforced version control.
- Advantages of a dedicated commenting system.
- Notifications and status. Document status including local modifications is visible to entire design teams.
- Concurrent PCB design works without any complex setup.
- Ability to share a read-only, browser-based interactive view of a project with other users, via the Web Viewer.
- A range of advanced version control features, such as an interactive Project History view.
Technically a Workspace project is the combination of meta-information stored on the Concord Pro Workspace, along with tight integration with Workspace's local Version Control service. The typical workflow is as follows:
- A user creates a new Workspace project via Altium Designer's Create Project dialog, by converting an existing local project via the Make Available On Server dialog, or from within the Workspace browser interface (detailed below). During creation, that user defines the project's name, description, and design repository.
- Access to the project is defined and managed in the Workspace browser interface, or directly within Altium Designer.
- All collaborators select the project for opening (either from within Altium Designer, or from the Workspace browser interface) after which it is automatically checked out.
This document takes a look at working with projects through the Workspace's browser interface. For information on working with projects in your design software, see Working with Projects.
Creating a New Workspace Project
There are three ways in which a Workspace project can be created:
- Creation of a new project from the Workspace browser interface, or from within Altium Designer.
- Making an existing project (a local project, or a local project currently under external version control) available to the Workspace, from within Altium Designer – that is, converting a local project to a Workspace project. See the Making an Existing Project Available in the Workspace page to learn more.
- Cloning an existing Workspace project through the Workspace browser-based interface, or by cloning a project from Altium Designer's Projects panel.
To create a Workspace project directly through the Concord Pro Workspace's browser interface:
- Sign in to the interface and select the Projects menu option to access the Designs page. Any previously created projects will be listed here.
- Click the
 button at the top of the page and then the Create Project menu option to open the Create Project window.
 -
The window will initially present in a simplified view. Enter the desired name for the project, a description (if needed), and choose a suitable Project Template from the Templates drop-down menu.
- To access more controls click the
 button. The following fields will present:
- Parent Folder – use this field to specify where the folder for the project is to be created within the Workspace's folder structure. By default, this will be Projects\<ProjectName>. The default path for new projects is specified on the Admin – Settings – Projects page of the Workspace's browser interface.
-
Repository – this field (if present) will list all Design Repositories managed through the Workspace's local Version Control service, and which have been shared with you to use. Choose the repository in which to store the new project and its files. By default, the Versioned Storage (Git-based) repository will be selected.

Defining a new Workspace project directly through the Workspace's browser interface.
After defining the new project as required, click  – the new project will be created. You will come back to the summary-level project list, where you will now see an entry for the newly-created project.
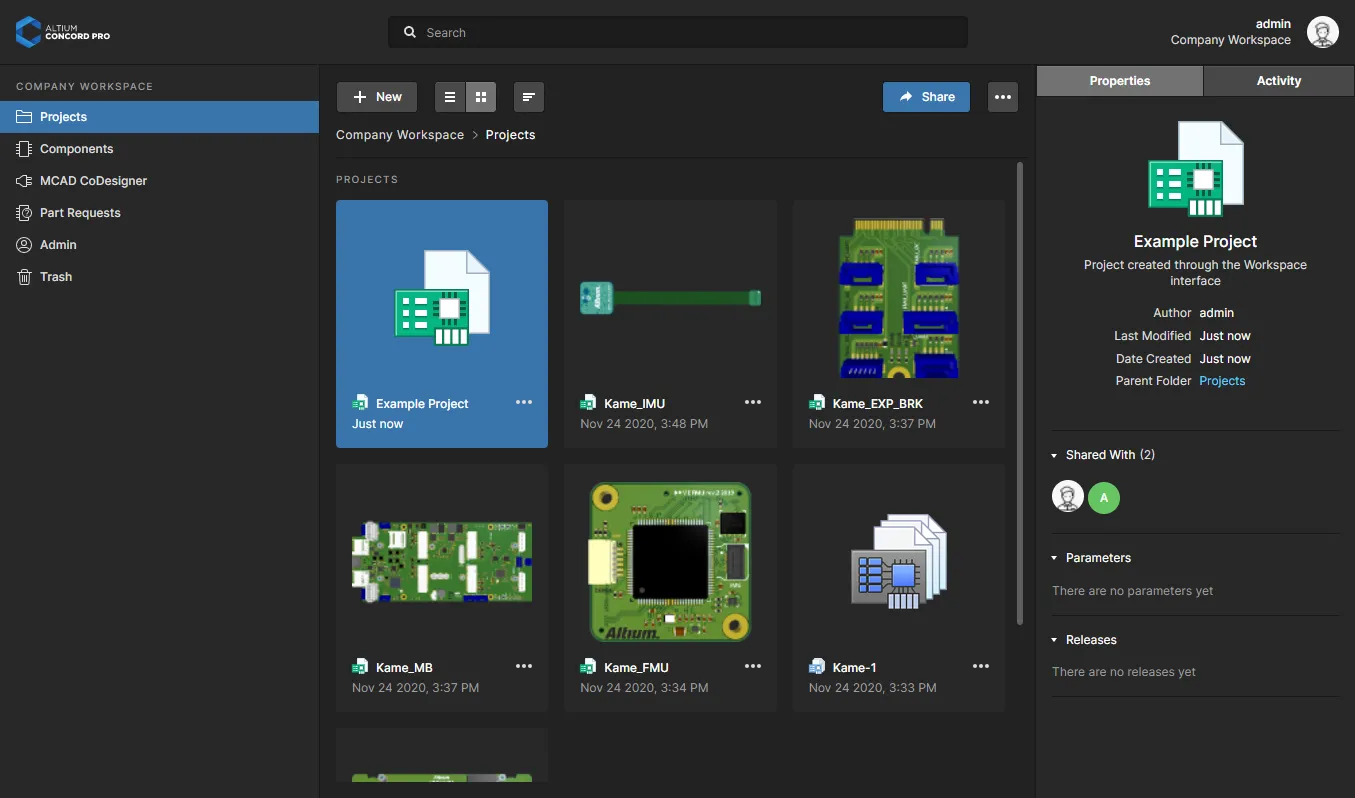
An additional Workspace project, created through the browser interface.
Browsing Workspace Projects
The projects listing on the Projects page of the Workspace browser interface includes all projects that are shared with you, and offers a range of controls to access project management features. Use the  button to switch the page to its project preview (graphical tiles) mode and the
  button to switch the page to its detailed list mode.
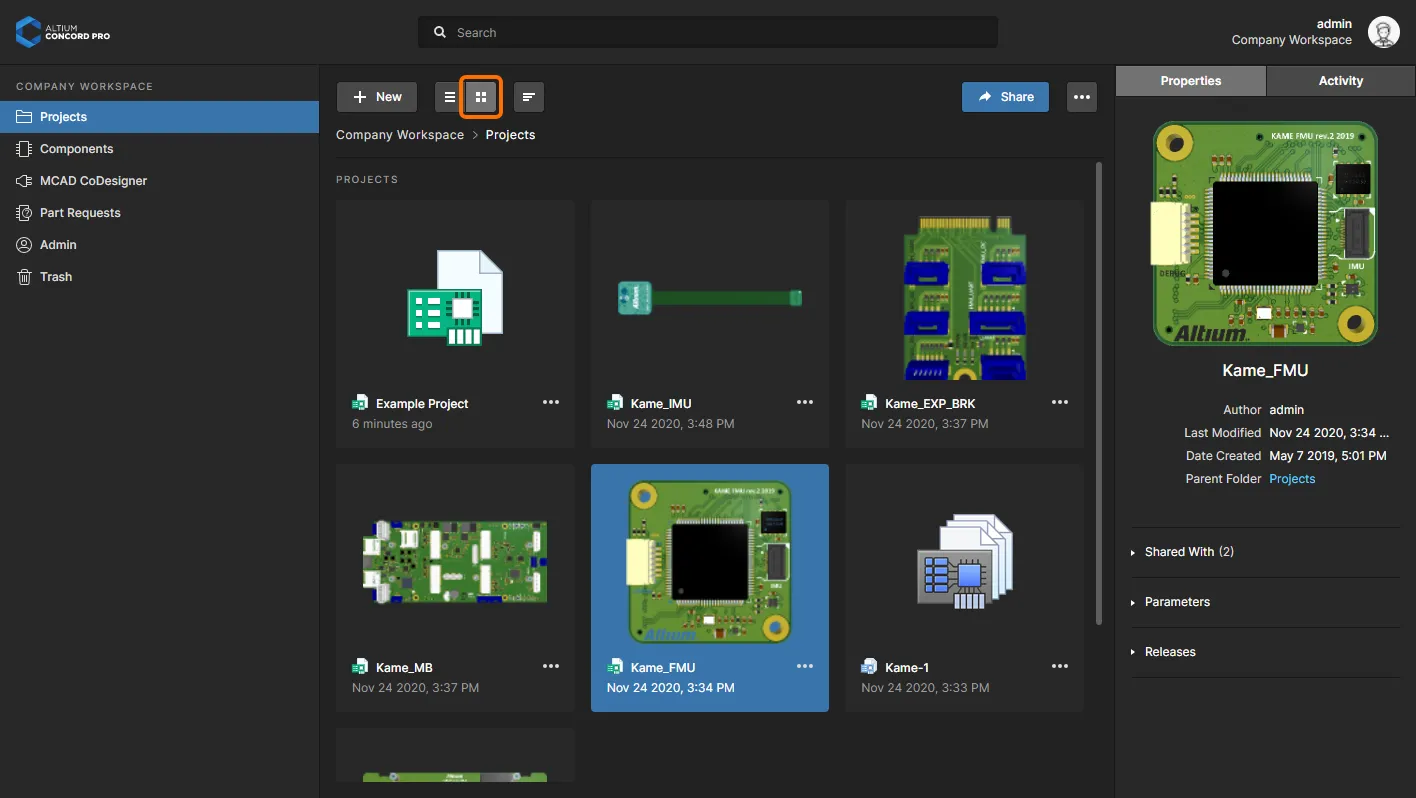
The Projects page of the Workspace browser interface – command central for working with your Workspace projects. Here, the detailed list mode for the page is shown. Hover the mouse over the image to see the project preview mode.
The view's project entries are automatically sorted by Last modified date, with the most recently modified project appearing first in the list. Click the  button to change to sorting by project Name, and click again to toggle between ascending and descending order.
The Projects view provides Properties and Activities data that relate to the selected project, available in the view's right-hand sidebar pane.
 |
The sidebar pane information includes:
|
For each project, the following operations also are provided by the buttons at the top of the view (and detailed in the linked sections that follow):
-
 Share – access controls with which to configure project access permissions.
 -
 Functions – menu access to project functions. Also available from the
  button of a selected project when in Preview mode:
- Open – open the project in its detailed CAD-centric view. Equivalent to clicking (Preview mode) or double-clicking (List mode) on a project name entry.
- Move – relocate the project to another parent folder within the Workspace's folder structure.
- Edit – edit the project in terms of its Name, Description, and Workspace Parameters.
- Clone – create a renamed identical copy of the project.
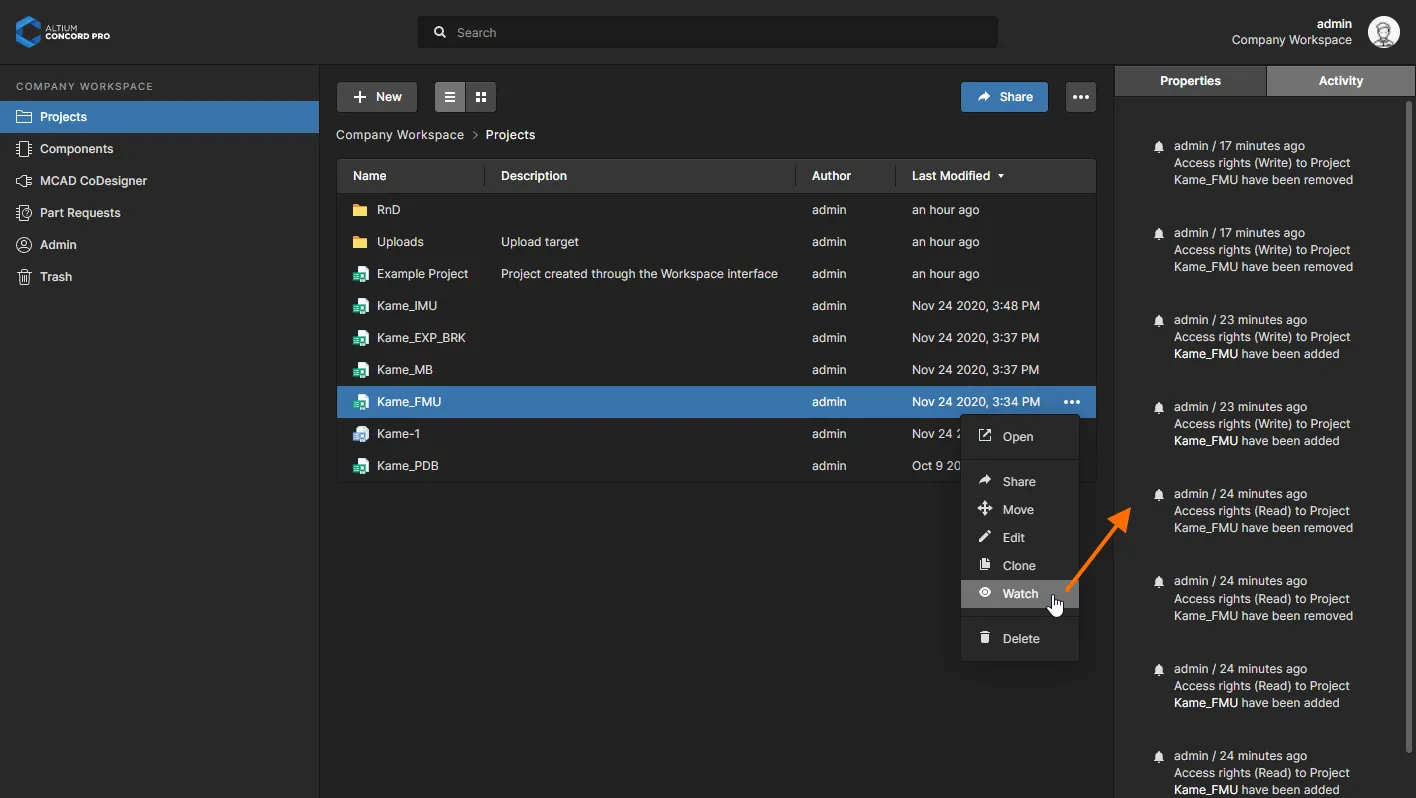
- Watch/Unwatch – follow/unfollow a project's activity by receiving related notifications (updated, released, etc.) in the project's Activity tab, and also via email if Email Notifications are enabled.
- Delete – remove the project entry by moving its structure and data to the Workspace Trash, where it can be permanently deleted from the Workspace or restored to its previous state.
Also included is a project Search feature that can filter the project listing by a range of properties such as Name, Author, Description, etc. Type any part of a search string in the field at the top of the browser interface. The list will update to include only those project entries whose attributes include the search string.
To clear the search filtering, either click on the main Projects page entry in the left-hand navigation pane, or clear the search field and press Enter.

Example use of the search feature, in this case finding a project based on its Description.
Working with Workspace Folders
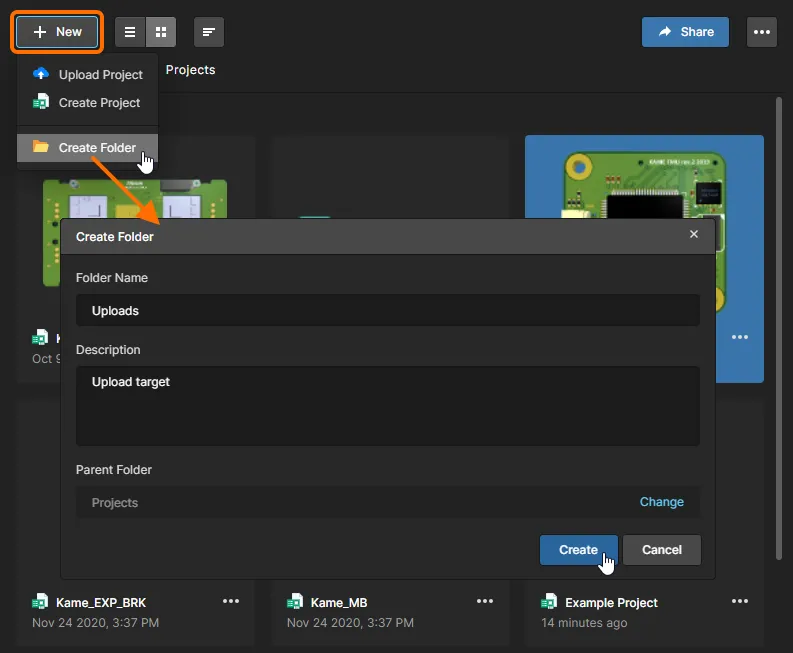
The Concord Pro Workspace also provides the ability to create and manage project folders within the Workspace's structure. Projects may then be created in or moved to any folder in the resulting folder hierarchy.
To create a new folder under the (default) top-level Project folder, choose the Create Folder option from the button menu. In the following Create Folder window, specify the name of the new folder, its parent folder, and an optional description. A new folder is always created under the currently selected folder, which becomes its parent folder.
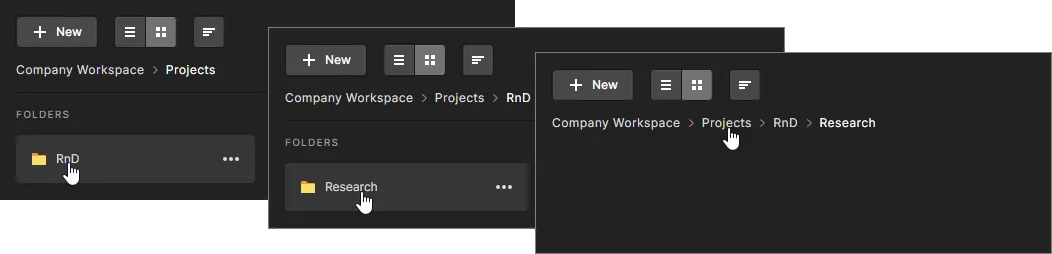
Open a created folder by selecting its title, and navigate back up the hierarchy using the breadcrumbs above.
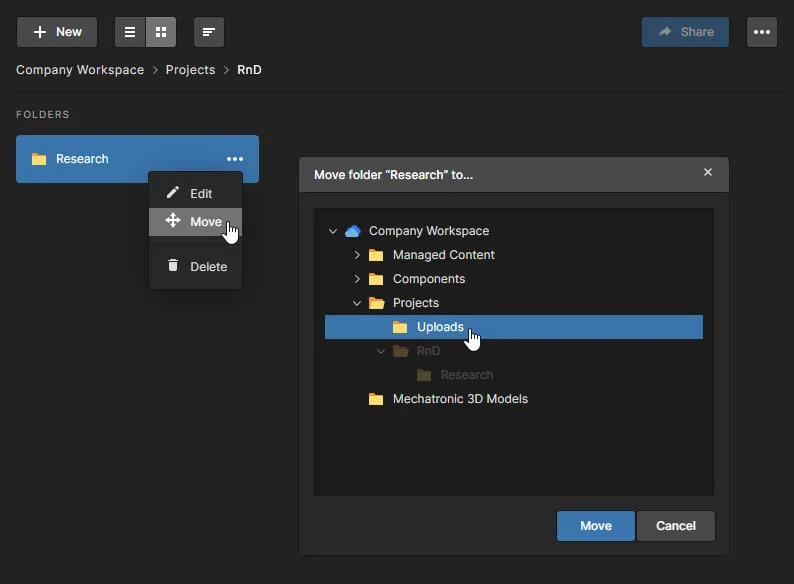
Use the  menu options to modify a folder's details (Edit), relocate the folder under a different parent folder (Move), or remove the folder from the Workspace's folder structure (Delete). When moving a folder, select a new parent folder from the hierarchy tree in the Move folder <folder> to window.
Upload a Project
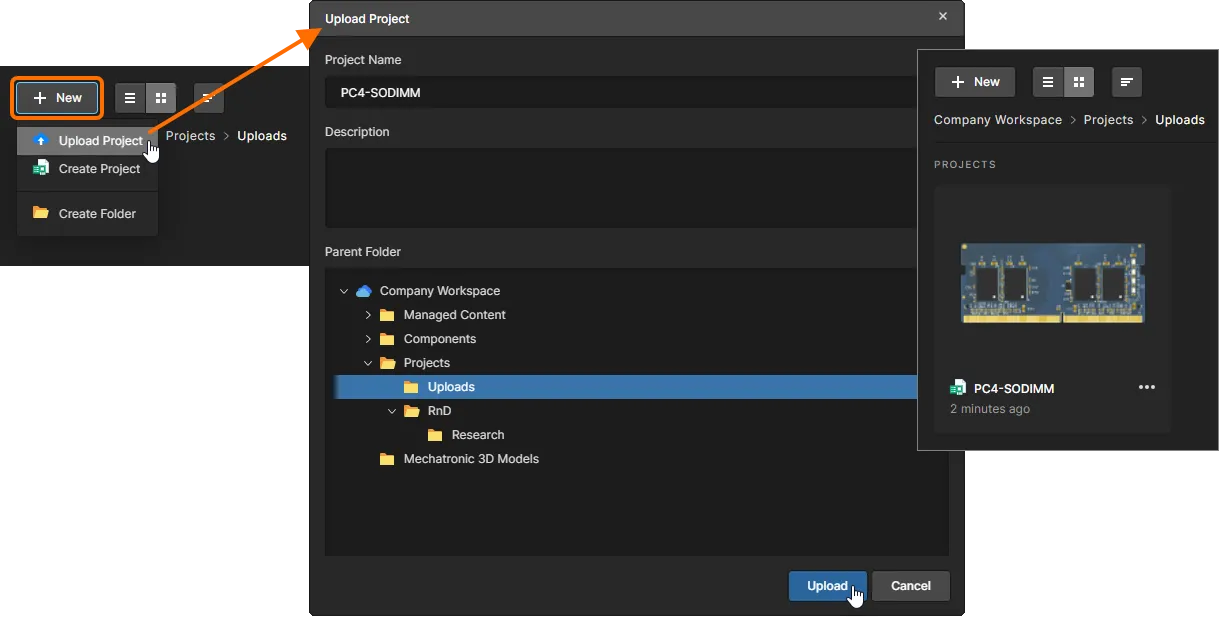
In Altium Designer the Make Available on Server command will upload a local project to the Concord Pro Workspace, where it becomes a Workspace project under its version control. An equivalent process can be performed within the Workspace browser interface from the Upload Project option available from the button menu. Browse to and select a local project's host folder to upload that project to the currently selected Workspace folder by default, or use the Change option in the Upload Project windows' Parent Folder list to select an alternative location in the folder hierarchy.
Any existing version control links in the local project are ignored, and the uploaded project becomes a fully version-controlled Workspace project – the local source project is not altered in any way.
Move a Project
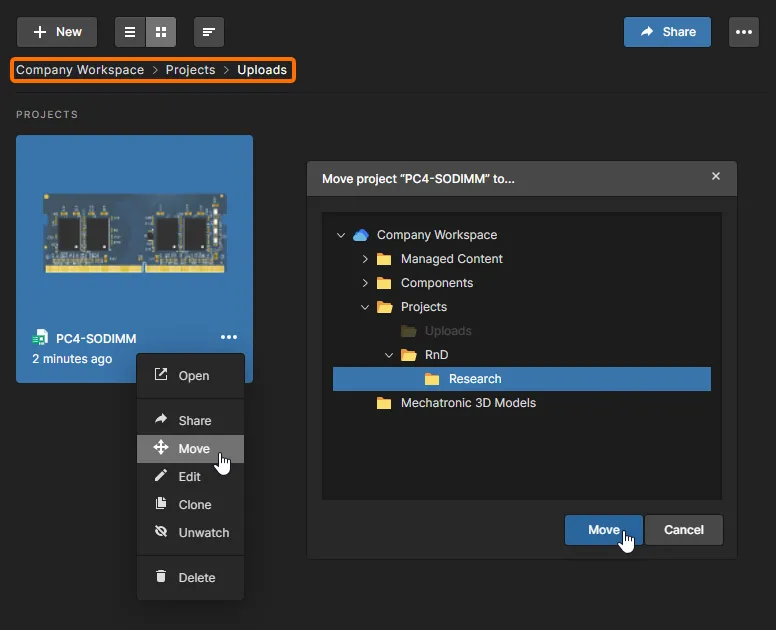
To relocate a project to a different Workspace folder, select the Move option from the menu drop-down options and select a new location from the folder hierarchy in the Move project <project> to window. When confirmed with the  button, the selected project will then be hosted under the newly specified parent folder.
Sharing a Workspace Project
Once a project is in the Workspace, you'll want to determine which users can actually access that project. This is done by sharing the project, or rather, by configuring its access permissions. A Workspace project is shared, by default, with the following:
- The Owner of the project, which is usually the designer who created it (or made it available in the Workspace): full (Read/Write) access permissions.
- The Administrators role group: full (Read/Write) access permissions.
- All members of the Workspace: with view-only access.
Default permissions for new projects can be defined/changed on the Admin – Settings – Projects page of the Workspace's browser interface. Note that the Owner of the project is inherently assigned permission to access it and therefore is not present in the list.
Configuration of access permissions can be performed through the Workspace's browser interface as described below, and also directly from within Altium Designer.
To configure access for a project from the Workspace's browser interface, select the project entry on the Designs page (Projects on the main menu) and click the button to access the Share:<project> window – or the Share option from the menu associated with a project entry. This offers all the controls necessary to share the project with other users or groups of users (Roles).
 With projects centrally managed in the Workspace, sharing with others is simply a case of managing each project's permissions.
Within the Share <project> window:
- A user/role has Read/Write access when the Can Edit option is enabled. If this option is disabled, they have Read access only.
- A project may be shared with all members of the Workspace for read-only (Can View) or read/write (Can Edit) access using the drop-down menu of the Workspace Members entry in the Shared With region.
- To remove an existing user/role from having shared access to a project, click the Remove option in the associated drop-down menu.
Things to be aware of:
- By default, all Workspace users will be able to see the project. If you want to lock access down to a specific set of users and/or groups, you must first select No access in the drop-down menu of the Workspace Members entry.
- The owner of a project has permanent Read/Write access.
- You can also share a direct link to the project. The link is obtained by clicking the Copy Link control, at the bottom of the Sharing window. The link is copied to the clipboard. When used, it provides the applicable user – where permitted – access to the detailed management page for the project, an overview for which is presented in the next section.
Sharing a Project with a Workspace User
To share a project with another Workspace user:
-
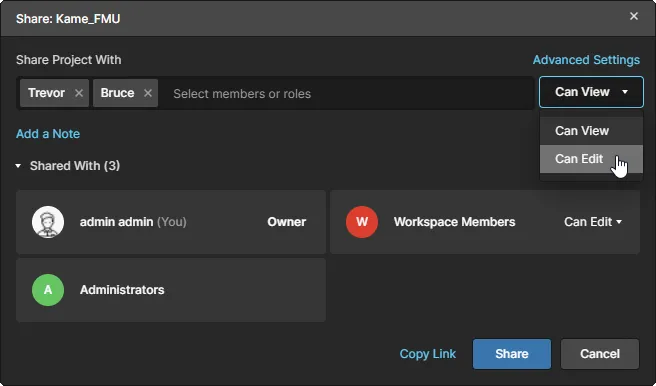
In the Share window, start typing the full name, username, or email address of a Workspace user (member) in the Share Project With field to activate a list of matching users. Select the required user from this list. Multiple users can be chosen. To remove a selected user, click the delete cross to the right of their name.

-
Set the permission for the user(s) using the associated drop-down menu to choose between Can View access (read-only), or Can Edit access (read/write). Note that the Workspace Members Can View/Edit option is global and can override sharing permissions that have been applied to specific users. In most situations, it is advisable to set this option to No access.
-
Click the
 button to confirm the addition of the user(s) and return to the Projects view. When the Share window is next opened, the added users can be seen by expanding the Shared With grid list. Use the Can Edit/View menu associated with a user entry to change permissions or remove the user entry itself. Click to save any changes.
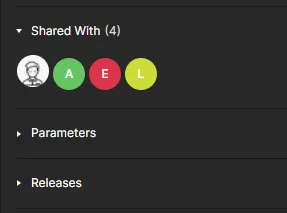
Note that the Properties pane shows a summary of the sharing applied to the currently selected project.

Sharing a Project with a Defined Role Group
You also have the ability to share a project with role groups defined in the Workspace (see Admin – Roles). Role permission will apply to all users that are members of that role group. To share a project with another group:
-
In the Share window, start typing the name of a Workspace role (user group) in the Share Project With field to activate a list of matching roles. Select the required role from this list. Multiple roles can be chosen. To remove a selected role, click the delete cross to the right of its name.
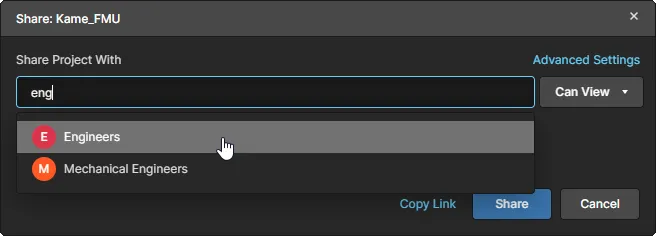
-
Set the permission for the role(s) using the associated drop-down menu to choose between Can View access (read-only), or Can Edit access (read/write). Note that the Workspace Members Can View/Edit option is global and can override sharing permissions that have been applied to specific users. In most situations, it is advisable to set this option to No access.

-
Click the
button to confirm the addition of the role(s) and return to the Projects view. When the Share window is next opened, the added roles can be seen by expanding the Shared With grid list. Use the Can Edit/View menu associated with a user entry to change permissions or remove the role entry itself. Click to save any changes.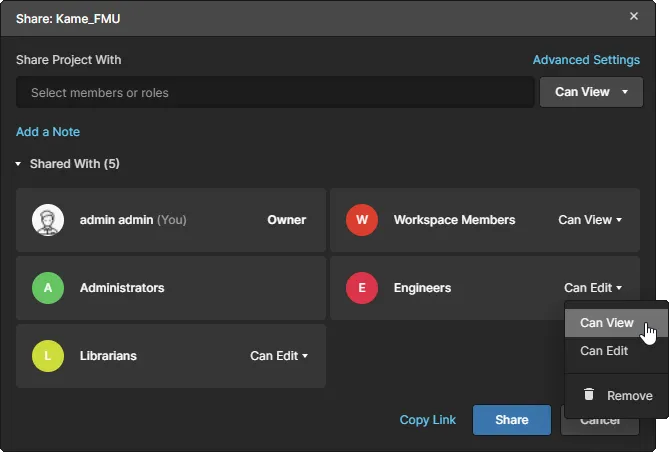
Note that the Properties pane shows a summary of the sharing applied to the currently selected project.
Advanced Share Settings
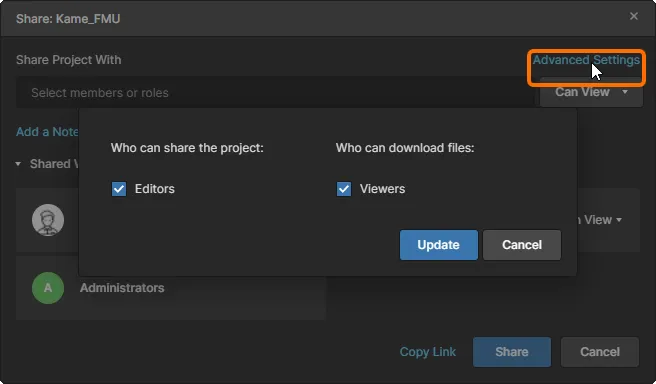
Click the Advanced Settings control at the top-right of Share window to access a window with which to determine advanced share settings. For people with editing rights, you can control whether a person can share with others. This allows you to restrict further sharing. For people with view-only access, you can control whether they can also download native data (project itself) and derived data (for example, generated Gerbers or PDFs). They can still view data in the Web UI and provide comments, as before.
Workspace Project Functions
Functional operations associated with projects are available from the menu on the Designs page, and include the ability to open, move, edit, clone, watch and remove a Workspace project. The menu also is available from the button of a selected project entry:
Open a Project
Select the Open option from a project entry's menu or from the upper menu to open a project into its manufacturing orientated CAD-centric view – or when in Preview mode (), click on the project's name. The view provides access to several sub-views available from the navigation pane:
- Design – navigate and interact with the project's design documents, inspect object properties and place review comments. The view applies to the current (latest) project revision, and uses the Web Viewer interface.
- Supply – Interactively examine work-in-progress (WIP) BOM data extracted from the design documents, including entries for Manufacturer and Supplier parts data derived from a project's populated ActiveBOM document.
- Releases – view summary information on all Releases for the current project, each of which can be opened in the Manufacturing Portal view. This in turn provides sub-views for the release package files, design documents and supply data in that selected release.
- History – browse a progressive timeline of major events relating to the project, including its creation, commits, releases, and clones. Each time a supported event happens in association with the project, that event is added to the timeline as a dedicated tile with various actions supported where applicable.

► See Management of a Specific Project for more information.
Edit a Project
To edit the properties of an existing project in the Workspace, select its entry on the Designs page (Projects) and then the Edit option from its menu or the upper menu. In the following Project Editing window you can change the project's Name, Description, and manage Workspace Parameters entries.
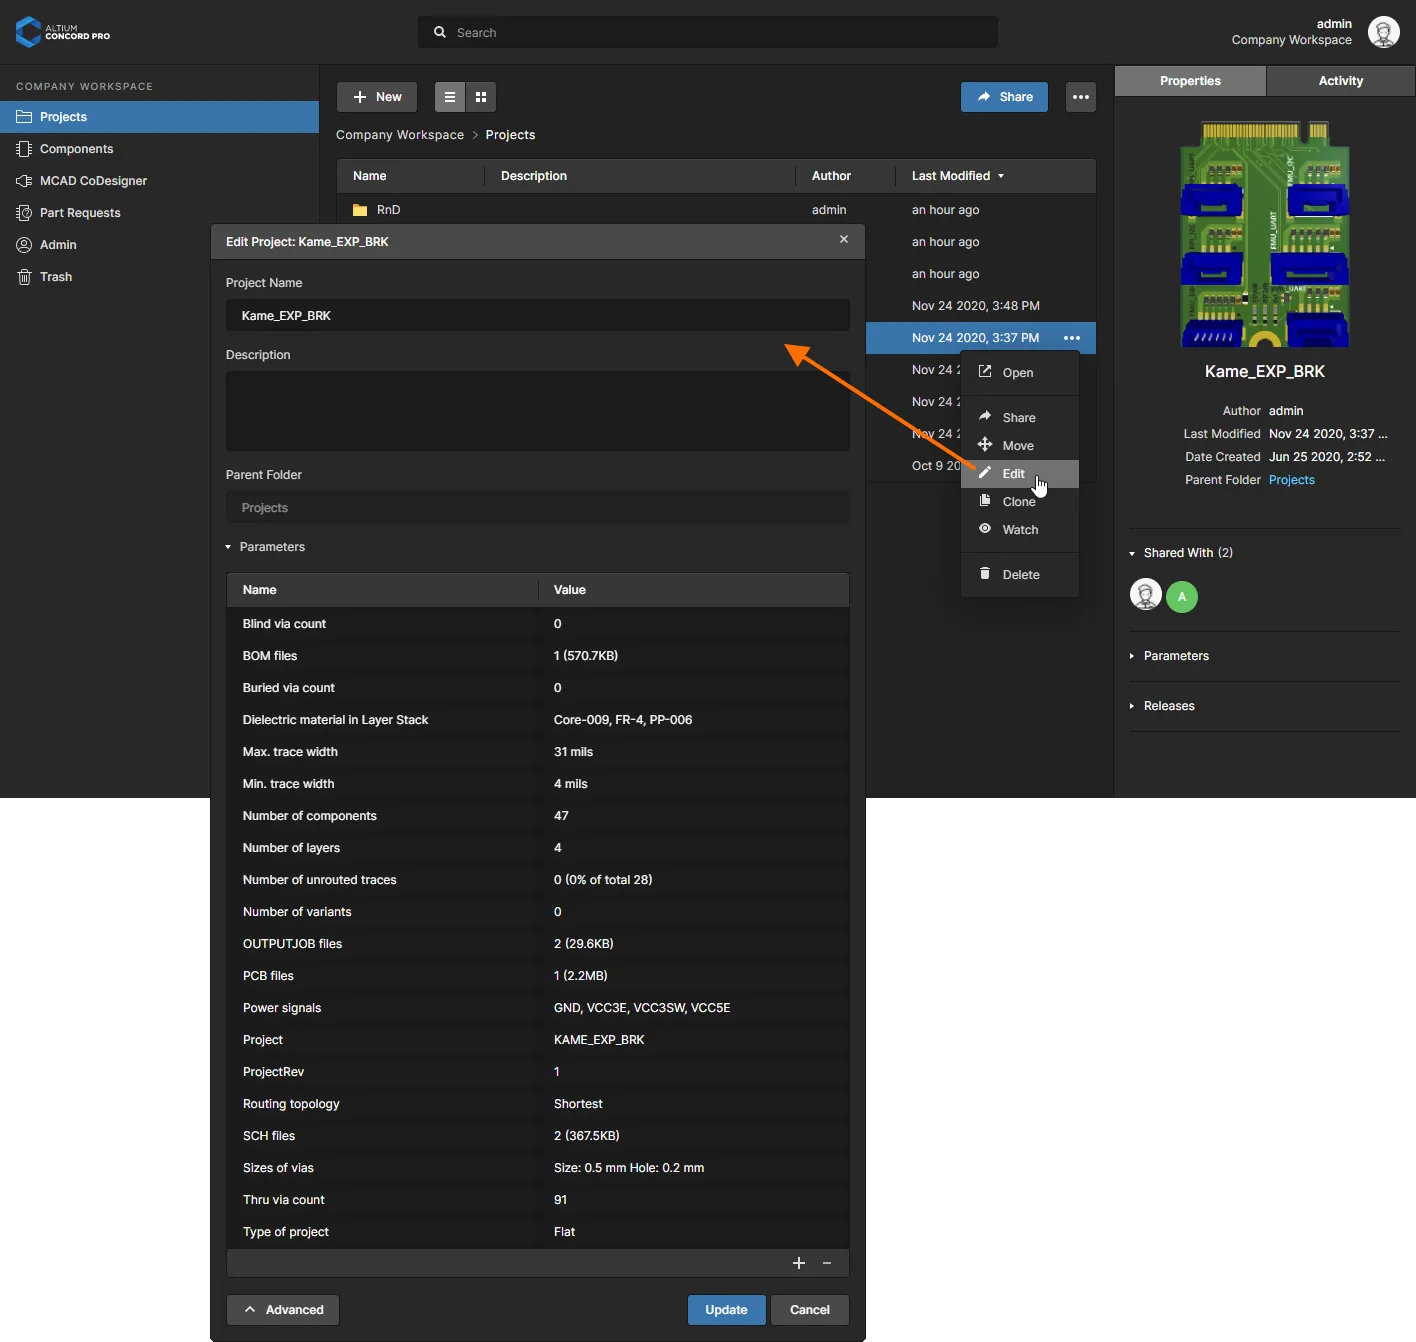
Click the button in the Project Editing window to expose additional property data derived from and stored with the project. Select the Parameters control to access and add ( ), edit, or remove (
 ) parameter Name/Value pairs. These are saved in the Workspace with the project and may be used as Special Strings in Altium Designer – access from the Properties panel with a placed text object selected in the design space. By contrast, Project type parameters are saved in the project file (
*.PrjPcb), and can be edited in Altium Designer.
Clone a Project
To clone (duplicate) an existing Workspace project, select its entry on the Designs page (Projects) and then the Clone option from its menu or the upper menu. Use the Clone Project window to set the name and description for the cloned project – by default, the original project name will be used with a - Copy suffix.
 You can clone a Workspace project to create an identical copy of it, along with its working files.
Click the button to expose additional property fields, which include the target parent folder and Repository information. The target folder setting will automatically match the project name unless manually specified, or assigned to a different existing parent folder via the Change option.
After setting the fields as required, click the  button to confirm. The original project will be cloned (duplicated) along with its constituent files and data, and be added as a new project entry to the Projects page listing.
Watch a Project
To 'watch' – receive notifications regarding – a project in the Workspace, select its entry on the Projects page (Projects) and then the Watch option from its menu or the upper menu.
When you follow (watch) a project, you will receive notifications related to the project (such as commit, release and property change messages) under the Activities tab in the interface's right-hand pane. The creator of the project will automatically be set to watch that project. When enabled, the command will change to Unwatch – select to stop following the project and cease reception of notifications for events relating to that project.
Deleting a Workspace Project
To delete (remove) an existing Workspace project, select its entry on the Designs page (Projects) and then the Delete option from its menu or the upper menu. The action is effectively a 'soft delete', where the project repository is moved into the Workspace's Trash area. A project can be deleted in Altium Designer using the menu Delete option in the Explorer panel.
From within that view (select Trash from the main menu), the project entry can be completely removed (Permanently Delete) or the action reverted (Restore). Note that the  button will remove all entries (where possible) that are stored in the Workspace's Trash.
 Removing a Workspace project from the Workspace.