The Altium Designer Scripting system is composed of two main parts – the editor and the debugger. The editor offers a range of scripting code help and inspection features, and the debugger provides access to script components and debug features.
Scripting Tools
The scripting system provides a range of tools to help you write and debug scripts. Along with automated code completion and analysis capabilities, the scripting system allows you to interactively step through scripts line by line, inspect variables and objects, and set breakpoints on one or many lines in the script.
The Scripting Editor Tools are a key asset when debugging scripts.
Language Setup
From the Language Setup dialog, you can create, edit and manage, a list of languages that can be associated to documents opened in a coding-aware variant of the Text Editor. Each language consists of a syntax scheme, a set of code templates, and a list of file associations. To access the dialog, click  on the Text Utilities toolbar.

The Language Setup dialog
The dialog contains a list of languages that are currently defined. Use the dialog to create, duplicate, modify, and remove languages as required. For any given language, the following must be defined:
- The mapping of a file extension to a language is unique, if you add the same extension to another language, the mapping to its old language is automatically removed.
- If a file with a particular extension is associated with a language, the content of the file is highlighted in accordance with the syntax defined for that language.
- When you duplicate a language you also copy its syntax scheme, as well as all the code templates it contains.
Syntax Highlighting
Syntax highlighting is a method used to make text documents more readable, where different elements in the document are highlighted based on their syntax. The way this is done is to assign different words, symbols and identifiers a unique color. This set of color assignments is called that language's syntax.
The syntax scheme for the language associated with the current document can be defined/edited from the Syntax Editor dialog accessed from the Text Editor (or any coding-aware variant of the Text Editor), by clicking the  button on the Text Utilities toolbar.

The Syntax Editor dialog
While the command is generically available from the Text Utilities toolbar, note that no language is associated to standard text files (*.txt) and so access to the dialog is not permitted from within a document of this type.
The Syntax Editor dialog is divided into five tabs, each representing a different area of the language's syntax:
- Options - used to define various general syntax options.
- Comments - used to define comments. Comments are elements in the text file that you wish to define as code comments. These can be defined as single-line, full-line or multi-line comments. Comments are defined by their delimiters, that is, the characters that indicate that a block of text is a comment. Single-line and full-line comments only require a left delimiter (the other end is defined by an EOL character). Single-line comments can commence anywhere on a line, full line comments require the comment delimiter to be the first character on the line. Multi-line comments require a left delimiter and a right delimiter to define where they start and end.
- Strings - used to define strings. Strings are elements in the text file that you wish to define as strings in the code, such as strings that appear as a message in a dialog that your program displays. Both single-line and multi-line strings are supported and both types require the left and right delimiters to define their start and end point.
- Numbers - used to define numbers. Like comments and strings, numbers are another class of information in the document that you may wish to make stand out. Simple numbers are defined as being strings of numeric digits, which may or may not contain a decimal point, for example, 45, 45.6 but not 45.6.6. Simple numbers can also include an E character, denoting scientific notation, such as 53E3, or 24e6. Special numbers are defined as having a prefix and/or a suffix and contain numerical digits, or the letters A-F. These could be used to tell a compiler that the number is hexadecimal or octal, for example. Examples of these numbers are 0xAF034AD, 88j, j8A8y, but not 0xA.4. Each number type is specified by a suffix, a prefix or a prefix and suffix combination. The basic behavior of prefixes and suffixes is that whenever a valid prefix or suffix is detected in combination with a number, then the number and the prefix (or suffix) is highlighted, according to the number style. This basic behavior can be modified through additional available options.
- Keywords - used to define keywords. Keywords are a set of pre-defined words that you would like to stand out in your document. Typically these are words reserved by the programming language to identify a specific function, procedure, object type, and so on. Keywords are defined as part of one or more keyword sets, each with its own style (color and font parameters), further enhancing the readability of your document.
- Enable/disable syntax highlighting for each of the syntax elements in their respective tabs. If the highlight option for a syntax element is disabled, then any such syntax that exists in the document will become unhighlighted and will revert back to the style for normal text.
- If the same keyword appears in more than one keyword set, then the highlighting style of the set that appears first in the list will be applied.
- Keywords can contain alpha and numeric characters and also the underscore character. The keyword cannot begin with a numeric character.
Code Completion
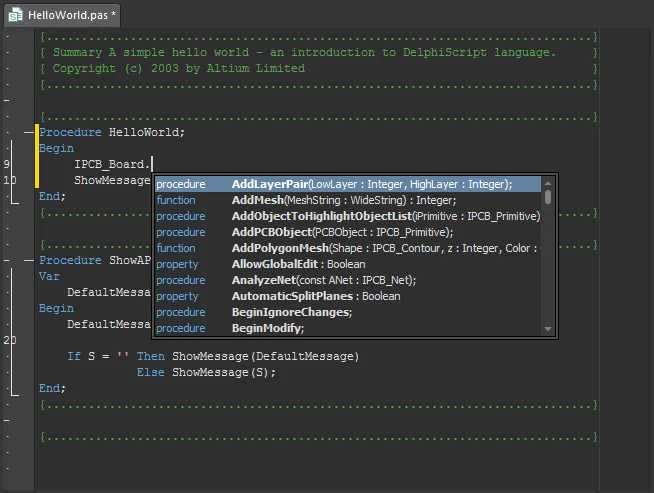
The editor supports a code completion feature, which is an automated pop-up window that displays context-sensitive code options.
When you type in a period after an object interface name, a list of available properties and methods for that object are shown in a code completion pop-up menu window – continue typing to further narrow the list. Selecting an option from the list will populate the code with that procedure/function or property.
You can use the Ctrl+Space shortcut keys to bring up the Code Completion list window at any time.
The Code Completion list will also include the global procedures and functions available within the currently open project, including those in the current script.
The Code Completion feature is extremely useful when selecting the correct Object Interface, method and property to apply in a script.
Statement Templates
Code templates are predefined blocks of code that can be automatically placed in a coding-aware text-based file, and are an excellent productivity aid when you are writing code in a particular language. Each code template has three properties: a name, a description, and the actual code to be inserted by the template.
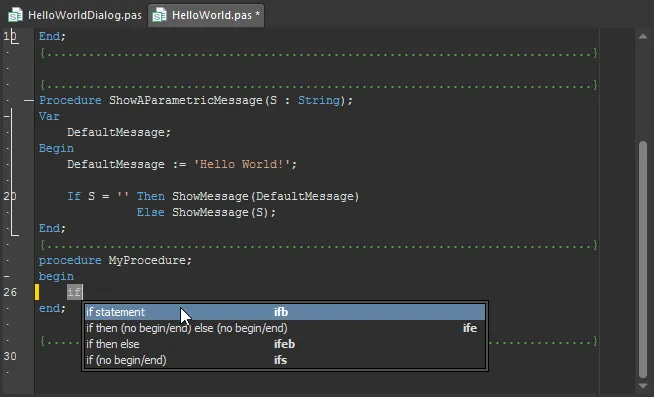
The script template feature will automatically generate a code structure for the statement selected from the pop-up list window.
The pop-up list can be activated at any time by the Ctrl+J shortcut keys, the Show Code Templates button ( on the Text Utilities toolbar), or the Tools » Show Code Templates command from the main menus. If activated after typing the first few letters of a code statement, for example, '
proc', the matching statement code will automatically populate the document code with the Procedure structure. Alternatively, if there are a number of statements available for the pre-typed code letters (for example 'if'), the template list window will offer a filtered list of statements.
You can also place the cursor at the required location in the file, then launch the command. A pop-up window listing all available code templates defined for the associated language will appear. Choose the required entry to place that template.
Each code template is identified by its name, as specified in the Code Templates Editor dialog. Access to this dialog can be made from the Language Setup dialog (click on the Text Utilities toolbar), by choosing the Templates command from the Menu.
Method Parameters
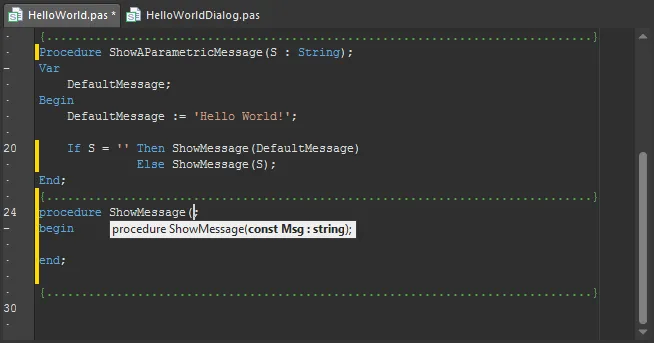
The Script Method Parameters feature displays a pop-up message that shows which parameters are used for a particular method (function/procedure etc) of an object interface.
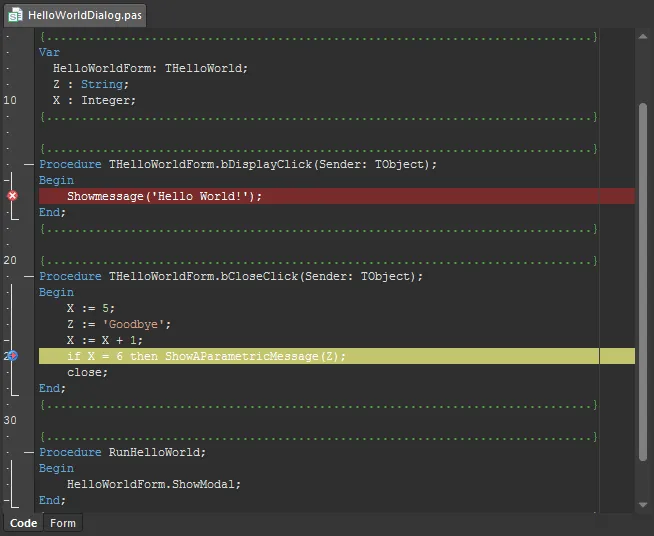
When the initial round bracket is typed following a method, as shown in the image below, the Parameters message will automatically appear. The Shift+Ctrl+Space keys can be used to manually display the Parameters pop-up message, where applicable.
To see the parameter definition for a completed method statement, place the cursor within its parameters brackets and use Shift+Ctrl+Space to the call the pop-up.
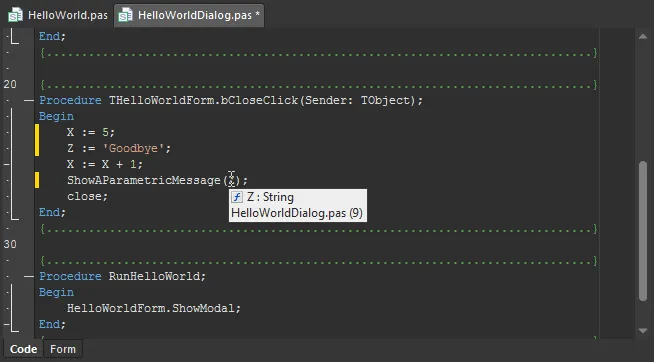
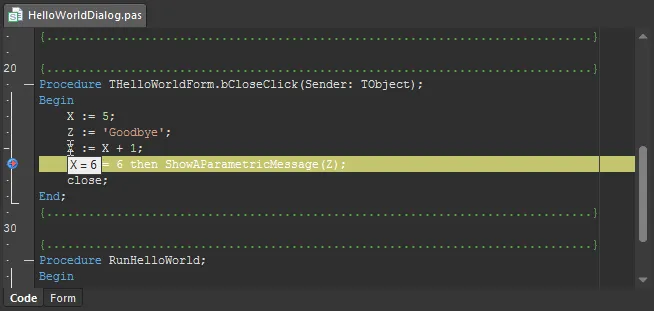
The pop-up Parameters message also shows the source location of the method (function/procedure) definition, where applicable. In the example above, the method (ShowAParametricMessage) is defined in the HelloWorld.pas script at line number 14 – hover over the image to see the method as used in the HelloWorldDialog script.
Definition Navigation
The source of a script variable or method definition can be immediately located using the editor's Navigation feature.
To find a definition source for a variable, press the Ctrl key while clicking on the variable where it's used in the script. The cursor will relocate to the definition. Use the same method (Ctrl+Click) to locate a procedure's source definition. If the procedure is defined in another script within the project, that script will open with the cursor at the procedure.

Insight ToolTip
The Insight ToolTip feature shows the variable type when the mouse cursor is hovering over the variable. Similarly, hovering the mouse over a procedure shows its definition and location (script and line number).
Breakpoints
Breakpoints are a primary debugging tool that allow you to pause the execution of a script at predefined points. A typical use of breakpoints would be in the different branches of a conditional statement, where a breakpoint is inserted into each branch to check which one is executed.
The simplest way to specify a breakpoint is by clicking in the editor's gutter alongside a line of code, which becomes highlighted in red. The line highlighting will change to a pea-green color when a running script has encountered that breakpoint. The script can run to the next breakpoint with the Run command (shortcut: F9) or the single-stepping commands.
To toggle a breakpoint for the current line, you can also use the Run » Toggle Breakpoint command from the main menus (shortcut: F5).
Alternatively, use the Run » Add Breakpoint command from the main menus to open the Add New Breakpoint dialog, from where you can define a new breakpoint to be added to any currently open script document. Use this dialog to define at what line number within the selected document, the breakpoint should be added. The Condition field of the dialog allows you to define a conditional breakpoint, whereby execution of the script will only halt if the condition associated to the breakpoint returns true, otherwise, execution will proceed unchecked.
You can also choose whether the breakpoint should be initially placed enabled or disabled. A disabled breakpoint remains defined but will not cause a running script to halt when encountered.
- An enabled breakpoint is indicated in the code by a red highlight over the breakpoint line and a red circle with a cross in the margin (
 ). A disabled breakpoint is indicated in the code by a green highlight over the breakpoint line and a green circle with a cross in the margin (
 ).
).
- A disabled breakpoint cannot be removed directly from the script document. In the disabled state, deletion is only possible from the Breakpoints panel.

The Add New Breakpoint dialog
Note that a script breakpoint must be on a statement line. Any breakpoints set on blank lines, commented lines or other non-statements will be ignored.
Breakpoints can be accessed via the Breakpoints panel to easily locate and manage all set breakpoints, without going through a script to locate them. The panel provides information on all breakpoints that are currently defined in all open script files (irrespective of the parent script project (*.PrjScr) they belong to), as well as providing commands for adding, enabling, disabling, and deleting selected breakpoints as required from the right-click menu.

The Breakpoints panel
Double-click on a breakpoint entry in the panel (or select the Edit Source command from the right-click menu) to make the associated script document the active document in the design space, placing the text cursor at the beginning of the line of script to which the breakpoint applies.
Select the Properties command from the right-click menu to access the Breakpoint Properties dialog for the selected breakpoint entry. You can use this dialog to change the state of the breakpoint (enable/disable it) and also add/modify a condition for the breakpoint as required. You cannot change the file in which the breakpoint has been added, nor the specific line number within that file.

The Breakpoint Properties dialog
Expression Evaluation
When a script is stopped in response to a breakpoint or error, the value of any expression (a script statement) can be determined by a ToolTip feature or via the interactive Evaluate dialog.
The Evaluation tools are primarily debugging tools, used in conjunction with debugging help panels such as the Watch List and Call Stack panels.
Evaluation ToolTip
The Expression Evaluation ToolTip feature displays the current data value for the variable that the cursor is hovering over.
Evaluate Feature
To use the editor's Evaluate dialog, click on an expression variable in the script and select the Run » Evaluate button (shortcut: Ctrl+F7). The dialog will be automatically populated with the expression and its current result.
Alternatively, you can copy an expression from the script to the dialog's Expression field and click Evaluate to see the result. An expression name can also be typed directly into the Expression field to evaluate the result.

A script in breakpoint mode with the Evaluate dialog activated.
Watch Expressions
Watch expressions allow you to keep track of variable/expression values as you single-step debug the current script document. A watch expression can be a single variable or an expression containing one or more variables.
To define watch expressions for the current script document, use the Run » Add Watch command from the main menus (shortcut: Ctrl+F5). After launching the command, the Add New Watch dialog appears. Use this dialog to define the required expression that you wish to monitor. For example, the expression could be a particular variable that is used in the code (e.g., OUT, a, Remainder), or an expression based on one or more defined variables (e.g., a+b, a*b, c+(b-a)).

The Add New Watch dialog
After clicking OK, the watch expression will appear in the Watch List panel. Use the panel to view all defined watch expressions at the same time. Watches can be added, edited and deleted from the panel's right-click pop-up menu.

The Watch List panel
As you step through the lines of code in the script document, the watch expressions will be evaluated and the corresponding values updated if the script changes any of the variables used in those expressions.
When script execution enters a function or procedure a watch expression will only be valid if the variable(s) in the expression are defined and used in that function or procedure. If a variable is not available to the function or procedure (i.e. is not global or is local to another part of the script) then the Value field will display Undeclared identifier: VariableName.
Double-click a watch entry in the panel or right-click an entry and select the Edit Watch command to access the Watch Properties dialog, from where you can edit the expression for the selected watch as required.
Bookmarks
Bookmarks are used in scripts to note statements and navigate to them quickly. Up to 10 bookmarks can be defined in a script.
A Bookmark is indicated by a green box in the editor gutter with the Bookmark number enclosed. To add a bookmark, select a line of code, right-click, select Toggle Bookmarks from the context menu, and then a location number from the sub menu (Toggle Bookmarks » Set Location Mark n, where 'n' is the bookmark number from 0 to 9).
To go to (jump to) a Bookmark, right-click then select Goto Bookmarks and the desired bookmark location from the sub menu (Goto Bookmarks » Jump Location Mark n). To remove a Bookmark, toggle the bookmark off by repeating the add bookmark process for that code line.
The stored location is only available while the document remains open (active or not). If the document is closed and opened again, the location marker will be empty.

Use bookmarks to jump to a statement in the script quickly.
- Use the Ctrl+n shortcut keys to jump to an existing bookmark in the script (where n is the bookmark number from 0 to 9) — for example, to go to bookmark number 3, press the Ctrl+3 shortcut keys.
- Use the Ctrl+Shift+n shortcut keys to toggle a bookmark (where n is the bookmark number to toggle), or move an assigned Bookmark to the current line.
Code Outlining
To facilitate your work with the code, procedures/functions/sub-routines in the document are organized in code outline blocks. Code outline blocks can be collapsed or expanded to show only the document content that you need right now.
The use of code outlining, including an option to display the collapse lines - the extent of an individual code block - is enabled/disabled from the
Text Editors - Display page of the
Preferences dialog.
To expand/collapse an individual code block, click on the small  or
or  control, to the left of the top statement in the block. When collapsed, a
  control appears to the right of the top statement for each code block. Hovering the mouse over this will reveal the code that has been collapsed. Double-clicking on this control will expand that individual code block.
To expand/collapse all code outline blocks in the current document, right-click and choose Outlining » Collapse All or Expand All from the context menu.
General Text Editing Tools
Adding To-Do Items
A To-Do item, as its name suggests, is basically used as a reminder for a task that needs to be carried out in relation to the document at a later stage.
To add a To-Do item at the point within the current document, place the text cursor at this point, right-click and choose Add To-Do Item from the context menu. After launching the command, the Edit To-Do Item dialog appears. Use this dialog to enter suitable text pertaining to the task that needs to be carried out at that point in the document. Use the available fields in the dialog to define a Priority for the task (ranging from Lowest to Highest, with Normal selected by default), the Owner of the task and also a Category for the task (e.g. Formatting pass, Code Review pass, etc).
After defining the To-Do item as required, clicking OK will close the dialog and return focus back to the current document. An entry for the To-Do item will appear at the point marked by the current text cursor position. The entry will appear between { and } delimiters, as illustrated by the example below:
{TODO Name=Check Spelling|Priority=3|State=1|Owner=Jase|Category=Proofing|UID=UIDYOGFS}
Where:
- Name is the actual text of the action to be taken.
- Priority is a value representing the assigned priority (Lowest = 0, Low = 1, High = 3, Highest = 4). If the Priority has been set to Normal, an entry will not be displayed.
- State reflects whether the Item has been done or not. If not, there will be no entry displayed. If done, the value for State will be 1.
- Owner is the assigned owner of the item.
- Category is the assigned category for the item.
- UID is the unique identifier for that particular item.
All To-Do items for the active project are listed in the
To-Do panel.
Change Text Letter Case or Capitalization
The commands of the Tools » Change Case menu allow you to change the text capitalization or letter case of the selected text or the word under the cursor.
- Selection To UpperCase – select the text whose case you wish to change from lower to UPPER case and launch the command. The selection will become upper case.
- Selection To LowerCase – select the text whose case you wish to change from UPPER to lower case and launch the command. The selection will become lower case.
- Capitalize Selection – select the text that you wish to capitalize and launch the command. Each distinct word in the selection that does not already start with a capital letter, will have its initial letter raised to uppercase.
- Word To UpperCase – position the text cursor at the beginning, end, or anywhere within, the word whose case you wish to change from lower to UPPER case and launch the command. The word will become upper case.
- Word To LowerCase – position the text cursor at the beginning, end, or anywhere within, the word whose case you wish to change from UPPER to lower case and launch the command. The word will become lower case.
- Capitalize Word – position the text cursor at the beginning, end, or anywhere within, the word that you wish to capitalize and launch the command. The word will have its initial letter raised to uppercase.
Text Indent
For better readability, you can apply text indention in your document. To indent or undent selected text within the current document, choose Tools » Indent or Tools » Unindent from the main menus or click the  /
/  button on the Text Utilities toolbar. The selection will be indented/unidented by the number of characters specified in the Block Indent field, on the Text Editors - General page of the Preferences dialog.
If the Backspace unindents option is enabled (on the Text Editors - General page of the Preferences dialog) you can unindent using the Backspace key. Place the text cursor before the first non-space character on the line to be unindented and press Backspace. The line will unindent, in keeping with the start of new words on the previous line.
Text Search and Replace
To configure a search for specific text located in the current document, all text-based documents in the active project, all open text-based documents, or all text-based documents in a specified directory, the Find Text dialog is used. The dialog can be accessed from the Text Editor (or any coding-aware variant of the Text Editor) by choosing the Edit » Find command from the main menus (shortcut: Ctrl+F).

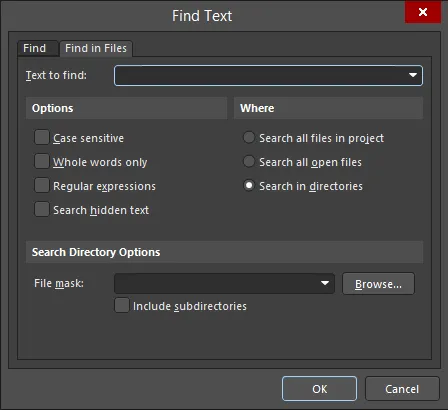
The Find Text dialog
The dialog essentially operates in two modes, with functionality delivered courtesy of two tabs:
- Find - use the options on this tab to configure a search within the current document only. After clicking OK, the first instance of matching text found will be highlighted on the document.
- Find in Files - use the options on this tab to configure a search across all text-based documents in the active project, all open text-based documents, or all text-based documents in a specified directory. After clicking OK, all instances of matching text found in the files coming under the scope of the search, will be listed as entries in the Messages panel. Each message will reflect the source file, the line on which the searched text was found, the entire text on that line, and the character position within that line at which the searched text string starts.
- Each message in the Messages panel is in the form (x, y): <LineText>, where x is the character position on line y of the document.
- Files do not have to be open in order to search text using the Find in Files mode.
- When using the Find in Files mode, resulting found text can be cross-probed to, from the Messages panel entry - simply double-click on the message.
To find the next occurrence of the last text search that was specified using the Find Text dialog, use the Edit » Find Next command from the main menus (shortcut: F3). After launching the command, the next occurrence of the text specified in the Text to find field of the Find Text dialog, will be located and highlighted. Use the command repeatedly to sequence through all other occurrences. This feature applies all search criteria options that were specified when performing the original text search.
Enable the Find selected text on Find Next option, on the Text Editors - General page of the Preferences dialog, to use this command to quickly find subsequent occurrences of the currently selected text, instead of the text that was used in the original find text action.
You can also find the next occurrence of the currently selected text in the active document using the Edit » Find Next Selected command from the main menus (shortcut: Ctrl+Shift+F). After launching the command, the next occurrence of the selected text will become selected. Use the command repeatedly to sequence through all other occurrences. This feature essentially performs a text search using the Find Text dialog, with the selected text used as the entry for the Text to find field. All search criteria options that were last specified when performing a text search using the Find Text dialog, will be applied using this feature.
To configure a search to locate and replace specific text located in the current document, all text-based documents in the active project, all open text-based documents, or all text-based documents in a specified directory, the Replace Text dialog is used. The dialog can be accessed from the Text Editor (or any coding-aware variant of the Text Editor) by choosing the Edit » Replace command from the main menus (shortcut: Ctrl+H).

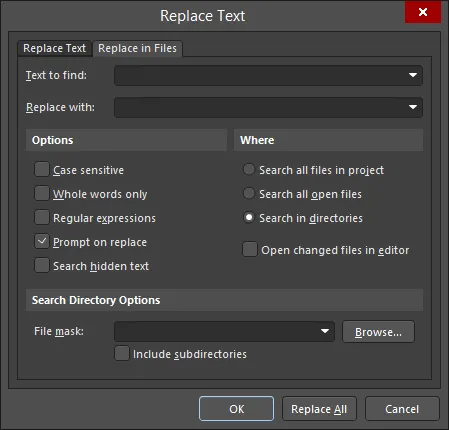
The Replace Text dialog
The dialog essentially operates in two modes, with functionality delivered courtesy of two tabs:
- Replace Text - use the options on this tab to configure text replacement within the current document only. To replace only the first instance of matching text, click OK. If the Prompt on replace option was enabled, the text will be highlighted, with a dialog appearing to confirm the replacement. Click Yes to replace only this instance. You will have the opportunity to replace all matching instances from this dialog. Alternatively, to replace all from the start, click Replace All, rather than OK. Again, all matching instances of the search text will either be replaced directly, or through individual prompting, depending on the state of the Prompt on replace option.
- Replace in Files - use the options on this tab to configure a text replacement across all text-based documents in the active project, all open text-based documents, or all text-based documents in a specified directory. After clicking OK, all instances of matching text found in the files coming under the scope of the search, will be replaced. Again, you can opt to be prompted on replacement by setting the Prompt on replace option beforehand. The Replacing dialog will appear to show progress of the replacement. Each replacement made will be listed as entries in the Messages panel. Each message will reflect the source file, the line on which the searched text was found, the entire text on that line, and the character position within that line at which the searched text string starts.
In each case, an information dialog will appear, summarizing the number of replacements made.
- Each message in the Messages panel is in the form (x, y): <OriginalLineText>, where x is the character position on line y of the document. The text shows the original text, prior to replacement.
- Files do not have to be open in order to replace text using the Replace in Files mode. Such files can optionally be opened after replacement by enabling the Open changed files in editor option, prior to performing the replacement.
- When using the Replace in Files mode, resulting replaced text can be cross-probed to, from the Messages panel entry - simply double-click on the message.
For both text searching and replacement, see related options in the Find region, on the Text Editors - General page of the Preferences dialog.
Options and Controls of the Find-Replace Text Dialog
Find/Replace Text Tab
- Text to find - enter the string of text to find in the document or use the drop-down to select the string from previous searches.
- Replace with - enter the string of text to replace the found text with or use the drop-down to select the replacement string from previous replacement strings. This command is available only in the Replace Text dialog.
- Options
- Case sensitive - check to perform the search paying attention to the case.
- Whole words only - check to find only whole words.
- Regular expressions - check to search using regular expressions.
- ^ - only match when the string is at the start of a line.
- $ - only match when the string is at the end of a line.
- . - indicates any single character (e.g., "te.t" matches "test", "text", and "tent", but not "tet").
- * - indicates any set of characters, including no characters (e.g., "te*" matches "text", "tent", and "te", but not "t").
- + - indicates any set of characters, except no characters (e.g., "te+" matches "text", and "tent", but not "te").
- [ ] - find any of the characters enclosed in the brackets.
- [^] - a caret at the start of a string in brackets means NOT (e.g., "[^tes]" matches any characters except t, e, or s).
- [-] - a hyphen within a string in brackets signifies a range of characters (e.g., "[l-o]" matches the characters l, m, n, and o).
- { } - used to group characters or expressions. Groups can be nested with a maximum number of 10 groups in a single pattern.
- \ - a backslash before a wildcard character tells the Text Editor to treat that character literally, not as a wildcard (e.g., "\^test" does not look for the string test at the start of a line; it looks for the string "^test").
- Prompt on replace - check to be prompted before replacement occurs. This command is available only in the Replace Text dialog.
- Search hidden text - check to include hidden text in the search.
- Wrap search - check to wrap the search string. This command is available only in the Find Text dialog.
- Direction - use these selections in conjunction with the Origin options to determine from where and how the text is searched..
- Forward - select to perform the search forward from the cursor.
- Backward -select to perform the search backward from the cursor.
- Scope
- Global - select to search the entire document.
- Selected text - select to only search currently selected text.
- Origin - use these selections in conjunction with the Direction options to determine from where and how the text is searched.
- From cursor - select to begin the search from the cursor location.
- Entire scope - select to perform the search of the entire document.
Find in Files/Replace in Files Tab
- Text to find - enter the string of text to find in the document or use the drop-down to select the string from previous searches.
- Replace with - enter the string of text to replace the found text with or use the drop-down to select the replacement string from previous replacement strings. This command is available only in the Replace Text dialog.
- Options
- Case sensitive - check to perform the search paying attention to the case.
- Whole words only - check to find only whole words.
- Regular expressions - check to search using regular expressions. Valid regular expressions include the following:
- ^ - only match when the string is at the start of a line.
- $ - only match when the string is at the end of a line.
- . - indicates any single character (e.g., "te.t" matches "test", "text", and "tent", but not "tet").
- * - indicates any set of characters, including no characters (e.g., "te*" matches "text", "tent", and "te", but not "t").
- + - indicates any set of characters, except no characters (e.g., "te+" matches "text" and "tent", but not "te").
- [ ] - find any of the characters enclosed in the brackets.
- [^] - a caret at the start of a string in brackets means NOT (e.g., "[^tes]" matches any characters except t, e, or s).
- [-] - a hyphen within a string in brackets signifies a range of characters (e.g., "[l-o]" matches the characters l, m, n, and o).
- { } - used to group characters or expressions. Groups can be nested with a maximum number of 10 groups in a single pattern.
- \ - a backslash before a wildcard character tells the Text Editor to treat that character literally, not as a wildcard (e.g., "\^test" does not look for the string "test" at the start of a line; it looks for the string "^test").
- Prompt on replace - check to be prompted before replacement occurs. This command is available only in the Replace Text dialog.
- Search hidden text - check to include hidden text in the search.
- Where
- Search all files in project - select to search within all files in the current project.
- Search all open files - select to search within all open files.
- Search in directories - select to search within directories.
- Open changed files in editor - select to open changed files.
- Search Directory Options
- File Mask - click the Browse button to open a dialog to select the desired folder to search.
- Include subdirectories - check to include subdirectories in the search.
Additional Control
- Replace All - click to replace all found strings with the text entered in the Replace with textbox. This command is available only in the Replace Text dialog.
Jumping to a Specific Line
To jump to a specific line in the current document, choose Edit » Goto Line Number from the main menus. After launching the command, the Go to Line Number dialog will appear.

The Go to Line Number dialog
Initially, the dialog will reflect the line in which the text cursor is currently positioned. Enter the line number that you want the cursor to jump to into the New Line Number field. If the line number is greater than the number of lines in the document the dialog will reappear, ready to type in a valid line number. After clicking OK, the cursor will jump to the same position in the specified line.
It can be very helpful to enable the display of line numbers. This can be done using the
Show line numbers option (and related sub-options), on the
Text Editors - Display page of the
Preferences dialog.
Open Document Under Cursor
A document that the cursor is currently over can be automatically opened from the text editor. Position the text cursor within the text that describes the document to be opened, right-click and choose Open Document Under Cursor from the context menu (shortcut: Ctrl+Enter). The document will be opened, and made the active document.
For example, to open a document called Example_Schematic.SchDoc, first make sure that the text Example_Schematic.SchDoc is typed somewhere in the current text document. Then place the text cursor anywhere within this string and launch the command - Example_Schematic.SchDoc will open as the active document.
- The feature is not case sensitive and so the case of the text entered in the text document does not have to be identical to that of the actual file to be opened.
- The feature will only open documents that have no spaces in their filenames. For example, Example_Design_File.SchDoc and ExampleDesignFile.SchDoc will both open using this feature, but Example Design File.SchDoc will not.
- The feature will only open documents that are stored in the same location on the hard disk as the text document making the call. If the document does not reside in that directory, an Open dialog will appear, from where you can browse to and open the required document.
- If a document is already open when a call is made, the document will become the active document.
Word Wrapping
If your document includes long lines of text, you make the document more readable manually, by inserting carriage returns or by enabling word wrapping. To manage word wrapping, use the commands of the Tools » Word Wrap main menu:
- None – turns word wrapping mode off in the current document. After launching the command, text entered will no longer be wrapped at either the right-hand margin, or the right-hand edge of the display area window.
- At Margin (or the
 button on the Text Utilities toolbar) – lines of text will be wrapped at the margin in the current document. After launching the command, text entered will be wrapped at the right-hand margin, as defined by the value entered in the Margin width field, on the Text Editors - Display page of the Preferences dialog.
- At Window (or the
 button on the Text Utilities toolbar) – lines of text will be wrapped at the edge of the display window in the current document. After launching the command, text entered will be wrapped at the right-hand edge of the display area window.
- You can change between word wrap modes at any time – the text in the document will be reformatted to comply with the mode chosen.
- Word wrapping can also be configured using the Word wrap option (and related sub-options) on the Text Editors - Display page of the Preferences dialog.
Document Display Split
You can 'split' the display of the current document into two distinct horizontal or vertical sections, allowing you to browse and edit two different areas of the same document. To divide the document window into two equal sections, choose one of the following commands:
- Window » Split Horizontally – the top half will show an area starting from the beginning (top) of the document. The bottom half will show an area starting from the point in the document that was originally at the top of the display window prior to launching the command.
- Window » Split Vertically – the left half will show an area starting from the beginning (top) of the document, with the horizontal scrollbar fully to the left. The right half will show an area starting from the point in the document that was originally at the top of the display window prior to launching the command.
You are now able to freely browse and edit different areas of the (single) current document.
A 'splitter bar' divides the two sections. Click and drag this dividing bar to change the area of document visible in each section.
To revert back to a single window for the document, use the Remove Split command, accessed from the Window menu. The area of the document that will be displayed when the split is removed will be that currently displayed in the bottom section (for horizontal split) or in the right-hand section (for vertical split).
If you want to change the split mode from horizontal to vertical or from vertical to horizontal, use the Split Vertically or Split Horizontally command, respectively, also accessed from the Window menu.
