Parent page: Designing with a Connected Workspace
Interaction with your connected Workspace can be made from various areas, but there are two main places:
From a purely component management perspective, much of the day-to-day interaction with your Workspace will be performed from within Altium NEXUS, through the
Components panel.
This page takes a look at accessing your Workspace from within Altium NEXUS.
- For an Altium 365 Workspace, it is assumed that you have been added to the team for at least one Workspace – either your own organization's Workspace or that of another organization. If you do not yet have an Altium 365 Workspace in your own organization, Altium NEXUS will guide you through its activation, when you attempt to connect.
- Note that when connected to a Workspace from Altium NEXUS, access will be at the same level as that of your Altium NEXUS Software Subscription. However, if you are an invited member of another company's Workspace and that Workspace - through the level of Altium NEXUS Software Subscription for the Altium account to which it is associated - provides a higher level of access, please be aware that some Altium 365 features and data may not be available to you.
Connecting to Your Altium 365 Workspace
First, ensure that you are signed in to your AltiumLive account through Altium NEXUS. To do so, click on the  control at the top-right of the main application window, then click the
  entry on the associated menu. Use the subsequent Sign In dialog that appears to enter your AltiumLive account credentials, then click
  . Alternatively, sign in using your Google® or Facebook® account and, in doing so, link/associate that account with your AltiumLive account. If you don't have an AltiumLive account, you can click the control to register for one.
Linked accounts (Google® or Facebook®) will be listed on your AltiumLive profile page. Controls are provided there to unlink accounts if required.
 Ensure you are signed in to your Altium account, using your AltiumLive credentials.
The control will change to reflect you are having signed in to your Altium account by displaying your AltiumLive profile picture, or avatar (e.g.
 ).
). The menu will display this also, with full name and with a link to quickly access your AltiumLive account (profile) through your default Browser.
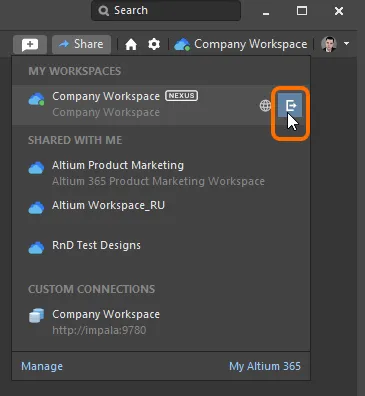
You can now connect to your Altium 365 Workspace. To do so, click on the  control at the top-right of the main application window. In the subsequent menu, all Altium 365 Workspaces that are available to you will be listed across two sections:
- My Workspaces – the Altium 365 Workspace activated for your own organization and to which you have been added as a team member. Note that each organization can activate a single Altium 365 Workspace.
- Shared With Me – those Altium 365 Workspaces of other organizations to which you have been invited and subsequently added as a team member.
Click the entry for the specific Altium 365 Workspace you wish to connect to.
All Altium 365 Workspaces are presented automatically by having signed in to your AltiumLive account.
 Click to access a Workspace from all those available to you.
If your organization does not yet have an Altium 365 Workspace, a link will be provided to an area with which to do so. The Manage link takes you to your AltiumLive account profile page from where you can activate, and then manage, Altium 365 Workspaces available to you. Click the My Altium 365 link to access the Altium 365 Platform Interface. In either case, clicking a link will open your default Browser (if not already) and open the relevant target in a new tab.
Automatic Connection to an Altium 365 Workspace
If you are a member of the team for one or more Altium 365 Workspaces and have nominated one of these to be the default Altium 365 Workspace, then you will connect directly to that Workspace when initially signing in to your Altium account (through Altium NEXUS) using your AltiumLive credentials. After that, each time you sign in to your account within Altium NEXUS the last connected Workspace will be automatically connected – all set ready to continue designing where you left off.
Setting the default Altium 365 Workspace is performed from the
Workspaces section of your AltiumLive profile page (
https://profile.altium.com/) by clicking the

button associated with the required Workspace and selecting the
Set as default option from the associated menu (the

label will be shown in the Workspace's tile on the page).
Read-only Altium 365 Workspace
If there is no active Altium NEXUS Software Subscription across any of the Altium NEXUS licensing for a company's account with Altium (to which that company's Altium 365 Workspace is associated), then that Workspace will switch over to being Read-only. All team members will still be able to view/work with existing content in the Workspace, but will not be able to modify that existing content in any way, nor create any new content.
When connecting to a Read-only Workspace, a warning dialog will be presented and the icon for the connected Workspace will present as  .
.
 Connecting to a Workspace that has been switched to Read-only mode.
Connecting to Your NEXUS Server Workspace
Connect to your NEXUS Server Workspace from within the NEXUS design client by clicking the Current User control, at the top-right of the main application window (e.g. ). This will be the user that is currently signed into AltiumLive through this instance of Altium NEXUS. In the subsequent menu choose the Custom connection command. The Sign in dialog will appear, with which to connect to the target Workspace. Enter the URL for the Workspace and your Workspace access credentials, then click the button.
It can be a good idea to enable the Sign in automatically option so that the entered URL and access credentials are stored, and you don't have to repeatedly enter them to access the Workspace when starting the NEXUS design client.
 Connecting to your NEXUS Server Workspace from within the NEXUS design client.
The NEXUS Server Workspace's URL (Server Address) will be in the format http://<ComputerName>:<PortNumber> (e.g. http://impala:9780 for a NEXUS Server installed using the default port assignment). If the Workspace is being accessed from an instance of the NEXUS client that is running on the same computer on which the NEXUS Server is installed, you may also use http://localhost:9780. If you want to connect using your Windows login credentials – taking advantage of the Workspace's support for Windows Authentication – enable the Use Windows Session credentials option.
The Altium NEXUS Server relies on a number of Microsoft runtime components for successful operation and access, in some situations these may not be present on the target machine. If you receive an error message about a missing library (DLL) when you attempt to connect to the NEXUS Server Workspace, it indicates that there are missing Microsoft runtime components. Obtain and install the relevant Microsoft Visual C++ Redistributable Package for your OS.
Connecting to a 'Known' NEXUS Server Workspace
If you have previously connected to your NEXUS Server Workspace from within the same instance of the NEXUS design client, it will become a Known Server. If this is the case, you can connect to that Workspace from within the Altium NEXUS client in a more streamlined fashion. To do so, click on the control at the top-right of the main application window. In the subsequent menu, choose the entry for your Workspace, in the CUSTOM CONNECTIONS grouping. If you enabled the Sign in automatically option when accessing that Workspace previously, you will be connected straight away. If this option was not enabled, the Sign in dialog will appear, with which to connect to the target Workspace. Enter the URL for the Workspace, and your Workspace access credentials, then click the button.
 Connecting to your NEXUS Server Workspace from within the NEXUS client, when that Workspace is already known.
Note that when the
Sign in automatically option is enabled, you will be connected to the Workspace as the user that last connected through the
Sign in dialog. If you need to connect as a different user, you will need to use the
Custom connection command in the menu associated with the Current User control, at the top-right of the main application window (e.g.
).You can also access your 'known' Workspace from the
Open Project and
Create Project dialogs, when wanting to open an existing project, or create a new project, respectively. In either case, select the

entry in the
Locations region of the dialog, then click the button relevant to that Workspace on the right-hand side. Again, if you need to connect as a different user, you will need to use the
Custom connection command in the menu associated with the Current User control, at the top-right of the main application window (e.g.
).Connecting to a NEXUS Server Workspace from Different Computers
Support is provided for connecting to your NEXUS Server Workspace using the same credentials but from different computers (other than the computer on which the NEXUS Server is installed). If you attempt to connect to a Workspace that you are already connected to from another computer – either through the NEXUS design client or the Workspace's browser-based interface – a pop-up dialog will alert you to this. You can choose from two options offered in the dialog:
- Terminate existing session – close the existing session that you have on the other computer and continue to login to the Workspace from the current computer.
- Start new session – login to the Workspace from the current computer by using an additional connection license and thereby keep logged into the Workspace from the other computer as well.
The same user can be accessing a NEXUS Server Workspace concurrently in different ways (e.g. connected through the NEXUS design client AND signed-in through an external web browser) and it only counts as a single connection from the licensing perspective, when access is made from the same PC. If the same user accesses that NEXUS Server Workspace from different PCs, each different PC access will require a separate connection (so extra seat of a Client Access License). You will therefore only be able to log in from the current computer as well, provided you have enough Workspace Connector licenses (CAL) remaining.
Checking Connection Status
You can check whether you are currently connected to a Workspace from the following places:
-
The menu associated with the Active Server control, at the top-right of the main application window. When actively connected to a Workspace, the control will reflect the name of that Workspace (e.g.  for an Altium 365 Workspace or
  for a NEXUS Server Workspace). The currently connected Workspace will also be highlighted in the associated menu (and is distinguished by the
  /
/ icon). Clicking the entry provides access to browse the content of that Workspace through the NEXUS client Explorer panel. Clicking the
  icon provides access to the Workspace's browser interface (through your default web browser).
 Verification of being connected to your Workspace. Shown here is an example for an Altium 365 Workspace. Hover the cursor over the image to see an example for a NEXUS Server Workspace.
The Current User control itself reflects the user who is currently connected to the AltiumLive account or to the active NEXUS Server Workspace (e.g.
).
-
The Data Management – Servers page of the Preferences dialog. When connected to the Workspace, that Workspace will be presented as the Active Server.
You can only be actively connected to one Workspace through the software at a time and this could be an Altium 365 Workspace or a NEXUS Server Workspace. If you have previously connected to other Workspaces from that instance of the NEXUS design client, they will be listed as Known Servers. While actively connected to one Workspace, you could also be connected to another (it will not be the active Workspace).
 Once connected to the Workspace, it will become the Active Server. Shown here is an example for an Altium 365 Workspace. Hover the cursor over the image to see an example for a NEXUS Server Workspace.
-
The Explorer panel. When connected, the Workspace will be available from the menu associated with clicking on the name of the Workspace currently being browsed.
Note that all connected Workspaces will be listed, but only one will be active and is distinguished by the inclusion of the

icon, and its name boldened.
 Browsing the Active Server through the Explorer panel in the NEXUS client.
Switching Workspaces
You can quickly switch between any of the Workspaces available to you. To do so, click the Active Server control, at the top-right of the main application window (e.g. or ). In the subsequent menu choose the entry for the Workspace you wish to switch to. You will be disconnected from the current Workspace, then momentarily connected to the chosen Workspace.
 When multiple Workspaces are available, you can quickly switch between them.
If switching to a NEXUS Server Workspace and the
Sign in automatically option was enabled when accessing that Workspace previously, you will be connected straight away. If this option was not enabled, the
Sign in dialog will appear with which to connect to the target Workspace. Enter the URL for the Workspace and your Workspace access credentials, then click the
button. Note that when the
Sign in automatically option is enabled, you will be connected to the Workspace as the user that last connected through the
Sign in dialog. If you need to connect as a different user, you will need to use the
Custom connection command in the menu associated with the Current User control, at the top-right of the main application window (e.g.
).Managing Your Workspace
From within Altium NEXUS design client, you have the ability to manage certain aspects of your connected Workspace. This is performed from the Data Management – Servers page of the Preferences dialog. Click the Properties control associated with the Workspace – in the Active Server region of the page – to access the commands, illustrated in the following image and detailed thereafter.
 Accessing commands to manage various properties of the actively connected Workspace. Shown here is an example for a connected Altium 365 Workspace. Hover the cursor over the image to see an example for a connected NEXUS Server Workspace.
- Server configuration – use this command to access the Workspace's browser interface in your default web browser. If you are an Administrator for the Workspace you will be taken to the Admin – Settings page of the browser interface.
- Lifecycles – use this command to access the Edit Lifecycle Definitions dialog, with which to manage the defined lifecycles for the Workspace.
- Naming schemes – use this command to access the Edit Revision Naming Schemes dialog, with which to manage the defined revision naming schemes for the Workspace.
- Operations – use this command to access the Edit Operation Permissions dialog, with which to define and manage global operation permissions for the Workspace.
- Connection (only for a NEXUS Server Workspace) – use this command to access the Connection Properties dialog, with which to configure your connection to the Workspace.
For another Workspace to which you have a connection (connected or disconnected), you will only have access to the Server configuration and Connection commands.
Disconnecting from Your Workspace
You can disconnect from your Workspace from within the NEXUS design client, in the following ways:
-
By clicking the Active Server control, at the top-right of the main application window (e.g. or ). In the subsequent menu, click the disconnect control ( ) at the far right of the entry for the currently connected Workspace.
-
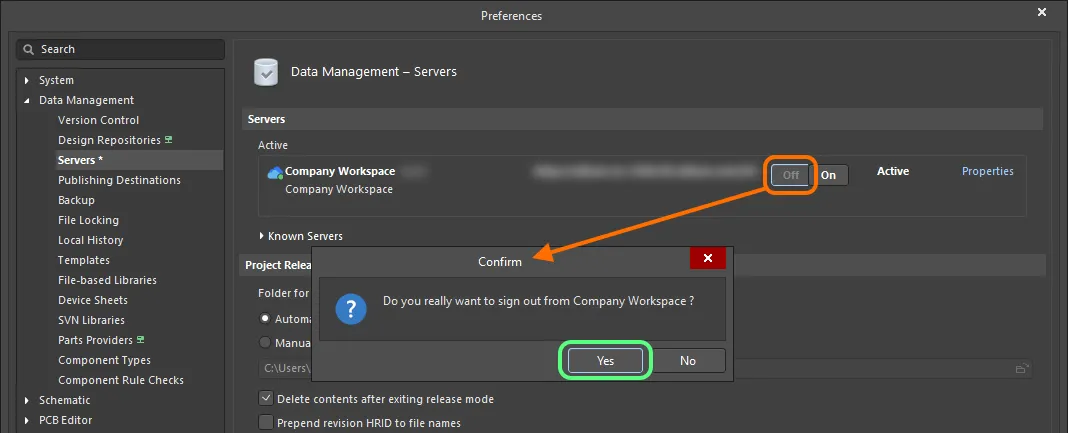
By clicking the  button, associated with the Active Server, on the Data Management – Servers page of the Preferences dialog. A confirmation dialog will appear – click Yes.
Your access to the Workspace will also be terminated when you exit the NEXUS client. In addition, and for an Administrator of your Workspace, there is the provision to drop a session from the Admin – Sessions page of the Workspace's browser interface. For an Altium 365 Workspace, this would then allow the administrator to remove that user from the Workspace team (something that could not otherwise be done if the user were actively using the Workspace). For a NEXUS Server Workspace, this can be used to terminate an existing session and thereby free up a connection to that NEXUS Server Workspace.
Working in the Workspace
Once you are connected to your Workspace, you can access and create content. The primary interface to the Workspace from Altium NEXUS is the Explorer panel.
From a purely component management perspective, much of the day-to-day interaction with your Workspace will be performed from within Altium NEXUS through the
Components panel.
 When you are working inthe Altium NEXUS client you access full Workspace content through the Explorer panel. For component management only, you'll tend to use the Components panel.
To display a panel:
- Click the
 button at the bottom-right of Altium NEXUS and select the required panel from the menu that appears.
- Choose the required panel entry from the View » Panels main menu.
