Parent page: Altium Concord Pro
Altium design software, in conjunction with Altium Concord Pro, brings support for Managed Projects. Managed projects target the development stage of the project lifecycle, simplifying the creation and ongoing workflow for version controlled projects. Centralized storage under the control of Concord Pro also enables this feature to be a foundation for other collaborative services.
Some key benefits to using managed projects are:
- Simplified storage. No need to make decisions about storage locations. Backup and other basic services are taken care of.
- Foundation for collaborative features.
- Enforced version control.
- Beneficiary of a dedicated commenting system.
- Notifications and status. Document status including local modifications is visible to entire design teams.
- Concurrent PCB design works without any complex setup.
Technically a managed project is the combination of meta information stored on the server, along with tight integration with Altium Concord Pro's local Version Control service. The typical work flow is as follows:
- A user creates a new managed project (via the Create Project dialog in Altium Designer, from within Concord Pro's browser interface, or by making an existing unmanaged project available on Concord Pro (from Altium Designer)). During creation, that user defines the project's name, description, and design repository.
- In Concord Pro's browser interface, or directly within Altium Designer, access to the project is defined and managed.
- All collaborators select the project for opening (either from within Altium Designer, or from Concord Pro's browser interface) after which it is automatically checked out.
The beauty of managed projects is that they are version controlled by default, and can be collaboratively worked upon without having to worry about shared drives, servers, agreements etc.
Prior to creating a new managed project, or making an existing unmanaged project available to the server, ensure that a design repository exists in which to store that project, and all future projects. Design repositories are centrally managed as part of the Altium Concord Pro server, through its local Version Control service. A new installation of Altium Concord Pro provides a single Git-based design repository - Versioned Storage - for accommodating all of your managed design projects. If you have upgraded your Server from Altium NEXUS Server 1.0 (or Altium Vault 3.0), then the use of SVN repositories will also be enabled, so that you can continue to use your previous (and established) design flow. In this case, you can continue to create repositories through the local Version Control service (SVN-only), or connect to external repositories (SVN or Git).
Creating a New Managed Project
There are three ways in which a managed project can be created:
- Creation of a new project within Altium Designer.
- Creation of a new project within Altium Concord Pro's browser interface.
- Making an existing, unmanaged project available to Altium Concord Pro, from within Altium Designer.
The following sections take a closer look at these three avenues of creation.
Through Altium Designer
A new managed project can be created from within Altium Designer using the Create Project dialog (File » New » Project):
 Setting up the Create Project dialog to create a new managed project from within Altium Designer.
- In the Locations list, select the entry for your Concord Pro server (it will appear with the name you have specified for it, on the Admin - General page of Concord Pro's browser interface) – you must be signed in to Concord Pro to see this option in the listing.
- In the Project Type list, choose the type of project you wish to create, and choosing from the applicable templates available as required. If you have project templates created and released into your Concord Pro installation, these will appear listed as the only available templates from which to choose.
- Enter a Project Name and optionally, a project Description.
The project name should start with, and can contain A-Z, a-z, or 0-9. Underscores, dashes, and spaces are allowed, but the latter can only be used within the middle of the name (leading and trailing spaces will be ignored). You can not use the following words: AUX, COM1-COM9, LPT1-LPT9, CON, NUL, and PRN. In addition, the name cannot contain the following characters: \ . / ? % * : | " < >.
- Use the Folder field to specify where the folder for the project – within Concord Pro's folder structure – is to be created. The default path for new Concord Pro projects is specified on the Admin - Settings - Projects page of Concord Pro's browser interface (by default, this will be
Projects\<ProjectName>). Click the  button to browse to and select a different server folder, if required.
- Use the Local Storage field to specify where the project will be stored on your hard drive, prior to its committal to the centralized design repository. The default location is defined in the System - Default Locations page of the Preferences dialog. Click the button to browse to and select a different folder location, if required. This is the 'working' folder for the project and the local Git repository it is committed to. The project is ultimately, or at the time of committal, Pushed to the centralized design repository in Altium Concord Pro (Versioned Storage), which is the remote Git repository.
- Use the Parameters list area to add or remove custom Name/Value parameter pairs that are associated with the project and saved in the server. Use the
 button to add a new parameter Name-Value pairing to the list. These managed project parameters are saved in the Concord Pro server with the new project, and can be edited within the server. By contrast, Project type parameters are saved in the project file (
*.PrjPcb), and can be edited in Altium Designer. Both parameter types may be used as Special Strings in Altium Designer - access from the Properties panel with a placed Text String selected in the design workspace. Parameters defined for the project can also be viewed on the Parameters and Server Parameters tabs of the Project Options dialog (Project » Project Options).
If you upgraded to Altium Concord Pro from previous server technology and still have the ability to use internal (SVN) and/or external (SVN/Git) design repositories, the Repository field will be presented. This lists all design repositories managed through Concord Pro's local Version Control service, and which have been shared with you to use. Choose the repository in which to store the new project and its files.
With the project defined as required, click the  button. The new project structure will be created in the specified local and server folders. The project will be opened in the Projects panel, which will show the project and its constituent documents as being Scheduled for addition, denoted by blue cross icons (
 ).
).
The project will appear in the Projects panel under an entry for the target server, reflecting the name of that server.
Right-click on the project in the Projects panel and choose the Commit Project command or the Version Control » Commit Whole Project command. You will be presented with the Commit to Version Control dialog. Select the files you wish to commit to Concord Pro's Versioned Storage design repository and click the  button. Once added, the Projects panel will reflect the fully synchronized state that exists between the files in the remote design repository (in Altium Concord Pro) and the local (working copy) repository - as indicated by the associated
  icons.
If you upgraded to Altium Concord Pro from previous server technology and still have the ability to use internal (SVN) and/or external (SVN) design repositories, you would click the relevant button in the dialog, to commit (or commit and push) the project to the chosen internal SVN repository, or external SVN/Git design repository.
 Commit and push the newly created project to the Versioned Storage design repository in Altium Concord Pro.
When committing a project, Altium Designer will detect the presence of any unsaved files and offer to save them.
In addition, an entry for the project will appear on the Projects page of Concord Pro's browser interface.
 The newly-created project, evident on the Projects page of Altium Concord Pro's browser interface.
The project will initially be shared for Read/Write access with the designer who created it (the Owner), and all Administrators for the Concord Pro server. In addition, it will be shared for Read-only access with
Anyone, meaning that all users of the Concord Pro server can view the project. For more information on configuring project access permissions, see
Sharing a Managed Project.
Commit Without Push
For those unfamiliar with Git repositories, or for those just wanting to get their local design changes into Altium Concord Pro, using the button in the Commit to Version Control dialog is the cleanest and most streamlined approach.
However you also have the option to Commit to your local Git repository, ahead of pushing changes to the remote Git repository (Versioned Storage) in Altium Concord Pro. To do so, select the Commit command as above, and in the Commit to Version Control dialog choose the Commit option from the button drop-down menu. The changes will be saved to the local Git repository for that project, and the state of the files – as reflected in the Projects panel – will become Ahead of server ( ).
).
 Example of committing a new project to the local Git repository.
These locally saved changes can be sent to the remote Git repository in Concord Pro at a later time by executing a Push command. This can be performed in a couple of ways:
- Right-click on the project entry in the Projects panel and choose the Commit Project command from the context menu, or choose the File » Commit Project command from the main menus. In the Commit to Version Control dialog, click the button. This will just push those files ahead of the server, and commit and push those that are not.

- Right-click on the project entry in the Projects panel (or on a specific file) and choose the Version Control » Push(n) command from the context menu - where n reflects the number of local commits that have been made (ahead of the server).
Once pushed, the Projects panel will reflect the fully synchronized state () that exists between the files in the remote repository (in Concord Pro) and the local (working copy) repository.
Through Concord Pro's Browser Interface
A managed project can be created directly from the Projects page of Altium Concord Pro's browser interface. The page lists all projects that have been made available to Concord Pro, and which are shared with the currently signed-in user. To create a new project, click the  button above the project list to open the Add Project window.
 Creating a new managed project through Altium Concord Pro's browser interface.
The Add Project window will initially present in simplified view. Choose a project template if available - the Templates region will list all Managed Project Templates that exist in Concord Pro. Choosing a template will also define the project type. Then enter a Name and (optionally) a Description for the project.
The project name should start with, and can contain A-Z, a-z, or 0-9. Underscores, dashes, and spaces are allowed, but the latter can only be used within the middle of the name (leading and trailing spaces will be ignored). You can not use the following words: AUX, COM1-COM9, LPT1-LPT9, CON, NUL, and PRN. In addition, the name cannot contain the following characters: \ . / ? % * : | " < >.
To access more controls click the Show additional fields control. The following fields will present:
- Vault Folder - use this field to specify where the folder for the project is to be created within Concord Pro's folder structure. By default, this will be Projects\<ProjectName>. The default folder path for new projects is specified on the Admin - Settings - Projects page of Concord Pro's browser interface.
- Project Type - use this field to specify the type of project from a list of all project types supported by Altium Designer. If you have selected a managed project template to use, this field will not be presented.
- Repository - this field will display Versioned Storage, the Git-based design repository available as part of Concord Pro, in which all new projects (and their files) are stored.
If you upgraded to Altium Concord Pro from previous server technology and still have the ability to use internal (SVN) and/or external (SVN/Git) design repositories, the Repository field will be presented. This lists all design repositories managed through Concord Pro's local Version Control service, and which have been shared with you to use. Choose the repository in which to store the new project and its files. If an SVN-based repository is chosen, the Repository Folder field will be presented. Use this field to specify the name of the folder within the repository in which to accommodate the project and its associated files. By default, this will take the project's name.
After defining the new project as required, click  to create the new project structure. You will come back to the summary-level project list, where you will now see an entry for the newly-created project.
 The newly-created project, evident back on the Projects page of Altium Concord Pro's browser interface.
The project will initially be shared for Read/Write access with the designer who created it (the Owner), and all Administrators for the Altium Concord Pro server. In addition, it will be shared for Read-only access with
Anyone, which means that all users of Altium Concord Pro can view the project. For more information on configuring project access permissions, see
Sharing a Managed Project.
Making an Existing UnManaged Project Available on Server
You can also create a managed project from an existing unmanaged one by essentially converting the former to the latter, and porting it to Altium Concord Pro. To do this, open the existing unmanaged project as normal in Altium Designer, then right-click on its entry in the Projects panel, and select Make Project Available on Server from the context menu, giving access to the Make Available On Server dialog.
If the project is currently under Version Control in a local design repository, it can not be converted and ported to Concord Pro directly. A message will alert you to this, with the option to essentially convert the project to a regular project first – ignoring SVN revisions and changes log – and then port that to Concord Pro as a managed project.
 Make an existing, regular project available as a managed project on the Altium Concord Pro server.
Use the Make Available On Server dialog to change the Project Name and add a Description. By default, the name will be that of the original project.
Click the Advanced link at the bottom to expose the Folder field. This field is used to specify where the folder for the project - within Concord Pro's folder structure - is to be created. The default path for new Concord Pro projects is specified on the Admin - Settings - Projects page of Concord Pro's browser interface (by default, this will be Projects\<ProjectName>). Click the button to browse to and select a different server folder, if required.
With the properties for the managed project defined as required in the Make Available On Server dialog, click OK. The project and files will be committed and pushed to Concord Pro's Versioned Storage design repository, with the Projects panel reflecting the fully synchronized state that exists between that remote design repository and the local (working copy) repository - as indicated by the associated icons.
The newly-created and ported managed project will subsequently be available from the Projects page of Concord Pro's browser interface.
 The converted and ported project is added to the list of centrally-managed projects.
The project will initially be shared for Read/Write access with the designer who (converting it) made it available on the Concord Pro server (the Owner), and all Concord Pro Administrators. In addition, it will be shared for Read-only access with
Anyone, meaning that all users of the Concord Pro server can view the project. For more information on configuring project access permissions, see
Sharing a Managed Project.
Browsing Managed Projects
The projects listing on the Projects page of Altium Concord Pro's browser interface includes all projects that are shared with you, and offers a range of controls to access project management features. Use the  button to switch the page to its project preview (graphical tiles) mode and the
  button to switch the page to its detailed list mode.
 The Projects page of Concord Pro's browser interface - command central for working with your managed projects. Here, the detailed list mode for the page is shown. Hover the mouse over the image to see the project preview mode.
The list of managed projects is automatically sorted by the last modified date, with the most recently modified project appearing at the top of the list (in detailed list mode) or top-left of the list (in project preview mode). In either mode, the

button can be used to quickly toggle the order alphabetically by project name.
Each project entry in the detailed list mode includes the following information:
- Name - the name of the project.
- Author - the user who created the project.
- Kind - the type of project, which is typically PCB (PcbProject) or Multi-board (SystemDesign).
- Last Modified - the user who last modified the project. A
System entry occurs when an automated Concord Pro background process has changed the project, typically by adding computed information (such as a Preview or PCB statistics).
- Date - the date on which the project was last modified.
The project listing can be sorted by Name, Author, or Date, using the column header in each case. Click once to sort in ascending order, click again to sort in descending order. The arrows to the right of the column name will indicate the currently active sort direction.
In the project preview mode, the tile for a managed project includes the name of the project and the last modified date. The tile also autopopulates with the 3D view of the project's PCB, where a PCB is available.
 Example tile for a selected managed project when
the Projects page is set in its project preview mode.
For both project view modes (detailed list and preview) the following controls are provided (and detailed in the linked sections that follow). They act on the currently selected project in the list:
 Share - click to access the Manage Permissions window, with all the controls necessary to share the project with other users.
 Open - click to open the CAD-centric Projects Management view for the project. This will open on a separate tab of the browser.
 Edit - click to access the Edit Project window. From here, you can change the project's Name, Description and server Parameters. All other fields are non-editable, providing information only.
 More - select to access further options:
- Clone - choose this command to access the Clone Project window, providing the controls to make an identical copy of the project.
- Watch - choose this command to follow the project. You will receive applicable notifications related to the project (e.g. updated, released, permission changes) on the main Home and Stream pages of the browser interface. The creator of the project will automatically be set to watch that project.
- UnWatch - choose this command to stop following the project and cease reception of notifications for events relating to that project.
- Delete - choose this command to remove the project from Concord Pro's design repository, rendering it no longer managed. Does not affect the local working copy.
In the project preview mode,
Edit,
Share,
Clone and
Delete commands are also available directly from the project tile - click the

control to access the corresponding menu. In addition, double-clicking the tile for a project in this preview mode will access the CAD-centric detailed management view for the project.
Also included is a project Search feature that can filter the project listing by a range of properties such as Name, Author and Description etc. Type any part of a search string in the field at the top of the browser interface. The list will update to include only those project entries whose attributes include the search string.
 Example use of the search feature, in this case finding a project based on its Description.
To clear the search filtering, either click on the main Projects page entry in the left-hand navigation pane, or clear the search field and press Enter.
Properties Pane
The right hand pane on Concord Pro's Projects page shows detailed property information for the currently selected project.
 Access more detailed information for the currently selected project in the Properties pane.
The property data that is available in the Properties pane has been extracted or generated by Concord Pro from the currently selected project. Each project data type is arranged under the following expandable headings (with example imagery to illustrate):
- General Info - high level information and current data about the project.

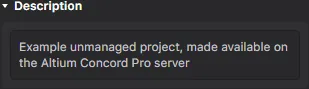
- Description - the description text added when the project was created. This can be modified through the project Edit feature.
- Releases - project releases presented in terms of the assembled packages (including assembly data, fabrication data for the linked/parent bare board, and source files from which both have been generated). Multiple releases are shown in sequential order, with the most recent at the top.

- Additional Info - a comprehensive collection of detailed data extracted or computed from the project design itself.

- Preview - generated thumbnail images of the project PCB 2D and 3D views, and the top-level schematic in the project structure hierarchy.

Sharing a Managed Project
Once a project is managed, you'll want to determine which users can actually access that project. This is done by sharing the project, or rather, by configuring its access permissions. Remember that a managed project - newly created or made available on the server - is shared, by default, with the following:
- The Owner of the project, which is usually the designer who created it (or made it available on the server): with full (Read/Write) access permissions.
- The Administrators role: with full (Read/Write) access permissions.
- Anyone - denoted by the presence of the Anyone entity: with Read-only access permissions.
Configuration of access permissions can be performed through Concord Pro's browser interface, and also directly from within Altium Designer.
From within the Server's Browser Interface
To configure access permissions for a project from Concord Pro's browser interface, select the project entry on the Projects page of the interface and click the Share button ().
Also available in the 'preview' display mode of the
Projects page by selecting the tile for the required project, then clicking the
control and choosing the
Share command from the context menu.
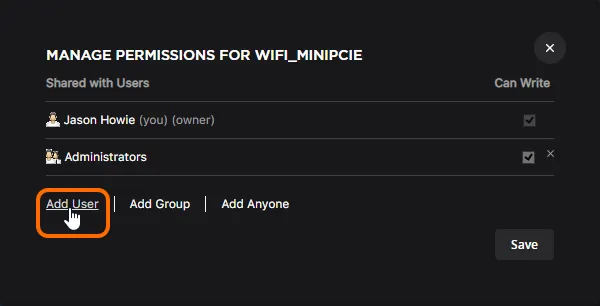
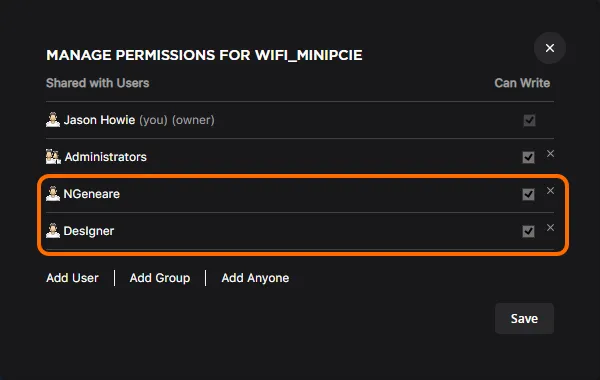
The Manage Permissions window will appear, with all the controls necessary to share the project with other users.
 With projects centrally managed in a Concord Pro server, sharing with others is simply a case of managing each project's permissions.
Things to be aware of:
- In terms of permissions, a User or Role (Group) has Read/Write access when the Can Write option is enabled. If this option is disabled, they have Read access only.
- To remove an existing user/group from having shared access to a project, click the associated Remove control (
 ).
).
- All users of the Concord Pro server will by default be able to see the project. If you want to lock access down to a specific set of users and/or group roles, you must remove the Anyone entity.
- If you remove the Anyone entity, it can be added back again using the Add Anyone control. Be aware that doing so will, by default, grant Read/Write access of the project to all Concord Pro users.
Sharing a Project with a Concord Pro server User
To share a project with another Concord Pro user:
- Click the Add User control in the Manage Permissions window.
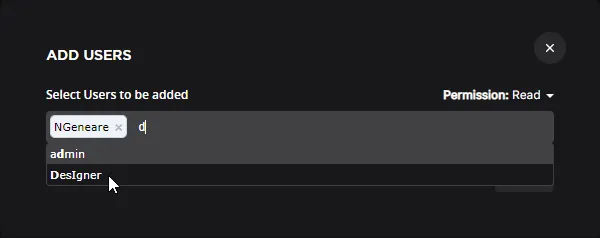
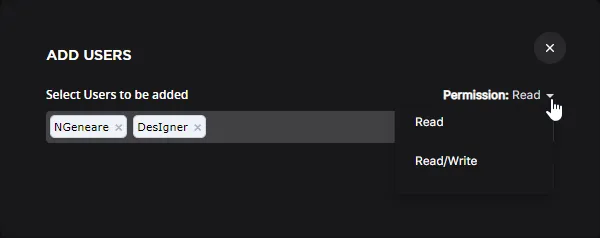
- In the Add Users window that appears, start typing the full name, username, or email address of a Concord Pro user in the Select Users to be added field, to pop-up a list of matching users. Select the required user from this list. Multiple users can be chosen. To remove a user, click the delete cross, to the right of their name.
- Set the permission for the user(s) using the Permission field. Use the drop-down to choose between Read access, or Read/Write access.
- Click the button once ready, to effect addition of the user(s) and return to the Manage Permissions window.
- Click the button in the Manage Permissions window.
To edit the permissions for an existing user, use the Can Write checkbox option in the Manage Permissions window to toggle between Read/Write access (enabled) or Read-only access (disabled).
Sharing a Project with a Defined Role
You also have the ability to share a project with roles (groups of users) defined for your Concord Pro server. To share a project with another role:
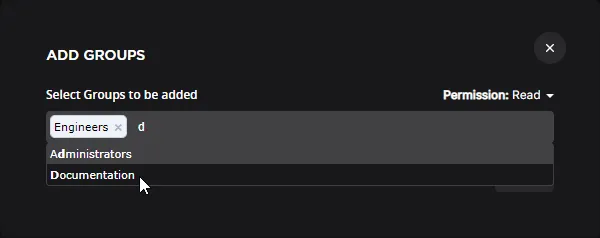
- Click the Add Group control in the Manage Permissions window.

- In the Add Groups window that appears, start typing the name of a group in the Select Groups to be added field, to pop-up a list of matching role groups. Select the required role from this list. Multiple roles can be chosen. To remove a role, click the delete cross, to the right of its name.
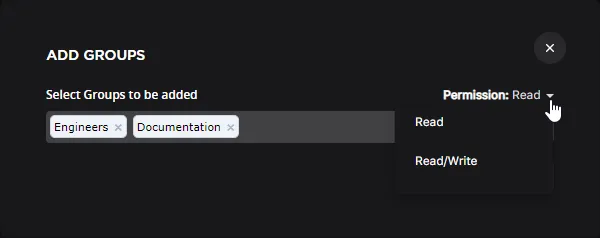
- Set the permission for the role(s) using the Permission field. Use the drop-down to choose between Read access, or Read/Write access.
- Click the button once ready, to effect addition of the role(s) and return to the Manage Permissions window.
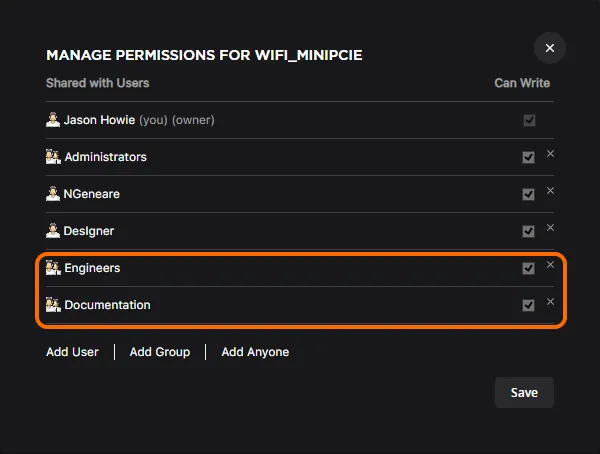
- Click the button in the Manage Permissions window.
To edit the permissions for an existing role (group), use the Can Write checkbox option in the Manage Permissions window to toggle between Read/Write access (enabled) or Read-only access (disabled).
From within Altium Designer
Access for a project can be configured directly from within Altium Designer by using the Share command. This command can be accessed for the active project, or a focused project:
- Active project - with a source document for the project open as the active document, choose the Project » Share command from the main menus.
- Focused project - access is made from the Projects panel by right-clicking on the entry for the required project and choosing the Share command from the context menu.
The Share dialog will open in which you can configure sharing as required. Use the dialog's Add menu to select the type of sharing you wish to apply - Add User, Add Role, Add Anyone. For a user/role, choose the desired entity in the subsequent Search for dialog.
 Configure access to your managed project directly from within Altium Designer.
Accessing the Detailed Projects Management Page
Main page: Management of a Specific Project
Altium Concord Pro provides an advanced, manufacturing orientated CAD-centric view of the project, opened by selecting the required project and clicking the control above the listing of projects, or by double-clicking directly on the required project entry in the list. The Projects Management page for that project opens in a new browser tab incorporating the CAD-centric interface, which offers Design, Manufacturing and BOM view options:
- Design - display and navigate source project design documents, view design object properties and place review comments. This view uses the Web Review interface. This view is for the latest version of the source project data, rather than a specified release from that project, and so could be considered to be a work-in-progress (WIP) view.
- Manufacturing - view the releases for the project. Access is provided for opening a release, which will be presented on a separate tab through a Manufacturing Portal. From this portal you can view and navigate the released Assembly and Fabrication data, inspect the BOM, and ultimately download the data into a manufacturing Build Package.
- BOM - view the source project's Bill Of Materials information.
 Accessing the CAD-centric Projects Management page for a project. Here, the Design, Manufacturing and BOM views of the interface are shown. The Manufacturing view provides further access to a Manufacturing Portal, from which a manufacturing Build Package can be downloaded.
The
Projects Management page can also be accessed from within Altium Designer. For the active managed project, use the
Project » Show in Web Browser command, from the main menus. Alternatively, right-click on the entry for the project in the
Projects panel and choose the
Show in Web Browser command from the context menu. When browsing the project through Altium Designer's
Explorer panel - configured in its default
Project View rather than
Classic View - access to the
Projects Management page is made by clicking the

button.
Opening a Managed Project in Altium Designer
To work on a managed project, you effectively check it out as a local working copy. This is performed directly from within Altium Designer using the File » Open Project command. The Open Project dialog will appear, from where you can choose which managed project to open from your Altium Concord Pro instance (when signed in to Concord Pro, the server will appear in the Locations region of the dialog, distinguished by the  icon, and appearing with the name given to the server). Only those managed projects that have been shared with you (you have permission to access) will be listed, and from across all managed design repositories shared with you.
Once opened, the project will appear under an entry for your Concord Pro server, in the Projects panel.
 Choose which managed project to open, from within Altium Designer, from those currently shared with you.
You have the option to open the project to the default checkout path, or use the

drop-down menu to specify a custom path. The default checkout path is taken from the
Document Path field on the
System - Default Locations page of the
Preferences dialog.
When browsing the project through Altium Designer's
Explorer panel - configured in its default
Project View rather than
Classic View - click the

button, at the top-right of the panel, to open the project in Altium Designer (adding it to the
Projects panel).
Editing a Managed Project
To edit the existing properties of a project in Altium Concord Pro, select its entry on the Projects page and then click the button. In the following Edit Project window you can change the project's Name, Description and manage server Parameter entries. Parameter Name/Value pairs my be added ( ), edited, or removed (
 ).
).
Also available in the 'preview' display mode of the
Projects page by selecting the tile for the required project, then clicking the
control and choosing the
Edit command from the context menu.
 You can edit the Name, Description and Parameters for a managed project at any stage.
Managed project parameters are saved in the Concord Pro server with the project, and can be edited within the server. By contrast, Project type parameters are saved in the project file (
*.PrjPcb), and can be edited in Altium Designer. Both parameter types may be used as
Special Strings in Altium Designer - access from the
Properties panel with a placed
Text String selected in the design workspace. Parameters defined for the project can also be viewed on the
Parameters and
Server Parameters tabs of the
Project Options dialog (
Project » Project Options).
Click the Show additional fields control to expose other project fields, which are non-editable and provide information only.
 Additional, read-only fields provide information on where the project can be found within Concord Pro's server
folder structure, it's type, and in which design repository it is stored.
Click the button to confirm any changes you have made.
When browsing the project through Altium Designer's
Explorer panel - configured in its default
Project View rather than
Classic View - the project can be edited by clicking the

button and then choosing the
Edit command from the associated menu.
Cloning a Managed Project
To clone an existing managed project, select its entry on the Projects page, click the button, then choose the Clone command from the associated menu. The Clone Project window will appear.
Also available in the 'preview' display mode of the
Projects page by selecting the tile for the required project, then clicking the
control and choosing the
Clone command from the context menu.
 You can clone a managed project to create an identical copy of it, along with its working files.
Use the window to set the naming, description and storage paths for the cloned project. By default, the original project name will be used with the suffix ' - Copy'.
The cloned project will be made in the same design repository as the original - you cannot change this as part of the cloning process.
After setting the fields as required, click the button. The original project will be cloned (duplicated) along with its constituent files and data, and be added as a new project entry to the Projects page listing.
Cloning a Managed Project in Altium Designer
To clone a managed project from within Altium Designer, right-click on the entry for the project in the Projects panel and choose the Clone Project command from the context menu. Use the Clone Project dialog to determine the Project Name, Description (which is not pre-populated), the Folder path (within Concord Pro), and the Local Storage path (to the working copy).
 Clone a managed project from within Altium Designer.
When browsing the project through Altium Designer's
Explorer panel - configured in its default
Project View rather than
Classic View - the project can be cloned by clicking the

button, at the top-right of the panel.
Deleting a Managed Project
To delete (remove) an existing managed project from the Altium Concord Pro server, select its entry on the Projects page, click the button, then choose the Delete command from the associated menu. Click the  button in the following Confirmation window to proceed with the removal.
Also available in the 'preview' display mode of the
Projects page by selecting the tile for the required project, then clicking the
control and choosing the
Delete command from the context menu.
 Removing a managed project from Altium Concord Pro.
When browsing the project through Altium Designer's
Explorer panel - configured in its default
Project View rather than
Classic View - the project can be deleted by clicking the
button and then choosing the
Remove command from the associated menu.
This action effectively renders the project no longer managed. Removal is from the Concord Pro server only - your local working copy is not affected.
Note that when you have removed a project its host Folder and Project Item will remain in Concord Pro's folder structure, as can be viewed on the Explorer page of the browser interface. If you wish to use that project name again you will need to remove the project Item and its host folder (via the right-click context menus), in that order.
If you are about to perform this action, make sure that the project has first been removed (deleted) as outlined above before removing any Items on the Explorer page.
 To be able to reuse a project name again, you must delete the project item for the project you have just deleted, followed by its folder.
