Project Module
The Project Module in Requirements & Systems Portal details and provides project management capabilities. The user interface to the Project Module is the Home page that opens when Requirements & Systems Portal is accessed from the nine-dot menu at the top right of the Workspace's browser-based interface (![]() ). The page provides access to existing requirements projects, which target requirements management, and also provides the ability to create a new requirements project.
). The page provides access to existing requirements projects, which target requirements management, and also provides the ability to create a new requirements project.

Creating a New Requirements Project
To create a new requirements project, click the ![]() button above the project list. The Create Requirements Project window will open.
button above the project list. The Create Requirements Project window will open.

The Create Requirements Project window will present with the following fields:
-
Project Name – enter the required name for the project.
-
Description – enter an optional description for the project.
-
Electronics Project – optionally, specify PCB project(s) that exists in your Workspace (learn more about Workspace Projects). For each PCB project added to the field, a block of the Electronics type with the same name as the project will be created in the requirements project, and this block will be linked to that PCB project. Also, a specification with the same name as the PCB project will be created in the requirements project, and the corresponding block will be added to the specification's Default blocks list.
After defining the new requirements project as required, click ![]() . You will come back to the summary-level project list, where you will now see an entry for the newly created requirements project.
. You will come back to the summary-level project list, where you will now see an entry for the newly created requirements project.

Browsing Requirements Projects
The projects listing on the Home page of Requirements & Systems Portal includes all requirements projects that exist in the Portal. Use the ![]() button to switch the page to its list view and the
button to switch the page to its list view and the ![]() button to switch the page to its graphical view.
button to switch the page to its graphical view.


The list of requirements projects is automatically sorted by the last modified date, with the most recently modified project appearing at the top left of the list (in the graphical view) or at the top of the list (in the list view). In the graphical view, the ![]() button can be used to quickly sort the project documents by name, description, author, owner, or last modified date (
button can be used to quickly sort the project documents by name, description, author, owner, or last modified date ( ).
).
In the list view, the project listing can be sorted by Name, Description, Author, Owner, or Last Modified, using the column header in each case. Click once to sort in ascending order and click again to sort in descending order. The arrows to the right of the column name will indicate the currently active sort direction. The chosen sorting method in one view is applied to both views.
Also included is a project Search feature that allows you to search for requirements projects by their names. Type a search string in the field at the top of the browser interface. The list will update to include only those project entries whose names include the search string. To clear search filtering, either click on the main Home page entry in the left-hand navigation pane or clear the search field (x).
Accessing a Requirements Project
A requirements project can be accessed from either the list or graphical view of Requirements & Systems Portal's Home page.
-
In the graphical view of the Home page, clicking the
 control in the tile for the required requirements project and choose the Open command from the associated menu. Alternatively, click on the project's name within the tile or double-click the tile.

-
In the list view of the Home page, hover the cursor over the entry for the required requirements project, click the
control at the far right of the entry and choose the Open command from the associated menu. Alternatively, click on the project's name within the entry or double-click the entry.

The requirements project will open in a new browser tab.
Removing a Requirements Project
An existing requirements project can be removed (deleted) from the Workspace from either the list or graphical view of Requirements & Systems Portal's Home page.
-
In the graphical view of the Home page, clicking the
control in the tile for the required requirements project and choose the Remove command from the associated menu.

-
In the list view of the Home page, hover the cursor over the entry for the required requirements project, click the
control at the far right of the entry, and choose the Remove command from the associated menu.

Before the deletion is complete, you will be asked to confirm.
 ).
).Changing Main Properties of a Requirements Project
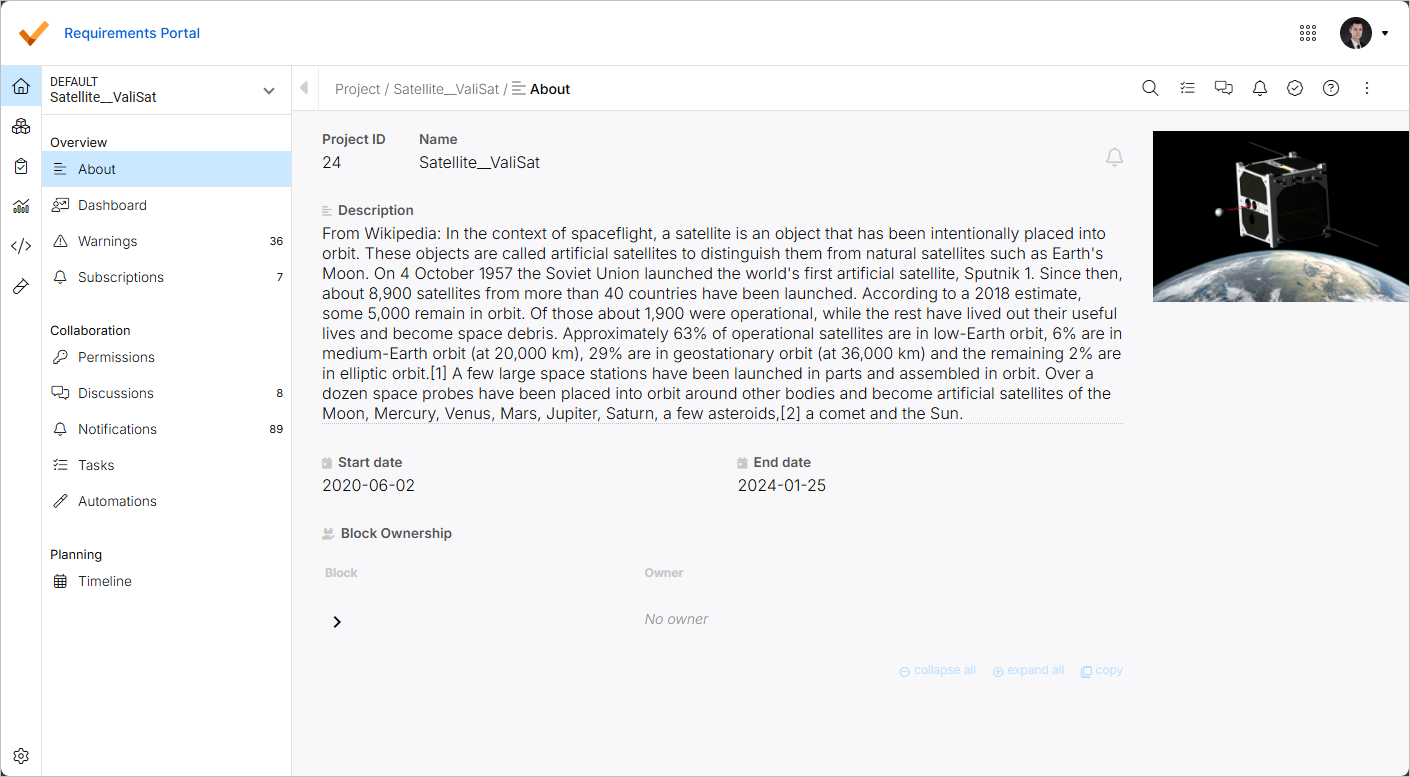
From the About page of the Project Module, you can change main properties of a requirements project. When in the Project Module (![]() ), select the About entry in the left-hand side menu (under the Overview heading) to access the page from which the following information and controls are available:
), select the About entry in the left-hand side menu (under the Overview heading) to access the page from which the following information and controls are available:
-
Project ID – a system-assigned ID of the project.
-
Name – the name of the project. If required, you can change it by clicking in the field, changing the name as required, and pressing
Enter(or clicking outside of the field). -
Description – a meaningful description that you can add to your project.
-
Start date / End date – estimated start and end dates of the project.
-
Block Ownership – shows the list of the project's blocks, alongside their owners. Expand or collapse block entries to explore the project structure (according to how it is defined in the Blocks Module) using arrow buttons or the collapse all and expand all controls at the bottom of the list. Use the copy control to copy the content of the list to the Clipboard (only those entries that are currently visible will be copied).
For more information about ownerships, refer to the Ownerships page.
Click the ![]() button at the top right of the page to subscribe to notifications for the project.
button at the top right of the page to subscribe to notifications for the project.
For more information about notifications, refer to the Notifications page.
You can also add an image to the project by clicking the + Add Image control at the top right of the page. Use the dialog that appears to add an image from a file or URL. When an image is added, hover the cursor over it preview and use the buttons that appear to change the image or remove it.