
Altium 365 Personal Space
As a registered user of the Altium 365 Platform (i.e. an Altium Account) you have your own Altium 365 Personal Space, which is accessible only by you. Your Personal Space accommodates persistent storage of various types of uploaded static data, including design 'snapshots' (from various ECAD platforms) and Gerber/ODB++ manufacturing data, with the ability to share with anyone for comments and redlining.
The Altium 365 Personal Space, which is completely free, is ideal for those who want to experience the collaborative aspect of Altium 365, without the need for a connected Altium 365 Workspace in which to store their data.
Accessing Your Personal Space
Related page: Altium Platform Interface
As with an Altium 365 Workspace, your Personal Space is a constituent part of the Altium Platform Interface. It is presented when:
-
You have no access to a Workspace.
-
You have access to a Workspace, but have chosen to open your Personal Space. This is performed by clicking on the current user area at the top-right of the interface, then clicking the My Personal Space entry on the associated menu.


If your company Workspace has already been activated but you are not yet a member, you can request access to it by creating a Join Request:
Joining your Organization Workspace
To join your organization’s Workspace or create one, go to the activation page directly or access it from the ![]() button in the left navigation pane, or access it from the Workspaces view in your My Profile page by selecting the
button in the left navigation pane, or access it from the Workspaces view in your My Profile page by selecting the ![]() button.
button.

-
If a Workspace already exists for your organization, you will have the option to request access – create a Join Request. An email approval request will be sent to the owner administrator of the Workspace (
 ). The administrator can then accept or reject the Join Request through the Team page, which on acceptance, will add your user profile as a member of the Workspace.
See Processing a Join Request for information on Administrator request approval in the Team page.
-
If you do not have access to a Workspace and your organization has not yet activated one, you may have the option to create one – select the
 button to proceed.
See Activating & Managing Your Altium 365 Workspace for detailed information.
Uploading Data to Your Personal Space
A static data snapshot is created by uploading the data to your Personal Space on the Altium platform. This is performed from the Files page of the interface.
What Can I Upload?
The following sections summarize what can be uploaded to your Personal Space on the Altium Platform – the types of supported static data 'snapshots'.
CAD Designs
In terms of design files, the following CAD design tools are supported, along with the file formats that can be uploaded to your Personal Space:
- Altium Designer – Schematic (*.SchDoc, *.Sch) and PCB (*.PcbDoc, *.Pcb) documents.
- Autodesk® EAGLE™ – Schematic design archive (*.sch) and PCB design archive (*.brd) documents. You can upload EAGLE design files saved with EAGLE version 6.4.0 or later (XML-format).
- KiCad® – Project file (*.pro), Schematic document(*.sch), PCB document (*.kicad_pcb,) and Schematic Symbols Library (*.lib).
- CircuitStudio – Schematic (*.SchDoc) and PCB (*.CSPcbDoc) documents.
CAD Data Upload Considerations
You can upload a full design (in a Zip archive) or an individual design file (schematic or PCB document).
When uploading a Zip file, the following considerations apply:
- For Altium Designer and CircuitStudio based designs, the Zip archive must contain a single PCB design project only. ► Other considerations.
- For EAGLE based designs, the Zip archive must contain a single PCB design only (so .sch and .brd files for a single design only).
- For KiCad based designs, the Zip archive must contain a single PCB design only (so .pro , .sch , .kicad_pcb, and .lib files for a single design only).
- All unsupported file formats in the uploaded Zip archive will be ignored. This means you can literally just Zip your full project folder and upload it.
CAM Data
In terms of CAM (manufacturing), the following formats are supported for upload to your Personal Space:
-
Gerber X2 (along with corresponding NC Drill files).
-
Gerber RS-274X (along with corresponding NC Drill files).
-
ODB++ fileset.
CAM Data Upload Considerations
You can upload a full set of ODB++ or Gerber files, their archived fileset (Zip, Rar, 7z, Tgz), or even an individual Gerber file. When uploading a Gerber CAM archive file, the following considerations apply:
- Ensure that there is only a single folder of Gerbers inside the archive.
- Ensure that the drill files are in the same folder as the Gerber files. If located in a separate folder, they will be ignored.
Performing the Upload
Data can be uploaded to your Personal Space in the following ways:
-
Dragging and dropping your data (in a Zip archive or an individual file), to the indicated area on the page.
-
Clicking the choose from your computer text (in the upload tile on the page) and using the Open dialog that appears to browse for the data (in a Zip archive or an individual file).
-
Clicking the
 button, choosing the type of data you want to upload, then using the subsequent Open dialog that appears to browse for that data (in a Zip archive or an individual file).
 ).
). 

With Zip archive or individual file chosen (or dropped), the main viewing area will reflect that upload is in progress. The processing time will depend on the size of the data being uploaded. The following image sequence shows an example upload of a snapshot of the WiFi_miniPCIe design. The upload is processed, a tile added to the page, and then the preview processed for display (of the board in 3D).


Embedding Uploaded Data on a Website
Designs and design data that you have uploaded to your Altium Personal Space can be embedded into a website for interactive viewing by anyone. The embedded Altium Viewer essentially offers similar functionality to the Altium 365 Standalone Viewer, including the ability to view all design files. However, a viewer embedded from your Personal Space will remain active (for as long as the design files exist in your Personal Space), and also allows registered Altium Account users to download generated design data.
To access the embed code for an uploaded design (or data collection) in your Personal Space Files page, select the Embed option from its ![]() menu, then enable the Allow embedding this design anywhere on the web option in the Embed <design> window – use the Options drop-down menu to select the default (first shown) view. Note that the latter option is not available if your organization’s administrator has set Personal Space sharing and saving to Only Admins.
menu, then enable the Allow embedding this design anywhere on the web option in the Embed <design> window – use the Options drop-down menu to select the default (first shown) view. Note that the latter option is not available if your organization’s administrator has set Personal Space sharing and saving to Only Admins.
See Embedding a Standalone Viewer for related information and custom code options.
 Select an upload's Embed option in the Embed design window to access HTML code to place in your website.
When inserted into the source of your web page, in the desired location on the page, the viewer will source the design/data files from your Altium 365 Personal Space to be displayed in the embedded interactive viewer.


 Screen capture of an uploaded Gerber file collection embedded as a design view in a website.
Sharing Uploaded Data with Others
Your uploaded design data 'snapshots' can be shared from your Personal Space with anyone, anywhere in the world. Selecting a data snapshot tile will present various controls and commands. Click the ![]() control and choose the Share command, or click the
control and choose the Share command, or click the ![]() button (at the top right of the page), to access the Sharing window.
button (at the top right of the page), to access the Sharing window.
 Once uploaded, you can share the data snapshot with others.
 ).
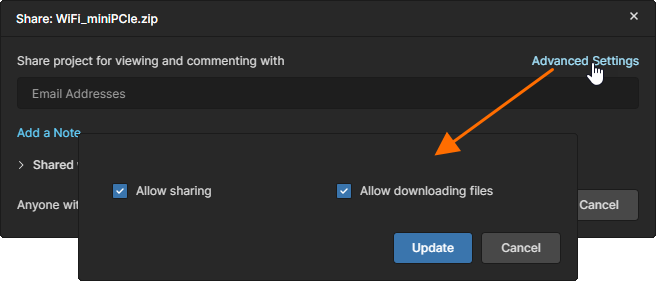
).Enter the full email addresses of the specific people you wish to share the data with (clicking Enter after each entry) and include a note if desired (stating what you are sharing with them, for example). Click the Advanced settings control to access controls for determining whether the person you share the upload with can share with others or not, and whether they are allowed to download the entity or any data derived from it.
 As the owner of an upload, you can control resharing and downloading of the data when shared with others.
With sharing and related controls defined as required, click ![]() . Each person you are sharing with will receive an email invitation to open and view the snapshot. The Copy Link option can be used to send someone a direct link to the shared design.
. Each person you are sharing with will receive an email invitation to open and view the snapshot. The Copy Link option can be used to send someone a direct link to the shared design.
Share with Anyone
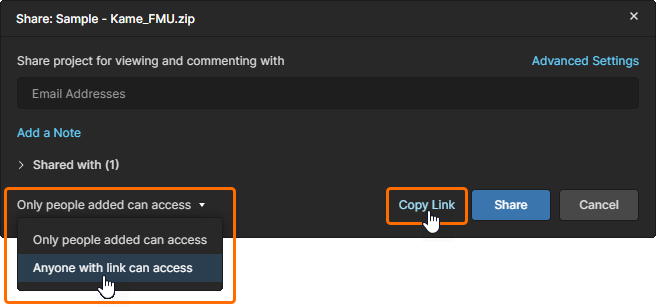
Alternatively, if you wish to share the design data with anyone, rather than specific people, select the Anyone with link can access option from the Share window's drop-down access menu. Click ![]() to confirm the new settings and use the Copy Link option to capture the viewer link for distribution to others. In this case, when the link to the data is opened by another user they will have read-only access to all design files in the Altium Web Viewer – the viewer's Download and Comments options are available if the user is registered with and signed in to an Altium Account.
to confirm the new settings and use the Copy Link option to capture the viewer link for distribution to others. In this case, when the link to the data is opened by another user they will have read-only access to all design files in the Altium Web Viewer – the viewer's Download and Comments options are available if the user is registered with and signed in to an Altium Account.
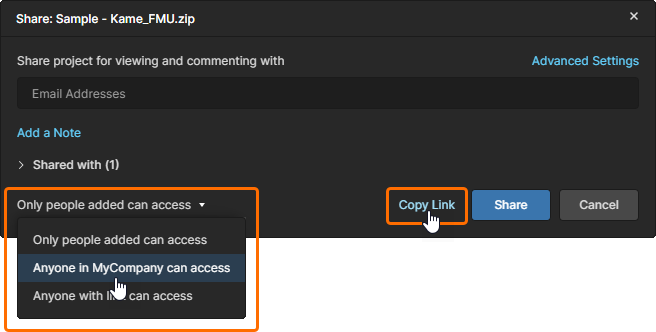
If you are a member of an organization – as defined in your company account – you also may provide access to the design for all members of your organization by choosing the Anyone in <my company name> can access option. Unlike the above open access approach, access is constrained to those users registered with your organization (typically with the same email domain).
Share from Comment
When placing a Comment on an uploaded design and mentioning another user, the Web Viewer will offer to share the design with that user if they do not already have access – it has not been previously shared with them. Note that the targeted user must be registered with an Altium Account for sharing to be possible.
 )
)  The Share window will be presented when a Comment mentions a user who does not have access to the design.
Viewing a Data Snapshot
Any data snapshot that you have personally uploaded will remain persistently available from the Files page of your Personal Space. Access to view a data snapshot in the Altium Platform Interface's Web Viewer – which opens in a separate browser tab – can be made by selecting the data snapshot of interest, clicking the ![]() button within its tile, then choosing the Open command from the associated menu. Alternatively, double-click directly on the tile (or click on the name of the upload).
button within its tile, then choosing the Open command from the associated menu. Alternatively, double-click directly on the tile (or click on the name of the upload).
.") Accessing the data snapshot from your Personal Space (only when you were the one to have uploaded it).
Accessing the data snapshot from your Personal Space (only when you were the one to have uploaded it).
Access by a Shared Person
A person with whom a data snapshot has been shared can open that snapshot in the Altium Platform Interface's integrated Viewer in the following ways:
-
From the email invite they will have received. Once they click the
 button in the email they will be taken to the Altium 365 Sign In page (unless already signed in to the platform, or their Altium User Account). Upon signing in, they will be taken to the Viewer, with the shared data snapshot loaded.
 Accessing the data snapshot from the email invite received by the user with whom the snapshot was shared.
-
From the Shared with Me page of the Altium Platform Interface. A data snapshot is denoted by the
 icon within its tile. To open in the integrated Viewer, select the data snapshot of interest, click the
  button within its tile, then choose the Open command from the associated menu. Alternatively, double-click directly on the tile (or click on the name of the upload).
 Accessing the data snapshot from the Shared with Me page of the Altium Platform Interface.
-
Using the direct link (Copy Link), if you have copied and sent it to them.
The integrated Viewer used to present the data contained in a shared data snapshot uses the Web Viewer interface. For a shared design snapshot for example, this interface offers a range of capabilities that allow detailed access to the design's data and layout. You'll be able to search, select, cross-probe, and inspect components and nets throughout the design and across the various sub-views as applicable. And when viewing the board in 2D, you can even take measurements.
Other interactive features are available, such as the Comments system which allows you to communicate with others with whom the snapshot has been shared, and the Assembly Assistant which provides a process for working through a BOM-driven board assembly process ( ).
).
See the Workspace Assembly Assistant page for full information on using the Assembly tool.
Full functionality is, of course, best enjoyed by having a full design uploaded.
Downloading a Data Snapshot
A data snapshot can be downloaded from the Files page of your Personal Space. Selecting its tile will present various controls and commands. Click the ![]() control and choose the Download command or click the
control and choose the Download command or click the ![]() button (at the top right of the page), to download the snapshot as a Zip archive. Alternatively, download can be performed when viewing the snapshot through the integrated Viewer.
button (at the top right of the page), to download the snapshot as a Zip archive. Alternatively, download can be performed when viewing the snapshot through the integrated Viewer.
 Accessing controls for downloading a data snapshot that has previously been uploaded to your Personal Space.
Removing a Data Snapshot
You can delete any data snapshot that you have uploaded to your Personal Space, and that is currently presented on the Files page of the interface. To do so, select the data snapshot tile, click the ![]() control, and then choose the Remove command. A warning window will appear alerting you to the fact that the item will be permanently deleted from the Altium Platform. Click the
control, and then choose the Remove command. A warning window will appear alerting you to the fact that the item will be permanently deleted from the Altium Platform. Click the ![]() button to effect the deletion. Since you are the owner of the snapshot and it is removed from the platform completely, it will also be removed from the Shared with Me page of all people with whom it was shared.
button to effect the deletion. Since you are the owner of the snapshot and it is removed from the platform completely, it will also be removed from the Shared with Me page of all people with whom it was shared.
 Any data snapshot that you have personally uploaded can be deleted. This affects access for everyone – since you are the owner and the snapshot is removed permanently from the Altium Platform, all other collaborators will lose their access to it.
For a person with whom a data snapshot has been shared, they can delete that snapshot in a similar manner from the Shared with Me page of the Altium Platform Interface. A warning window will appear alerting them to the fact that the snapshot will be permanently deleted for them – they will no longer have access to it, but others will continue to have access since it has not been deleted by the owner (from their Personal Space, where the original upload resides).
Viewing Gerber and ODB++ Data Packages
Gerber or ODB++ data packages that have been uploaded to or shared with your Personal space will be opened in a dedicated manufacturing data view. The Gerber/ODB viewer allows you to browse and inspect the fabrication data, place and manage Comments, enable/disable the visibility of its layers, and perform measurements between placed datum points.
See Gerber Fabrication (Web Viewer) and Working With Uploaded Manufacturer Data (Standalone Viewer) for more information.


Viewing a Gerber Comparison
When viewing a Gerber file package in your Personal Space, a data comparison can be performed between the current Gerber data and that of another Gerber package. A typical comparison might be between Gerbers generated from subsequent project releases or between major design stage iterations.
To invoke the comparison process, select the Compare Geber option from the view's ![]() menu and then another comparative Gerber dataset from the following Compare Gerber window – select an existing (previously uploaded) Gerber package or upload one through the options in the lower window section. Note that a Gerber comparison also can be invoked from the
menu and then another comparative Gerber dataset from the following Compare Gerber window – select an existing (previously uploaded) Gerber package or upload one through the options in the lower window section. Note that a Gerber comparison also can be invoked from the ![]() menu of a Gerber package tile in the main Files menu (
menu of a Gerber package tile in the main Files menu ( ). The Gerber Compare view will open when the comparison process has completed, from where you can fully inspect both the graphical and net changes between the two Gerber datasets.
See the related Standalone Gerber Compare viewer or Gerber Design Data Comparisons for more information.


Accessing Data Shared with You
Data and design entities that have been shared with you by another user are available from the Shared with Me page of your Personal Space, where just as with your own uploaded design data, a shared entity can be opened for inspection in the Altium Platform's integrated web viewer.
 A design project or data collection that has been shared with you can be opened for inspection from the Shared with Me page of the interface.
The level of access to a shared entity is determined by how the data has been shared with you:
-
If the data has been shared with you with editing rights, you will have full access to that data, and if enabled by the owner, the ability to share and download it.
-
If the data has been shared with Sharing enabled, you can re-share it with other specified users.
-
If Sharing has not been enabled, you can submit a share request to the owner of the data. The owner will receive a related email and can choose to act on the request by changing the share permissions of the source data through their Personal Space or Workspace.
-
If sharing from a Personal Space has been set to Only Admins by your organization’s administrator, you will not be able to re-share files that have been shared with you (unless you are a member of the organization’s
Group Administrators) – a particular Group also may be specified. The Personal Space sharing level is determined by the Advanced Controls page in your organization’s Company Dashboard.
 An entity that has been shared with you without share permissions can be re-shared by sending a request to the owner of the data.
Along with the received email, the owner of the shared entity will see the sharing approval request when accessing the entity's Share window. The Set Rights menu is then used to specify the permissions (Edit/View) granted to the reshared user, or to deny the requested sharing access (Reject).
 The owner of a reshared entity can approve the share request through the Share window.