Parent page: Working with Projects
Altium NEXUS, in conjunction with a connected Workspace, allows you to view and interact with an advanced graphically orientated Project History timeline. The dedicated History view provides a progressive timeline of major events relating to the project – its creation, commits, releases, clones and MCAD exchanges – with various actions supported where applicable.
To get the most out of this feature requires your project to be fully managed, by ensuring the project is under the Workspace's own built-in VCS (Git).
For information on working with the
History view for a project through the Workspace's browser interface, see
Project History.
Enabling Project History
The Project History functionality is delivered through a purpose-made extension – the Project History extension.
 The Project History extension.
This feature is only made available, provided the
Project History extension is installed as part of your Altium NEXUS installation. This extension is installed by default when installing the software, but in case of inadvertent uninstall can be found back on the
Purchased tab of the
Extensions & Updates page (click on the current user control (e.g.
 )
) at the top-right of the main application window, then choose
Extensions and Updates from the associated menu).
Accessing the Project History
To access the History view for a project from within Altium NEXUS, right-click on its entry in the Projects panel and choose the History & Version Contol » Show Project History command from the context menu. The History view presents as a distinct tabbed document (<ProjectName>.PrjPcb History).
 Access the history for a project from within Altium NEXUS.
For a project in your Workspace that already existed prior to the arrival of the Project History feature, its history will initially not be complete. Reindexing of the event data for that project will be performed automatically when the
History view is first accessed for that project. Notification will appear at the bottom of the view once the reindexing has completed – click the

control to update the timeline with the full historical event data.
History Timeline – Overview
The History view presents a timeline of basic events that have occurred during the project's evolution. It can essentially be broken down into three key sections, as shown in the following image and detailed thereafter.
 Identifying the three key components of the History view.
- Main trunk of the timeline. Direction of event chronology is from the bottom up. The first event – the creation of the project – will appear at the bottom of the timeline. Subsequent events appear above, with the latest (the most current event) appearing at the top of the timeline.
- Events. Each time a supported event (see below) happens in association with the project, that event is added to the timeline as a dedicated tile. Each type of event will have a different colored tile and will either be linked directly to the main trunk of the timeline, or have some additional icon next to it (as is the case for MCAD Exchange events).
- Search. Click the
 control at the top-right of the view to access a search field that facilitates basic searching of the project history. As you type your search string, filtering will be applied to the timeline to present only the events relevant to that search. For more information, see Filtered Searching.
Supported Events
The timeline shows a progression of events that happen during the life of a project. Each of these events appears along the timeline as a dedicated 'event tile'. The following expandable sections take a look at the range of events currently supported and presentable as part of a project's historical timeline.
Project Creation
Refer to: Creating a Project, Making an Existing Project Available Online, Cloning a Project
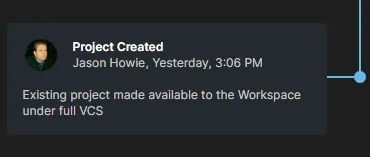
When a project is created, the Project Created event tile will be added to the timeline. This event marks the beginning of the historical timeline for the project. As such, it can always be found as the entry at the bottom of the timeline. The tile for this event can appear in two distinct variations:
- When the project is newly created within the Workspace. The creator of the project is presented by name (and picture), along with the date and time of the project's creation. The description for the project is also displayed within the tile, if one was entered at the time of creation.
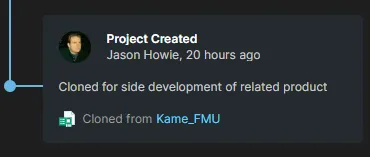
- When the project is a clone of an existing project. The person who created the cloned project is presented by name (and picture), along with the date and time of the project's creation. The description for the project is also displayed within the tile, if one was entered at the time of cloning. A link is provided to the original project – clicking this will access the detailed management page for that project through the Workspace's browser interface.
The
Project Created event tile is physically connected to the main trunk of the timeline with a solid blue connection line and node:

.
Project Commit
This type of event is only supported for a project that is fully managed and stored under the Workspace's native VCS (within its
Versioned Storage Git repository). For an unmanaged project that has been made available to the Altium 365 Workspace but is not under formal version control – thereby using the Simple Sync methodology – you will not see any VCS-related commit events on the history timeline. To get this information, you can switch the style of online availability by enabling the
Version Control option, on the
General tab of the
Project Options dialog. This brings the project under the Workspace's native VCS.
For a project that has been made available to an Altium 365 Workspace but is already under external version control, you will also not see any VCS-related commit events on the history timeline. Use your external version control client to examine the project's version control history. Alternatively, you can effectively switch to Workspace's native VCS. What you can do is create a snapshot of your project – performed most efficiently and cleanly using Altium NEXUS's
Project Packager. This disconnects it from external VCS and from the Workspace (if already made available there), after which you can then make it available to the Workspace again, but under the Workspace's VCS – starting afresh as it were. For detailed information on how to do this, see
Moving from External VCS to Workspace Native VCS.
Each time you Commit a project to the Workspace (where the project is managed under the Workspace's internal Versioned Storage Git repository), a Project Committed event tile will be added to the timeline. The person who performed the commit (Save to Server) is presented by name (and picture), along with the date and time. If a comment was added at the time of the commit and push – through the Commit to Version Control dialog – then that will also be displayed within the tile.
If the project was a local, unmanaged project that was subsequently made available online, then the description that was entered in the
Make Available Online dialog will be used in both the
Project Created event tile and the initial
Project Committed event tile, since the project commit is performed as part of making the project available online – provided of course that the
Version Control option was enabled.
 Example initial Project Committed event tile.
The tile also supports and presents design diffing information, showing more detailed information on what has changed between the current and previous commits. Elements supported include files, components, nets, variants, and PCB structure. The diffing section of the tile summarizes the various elements affected by the commit event, grouped by the following states:
 – element added.
 – element removed.
 – element modified.
Clicking on the  control in the tile will expand this diffing section to present the affected elements by name.
Use the available
Show More and
Show Less controls to interrogate the full listing for each element type. Click on the

control in the tile to return to the summary display.
Click the  control at the tile's top-right corner to access a menu with the following commands:
- Open Snapshot – use this command to download and then open that specific revision of the project (in the Projects panel). The project name will include the date and time at which that revision of the project was committed. Note that this revision is Read-only; you can view, but not edit it in any way.
 any specific revision of the project – directly from the corresponding Project Committed event tile for that revision.") You can open (for viewing only) any specific revision of the project – directly from the corresponding Project Committed event tile for that revision.
You can open (for viewing only) any specific revision of the project – directly from the corresponding Project Committed event tile for that revision.
- Schematic to – allows you to compare the Schematic data in this commit against that of another commit or release event. Use the sub-menu to compare against the previous commit, or select from all possible releases and commits. Once the comparison release/commit has been chosen, the results of the schamtic comparison are presented in the Compare view, which opens as a new tab in your default web browser. For more information, see Schematic Comparison.
- Revert to – use this command to revert to using the data from that specific revision of the project. The data from the project source documents in that specific revision overwrites the data in your local working copy of the project. Effectively, the project is momentarily closed and then reopened with that reverted data. Should you then wish to complete the reversion, and make that data the Head Revision (current version), you will need to commit and push the project back to the Workspace.
 You can revert to any specific revision of the project – directly from the corresponding Project Committed event tile for that revision.
After reverting to a specific revision, and before committing, you can get your local working copy back to the latest revision again by using the Revert to command associated with the latest Project Committed event tile on the timeline.
A
Project Committed event tile is physically connected to the main trunk of the timeline with a solid blue connection line and node:

. The latest revision of the project (i.e. the last commit) is distinguished by having a white fill for its node:

.
Project Release
Related page: Board Design Release
Each time you perform a release of the project – using Altium NEXUS's Project Releaser – a Project Released event tile will be added to the timeline. The person who performed the release is presented by name (and picture), along with the date and time. If a release note was added at the time of releasing the generated data to the Workspace – through the Confirm Release dialog – then that will also be displayed within the tile. Each of the data sets included in the release will also be listed.
 Example Project Released event tile.
Click the  control at the tile's top-right corner to access a menu with the following commands:
- Open Snapshot – use this command to download and then open (in the Projects panel) the specific revision of the project from which this release package was generated. The project name will include the release version. Note that this revision is Read-only; you can view, but not edit it in any way.
- Schematic to – allows you to compare the Schematic data in this release against that of another release or commit event. You also can compare schematics between a commit and a release or another commit. Use the sub-menu to compare against the previous release's source data, or select from all possible releases and commits. Once the comparison release/commit has been chosen, the results of the comparison are presented in the Compare view, which opens as a new tab in your default web browser. For more information, see Schematic Comparison.
- Gerber to – allows you to compare the generated Gerber data for this release against that of another release. Use the associated sub-menu to compare against the previous release's fabrication data, or select from all possible releases (the timeline will be filtered to just show Project Released event tiles). Once the comparison release has been chosen, the results of the comparison are presented in the Compare view, which opens as a new tab in your default web browser. For more information, see Gerber Comparison.
As a release of a project is a very significant event, the Project Released event tile is made more prominent – rather than just a 'connected' event, it straddles the timeline as a 'major' event.
Project Cloning
Refer to: Cloning a Project
Each time you clone the project – either through the Workspace's browser interface, or from within Altium NEXUS – a Project Cloned event tile will be added to the timeline. The person who performed the clone is presented by name (and picture), along with the date and time. If a description was added at the time of cloning – through the Clone Project window (browser-based) or Clone Project dialog (Altium NEXUS) – then that will also be displayed within the tile. A link is provided to the cloned project – clicking this will access the detailed management page for that project through the Workspace's browser interface.
 Example Project Cloned event tile.
The main
Clone commands available from within Altium NEXUS (right-click on the entry for the project in the
Projects panel, or click the

button, at the top-right of the
Explorer panel when browsing the project), or from the
Projects page of the Workspace's browser interface, act on the latest (or Head) revision of the project. When accessing the
History view for the project through the Workspace's browser interface, you also have the ability to clone a specific revision of that project. To do so, locate the
Project Committed event tile for the required revision of the project, then click the
control at the tile's top-right corner. From the subsequent menu, choose the
Clone command.
The
Project Cloned event tile is physically connected to the main trunk of the timeline with a dotted green connection line and unfilled node:

.
MCAD Exchanges
Related page: More about ECAD-MCAD CoDesign
When working between the electronic and mechanical design domains, the Workspace acts as the bridge between the two – facilitating direct ECAD-MCAD codesign. Whenever changes are made to the project's PCB design and those changes are pushed to the Workspace through the relevant CoDesigner panel, an MCAD Changes Suggested event tile will be added to the timeline. The person who performed the push is presented by name (and picture), along with the date and time. If a message was posted at the time of pushing – through the MCAD CoDesigner panel (Altium NEXUS), or Altium CoDesigner panel (in the supported MCAD software) – then that will also be displayed within the tile.
Only Push events are currently supported.
 Example MCAD Changes Suggested event tile.
When the MCAD engineer makes changes to the PCB in their supported MCAD software and pushes them back to the Workspace, the corresponding push event will be available on the project's history timeline only after pulling the changes from the Workspace into Altium NEXUS.
 Example showing two MCAD-related events. On the left of the timeline's trunk, the push event from the ECAD side, while on the right, the push event from the MCAD side.
The
MCAD Changes Suggested event tile is not physically connected to the main trunk of the timeline. Instead, a directional arrow symbol is used, which points towards the trunk:

.
Local Changes
When there are project documents saved locally but to the Workspace yet, a Local Changes event tile will be added at the top of the timeline. The person who performed the local save (i.e. the current user) is presented by name (and picture).

Example Local Changes event tile.
Click the control at the tile's top-right corner to access a menu with the following command:
- Schematic to – allows you to compare the locally saved Schematic data against that of a release or commit event. Use the sub-menu to compare against the previous release's source data, previous commit's source data, or select from all possible releases and commits. Once the comparison release/commit has been chosen, the results of the comparison are presented in the Compare view, which opens as a new tab in your default web browser. For more information, see Schematic Comparison.
The
Local Changes event tile is not physically connected to the main trunk of the timeline. Instead, a dotted circle symbol is used:

.
Filtered Search
Click the control at the top-right of the view to access a search field with which to quickly find events of interest along the timeline. The search facility supports basic searching of the project history, with dynamic filtering applied as you type your search string – leaving only the events relevant to that search displayed on the page. The matching text within an event tile is highlighted.
The search facility is not case-sensitive.
 search term, with matching entries highlighted within each relevant event tile.") Example search of a project's history. The timeline is dynamically filtered as you type your (case insensitive) search term, with matching entries highlighted within each relevant event tile.
Example search of a project's history. The timeline is dynamically filtered as you type your (case insensitive) search term, with matching entries highlighted within each relevant event tile.
A box is provided above the filtered selection that summarizes how many events are currently being shown, along with controls to quickly remove the filter/search string.
The search facility works with the following information:
- Event tile title.
- Person's name who performed the event.
- Descriptive text (the text sourced from a comment/note/description when the relevant event occurred).
- Diffing data text – in a Project Committed event tile.
- Data set name – in a Project Released event tile.
- Project name – in a Project Cloned event tile and Project Created event tile (when created through cloning).
To clear the current filtering and return to the full timeline, clear the search field – either by selecting the current text and pressing the
Backspace key, or by clicking the

control at the far right of the field. Alternatively, click on either the
Clear Filter control in the box summarizing how many events are being shown (at the top of the view).
Updating with New Events
Whenever a supported event happens in relation to the project, that event will be detected and made available to the History view automatically. Notification will appear at the bottom of the view shortly after the event takes place – click the control to update the timeline with the new event.
A manual refresh is also provided, performed by clicking the

control at the top-right of the view.
