
Document Commenting

Altium Essentials: Design Review and Commenting
This content is part of the official Altium Professional Training Program. For full courses, materials and certification, visit Altium Training.
When integrated with a connected Workspace, Altium Designer projects enable a dispersed design team to work collaboratively on centrally stored and managed projects. The design interface supports commenting on various design documents to enhance the design collaboration process. Comments, i.e., user-added notes, can be placed in documents and replied to by other users.

The Comments and Tasks panel
Placed comments are available in real-time to collaborating users (those that have shared access to the document) and are saved to the server independently of the project without altering its constituent documents in any way. The commenting feature is managed through the Comments and Tasks panel. When a comment entry is selected in the Comments and Tasks panel, the system will open (and load, if necessary) the associated design document.
The Comments and Tasks panel allows you to add comments to a defined area or point in the active document of a Workspace project and assign these comments to Workspace members, essentially creating tasks for them. The panel allows all users who are working on the document to add comments and view all comments without actually modifying the document itself. This feature allows for the facilitation of strong collaboration processes and is invaluable when issues within the document need to be pointed out without physically merging and receiving conflicts. The Comments and Tasks panel can essentially be used to create a 'to-do' list, and as the design matures, the comments can be resolved and closed. Placed comments are available in real-time to collaborating users – those that have shared access to the document – and are saved to the Workspace independently of the project without altering its constituent documents in any way.
Note that comments and tasks can be added and managed in both Altium Designer and in the related Workspace via its browser interface design view. The functionality of the two commenting systems is essentially the same, and since both the project and commenting data are stored in the Workspace, the systems work together in real time.
See Commenting in the Web Viewer (Altium 365 Workspace, Enterprise Server Workspace) for detailed information on the commenting system in a Workspace's browser interface.
Where Commenting is Supported
Schematic
A comment can be applied to an object, a specific point, or an area in a schematic document.
PCB
A comment can be applied to an object, a specific point, or an area in a PCB document (in 2D layout mode) –  .
.


Draftsman
A comment can be applied to a specific point or an area in a Draftsman document of a PCB, Multi-board, or Harness Design project –  .
.
Multi-board Schematic
A comment can be applied to an object or a specific point in a Multi-board Schematic document –  .
.
Multi-board Assembly
A comment can be applied to a specific point in the Multi-board Assembly document –  .
.
Harness Wiring Diagram and Layout Drawing
A comment can be applied to an object, a specific point, or an area in a Wiring Diagram or Layout Drawing document of a harness design project.
ActiveBOM
A comment can be applied to a row in an ActiveBOM document –  .
.
Comments and Tasks Panel Access
The panel is accessed from a Workspace project in the following ways:
-
Click the Panels button on the bottom-right of the design space, then select Comments and Tasks.
-
Select the View » Panels » Comments and Tasks command from the main menus.
-
Double-click on the marker pin of a comment placed in the design space.
Adding a Comment When Not Connected to a Workspace
Before using the commenting feature, ensure that you are connected to your Workspace and have opened a project and one of the document kinds that supports comments (including schematic, 2D PCB, Draftsman, and ActiveBOM). Use the File » Open Project command to choose a Workspace project from those that have been shared with you. The Comments and Tasks panel will provide hints for these prerequisites.

Comments and Tasks Panel Options
Use the buttons at the top of the Comments and Tasks panel to set the availability of comments in the panel and editor space and to specify if mentioned users are notified.

The panel's ![]() button toggles the visibility of comment marker pins on the document. Comment entries in the Comments and Tasks panel listing may still be selected as usual.
button toggles the visibility of comment marker pins on the document. Comment entries in the Comments and Tasks panel listing may still be selected as usual.
Use the filter drop-down menu in the Comments and Tasks panel (![]() ) to configure comment filtering and the associated
) to configure comment filtering and the associated ![]() button to toggle between the filtered and unfiltered view.
button to toggle between the filtered and unfiltered view.
- Tasks only - enable this option to show only comments that are assigned to a user.
- ASSIGNED TO - all options are disabled by default. Consequently, all tasks/comments are shown and sorted by name (the first entry in the list is the current user). When checkboxes are enabled for a user(s), the entries of those enabled will be displayed.
Use the options of the ![]() button menu to configure comment visibility and notifications:
button menu to configure comment visibility and notifications:
-
Unresolved Only – comments that have been resolved are not included in the listing.
-
Current document only – show only comments that have been placed on the currently active document.
-
Notification settings – click to open the Notification Settings dialog and configure email alerts receiving for all comment activity in this design (All), for only those comments where you are mentioned or assigned (My), or not receiving email alerts at all (None). ► Email content example.
-
Export Comments – click to open the Comment Export Configuration dialog to configure the export of comments into a PDF file.

The output PDF will include information about comments in the design: comment ID, author, date and time of creation, comment text, assignee (for tasks), and status (for a comment, if it is
Resolved; for a task, itsTo Do/In Progress/Resolvedstatus). You can choose to export all comments associated with the design, irrespective of when those comments were made or only comments made between specific design releases. There are also a few options to define which screenshots to include in the generated PDF document. Together, both give information on where a comment is and what it applies to (point, component, area). If you leave both unchecked, you'll get just the comments themselves. Once configured, click Export to generate the PDF, using the subsequent dialog to determine where and with what name (by default, that of the project).- Entire designs snapshots - include a snapshot of each source document with a comment within the nominated time Period. This provides a visual confirmation of where on the document the comment resides by numbered comment marker.
- Original design screenshots - include the Original Snapshot that was taken when a comment was created (and is the snapshot available from the Contextual Commenting window when a comment marker is clicked in the main design space). This shows the point, area or component to which the comment applies.

Placement
To place a comment in the design space of an object-based graphical editor, such as schematic, 2D PCB or Draftsman, run the command for it first. This can be done by performing one of the following:
-
Click the
 button available in the Comments and Tasks panel.
-
Click
 near the top right-hand corner of the design space.
-
Click Place » Comment from the main menus.
-
Using the
Ctrl+Alt+Ckeyboard shortcut. -
Right-click, then select Comment from the design space.
Depending on the document type (see above), comments can be assigned to an object, a specific point, or an area on the active document. The command invokes the comment placement mode, and the cursor changes to a crosshair with a blue circle that detects and highlights objects for selection:
-
Click a highlighted object to attach (pin) a comment to that object.
-
Click in a non-highlighted area to attach a comment to that specific point on the document.
-
Click away from an object and drag the cursor to create a rectangular highlighted area and attach a comment to the specified area (
 ).
).
In an ActiveBOM document, click on a cell in an ActiveBOM document to add a comment to that row of the BOM. Right-click on a row and then select the Comment command to add a comment to this row.
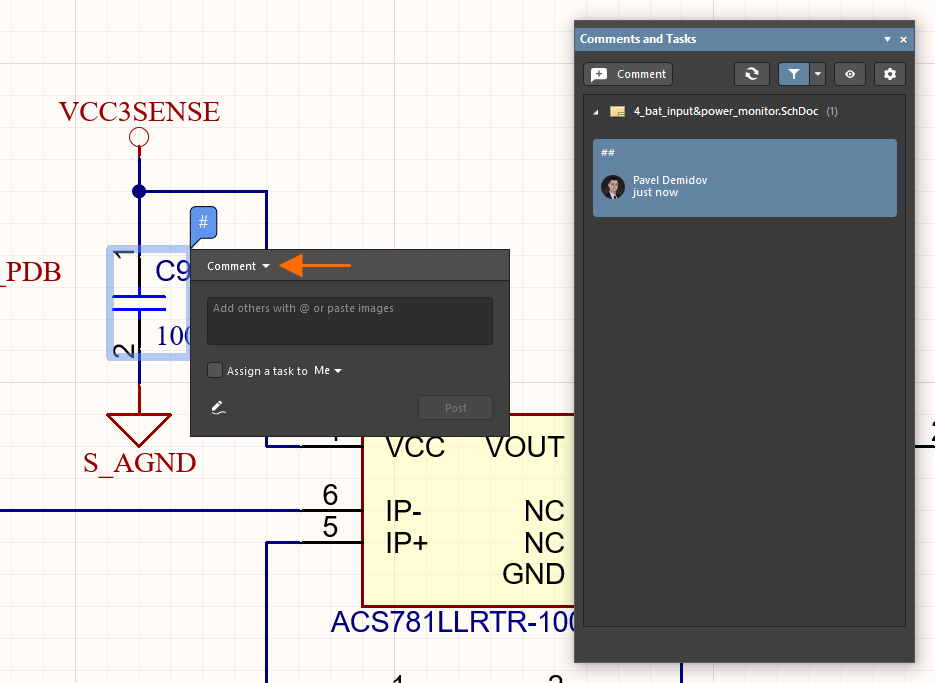
The placement action then opens a comment entry dialog that offers a field for entering the comment text and, for graphical documents, also an additional option for adding a freehand drawing to the comment where applicable (![]() ). Select the Assign a task to option to assign a task to yourself or to one of the users mentioned in the comment (see details below). Click
). Select the Assign a task to option to assign a task to yourself or to one of the users mentioned in the comment (see details below). Click ![]() to confirm the comment creation, which will associate the comment with a numbered pin marker on the document, and also add a comment summary entry to the Comments and Tasks panel.
to confirm the comment creation, which will associate the comment with a numbered pin marker on the document, and also add a comment summary entry to the Comments and Tasks panel.
Placing a comment on an object, mentioning another registered user in the comment, moving the comment's pin indicator, and adding a freehand drawing to the comment.
Mentions and Task Assignments
Along with text in the comment entry dialog, a 'mention' reference can be added for any other user or role registered with the connected Workspace by entering the @ character. Select a name/email from the dropdown list to add the user (Workspace member) reference to the comment, and also as an Assign a task to entry – essentially, a task will be assigned to the user. Uncheck the latter option if you do not wish the comment to be regarded as specifically assigned to that user. A Role group (e.g., 'Engineers'), and therefore its constituent users, may also be added as a mention.

If a mentioned user does not have access to the current project, you will be invited to share it with that user. This option is available if you are the project owner or a Workspace administrator. User Access Rights are granted through the Share dialog; the user will receive an email notifying them of the shared access. If you cancel the Share dialog, the project will not be shared, but the comment will be placed as usual.
► See more information about sharing a design.
When a task is assigned to a user, the image/photo of this user will be shown at the top-left of the comment dialog and the comment tile in the Comments and Tasks panel. Also, the task will be named with the project name and the sequence number (e.g., Kame_FMU-1) instead of a simple number as is done for normal comments. This name is also shown in the comment dialog and the comment tile. Click it to open the Tasks page of the project in the Workspace's browser interface with the selected task focused in the task list.


Positioning
A comment's location in the editor space is moved by dragging its associated 'pin' to a new position – during or after its placement. When selected, the comment pin includes a connecting line to its associated object or area.
Note that a comment may also be positioned during its initial placement by clicking and dragging when in placement mode ( ).
).
Pasting Images
You can add an image to a comment by first copying the image from an Explorer window or a browser page by right-clicking on the image, which copies the image to the clipboard. To attach the image, use right-click Paste (or the Ctrl+V shortcut) in the comment itself (in the field that states Add others with @ or paste images).
Each image can be a maximum of 2MB. After it is pasted into the comment, click the image to display the full image, as shown in the image on the right.

You also can post a comment if it includes only a pasted image without any text, as shown below.

Drawing
When placing or editing a comment, select the ![]() option button to add a freehand drawing with the resulting pen cursor. Click and drag to create lines, and then right-click to finish and associate the drawing with the currently selected comment.
option button to add a freehand drawing with the resulting pen cursor. Click and drag to create lines, and then right-click to finish and associate the drawing with the currently selected comment.

To access the Freehand Drawing mode of the Properties panel, press the Tab key when freehand drawing mode is active (this is indicated by the ![]() icon in the design space). These options allow you to undo and redo comments under the Commands drop-down and change the width, size and color under the Properties drop-down.
icon in the design space). These options allow you to undo and redo comments under the Commands drop-down and change the width, size and color under the Properties drop-down.
General Tasks
General tasks (tasks applied to the current project but are not associated with a project comment or document) are listed in the panel in a separate group under the entry of the project. The same content and attributes are shown in the panel for general tasks (assignee, priority, etc.).

General tasks are listed in the Comments and Tasks panel.
Click a General Task entry in the panel to access its commenting dialogs. Use the dialog to post comments (including those with pasted images) for the selected General Task.
Detached Comments
When a project document is removed, or its UniqueID has changed, the comments for the document can become "detached." Those comments can still be accessed from the panel's Detached Comments collapsible region. Click on a detached comment's tile in the Comments and Tasks panel to show its dialog in the design space of the currently opened document.

Working with Comments
Comments placed in a design document are registered in both the Comments and Tasks panel (as a sequence of numbered entries) and in the corresponding document editor (as numbered pin graphics). Each panel entry represents a comment thread and provides summary information, including who placed the comment and when, the initial comment text, any applied mentions/assignments, and the number of thread replies.
A comment thread is opened by selecting its entry in the Comments and Tasks panel or by clicking on its associated pin in the design space. This highlights the comment in the document editor and opens the comment entry dialog, which includes the initiating comment and any user replies. If a selected comment is associated with another design document, the system will open (and load, if necessary) that document.
Navigating comments by selecting pin markers in the design space, and by selecting entries in the Comments and Tasks panel.
Comments Dialog
Interaction with a placed comment is through the pop-up comment dialog, which shows all entries in the selected comment thread and includes options to preview, reply, edit, resolve, and delete an entry. The dialog is opened when initially placing a comment or when a placed comment is selected in the Comments and Tasks panel or in the design space. Press Esc or click in the design space to close the comment dialog.

Preview
Select the Original Snapshot option in the initial comment to see a graphical capture of the editor area when the comment was placed. Click the ![]() icon at the top-right of the screenshot or the screenshot itself to open a full-size preview (click the
icon at the top-right of the screenshot or the screenshot itself to open a full-size preview (click the ![]() icon at the top-right of this preview or the image itself to close it).
icon at the top-right of this preview or the image itself to close it).

Reply
Enter text, and optionally a user mention ('@') in the Reply field to add a new entry to the comment thread. Select the Assign a task to option to create a task assigned to a user specified in the drop-down. Click ![]() to confirm the entry.
to confirm the entry.

Edit and Delete
An existing comment may be edited by the author of that comment using the Edit option available from the comment's ![]() menu. Click the
menu. Click the ![]() button to confirm the comment edit.
button to confirm the comment edit.
Use the Delete option to remove the currently selected comment. Note that the entire thread will be removed if the initial comment (instead of a Reply) is deleted.
Use the Convert to Task option to convert the comment to a task assigned to yourself.
Use the Copy Link option to copy the URL to the comment thread. This link can be used to open this project in the Web Viewer of the Workspace's browser interface, with an object, point, or area of the comment zoomed and centered.

Resolve
Click the ![]() /
/ ![]() button to toggle the comment state between
button to toggle the comment state between Resolved and Unresolved (the default). A resolved comment (closed as complete) is inactive and non-editable, and both its entry in the Comments and Tasks panel and its pin marker on the document are grayed out.

Setting Task Priorities and Statuses
If a task comment has been assigned to a user, its priority and status can be set. A task is initially immediately set to Medium priority and to To Do status, but they can be changed by clicking an associated control at the top of the comment dialog.

Commit Tag, Release Revision ID, and Design Review Information
Commit tags and release revision IDs are displayed when viewing the applicable comments/tasks in both the Comments and Tasks panel and the commenting dialog in Altium Designer.
-
Comments created in the Web Viewer when viewing the design snapshot of a tagged commit will include the associated tag name. Click the tag name link to open the related commit snapshot in the Web Viewer.
-
Comments created in the Web Viewer when viewing a specific release will include the release revision ID. Click the release revision ID link to open the Manufacturing Portal for this release.
-
Comments created in the Web Viewer when viewing a Design Review snapshot will include the design review entry. Click the design review link to open the review's page.

Working with Jira Tasks
If Jira Integration is enabled and configured for your Altium 365 Workspace, then a placed comment will include the additional option of placing and linking with a Jira issue in your Atlassian Jira® service. Like conventional comments and their associated tasks, placed Jira issues can be viewed, edited, and commented on from within the design documents, and viewed/selected via the Comments and Tasks panel.
A placed Jira task instance is synchronized with its respective issue in the Jira space. The bidirectional data synchronization between Jira issues and Workspace tasks allows design project management to be conducted through the Jira space in conjunction with Altium 365.
Create a Jira Issue
To place a Jira Issue task for a design project, first place a comment instance in the usual way and then select the Jira Issue option in the comment dialog. Follow by choosing an Issue type and adding a summary to create the synchronized Jira issue task.
|
Place a Jira task in the current project document by first placing a comment instance. The alternative Jira mode is available from the Comment drop-down menu. Invoke the Jira task placement by selecting the Jira Issue option from the dialog's Comment menu. Click the Create Issue option if not already selected. Select the type of issue to be created from the Issue Type drop-down list, which includes those available in your Jira service. Enter an issue Summary and optional description/assignee. The Assignee drop-down list will include only those users who are registered members of your Jira account. Select Post to confirm. The Jira issue is placed in the initial document comment position, is included in the Comments and Tasks panel, provides a link to the issue in the Jira space, and includes interactive access to its task priority ( |

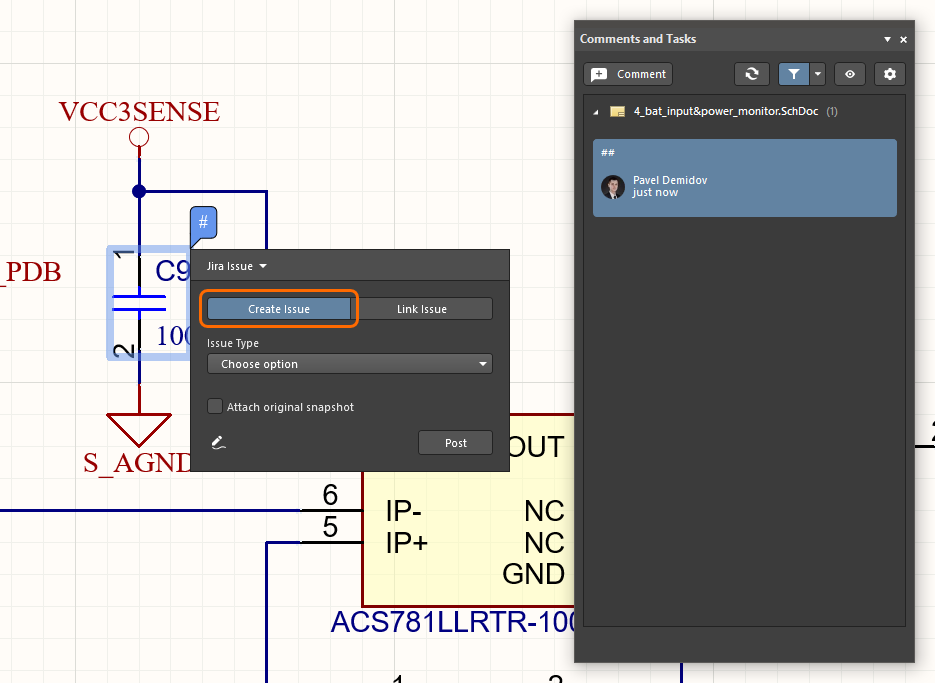
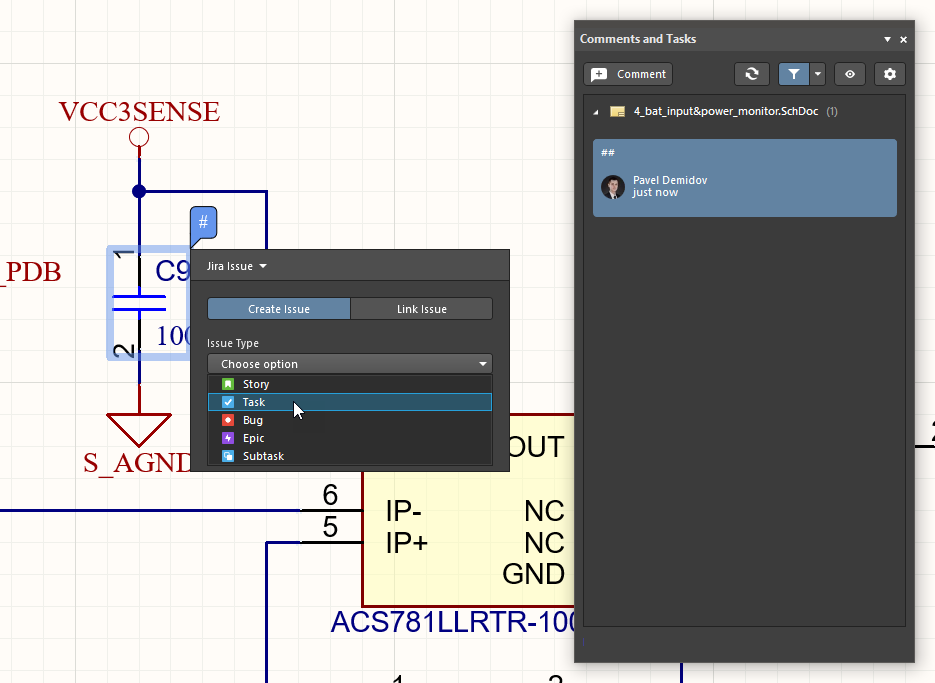

 ).
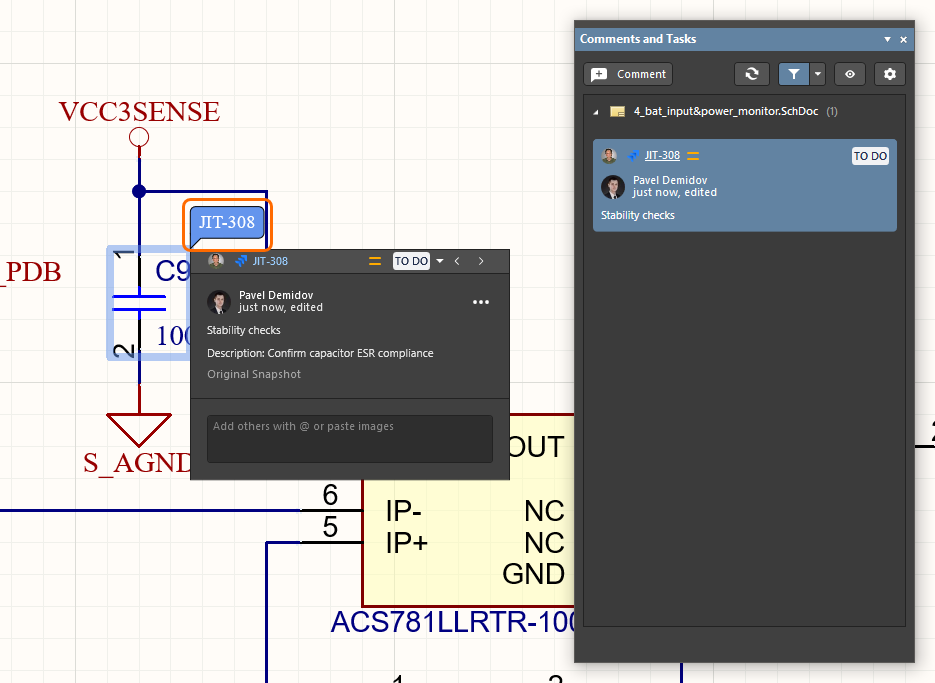
).Select the Task ID of the Workspace Jira issue in the comment dialog or Comments and Tasks panel to directly open that issue in the Jira space in a new tab of your default browser. The Workspace Task ID maps to the Issue Key in the Jira space, and the main Jira parameters, such as Summary, Description, Assignee, and Comments, are mapped between the two instances. The Workspace user who created the Jira Issue is the Issue Reporter on the Jira side. Note that a snapshot image of the current Workspace document is included as a Jira attachment if the Attach original snapshot option was selected when creating the Workspace Jira issue (see above).

A placed Workspace Jira task will create a synchronized Jira issue in the Jira space. The two are linked by the mapping of the Workspace Task ID with the Jira Issue Key.
Along with the parameters mapped between the Workspace and Jira issues, the task-related Priority and Progress status settings are also synchronized. For example, moving the Workspace issue task from a Medium to High priority state will immediately be reflected in the issue on the Jira side, and changing the progress state from To Do to In Progress on the Jira side will similarly change the state of the Workspace Jira issue. A data refresh (run by clicking the ![]() button at the top of the Comments and Tasks panel) may be required to see updated data.
button at the top of the Comments and Tasks panel) may be required to see updated data.
Link to a Jira Issue
Altium 365 Jira Integration also allows a Workspace Task to be linked to an existing Jira issue in your Atlassian Jira service through the comment dialog’s Jira Issue mode. You can link to any issue in the specified Jira project, which is then synchronized with the Workspace Jira task.
|
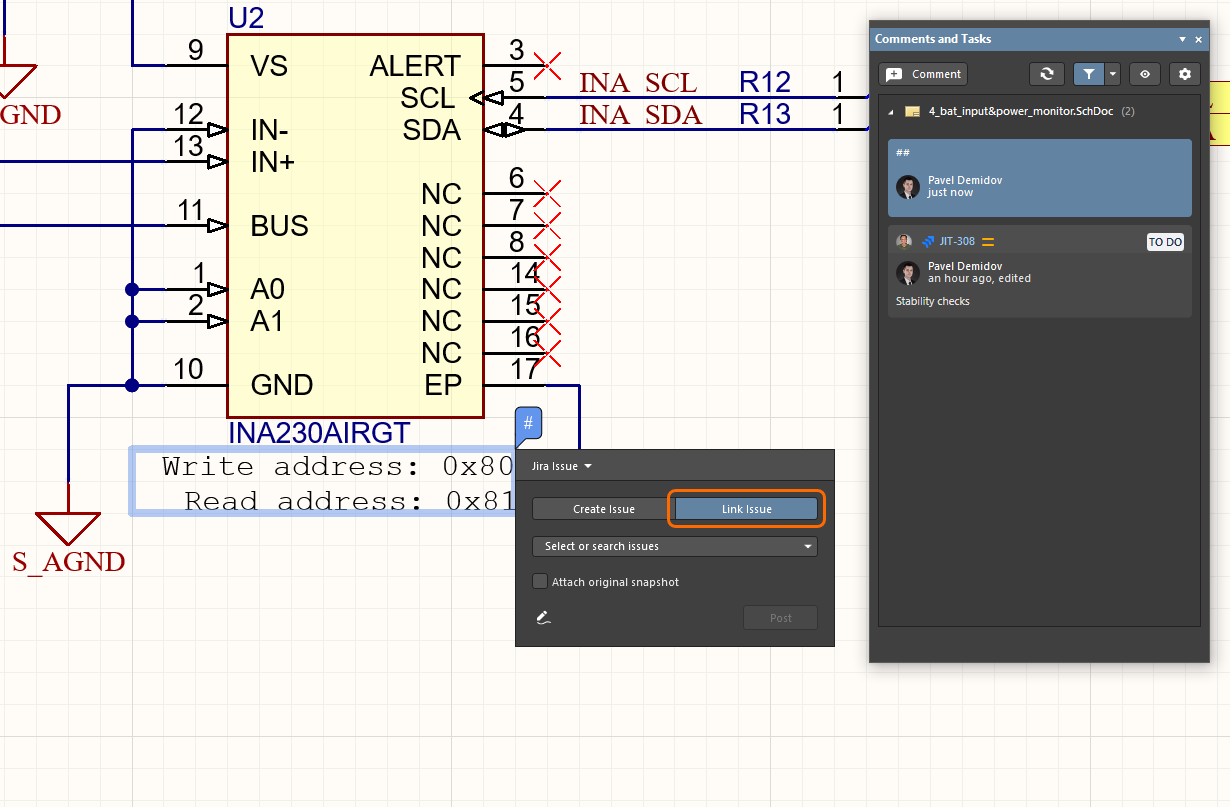
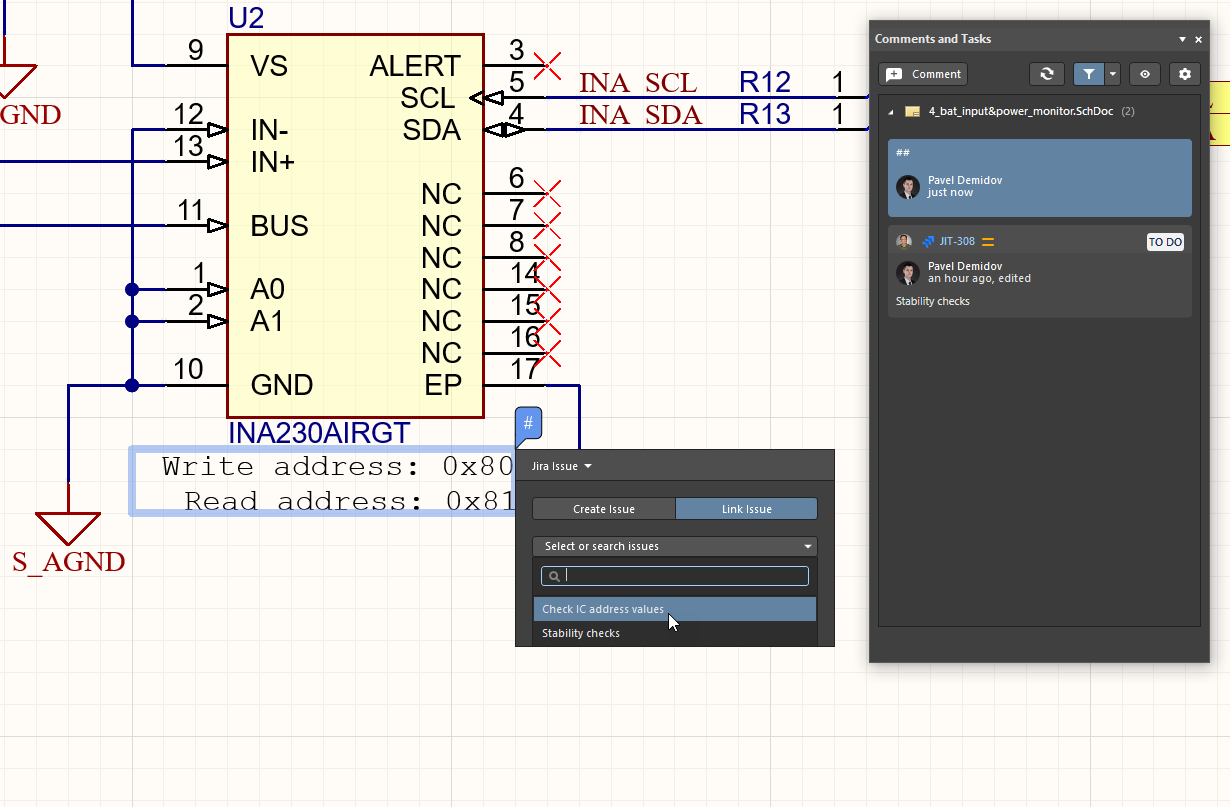
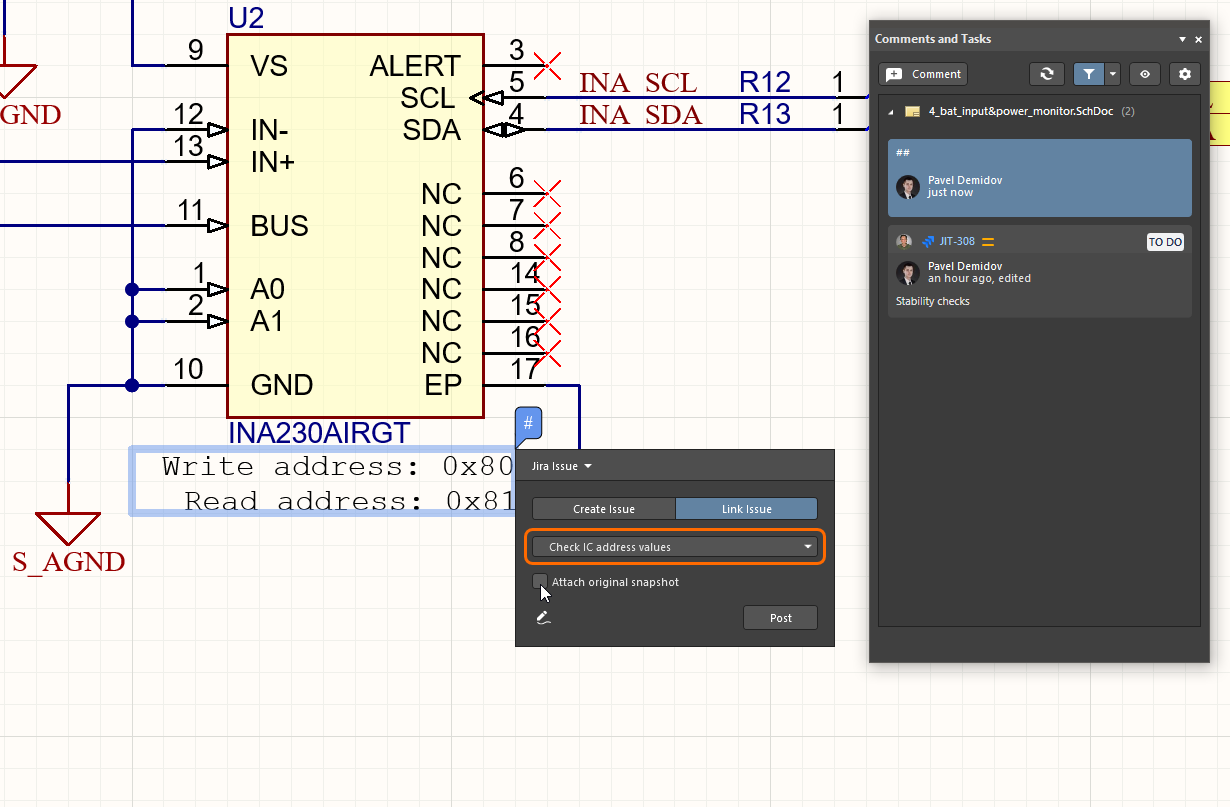
Place a comment instance on the document area or object you would like to associate with an existing Jira issue, then select the Jira Issue mode and the Link Issue option in the comment dialog. Use the Select or search issues drop-down to select the Jira issue (shown as a The dialog’s Jira Issue drop-down will show the selected issue from the Jira space. If required, check the Attach original snapshot option to transfer an image of the current document view to Jira. Click the Post button to establish the link between the Workspace Jira task and the selected Jira issue. The new Jira issue task is shown in the Comments and Tasks panel and the comment dialog, which will include any existing (or added) comments – select the dialog’s Show all Replies option to see the full list. |

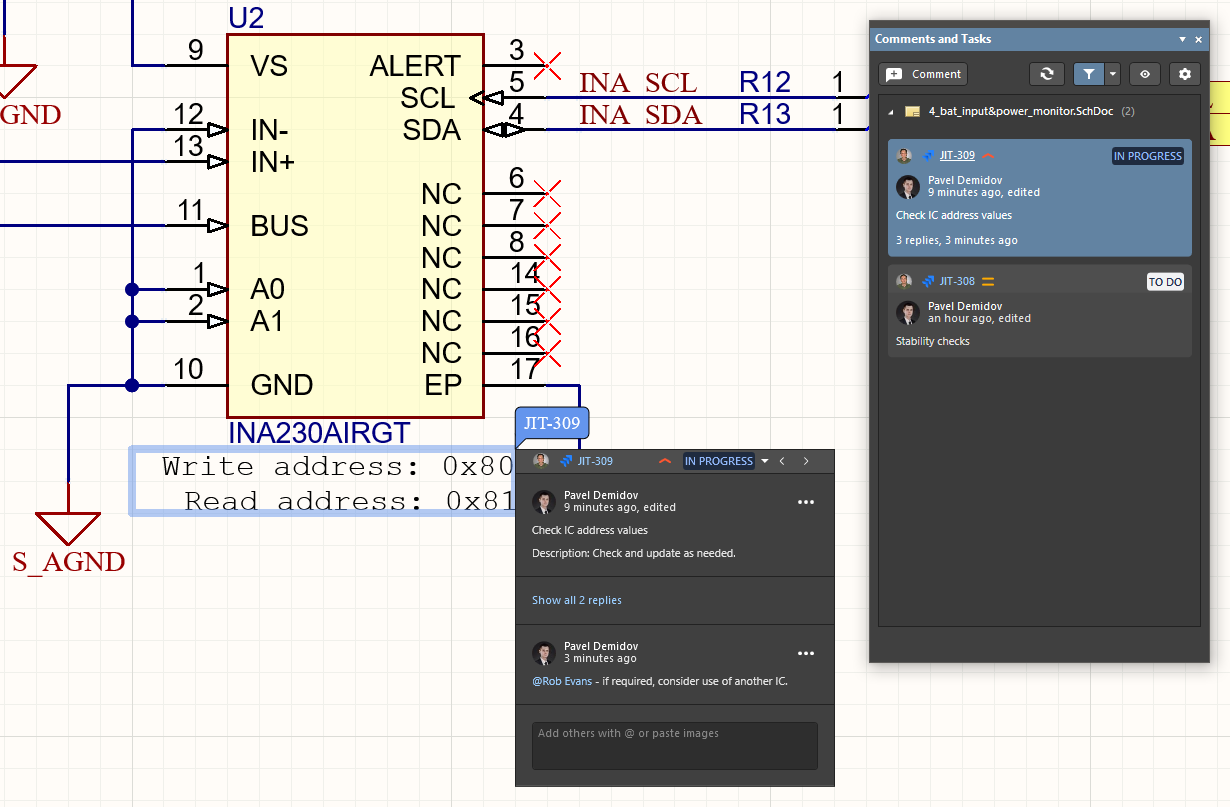
The linked Jira issue is now synchronized with the Workspace Jira task, which includes the issue Comments and is set to the Progress and Priority states defined by the Jira issue – In Progress and High in this example. Note the Jira issue Web links entries will now indicate that an Altium 365 Workspace Jira task has been linked (or re-linked) to this issue.

An existing Jira issue is linked to a Workspace task by specifying its Jira Issue entry in the Workspace comment dialog's Link Issue mode.
To-Do Panel
While your connected Workspace provides a comprehensive set of features for commenting and task assignment described above, you can also access the To-Do panel to keep track of your tasks. The To-Do panel lists all To-Do items that are currently defined for the active project. A To-Do item is used as a reminder for a task that needs to be carried out later in relation to a document.

The To-Do panel
To-Do Panel Content and Use
The To-Do panel can list two varieties of 'to-do' items for the active project:
- A project-level To-Do item.
- A document-level To-Do item - added to a text-based document within the project.
For each To-Do item, the following information is displayed:
- Done - this check box lets you check the item when its defined task has been completed.
- Action Item - the actual task that needs to be performed.
- Priority - the importance of the task to be performed (Lowest, Low, Normal (default), High, Highest).
- Document - a reference to the source document to which a document-level To-Do item has been added.
- Owner - this could be the name of the person entering the task or who is actually to perform the task.
- Category - this could be the particular area within the project that the task to be performed falls under (e.g., schematics, design rules, routing, constraints, etc.).
Adding Project-level To-Do Items
Project-level To-Do items are added from within the panel itself. Before adding any items, ensure that the active document in the design editor window is one of the design documents for the project for which you want to define To-Do items.
To add a new To-Do item, right-click within the panel and choose the Add Project To-Do Item entry from the subsequent context menu that appears. The Edit To-Do Item dialog will open.

Use this dialog to enter suitable text for the task that must be carried out for the project. Use the available fields in the dialog to define a task's Priority, Owner, and Category. After defining the item as required, click OK to add the new item to the panel.
Adding Document-level To-Do Items
Document-level To-Do items are added to a text-based source document (e.g., VHDL file, Constraint file, Embedded Source code document, etc.). Before adding any items, ensure that the required document is active in the design editor window and that this document belongs to the project whose overall To-Do items you are currently defining.
To add a new To-Do item, place the text cursor at the required position within the document at which you wish to place a To-Do item, right-click and choose the Add To-Do Item entry from the subsequent pop-up menu that appears. The Edit To-Do Item dialog appears. Use this dialog to enter suitable text pertaining to the task that must be carried out in the document. Use the available fields in the dialog to define a Priority, Owner and Category for the task (e.g., Formatting pass, Code Review pass, etc.). After defining the To-Do item as required, click OK to close the dialog and return focus to the current document. An entry for the To-Do item will appear in the To-Do panel and also at the point marked by the current text cursor position. The entry will appear as a comment (between the comment delimiter(s) defined for that document type), including the actual text for the item and a unique identifier, as shown in the image below.

Right-click Menu
The right-click menu provides the following commands:
- Goto Source - this command becomes available when the selected item in the panel is a document-level To-Do item. Use this command to open (if not already) the associated source document referenced in the Document field of the item and make it the active document in the design editor window. The text cursor will be placed at the beginning of the To-Do item text.
- Add Project To-Do Item - add a project-level To-Do item to the panel for the active project.
- Edit - edit the selected To-Do item. The Edit To-Do Item dialog will appear, allowing you to make the required changes.
- Delete - delete the selected To-Do item from the panel.
- Show Completed Items - with this option enabled, only To-Do items that have been marked as complete (Done option enabled) will remain displayed in the panel.
- Report - generate a report containing all To-Do items currently displayed in the panel. After launching the command, the Report Preview dialog will open in which you can configure, print and export the report in various file formats.
Notes
- If a document-level To-Do item has been defined in the panel and the corresponding source document is the active document in the design editor window, the text for the entire To-Do entry in the panel will become bold.
- Double-clicking on a To-Do item entry in the panel will open the Edit To-Do Item dialog, enabling you to modify the task's definition.
- The entries in the panel may be sorted by any column by clicking on the header for that column. Click once to sort in ascending order; click again to sort in descending order.
- Direct filtering lets you quickly jump to a To-Do item entry by directly typing within the panel. You can filter based on any data column in the panel. Use the Right Arrow and Left Arrow keys to switch between columns for filtering, or click directly on a field within a column. To use this filter feature, click within a data column and type the first letter of the entry to which you want to jump. The first entry in that column, starting with the letter you type, will become selected, and the letter will be highlighted to show that filtering of the column content is based upon the letter typed.