Parent page: Getting Familiar with the Altium Design Environment
Once a project is established design documents can be added, edited or removed from the active project. These operations can be performed within the Projects panel, which provides an organized view of the project structure and its constituent design documents. The panel's right-click context menus offer the majority of commands required for working with design documents.
Note that the presentation of documents in the Projects panel does not reflect how they are stored on the hard drive or elsewhere. The panel's contents can be considered as a logical representation of the project, whereas the physical location and organization of the document file storage (and its type) are up to you – the documents might be stored in a folder on your local machine or a LAN, and of course, hosted in a version-controlled repository provided by a basic Git/SVN VCS system or a fully managed system such an Altium Workspace.
Add or Remove a Design Document
The simplest way to add new or existing design documents to a project is to right-click on the project name in the Projects panel and select Add New to Project or Add Existing to Project from the context menu options.

Add a specific or another type of document to a project.
Other types of project-relevant documents can also be added to a project, such as text files, PDFs, spreadsheets, etc. To do so, use the Add Existing to Project option and set the File Type drop-down list in the Choose Document to Add browser dialog to All Files (*.*) so all file types can be accessed.
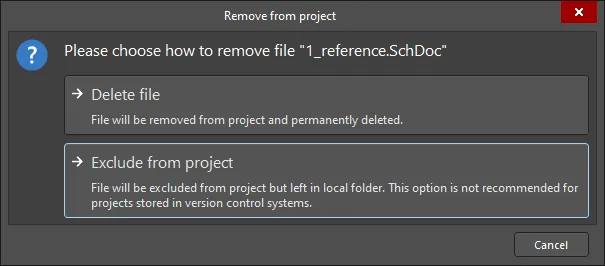
To remove a document from the project structure, right-click on its name in the Projects panel and select the Remove from Project menu option. You will be prompted to choose:
- Delete File – to permanently remove the source document file itself.
- Exclude from Project – to remove the project's link to that document (and not delete the source document file itself). If it is currently open in the design editor window, it will be removed from its parent project but remain open in the panel as a free document. If, however, it is not currently open in the design editor window, removal will effectively close it.
To open an instance of Windows Explorer, at the location where a project document is stored, right-click its entry in the Projects panel and select the Explore command. For the document focused in the Projects panel, it can be done by clicking the  control at the top of the panel.
Displaying Documents
Open Versus Active Documents
To open a document, double-click it in the Projects panel. Multiple documents may be opened simultaneously and each open document has its own tab on the Documents Bar at the top of the design window.
When you open a document, it becomes the active document. In Altium NEXUS, you are allowed to have as many documents open as you wish, however, only one document can be the 'active' document. The active document is open in the design space allowing you to make any required updates. The tab of the currently active document displays with a medium gray background; documents that are open and not currently active display with a charcoal gray/black background.

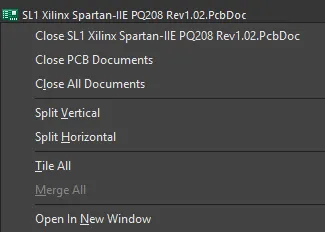
Right-click on any document tab to access a drop-down of commands to close the document on which you right-clicked, close all documents of the same editor (e.g., all PcbDoc, all SchLib, or all PcbLib documents) as the one on which you right-clicked, close all open documents, split, tile or merge documents.
To make another open document the active document, click on its tab. Alternatively, use the Ctrl+Tab or Ctrl+Shift+Tab keys to cycle forward or backward (respectively) through all open documents.
If you have a large number of documents open, you can choose to group them by enabling the Group documents if need option in the Documents Bar options on the System - View page of the Preferences dialog. Documents can be grouped by document kind or by project. Documents grouped by document kind are sorted alphabetically in a grouped tab. Documents grouped by project are sorted alphabetically within each document kind sub-group in a grouped tab.
Document Window Management
With Altium NEXUS, you are not limited to viewing and working with a single design document at a time. Various commands are provided that allow you to effectively manage the open documents and tailor their display to your preferred working habits.
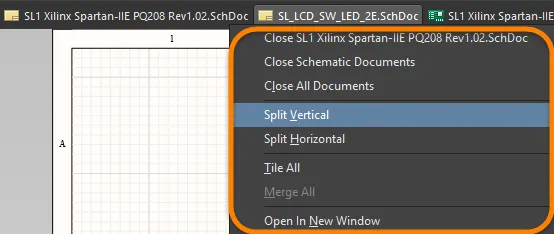
Right-click on a document tab to access various commands for managing the document. These commands include those affecting the display of all open documents within the main design window, as shown below. Commands for splitting the main design window vertically (Split Vertical) or horizontally (Split Horizontal) are invaluable when performing cross-document tasks, such as cross-probing between a schematic and its PCB.
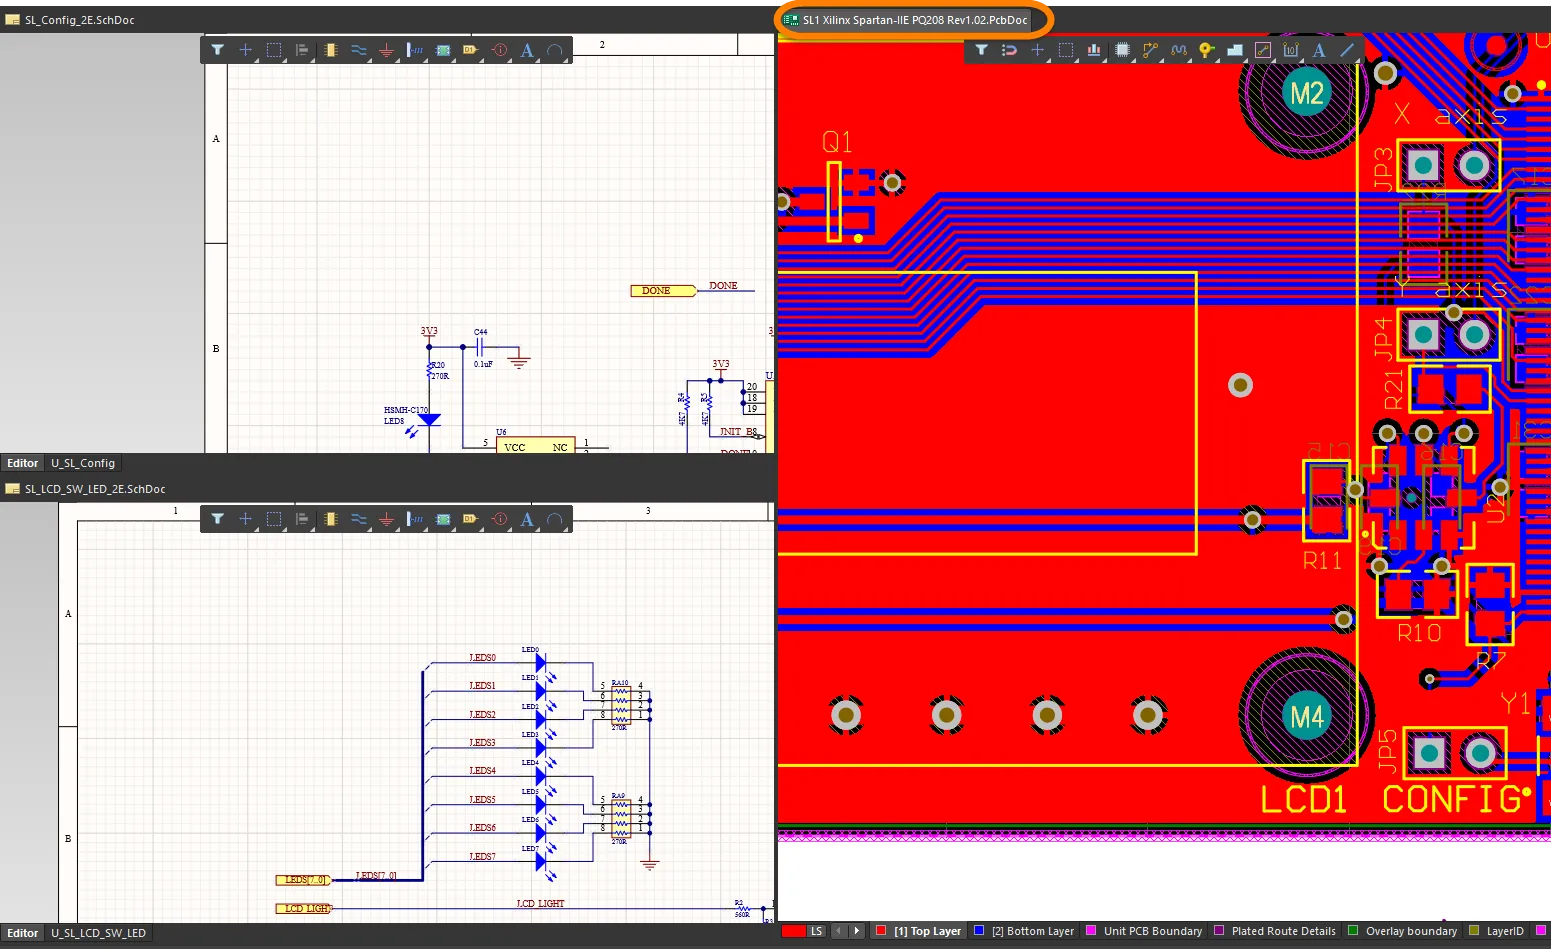
When split, the regions are treated as though they are individual windows. One document may be active in each region, but only one document, across all regions, can have the focus at any given time. When a new document is added, or an existing document is opened, it will be opened as part of the region in which the currently focused document resides. The image below shows the design space split vertically; the highlighted schematic document is the currently active document.

The right-click commands also allow you to tile the documents (Tile All), which opens each document in the design space as shown in the below image. In the image, the highlighted PCB document is the currently active document.
When documents are split or tiled, you can drag and drop them to another region.
Use the Merge All command to 'merge' all documents back into a single design window.
You can also open a document in its own separate design window by right-clicking on its tab then choosing Open In New Window from the menu.
Altium NEXUS also provides a visually orientated project navigation aid –
Design Insight – that applies to individual document entries in the
Projects panel – as a
Document Insight. Refer to the
Document Insight section of the
Navigating a Project page to learn more.
Navigating a Document
When working with a graphical document, such as a schematic sheet, PCB document, or Draftsman document, you can zoom and pan the document to focus on a specific document area. The basic shortcuts that can be used to do this are:
- Ctrl+Mouse Wheel to zoom in and out
- Right-Click, Hold&Drag to slide the document around
The View main menu includes a number of commands that can be used to control the view of the current document.


Use commands of the View main menu to control the view of your document. In the top image, the View menu of the schematic editor is shown. In the bottom image, the View menu of the PCB editor is shown.
Indicating Document Status
As you work with project documents in Altium NEXUS, the Projects panel provides a visual summary of which document files are modified or saved through status icons that are associated with each design document, and the main project file. This provides a quick visual summary of which documents are modified, saved, whether they are Workspace or local, and their version control status. The document icons and meanings are listed below.
Open/Modified Status Icons
| [blank] |
The document is closed. |
 |
Open – The document is open as a tabbed document in the design editor window. |
 |
Open/Modified – The document is open and has been modified (yet to be saved). |
 |
The document file is open and locked by this instance of Altium NEXUS. |
 |
The document file is open and has been locked by another instance of Altium NEXUS. |
 |
The document is being edited by another user. |
 |
The document being edited by another user is currently open in the editor. |
Note that the hover text will also report when multiple users are editing (or have edited) the shared document.
A modified document or project that has yet to be saved locally is distinguished by an asterisk next to its entry in the
Projects panel. Modified documents are also indicated by an asterisk inside their tab in the main editor window. When file locking is enabled (see
Data Management – File Locking), the icons associated with documents in the panel indicate when a file is open, modified, open, and locked by this instance of Altium NEXUS, or open and locked by another instance of Altium software. Regardless of file locking, a modified document is indicated by an asterisk associated with its file name.
Version Control Status Icons
The version control system essentially monitors and compares the files in the working folder to their counterparts in the design repository. Altium NEXUS both requests and exchanges information with the version control system via its VCS interface, and responds to the comparative file status conditions accordingly. In practice, this manifests itself in the Projects file icons, through a range of VCS alerts, and by appropriate changes in the available file management commands.
The icons and their meaning are as follows:
| [blank] |
N/A |
The file is not under version control in a VCS repository, |
 |
No modification |
The local copy of the file matches the file in the repository and is up to date. |
 |
Scheduled for Addition |
A file has been added to version control but not yet Committed (checked in) to the VCS repository. |
 |
Modified |
The local copy of the file has been modified and saved to the working folder. Commit the file to create a new revision in the repository. |
 |
Out of date |
The local copy of the file (in the working folder) is older than its counterpart in the repository and is therefore out of date. Use the Version Control Update option to retrieve the latest file from the repository or save the file, which will create a Conflict condition. |
 |
Conflict |
The file has been committed by another user before you have committed your own edited and saved version of that file. Use the Version Control Update or Resolve command to determine which version of the file will become the latest revision in the repository. |
 |
Ahead of server (Git) |
The file in the local working repository is newer than its counterpart in the remote Git repository. This occurs when a local file has been modified, saved and committed to the local repository, but not yet Pushed to the remote repository. |
 |
Scheduled for Deletion |
The project file has been removed from version control and will be deleted from the VCS repository and database during the Version Control Commit process. This icon also appears when a file is missing from the local working folder (it has been deleted, renamed or moved), which is resolved by re-populating the folder from the repository with the Version Control » Update command. |
- Select the Version Control » Refresh option from the panel's right-click menu (or press F5) to refresh the current VCS status of each file entry.
- Hover over a VCS icon to see a definition of its meaning.
Managing Project Documents
Change Project Document Order
Documents in the Projects panel are automatically arranged in logical groups or 'folders', such as Source documents (Schematic, PCB, etc.), Settings documents (Harness, Outjob, etc.,) and in the case of a hierarchical design, top-level schematic documents. The documents within each folder group are displayed, by default, in the order they were added, but can be dragged and dropped to a new order position within the group.
In the case of a new hierarchical design, the parent-child relationship between documents will be displayed in the Projects panel. Note that the connectivity relationships cannot be defined by dragging and dropping schematic documents since the inter-sheet connections and design hierarchy are in fact defined by Sheet Symbols and Port definitions.
► For more information about project hierarchy, see Creating Connectivity and the Net Identifier Scope section in the Options tab of the Project Options dialog.
Document Renaming
You can directly change the name of any of PCB project constituent design files (*.PcbDoc, *.SchDoc, etc.) or the PCB project itself (*.PrjPcb) by using the Rename command – available from the right-click context menu for a project in the Projects panel.
 Examples of renaming a project and one of its design files, locally from within Altium NEXUS. Those changes will be synchronized with the Workspace when you save and send the changes to that Workspace.
With renaming performed, save the changes to the Workspace using the Save to Server command (available from the same context menu for the project). File rename synchronization is maintained between the local working copy of the project and its counterpart in the Workspace. Additionally, when the project file name has been renamed and the project saved to the server, the Workspace automatically changes the managed project's Name parameter to match.
Conversely, when the name of a managed project is updated through the Workspace's browser interface, the change is propagated to Altium NEXUS when the project is next opened.
To edit the properties of an existing managed project in the Workspace, select its entry on the
Projects page, click the

control above the listing of projects, and choose the
Edit entry on the associated menu. Change the name for the project in the subsequent
Edit Project window that appears.
When the updated project is opened in Altium NEXUS (File » Open Project), an initial dialog provides the option to align the local project file name with the new project Name, or force the server project Name to match the existing project file name.
 Options available if you have renamed the project on the Workspace side.
Share Documents Between Projects
Because an Altium NEXUS project defines and saves links to stored document files, any number of projects can be created that link to those same document files.
While this may be a convenient way to re-use established design documents – say, including a standard power supply schematic in several projects – it is not recommended practice because a change in the document will affect all projects it is linked to. A far better approach for design reuse is to establish and apply Managed Sheets.
► For more information about design document reuse and Managed Sheets, see the Managed Sheets page.
Save a Copy of a Document
An open project document can be saved under a new name using the File » Save As command, which creates a copy of the document file under the nominated new name. This process automatically adds (links) the new document copy to the active project in place of the existing (source) document, which remains intact in the source folder. If the open document is not part of a project – a free document – the new copy is simply opened in the editor in place of the original document.
If the intention is just to make a backup copy of a document, use the Save Copy As option. This creates a named copy of the document file without affecting its host project.
If the intention is to rename a document, see the Document Renaming section.
Compare Local Documents with Commit or Release Data
For projects hosted by an Altium 365 Workspace, you can compare locally saved schematic and BOM documents with the data of a commit or release of this project. Commands for selecting a required data set with which the local documents should be compared can be chosen from the following locations:
When the Latest Commit or Latest Release command is selected, the project data comparison with those from the latest commit/release entry will start. When the Select Commit or Release command is selected, the Project History view will open for the selected project. Select the tile of a commit or release to compare the locally saved data with the data of this commit/release.
Once complete, the comparison results are presented in the Compare view, which opens as a new tab in your default web browser.
To learn more about design data comparison features provided by the Altium 365 Workspace, see
Design Data Comparisons.
Clipboard Panel
To store and display copied objects that can be added (pasted) to Altium NEXUS documents at any stage, allowing for multiple copy/paste operations, the Clipboard panel can be used.
 View and apply (paste) Clipboard panel content for all design data types.
To access the panel, the
Value field for the
UI.PanelClipboard Preference Name on the
Advanced Settings dialog must be enabled (it is disabled by default). The
Advanced Settings dialog is accessed by clicking the
Advanced button on the
System - General page of the
Preferences dialog. If any changes are made in the
Advanced Settings dialog, the software must be restarted in order for the changes to take effect.
Clipboard Panel Contents and Use
Panel Contents
The Clipboard panel supports a variety of data formats depending on the origin and object type. It can be set to display either only objects copied or cut from within the Altium NEXUS environment, or the entire Windows clipboard (this setting is accessed through Preferences on the System - General page of the Preferences dialog). Note that not all data types are supported by each design editor (PCB editor, schematic editor, etc.).
The data types supported are:
- Any design object copied or cut from a schematic-based (schematic/schematic library) or PCB-based (PCB/PCB library) document.
- Uni-code text copied or cut from any text-based document (e.g., text file, scripting file, constraint file, Microsoft Word/Excel document, etc.).
- Bitmap images created from 3D view modes for pasting into other applications.
- Windows enhanced meta-file image formats (e.g., simple bitmap images/text cut/copied from Microsoft Word/Excel documents). This data type is supported in the PCB editor only.
Panel Use
As objects or text are copied/cut; a matching entry will appear in the main list area of the panel in their native formats - that is, graphics or text.

To paste an item into the active document in the design editor window, click on the item in the Clipboard panel. The nature of the paste depends on the object being pasted and the target document type as described below:
- When pasting schematic-based or PCB-based objects into a document, the object will appear floating with the cursor. Position the object as required in the workspace and click to place.
- When pasting text into a text-based document, the text will be placed at the current cursor position in the document.
Use the Paste All button at the top of the panel to paste all objects in the panel into the active document. Again, the nature of the paste depends on the target document:
- The target document will only paste compatible objects to the document type. Each object in the panel will appear floating, in turn, on the cursor in the main design workspace. Place each object at the desired location and click to place.
- When pasting into PCB documents, if the object is re-sizeable, handles will appear that can be dragged to resize. Right-click to enable the resizing and progress to the next pasting object.
- When the target document is text-based, only text entries will be pasted. Each text entry in the panel will be pasted, in order, starting from the current position of the text cursor.
Right-click over an entry in the panel to open a context menu allowing you to either paste that entry or delete it.
To delete all current entries from the panel, click the Clear All button.
Notes
- You can only paste objects from the panel if they are supported in the target document that is open (the active document) in the design editor window. For example, if you try to paste a schematic-based object into a text-based document, there is no result, and vice versa.
- Text objects copied to the panel will appear as though they are unformatted. However, when pasted they will appear with the original formatting that existed before they were copied.
- It is advisable to place the text cursor in the required position before pasting text from the panel into a text-based document.
- When using Paste All to paste multiple text entries into a text-based document, the pasted text will, in effect, be concatenated - that is, each subsequent text entry is pasted immediately after the last.
- Clipboard panel content is not persistent across design sessions. All content will be cleared when the software is closed and restarted.
