Parent page: Creating a New Component
As a board designer, the components you use will have defined symbols (and other domain models) and some key parametric data, but at the end of the day, they are just 'symbols of design intent' – having meaning in the context of the project design, but holding no physical meaning outside of that design. Each of these design entities needs to be 'embodied in the real world' either by purchasing an off-the-shelf (OTS) pre-manufactured item or by having it made to spec (MTS).
In the Supply Chain Area, a procurement specialist often does not know what a particular component in the design represents. What is required, is an indication of what needs to be procured – which physically-manufactured components can be used to implement that design component. The best person to indicate which real-world components can be validly used to implement the design-level components would be the designer. As part of the Unified Component modeling paradigm, Altium caters for exactly that through the provision of a Part Catalog and the concept of making Part Choices.
Part Choices can be made while defining the component, prior to its saving to your connected Workspace, and can be modified at any time thereafter by editing that component. This document looks at the concepts of Part Catalogs and Part Choices, how supply chain information can be added to a component after its saving (without directly editing it) to your Workspace and how that information can then be used as part of a Bill of Materials.
The Part Catalog
There are two types of part catalog – Global and Local. The type of catalog employed depends on your design environment. The following sections summarize these two catalog types.
Global Part Catalog
This is Altium's cloud-based part catalog database. The Global Part Catalog stores items representative of actual Manufacturer Parts, along with one or more items representative of Supplier Parts – the incarnations of those Manufacturer Parts, as sold by the Suppliers/Vendors. Each Supplier Part is a reference to an item in a parts database – the aggregate parts database of the Altium Parts Provider (which itself interfaces to, and gathers the parts from, enabled Suppliers).
The aggregate parts provider functionality is provided through the installation of the Altium Parts Provider extension, which is installed by default.
This catalog is used when:
- A connected Workspace is not being used. That is, using older component management methodologies that utilize SchLib, DbLib, or SVNDbLib as their 'backbone' for component storage.
- A legacy Altium Personal Vault is being used (and you are not actively connected to a Workspace).
Local Part Catalog
This is a local part catalog database, dedicated to the management and tracking of manufacturer parts and their associated supplier parts. The catalog is installed as a service (Part Catalog Service), provided through your Workspace's platform, and works only with that Workspace.
The Local Part Catalog stores items representative of actual Manufacturer Parts, along with one or more items representative of Supplier Parts – the incarnations of those Manufacturer Parts, as sold by the Suppliers/Vendors. Each Supplier Part is a reference to an item in a parts database – either the aggregate parts database of the Altium Parts Provider (which itself interfaces to, and gathers the parts from, enabled Suppliers) or a linked local parts database (where supported).
Which Suppliers are actually used – a list of
Approved Suppliers as it were – is managed by the Workspace. This list is configured through the Workspace's browser interface. This facilitates centralized supply chain management, with designers across the entire organization using the same approved list of Suppliers, with which to source supply chain intelligence for parts used in their designs. For more information, see
Part Source Configuration (Altium 365 Workspace), or
Part Source Configuration (NEXUS Server Workspace).
The Workspace dictates centrally which Suppliers are to be used in an organization. While signed in to it, the list of Suppliers – in the
Altium Parts Options region, on the
Data Management – Parts Providers page of the
Preferences dialog – will be disabled. It will simply be a read-only reflection of this centrally-defined list.
Part Choices
Mapping itself – from a component in a Workspace to nominated Manufacturer Parts in that Workspace's local Part Catalog – is performed using Part Choices. Each component references its own list of part choices. The revisions of that component will utilize that same list of part choices.
The designer can feel truly empowered by being able to specify Manufacturer Parts that are truly interchangeable at manufacturing time in the context of any usage of that component in their design – the very essence of true part equivalency. And it is this intelligent mapping of a component that turns the humble Workspace component into a truly Unified Component. The unified nature of a component, through the chosen part choices made for it, ultimately creates a link from that component, all the way through chosen Manufacturer Part(s), and on to the Vendor (Supplier) Parts that each itself references. From the designer's perspective, the component is hooked directly into the supply chain.
Each defined part choice uses the manufacturer part, and not a specific vendor/supplier, meaning you get a single part choice that will bring with it all solutions based on the suppliers vending that part (and who are defined for use through your Workspace).
Real-time data is made available – fed back from the relevant parts database – to let the designer know the current costing and availability of the chosen parts, and from all enabled Vendors that sell those chosen parts (as defined in the local Part Catalog). And not just the designer gets to see this information. The procurement specialist can also keep abreast of supply-chain information, as it is made available in the Workspace for each component therein.
A part is no longer available or has suddenly become cost-ineffective? No matter, provision is made for real-time updates to be sent back to the Design Area as soon as a change occurs. With this vital 'heads-up', the designer can take that choice of part out of the associated list of part choices for that component and essentially 'off the radar'. And at any time additional new, truly equivalent parts can be added to the list, should something more appropriate, available, and cost-effective come along.
Accessing the Part Choices List
Since a component references its list of part choices, you are able to manage that list without having to formally edit that component, which would otherwise mean re-saving it into a new revision. And remember that when the part choices list is modified, all revisions of that component will 'see' that revised list. There are three key places to access the part choices list for a component from within the design itself:
-
The Components panel – browse to and select the required Workspace component. The current list of part choices made for that component can be seen in the Part Choices region of the Details pane (displayed by clicking the  control at the top-right of the panel).

From the Components panel, the part choices list for a component can be seen in the Part Choices region of the Details pane.
-
The Explorer panel – browse to and select the required component. The current list of part choices made for that component can be seen on the Part Choices aspect view tab (click on this tab to make it active).

From the Explorer panel, the part choices list for a component can be seen on its Part Choices aspect view tab.
-
The ActiveBOM document (*.BomDoc) – select the component entry in the top region of the document. The current list of part choices made for that component will be presented as Solutions, in the lower region of the document.

From the ActiveBOM, the part choices list for a component is presented as solutions for that component, in the lower region of the document.
Managing the Part Choices
To manually add a part choice to the list:
-
From the Components panel, right-click on the entry for the Workspace component and choose the Operations » Create/Edit PCL command from the context menu. This will give you access to the Edit Part Choices dialog. From there, click the  button at the bottom-right of the dialog. The Add Part Choices dialog will appear – search for the required manufacturer part, select a part, then click the OK button. Click OK again, back in the Edit Part Choices dialog, to effect the change – the new part choice will be added to the Part Choices region of the Details pane.

From the Components panel, the part choices list for a component can be managed with the Operations » Create/Edit PCL command.
-
From the Explorer panel, click the button at the bottom-right of the Part Choices aspect view tab. The Add Part Choices dialog will appear – search for the required manufacturer part, select a part, then click the OK button. The new part choice will be added to the Part Choices aspect view tab.

From the Explorer panel, the part choices list for a component can be managed from its Part Choices aspect view tab.
-
From the BomDoc, select the entry for the component in the upper region, then click the  button in the lower region and choose the Create/Edit PCL command from the associated menu. This will give you access to the Edit Part Choices dialog. From there, click the button at the bottom-right of the dialog. The Add Part Choices dialog will appear – search for the required manufacturer part, select a part, then click the OK button. Click OK again, back in the Edit Part Choices dialog, to effect the change – the new part choice will be presented as an additional solution, back in the lower region of the BomDoc.
Added part choices and rankings in the BomDoc are automatically saved back for the component in the Workspace.

From the ActiveBOM, the part choices list for a component can be managed with the Add Solution » Create/Edit PCL command.
Search results in the Add Part Choices dialog are by Manufacturer Part, with the associated SPN entries (Supplier Part Numbers) reflective of the enabled vendors supplying that part. When you select a part, it is the manufacturer part that is added to the part choices list. And by using the manufacturer part, and not a specific vendor/supplier, you get a single part choice that will bring with it all solutions based on the suppliers vending that part (and who are available for use through your Workspace).
Click the SPNs entry for a manufacturer part to see the available suppliers of that part, and assess whether you are making the right part choice, based on availability, pricing, etc.
To remove a part choice, select it in the list – in the
Edit Part Choices dialog (
Components panel and BomDoc) or
Part Choices aspect view tab (
Explorer panel) – then click the

button.
Anatomy of a Part Choice
A part choice contains various pieces of information, as summarized in the following image, and detailed thereafter.

The 'anatomy' of a Part Choice – the entry can be broken down into 9 key pieces of information.
- Part Image.
- Manufacturer Name and Manufacturer Part Number. This is a clickable link to the Octopart website, providing detailed information on that manufacturer part.
- Description.
- Stock. This entry displays the total sum of the stock available from the suppliers enabled as part of the Altium Parts Provider source for your Workspace.
- Median unit price. This entry will be displayed in red text if there are no prices, or the price = 0.
- Manufacturer Lifecycle Bar. Hover over the bar for an informative tool-tip. This can appear in one of four states:
- White/Gray = Default, unknown or no information
- Green = New or Volume Production states
- Orange = Not Recommended for New Design
- Red = Obsolete or EOL
The manufaturer lifecycle status is designed to be used as an indicator, for a number of reasons:
- Altium maintains a database of many millions of components, produced by thousands of component manufacturers. Since there is no single, consistent method used by those manufacturers to reflect a component's lifecycle state, the status is based on information aggregated from manufacturers, global distributors and global sales analysis.
- A part is only reported as EOL or Obsolete when there is at least one authorized distributor or manufacturer that has confirmed this status.
- Determining the Not Recommended for New Design status is more complex. Manufacturers sometimes just report if a part is active or not, and may not give advance warning that a part is to be discontinued or replaced. Therefore this lifecycle status does not always concur with the status provided by the manufacturer. The status algorithm uses various information, including real time and historical stock availability from all distributors, to try to determine the availability of the part. Parts which have consistently poor availability (when they have been generally available in the past), or cannot be sourced over a period of time after having previously having good availability, will eventually be flagged as Not Recommended for New Design (if they are not already EOL or Obsolete).
- The idea of the lifecycle status indicator is to provide simple-to-understand information that helps you to make more informed decisions about a part, by highlighting those parts which may be problematic. However, due to the sheer volume of data and number of components that are managed, there is always a chance that the Altium status lags behind the instantaneous manufacturer status, and is therefore not up-to-date. It is not possible for Altium to guarantee the accuracy of the lifecycle status, it is recommended that if there is any doubt that you double-check with the manufacturer for authorized lifecycle information.
- Datasheet. Click the
 button to open the manufacturer's datasheet for the part. All datasheets are hosted on the Ciiva website.
- SPNs (Supplier Part Numbers). Indicates the number of suppliers (for those enabled as part of your Workspace's Altium Parts Provider source) who can deliver this part. Click the link to display detailed supply chain information about the suppliers that carry that part, ordered by availability and price. Each Supplier's details about that part are presented on a tile with a colored banner. Details about the icons and information in each tile is given below.
- User Rank (not available from the Components panel). If multiple manufacturer parts are available – multiple part choices made for the component and therefore multiple solutions when using ActiveBOM (and a BomDoc) – the solutions are automatically ranked from highest to lowest, based on the part's availability, price and manufacturer lifecycle state. If you prefer to use a lower ranked solution, for example to use a specific manufacturer, you can override the automatic ranking by defining a User Rank, using the star feature. Click on the number of stars required, to increase or decrease the ranking level of that particular part choice. To remove ranking, click the control to the right of the stars.
Understanding the Supplier Tile
There is a large amount of information presented in each SPN tile. Hover the cursor over an icon or detail to display a tooltip with more information.
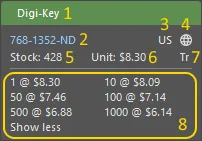
The SPN tile includes detailed information about
the part's availability from that specific supplier.
- Tile banner showing the supplier name where the banner color indicates:
- Green = Best choice
- Orange = Acceptable
- Red = Risky
- Supplier part number (links to that part on the supplier's website).
- Country code for the supplier location (ISO alpha 2).
- Part Source (typically the Altium Parts Provider) and Last update; the color indicates:
- Light Gray = Default, updated less than one week ago
- Orange = 1 week < last update < month ago
- Red = last update > 1 month ago
- Stock quantity; red if no stock available.
- Unit price, red if no price available. Unit price includes currency icon; currency is determined by the location of the supplier.
- Packaging of supplied parts (e.g. Tr = Tray).
- Available price breaks, with Minimum Order Quantities.
Including Supply Chain Information in a BOM
Related pages: BOM Management with ActiveBOM, BOM Configuration in the Report Manager
Once supply chain data has been defined for your components, you can then include that information in your Bill of Materials. The following combo image shows this for a BOM generated from the project's BomDoc, and also when generated from the source project (no BomDoc).
 and without (bottom) a BomDoc (ActiveBOM).")
Including supply chain data for components in a Bill of Materials, generated for the project with (top) and without (bottom) a BomDoc (ActiveBOM).
