
Installation
Parent page: Altium Vault with Oracle Backend
This document is intended for an IT administrator who is configuring the Altium Vault to use an Oracle Database backend. It contains details about the Altium Vault, it’s installation procedure, important information on system requirements, as well as an example.
Installation Process Overview
Configuring the Altium Vault to use an Oracle backend depends on how your company manages its Oracle Databases. Some companies run Oracle Databases on top of Windows Server Operating Systems, while others have entire Oracle datacenters. The process of installation typically involves three steps, as illustrated in the following image.
 High level overview of the Altium Vault and Oracle database installation procedure.
Assumptions made throughout this document
While Oracle configurations can vary from site to site, a few assumptions are made throughout this document:
- An IT admin performs installation. At very minimum, the user performing Vault installation should have administrative rights to the host machine.
- The Altium Vault is installed and running on a full MS Windows OS.
- The Oracle Client Connector is installed and running on the same machine hosting the Altium Vault Application.
- .NET 4.0 or higher is installed and running on the same machine hosting the Altium Vault Application.
- The Oracle Server should be running on a physically different host machine than the Altium Vault application.
- The Oracle Schema and Oracle application credentials used on source and destination Oracle servers must be the same, if this installation is being performed as part of a data migration process.
High-level Overview of the Altium Vault Architecture
Similar to other software designed to run on Microsoft Windows, the Altium Vault is a multi-threaded, multi-service server application. Since this document solely focuses on parts of the Altium Vault that may interact with an Oracle Database, the following image is simplified to represent the overall Altium Vault Backend Architecture.
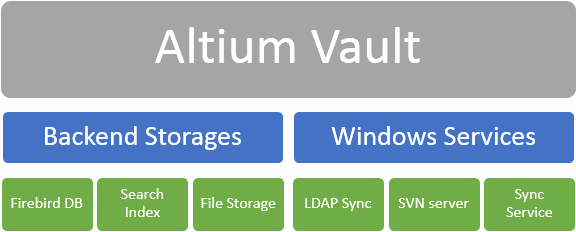 High level overview of the Altium Vault architecture. The Backend Storages of Altium Vault contains most of customer
binary data, while the Windows Services is a collection of supporting services.
This document focuses on the Backend Storages since the data within this block is what gets backed-up, potentially migrated to another machine, then restored either on the same or different machine. Within the Backend Storages, the following items can be found:
- Databases - contains metadata such as component footprint and schematic symbol association, parameters, file paths, links to component supply chain data sources and more. This information could reside inside a Firebird or Oracle database.
- File Storage - this File Storage area holds binary data inside the Vault’s SVN repository. This binary data includes information such as PCB and Schematic Project documents, footprints, symbols, Draftsman and other native or non-native Vault documents.
Example Setup of Vault with Oracle backend on the Windows Platform
In this example, the instructions also cater to smaller businesses who may not have a dedicated Oracle DBA, but still have the need to implement a Vault-Oracle configuration on their network. The following steps show how a basic installation of Altium Vault and Oracle 11G Express can be deployed.
It is assumed the installation is done using the internal Oracle SYSTEM account, and that no custom SCHEMA is created. However, it is recommended that more experienced users, or DBAs, create an appropriate user account, with associated SCHEMA that is granted proper permissions.
Required Items
- Oracle Database Server Host machine, running Windows 7 Professional or newer.
- Altium Vault Server Host machine, running Windows 7 Professional or newer.
- Oracle 11G flavor (the publicly available Express edition is used for this example).
- Oracle Client Connector, specifically ODTwithODAC112030.
- .NET 4.0.
- Altium Vault.
Installation Procedure
- On the Oracle DB server Host machine:
- Install Oracle 11G Express (x86 or x64, doesn’t matter). Write down the password you choose here.
- Optional: Setup a workspace for use with the Altium Vault. Write down the User name and login info you choose here.
- On the Altium Vault Host machine:
- First install ODTwithODAC112030.
- Copy the TNSname.ora file from Oracle DB Server Host Machine in C:\oraclexe\app\oracle\product\11.2.0\server\network\ADMIN to C:\app\yourusername\product\11.2.0\client_1\Network\Admin on the Altium Vault Host machine.
- Install .NET 4.0 or newer framework.
- Install Altium Vault.
- During Vault installation, enter the following:
- TNS Name: default is XE. If you performed step 1-a, enter the appropriate TNS Name that you defined here.
- User Name: default is SYSTEM. If you performed step 1-b, enter the appropriate TNS Name that you defined here.
- Password: the same that was defined in step 1-a, or 1-b.
- Disable the Install sample data option.
- Proceed with Vault installation and configuration as described in the document Installing the Altium Vault.
Conclusion
Although the aforementioned example includes additional details pertaining to the handling of an Oracle Database, there are only three key steps to configuring your Altium Vault to work with an Oracle backend:
- Step 1 is to create an Oracle account and SCHEMA.
- Step 2 is to configure the TNS.ORA parameters.
- Step 3 is to install the Altium Vault.