
The Storage Manager panel
Summary
The Storage Manager panel provides controls to navigate the active project in terms of its file storage in Windows. The panel also provides access to the local history feature for documents as well as version control.
The Projects panel represents the logic structure of the project while the Storage Manager panel provides a file management type interface.
Panel Access
The panel can be accessed in the following ways:
-
Click the Panels button at the bottom right of the design workspace then click Storage Manager.
-
Click View » Panels » Storage Manager from the main menus.
-
Right-click on a Schematic or PCB file within the Projects panel, then choose the History & Version Control » Storage Manager entry from the context menu.
Content and Use
The Storage Manager panel presents a folder/file view of the active project's documents. You can immediately see which documents are part of the project and where they are stored, as well as other files that are stored but not explicitly added to the project. The panel lists the documents and paths in the active project. Right-click on a document to perform file management tasks, such as renaming or deleting, as detailed in the following sections.
When the active document is an SVN Database Library (*.SVNDBLib), the panel will present the local working copy of the symbol and footprint libraries checked out from a linked Subversion repository. The panel acts as central interface for committing changes to and updating from the repository.
The Storage Manager panel can be used for:
-
General file management functions for files in the project or within the active project's folder structure.
-
Management of symbol and footprint libraries stored in an SVN repository and associated with an SVN Database Library. The panel provides access to the local working directory from which a copy of the libraries stored in the repository are checked out. Committal of changes to the repository and reception of updates from the repository can only be performed through this panel.
-
Management of backups using the Local History feature (see Data Management - Local History).
-
As an SVN compliant interface for your projects.
-
Performing a physical and electrical comparison of any two versions in the Local History.
Regions of the Panel
The Storage Manager panel is divided into three regions:
-
Project Folders region
-
Project Files region
-
Time line region
-
Right-click in the Time line region then choose Switch to Classic View to display a split view for VCS Revisions and Local History.

To return to the Time line view, right-click then choose Switch to Combined View.
Folders Region
This region provides a view of the folder structure for the active project. When the active document is part of a project or an SVN Database Library, the name of the project or library is the heading for this region. The project file is listed at the top of the structure corresponding to the root directory with all other folders and sub-folders contained within that directory displayed below in their storage hierarchy.
If the active document in the design editor window is part of the project, this project folder storage structure will remain displayed. If the active document is a free document (i.e., not added to the project), only the entry for that document will appear in the region representing the root directory in which that document resides. No other sub-folders will be displayed even if they exist on the hard disk.
If the active document is an SVN Database Library file, the folder structure for the symbols and footprints checked out to the local working directory will be displayed. This directory is the local workspace from which modifications are committed to the libraries in the linked SVN repository.
When you click on an entry, the documents contained within the root directory or sub-folder are listed in the Files region.
Right-click within the Folders region for access to the following commands:
-
Refresh - click to refresh the contents of the region after using the Delete command or after having made changes to the folders using Windows Explorer.
-
Copy - click to copy the selected item. This allows you to easily copy folders between projects. If the project entry itself is selected when this command is selected, the entire folder structure will be copied.
-
Paste - click to paste a previously copied folder or project directory into the folder structure for the active project. The content will be pasted into the currently focused folder in the structure. The content on the clipboard can only be pasted once.
-
Delete - click to delete the selected folder(s) from the folder structure. A dialog will appear asking for confirmation before deletion. Proceeding will permanently delete the folder(s) from the hard disk.
-
The folder (and constituent document(s)) in the version control repository are not touched - only the local copies for that particular checked-out instance of the project are deleted.
-
The entry for the project itself cannot be deleted.
-
Rename - click to rename the selected folder or the focused folder in a group of selected folders. The entry for the folder will become editable. Type the new name for the folder as required.
-
You can also rename the selected folder by pressing F2.
-
The folder in the version control repository is not touched - only the local folder for that particular checked-out instance of the project is renamed.
-
The root folder cannot be renamed.
-
New - click to create a new sub-folder beneath the currently selected folder in the structure. After launching the command, the folder will be added to the hard disk and the entry will become editable, allowing you to directly type the name for the folder as required. If the parent folder already contains sub-folders, the new folder will be added below those existing folders in the structure.
Files Region
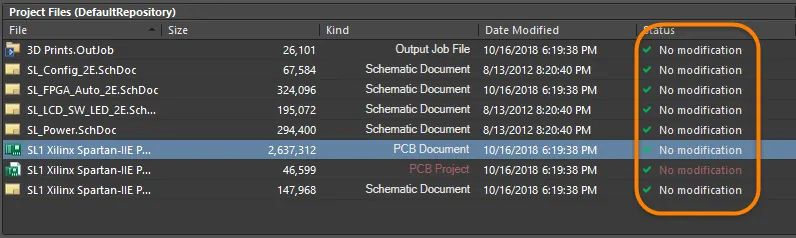
This region of the panel lists all documents currently stored in the root directory or sub-folder for the active project. For a free document, all documents stored in the same location as the free document will be displayed.
For an SVN Database Library document, this region lists all symbol or footprint libraries in the folder currently selected in the Folders region. These libraries are not those in the actual repository; instead they are those that have been checked out to your local working directory.
When you click on an entry in the Folders region, the document content will be reflected as shown.

For each document, the following information is displayed:
-
File - the name of the file including extension.
-
Size - the size of the file on disk in bytes.
-
Kind - the type of file.
-
Date Modified - the date and time at which the file was last saved.
-
Status - the current status of the document with respect to version control.
Additional document information is conveyed using the following display entry techniques (most of these display types are only related to a document that is part of a project):
-
Bold text - used to distinguish the active document in the design editor window.
-
Red text - used to distinguish a document that has been modified and has not been saved. (Note: when the document is both active and modified, it will appear as a highlighted red entry).
-
Gray text - used to distinguish a document that exists in a folder but is not added as part of the project. The entry in the Kind column will be enclosed in brackets (e.g., {TEXT}). To hide these documents in the list so that only those documents added to the project are shown, check the Only Show Files in Current Project option at the top right of the region.
-
Italics - used to distinguish a document that is added as part of the project but does not reside in the storage hierarchy for that project (e.g., a constraint file that is part of the installation).
When you click on a document entry, the path to the local folder in which that document resides is displayed at the top of the panel (the full path also appears as a tool tip). The link status to a repository folder in an SVN Repository will also be shown. To hide documents that exist in a folder but are not actually added as part of the current project, check Only Show Files in Current Project.
Right-click within the Files region for access to the following commands:
-
Open - click to open the selected document as the active document in the design editor window. If a group of documents are selected, all documents will be opened as tabbed documents in the design editor window with the focused entry becoming the active document. (Double-clicking on a document entry will also open it as the active document in the design editor window.)
-
Refresh - click to refresh the contents of the region, for example, after using the Delete command or after having made changes to a document using Windows Explorer. The command also compares the files in the working folder to their counterparts in the design repository, refreshing the status of each document accordingly.
-
Copy - click to copy the selected document(s). This allows you to easily copy documents between folders of the same project or to a folder in a different project.
-
Paste - click to paste a previously copied document(s) into the focused folder for the active project. The content on the clipboard can only be pasted once.
-
Add Project Folder to Version Control - for projects not already committed to version control, this command will open the Add to Version Control dialog in which you can add the complete project folder to version control.
-
Delete - click to delete the selected document(s). A dialog will appear asking for confirmation before deletion. Proceeding will permanently delete the document(s) from the hard disk.
-
The document(s) in the version control repository are not touched - only the local copies for that particular checked-out instance of the project are deleted. In the Storage Manager panel, the deleted document(s) will still be listed, but no information is presented since they do not exist locally. A deleted document will appear with the status
Missing.
-
The project document cannot be deleted.
-
Rename - click to rename the selected document (or the focused document in a group of selected documents). The entry for the document's filename will become editable. Type the new name as required.
-
You can also rename the selected document by pressing F2.
-
The document in the version control repository is not touched - only the local document for that particular checked-out instance of the project will be renamed.
-
Add to Version Control - this command is available only if the active project is under version control and opens the Add to Version Control dialog where the selected folder in the Folders list will be added to version control under the project parent folder.
Right-click Version Control Commands
If you have version control software installed on your computer, additional version control-related commands will be available on the right-click menu. The exact commands available depend on whether the active project and its documents have been added to the version control repository and also which type of version control system you are using. The following is a listing of all possible commands. Commands specific to a particular type of version control system are indicated as such:
-
Refresh - use this command to interrogate the link between the selected project in the Storage Manager panel and the corresponding project that resides in the version control database and refresh the status of the local project and its documents. After launching the command, the status of the focused project and its documents is checked against the entries in the version control database and refreshed. This command can be used at any time but is especially useful when you have performed an action, such as check in, check out, or remove in the version control software directly. You can also use the F5 shortcut key on the Storage Manager panel to refresh the status of documents.
-
Commit Whole Project - use this command to commit a project to version control that has already been added as indicated by the Scheduled for addition status of the files (see above) or to check in modifications to all files in the parent project, en-masse.
After launching the command, the Commit to Version Control dialog will appear. All modified files will be enabled for commit. If there are any other files not yet under version control, these will also be listed but not enabled by default. Choose what you want to commit and/or add to your version control repository, enter a comment if required, and click Commit / Commit and Push - the files will be added to the version control database and the entry No modification will appear in the associated Status field for the document(s) in the Files region of the panel.
Note that only files that are part of the project and that reside in the same folder as the project document will be checked in.
Note that for Git-based Workspace projects, the Commit Whole Project command is not available. You can use the Save to Server command from the right-click menu of the project entry in the Projects panel to commit the Workspace project to the local repository and push it to the remote repository in one action.
If required, the Commit Whole Project command can be made available by enabling the VCS.AllowGitCommit option in the Advanced Settings dialog.
-
Update Whole Project - use this command to update files that are out of date in the parent project, en-masse, by updating the working copy of each file with changes that exist in the latest revision for the file, from the VCS repository.
After launching the command, the Update from Version Control dialog will appear. All out of date files will be enabled for update. Choose what you want to update and click Update - the file versions will be synchronized, with the local version of each selected document being updated to the latest revision of that document from the version control repository. The status for each file will return to No Modification.
-
Add Project Folder to Version Control - use this command to add the selected project to your version control repository/database. This command is available only when the project has not already (or previously) been added to version control. This process will create a version-controlled copy of the project within the selected target design repository. The VCS will configure the project files and settings so that whenever you work on this project in the future, Altium Designer will recognize that it is under source control and correctly reflect the status of the documents – such as when a document has been modified or added (but not yet committed) to the VCS.
After launching the command, the Add to Version Control dialog will open (dependent upon the version control software you are using), in which you will be required to select a Design Repository target or create a new folder entry for the current project. After the storage area for the project has been defined (and therefore, the project is linked to the database), the dialog is populated with the project and its constituent documents with the project file already selected for addition to the version control database. Select other files that you wish to put into version control at this time, as required.
 Select a Design Repository from the Add to Version Control dialog to populate the dialog with proposed version control files.
After clicking OK, the files will be added to the version control database and the entry Scheduled for addition will appear in the associated Status field for the document(s) in the Files region.
-
Commit - use this command to check in modifications made to the working copy of the selected file (distinguished by the Status Modified) into your VCS repository. After launching the command, the Edit Comment dialog will open. Enter a new comment or select a previous comment and click OK to commit the document(s). The latest copy of the file in your working folder will be checked in and the associated revision number incremented - see Commit Whole Project above.
Note that you will not be allowed to commit a file if someone else has committed an update since you checked out your copy of the file. In this case, you will be required to perform an Update first before committing the file.
Note that for Git-based Workspace projects, the Commit command is not available. You can use the Save to Server command from the right-click menu of the project entry in the Projects panel to commit the Workspace project to the local repository and push it to the remote repository in one action.
If required, the Commit command can be made available by enabling the VCS.AllowGitCommit option in the Advanced Settings dialog.
-
Update - use this command to update the working copy of the selected file(s) with changes that exist in the latest revision for that file in the VCS repository.
After launching the command, the file versions will be synchronized, with the local version of each selected document being updated to the latest revision of that document from the version control repository. The status for each file will return to No Modification.
-
Lock - use this command to lock the active document in SVN Version Control. Only the designer who locked the document can commit the document with any modification to the repository. After running this command, the status column will appear 'Locked by me' in the Storage Manager panel. Learn more about Locking Files of an SVN Project.
-
Unlock - use this command to unlock a selected, locked document in SVN Version Control. After unlocking, any user can commit the document with any modification to the repository. Learn more about Locking Files of an SVN Project.
-
Resolve Conflict - use this command to resolve a conflict (where the same file has been locally edited and saved by two Altium Designer users, and one has committed those changes) by discarding changes committed to the repository since you last updated. Learn more about Revision Conflict.
-
Revert Local Modifications - use this command to revert Modified files to discard their attributed local modifications. Before the action is finalized, you will be asked to confirm the changes. All local modifications to the document will be lost, and the file will be reverted back to its base revision (the last revision of the file checked out/updated to the working folder). The Status of a file that has been reverted depends on its previous status. For example, a file showing as Modified will revert back to No modification. A file that was in Conflict will revert back to Out of date (since a later version exists in the repository).
-
Add To Version Control - use this command to add the selected file(s) to your version control repository. After launching the command, the file(s) status will change to Scheduled for addition. As with the case of adding a whole project, the final Commit step will open the Edit Comment dialog.

Use this dialog to attach a comment (or log message) to the file(s), for example stating why the file(s) are being added to version control. Either type a new comment or use previous comment text as required.
Note that in order to be validly checked in, the selected file(s) must be part of the parent project. If a file being added is currently open, it should be saved prior to adding it to version control since the last saved version of the file is taken into VCS and not the current copy in memory.
-
Remove From Version Control - use this command to remove the selected project from your version control repository. This command is available only when the project is currently added to version control. After launching the command, the Remove from Version Control dialog will appear, with the entry for the project already selected.
The associated project documents are also listed and you can select any or all of these for removal from the version control database as well. After clicking OK, the project and any other nominated documents will be progressed to the status of Scheduled for deletion.

A subsequent Commit command (Commit Whole project or just Commit for individual files) will remove the project files from the version control database and these documents will appear with the status entry Not in version control.
Note that by removing the project itself from the version control database, you are requesting not to associate the project with version control and the link between Altium and your version control software will be removed. Removing the project alone does not remove all associated project documents from your version control database. They will still be there, but as the link from Altium to version control is no longer there, Altium will behave as if they are not in the version control database. They will appear checked in again only when the project is added back into version control and a refresh is carried out to re-synchronize the system.
-
VCS Properties - use this command to display property information with respect to the selected document's entry in the SVN repository.
After launching the command, the Properties dialog will appear. The dialog presents property information relating to the selected document, including:
-
Path to the local document (in your working folder).
-
URL for the document's location in the VCS repository.
-
Repository Root and UUID.
-
Current revision of the document in your local working folder.
-
Last changed author.
-
Last changed revision.
-
Last change time.
-
Whether or not the document is conflicted.
The dialog interface and information displayed will depend on the version control software you are using, but will normally include information such as file type, size, version, and whether the file is currently checked out or not.
Time line Region
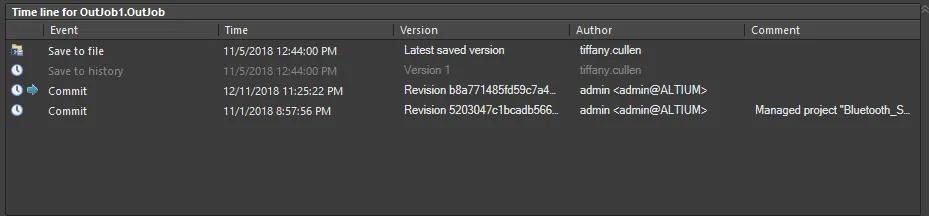
The Time line region lists the historical and Version Control events over time for the currently selected folder or file.
This region can be switched between the default combined view and the 'classic' VCS/History view via the right-click menu.
The commands and functions are common to both view types and are outlined below for the classic dual-view mode.
VCS Revisions
If the active project in the Folders region is under version control and you are using the SVN version control systems, selecting a document belonging to that project (in the Project Files region of the panel) will populate the VCS Revisions region with a historical Revisions list for that document.
A history for the selected library document will also be shown when that library is a symbol or footprint library referenced by a database, which in turn, is linked to an SVN Database Library file.

The revision history list can contain the following entry types:
-
Document - the version of the document currently open in the workspace. Modifications may have been made to this document and it has yet to be saved.
-
Last Saved Contents - the last saved version of the document (in your local, working folder).
-
RevisionNumber - revision of the document in the VCS repository. When you modify the document, save it and then commit it to the VCS repository, a copy of it will be stored and the revision number incremented. The latest revision in VCS will be listed first.
For each entry in the list, the following information is provided:
-
Date Modified - for the Document and Last Saved Contents entries, this is the time the working copy of the document was last saved. For the VCS revision entries, this is the time at which the file was committed.
-
Author - the name of the person currently logged into the VCS software.
-
Comment - any applied comment to a VCS revision, applied when committing the file to the VCS repository.
Right-clicking within the VCS Revisions region will open a context menu giving access to the following commands:
-
Compare - this command becomes available when two versions in the region are selected. Use it to perform a comparison between the documents (see Comparing Documents).
-
Open - use this command to open the selected version of the document in the design editor window. The name of the opened document will be prefixed with the revision number, for example, [Revision 1.2] Buzzer.SchDoc. Note that this command will not be available if multiple version entries are selected within the region. Double-clicking on a revision in the list will also open that revision within Altium Designer.
-
Switch to Combined View - switch the region to the alternate (single) Time line view, as mentioned above.
Local History
The Local History management system allows you to maintain history and track document changes locally without the need for a Version Control System (VCS).
The approach of the local history management system is to make a copy of a file each time you perform a save, keeping the copies in a project History folder (the copy is the file prior to the save event). The project History folder is created within the folder that contains the project file. If a project includes documents stored in sub-folders, this sub-folder structure will be repeated within the History folder.
Local History is configured in the Data Management – Local History page of the Preferences dialog. The number of days the file history is retained can be configured, where the history of a file save event will be held for the specified period (up to 10 days). You can also enable the Use global repository option and specify a Global repository location that will hold the history of all projects, with each set of project files saved in a project sub-folder.
Local History files are saved in the compressed ZIP format with an added filename number suffix (for example: SheetZ.~(3).SchDoc.Zip) that indicates its sequential version – the highest number represents the newest version.
Document history management features are accessed through the Storage Manager panel. The features include the ability to view the differences between documents – both physical and logical – and revert to a previously saved version of a document. Local document history management also works in harmony with an active VCS. Individual designers can manage their own changes using the local history system with the VCS providing a complete team-oriented document management system.
The Local History region of the panel presents a local history for the currently focused document in the Files region of the panel.

The history list can contain the following entries:
-
Document - the version of the document currently open in the workspace. Modifications may have been made to this document and it has not been saved.
-
Last Saved Contents - the last saved version of the document.
-
Version n - a local (manual) backup version of the document. When you save the document, the version that was listed as the Last Saved Contents will be backed-up as entry Version 1. Saving again will back up the Last Saved Contents as Version 2, etc., creating a history for the document.
-
Version n [label] - local (manual) back-up version of the document that has a label applied to it.
-
Version n [AutoSave Date Time] - an automatically generated back-up of the document, distinguished by an AutoSave-Date/Timestamp label.
The history is listed with the most recent version at the top, for example:
-
Document
-
Last Saved Contents
-
Version 3
-
Version 2 [AutoSave 2015-01-28 14~14~17-935]
-
Version 1 [Original Draft]
Right-click within the Local History region for access to the following commands:
-
Compare - this command becomes available when two versions in the region are selected. Use it to perform a comparison between the documents (see Comparing Documents).
-
Open - use this command to open the selected version of the document in the design editor window. This command will not be available if multiple version entries are selected within the region. Double-clicking on a version/revision in a list will also open that version/revision within Altium Designer.
-
Apply Label - use this command to add a meaningful label to the selected version (e.g., to easily recognize its purpose). The
![]() Apply Label dialog will open where you type the name for the label as required, up to a maximum or 64 characters. The entry will appear as Version n [Label]. When a label is applied, the saved back-up will become read-only.
Apply Label dialog will open where you type the name for the label as required, up to a maximum or 64 characters. The entry will appear as Version n [Label]. When a label is applied, the saved back-up will become read-only.
-
Revert to - use this command to revert back to the selected version of the file. The last saved version will be backed-up and a label applied to indicate to which version it was subsequently reverted. The chosen historical version will then become the current version and display in the design editor window.
-
Delete - use this command to delete the selected version(s) of the file. The file(s) will be permanently deleted from the hard disk. Note: you cannot delete the Document or Last Saved Contents entries.
-
Purge History - delete local history files for the selected document(s). The Confirm purge document history dialog will open from where you can determine exactly which local history files are to be purged. You can elect to purge all versions, versions older than a specified number of days, or versions older than a specified date. In addition, you can opt to keep a specified number of versions, which is combined with the other options but takes precedence over them, ensuring that gaps in history do not cause undesired loss of history. Labeled versions are protected by default but you can choose to override this.
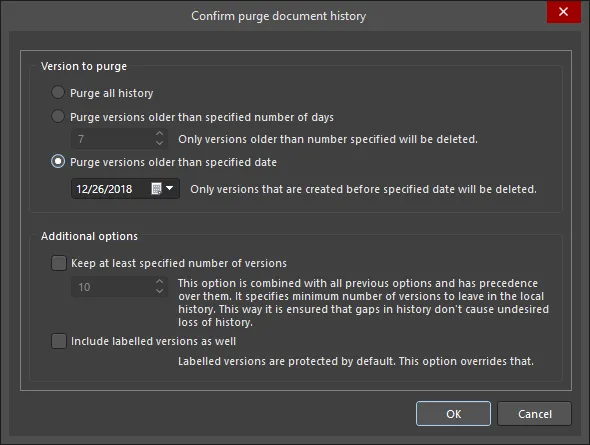
After clicking OK, all Version n entries (where n is the revision number) in the Local History region for the selected document(s) will be deleted in accordance with the purge options defined. If you have enabled the option to include labeled versions of the file(s) in the purge, then the relevant Version n [label] entries will be deleted as well.
-
Show Autobackups - use this command to enable the display of automatically saved versions of files within the local history list created using the Auto Save feature.
-
An automatically generated back-up of the document is distinguished by an AutoSave-Date/Timestamp label in the format Version n [AutoSave Date Time].
-
The Auto Save feature is enabled and configured on the Data Management - Backup page of the Preferences dialog.
-
In order to have auto saved documents added to the local history, and therefore appear in the applicable region of the Storage Manager panel when using this Show Autobackups command, you need to enable the Add autosaved documents to history option in the Local History region of the Data Management - Local History page of the Preferences dialog.
-
Switch to Combined View - change the panel region back to the Time line view that displays VCS/History events in a single region.
Note that an active project's document history is also available from the Local History dialog. This is accessed by selecting Project » History & Version Control » Local History (Legacy) from the main menus or by right-clicking on a document entry in the Projects panel then choosing History & Version Control » Local History (Legacy) from the context menu.

The Local History dialog
Options and Controls of the Local History Dialog
-
Local History - lists all versions of documents since the original document was loaded in the software.
-
Label - displays a brief description of the version.
-
Time - displays the time the version was saved.
-
Compare - click to open selected versions in a split screen view. Two versions must be selected to access this command. The Differences panel is opened (if differences are detected) and displays any differences between the versions.
Comparing Documents
A valuable asset to working with Version Control is the ability to compare historical revisions of design files, which is provided by Altium Designer's built-in Difference Comparator and accessed from the Storage Manager panel. When used in conjunction with the Differences panel, a logical or graphical comparison can be made between VCS revisions while interactively exploring the affected objects.
With the required document selected in the Files region of the Storage Manager panel, select two entries (in either the VCS Revisions or Local History regions when in Classic View or the Time line region when in the Combined View) then right-click and select Compare from the context menu.

A comparison is made between the two documents, the result of which depends on the document type:
-
For schematic or PCB (design or library) documents, a graphical comparison is made and the differences detected listed in the Differences panel. With the two versions of the document open side by side in the design editor window, you can view the differences graphically. Clicking on a top-level folder for a detected difference will simultaneously highlight that difference on both documents simultaneously.
-
For text-based ASCII documents, the CompareForm dialog will open showing a graphical 'diff' of the two versions of the document. The chosen documents are displayed side by side. Through color-coding, the dialog highlights the various differences between the two document versions - lines added (pink), lines modified (green) and lines deleted (blue). A summary of changes and color-code legend is presented at the bottom left of the dialog.
The dialog is for comparison only - no modifications to a loaded document can be made.
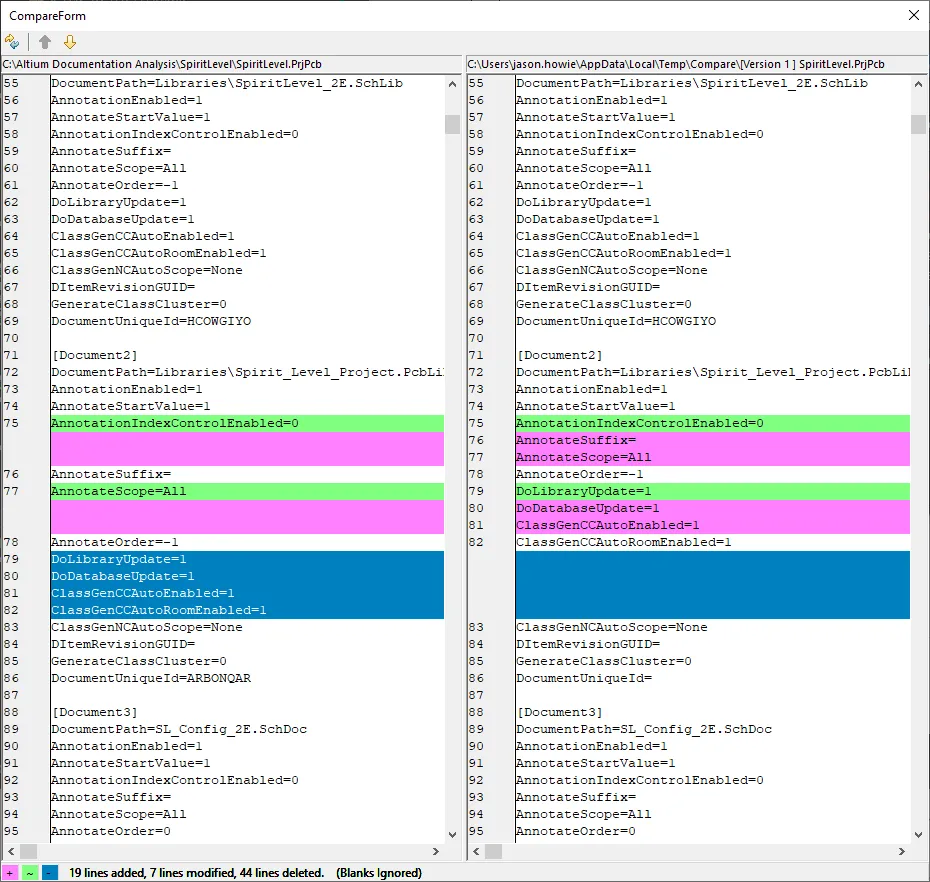
Use the mouse wheel to scroll the two documents synchronously. Use the up/down arrow controls at the top-left of the dialog to jump up/down to the next found difference in the document that the cursor is currently positioned. Use the top-lect button to quickly reset both documents back to the first line (jump to top of document).
Preferences
-
Version control functionality is enabled/disabled and the type of system is chosen from the Data Management - Version Control page of the Preferences dialog.
-
In order to view symbol and footprint libraries for the active SVN Database Library file, a copy of those libraries must be checked out to a nominated local working folder. This directory is specified on the Data Management - SVN Libraries page of the Preferences dialog. You must also ensure that the version control system is set to SVN - Subversion on the Data Management - Version Control page of the Preferences dialog.
-
The Last Saved Contents version of the file is the actual master copy of the file saved in the project folder. The manual back-up versions (Version 1, Version 2, etc.,) are stored in a sub-folder for the project. You may store all local back-up versions of files in a single storage location of your choosing. Enable the Use global repository option on the Data Management - Local History page of the Preferences dialog and nominate the required storage folder.
-
Any number of local (manually created) back-ups can be made depending on personal preference and storage space. The back-ups will be retained on the hard disk until the nominated time (in days) has elapsed - again specified on the Data Management - Local History page of the Preferences dialog. You can specify between 1 and 10 days to keep the generated back-up documents in local history, after which time they will be deleted (according to time-stamp) as new back-ups are made.
-
Open documents can be automatically backed-up using the Auto Save facility, which is configured on the Data Management - Backup page of the Preferences dialog.
Notes
-
Standard multi-select features are supported: Ctrl+Click and Shift+Click. In addition, multiple selection of documents in the Files, VCS Revisions and Local History regions of the panel can be performed using click and drag.
-
The local history for the active document in the design editor window also can be accessed using the Project » History & Version Control » Local History (Legacy) command from the main menus. The Local History dialog will open, showing the current version of the open document, the last saved version of the document, and any previously saved and stored back-ups.

The history list can contain the following entries:
-
Open Document - the version of the document currently open in the workspace (if applicable). Modifications may have been made to this document and it has yet to be saved.
-
Last Saved Contents - the last saved version of the document.
-
Version n - a local (manual) back-up version of the document. When you save the document, the version that was listed as the Last Saved Contents will be backed-up as entry Version 1. Saving again will back up the Last Saved Contents as Version 2, and so on, creating a history for the document.
-
Version n [label] - local (manual) back-up version of the document that has a label applied to it.
The history is listed with the most recent version at the top, for example:
-
Open Document
-
Last Saved Contents
-
Version 3
-
Version 2
-
Version 1 [Original Draft]
Double-click on an entry to open that version of the document as the active document in the main design window.
Select two versions of the document in the list then click the Compare button to perform a comparison between the documents.
The Local History list in the dialog is similar to that presented in the Local History region of the Storage Manager panel when configured in its Classic View.
-
For schematic and PCB design and library documents, two versions of the same document can also be graphically compared using the Project » Show Physical Differences command. Ensure that the previous version (typically a backup) is saved with a different name before opening. The backup version of the document does not need to be added to the project; it can be opened as a free document. Run the command to access the Choose Documents To Compare dialog which, when configured in Advanced mode, can be used to select the two versions of the document for comparison.

Click OK to proceed with the comparison; the detected differences will be displayed in the Differences panel.
-
The following keyboard shortcuts can be used to navigate within the panel:
-
Up Arrow - select the previous entry in a region.
-
Down Arrow - select the next entry in a region.
-
Right Arrow - expand a top-level entry of sub-folder.
-
Left Arrow - collapse a top-level entry or sub-folder.
