Parent page: Managed Domain Models
From a designer's perspective, a managed component (Component Item) gathers together all information needed to represent that component across all design domains, within a single entity. It could therefore be thought of as a container in this respect - a 'bucket' into which all domain models and parametric information is stored. In terms of its representation in the various domains, a managed component doesn't contain the domain models themselves, but rather links to these models. These links are specified when defining the component.
Altium NEXUS, in conjunction with your managed content server, caters for the ability to create and manage Symbol Items in that server. Such Items are created directly within the server. Once a Symbol Item has been created (and data released into a revision of it), and its lifecycle state set to a level that the organization views as ready for use at the design level, it can be reused in the creation of one or more managed components.
Folder Type
When creating the folder in which to store Symbol Items, you can specify the folder's type. This has no bearing on the content of the folder - releasing a schematic symbol will always result in a corresponding Symbol Item. It simply provides a visual 'clue' as to what is stored in a folder and can be beneficial when browsing a server for particular content. To nominate a folder's use as a container for Symbol Items, set its Folder Type as Symbols, when defi ning the folder properties in the Edit Folder dialog.

Specifying the folder type - its intended use - gives a visual indication of the content of that folder when browsing the server.
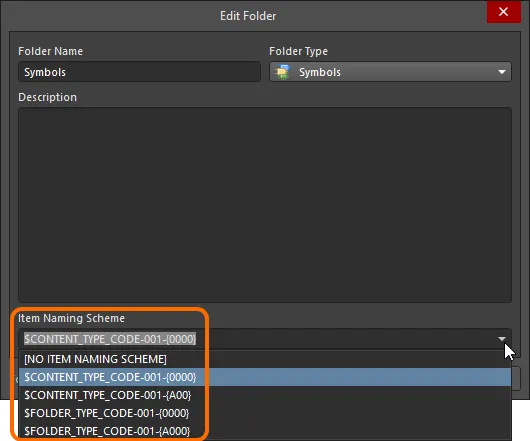
Item Naming Scheme
Another important aspect of the parent folder is the Item Naming Scheme employed for it. This defines the format of the unique ID for each Item created in that particular folder. Several default example schemes are available, utilizing the short-form code for either the folder type (SSL - Schematic Symbol Libraries) or the content type (SYM - Symbol):
- $CONTENT_TYPE_CODE-001-{0000} - for example, SYM-001-0001.
- $CONTENT_TYPE_CODE-001-{A00} - for example, SYM-001-A01.
- $FOLDER_TYPE_CODE-001-{0000} - for example, SSL-001-0001.
- $FOLDER_TYPE_CODE-001-{A000} - for example, SSL-001-A001.
Using a default naming scheme, the software will automatically assign the next available unique ID, based on that scheme, having scanned the entire server and identifiers of existing Items. This can be a great time-saver when manually creating Symbol Items.
A custom scheme can also be defined for a folder by typing it within the field, ensuring that the variable portion is enclosed in curly braces (e.g. SYMBOL-001-{0000}).
The Item Naming Scheme of the parent folder is applied to the Unique ID for each Item
created within that folder.
The Item Naming Scheme employed for the parent folder can be changed at any time. The modified scheme will then be applied to any subsequent newly-created Items within that folder.
Item Type
When creating a target Symbol Item in which to store your schematic symbol, ensure that its Content Type is set to Symbol, in the Create New Item dialog. If you are creating the Item in a Symbols type folder, this Item type will be available from the right-click context menu when creating the Item.

Creating a Symbol Item within a Symbols folder - the correct Content Type is available on the context menu.
Item Lifecycle Definition and Revision Naming
When defining a Symbol Item, be sure to specify the type of lifecycle management to be used for the Item, and the naming scheme employed for its revisions, respectively.
Control over which Item types can use a particular lifecycle definition or revision naming scheme, can be defined and enabled at a global level from within the Content Types dialog, when defining each schema. The default schemes assigned for use by a Symbol Item are: Generic Lifecycle and 1-Level Revision Scheme, respectively.
Once a schematic symbol has been released into the initial revision of a Symbol Item, these schemes cannot be changed for that particular Item.
Specify the required schemes in the Create New Item dialog, using the Lifecycle Definition and Revision Naming Scheme fields respectively.
If the option to control use of lifecycle definitions and revision naming schemes per content type is enabled for any definitions/schemes, and the Symbol Item type is not set to use a particular definition/scheme, then that definition/scheme will not be available in the applicable drop-down list.

Selecting the Lifecycle Definition and Revision Naming schemes for a manually created Item.
Observing standard revision naming schemes and lifecycle definitions, across the various types of design item in a managed content server ensures smooth, consistent management of those items.
It is a good idea to add a Name and Description as part of the Item's definition. This information is used when searching the server and enables quick identification of what a Symbol Item offers.
Releasing a Schematic Symbol
Related page: Creating and Editing Items Directly through a Server
So far, we've discussed the support for a Symbol Item in the server, in terms of related folder and item types. Releasing an actual defined schematic symbol into a revision of such an item can be performed in a streamlined way.
A schematic symbol can be edited and released into the initial revision of a newly-created Symbol Item, courtesy of the server's support for direct editing. Direct editing frees you from the shackles of separate version-controlled source data. You can simply edit a supported Item type using a temporary editor loaded with the latest source direct from the server itself. And once editing is complete, the entity is released (or re-released) into a subsequent planned revision of its parent Item, and the temporary editor closed. There are no files on your hard drive, no questioning whether you are working with the correct or latest source, and no having to maintain separate version control software. The managed content server handles it all, with great integrity and in a manner that greatly expedites changes to your data.
When you create a Symbol Item, you have the option to edit and release a schematic symbol into the initial revision of that item, after creation. To do so, enable the option Open for editing after creation, at the bottom of the Create New Item dialog (which is enabled by default). The Item will be created and the temporary Schematic Library Editor will open, presenting a .SchLib document as the active document in the main design window. This document will be named according to the Item-Revision, in the format: <Item><Revision>.SchLib (e.g. SYM-001-0001-1.SchLib).

Example of editing the initial revision of a Symbol Item, directly from the managed content server - the temporary Schematic Library Editor provides the document with which to define your schematic symbol.
Use the document to define the schematic symbol as required. For more information on doing this, see Creating the Schematic Symbol.
One important thing to observe is that only the symbol graphics need be defined - the representation of the higher-level managed component within the schematic editing domain. It is not a 'schematic component' as defined for use in file-based component management methodologies, where other models and parameters are defined as part of that schematic component. A managed component needs only the graphical depiction of the symbol. It will include links to other domain models and parameters as part of its own definition.
There are three relevant controls when direct editing, readily available from the Quick Access Bar (at the top-left of the main application window), or from the Sch Lib Standard toolbar:
-
 - Save Active Document. Use this button to save any changes made to the document. This allows you to save current changes, should you wish to come back at a later stage to make further changes before ultimately releasing to the managed content server.
-
 - Save to Server. Use this button to release (effectively save and release) the defined schematic symbol to the managed content server, storing it within the initial (planned) revision of the target Symbol Item. The Edit Revision dialog will appear, in which you can change Name, Description, and add release notes as required. The document and editor will close after the release. The library document containing the source schematic symbol, *.SchLib, will be stored in the revision of the Item.
-
 - Cancel Editing. Use this button if you wish to cancel editing. The document and editor will close, and nothing will be released to the target Symbol Item.
These controls are also available as commands - Save (Shortcut: Ctrl+S), Save to Server (Shortcut: Alt+Ctrl+S), and Cancel Edit - from the main File menu.
The released data stored in the server consists of the source schematic symbol, saved in a Schematic Library file named using the Symbol Item's Name. In the Explorer panel, switch to the Preview aspect view tab to see the symbol graphics.

Browse the released revision of the Symbol Item, back in the Explorer panel. Switch to the Preview aspect view tab to see the symbol graphics.
Reusing a Managed Symbol Item
Related page: Managed Components, Controlling Access to Server Content
Once a schematic symbol has been released to a managed content server, and its lifecycle state set to a level that the organization views as ready for use at the design level, that symbol can be reused in the creation of one or more managed components. When directly editing a revision of a Component Item from a managed content server, how a Symbol Item revision is added for use, depends on which mode of editing is being used:
- Single Component Editing - the Symbol Item revision is added to the component's Models region. Use the drop-down associated to the Add Symbol entry to choose the Existing command. An explorer-like dialog will open, with which to browse to, and choose, the required Symbol Item revision.
 using the Component Editor in its Single Component Editing mode.") Example of referencing a revision of a Symbol Item as a model link, when direct editing a revision of a Component Item (managed component) using the Component Editor in its Single Component Editing mode.
Example of referencing a revision of a Symbol Item as a model link, when direct editing a revision of a Component Item (managed component) using the Component Editor in its Single Component Editing mode.
You can edit a Symbol Item revision directly from the
Models region by clicking the

button, at the top-right of the symbol preview.
- Batch Component Editing - the Symbol Item revision is added to the component's Model Links region. This region can be thought of in terms of a 'bucket' of domain models that can be accessed by any component definition. Assignment is a case of specifying which links are required for each definition. Click the Add control beneath the region and choose the SCHLIB entry. The Choose Models dialog will open (essentially an incarnation of the Explorer panel) with which to browse to, and choose, the required Symbol Item revision.
 using the Component Editor in its Batch Component Editing mode.") Example of referencing a revision of a Symbol Item as a model link, when direct editing a revision of a Component Item (managed component) using the Component Editor in its Batch Component Editing mode.
Example of referencing a revision of a Symbol Item as a model link, when direct editing a revision of a Component Item (managed component) using the Component Editor in its Batch Component Editing mode.
You can edit a Symbol Item revision directly from the Model Links region by right-clicking and choosing the Edit command from the context menu.
Re-Releasing a Symbol Item
At any stage, you can come back to any revision of a Symbol Item in the server, and edit it directly. From the Explorer panel, right-click on the revision and choose the Edit command from the context menu. Once again, the temporary editor will open, with the library (containing the source schematic symbol) contained in the revision, opened for editing. Make changes as required, then commit the release of the document into the next revision of the item.
Right-clicking on the top-level entry for an Item itself, will edit the latest revision of that Item.

Accessing the command to launch direct editing of an existing revision of a Symbol Item from within the Explorer panel.
You can also update the revision of a Symbol Item being used by a revision of a Component Item directly on-the-fly, as part of editing that revision of that Component Item. If the Component Editor is in
Single Component Editing mode, edit a Symbol Item revision directly from the
Models region of the editor by clicking the
button, at the top-right of the symbol preview. If the Component Editor is in
Batch Component Editing mode, edit a Symbol Item revision directly from the
Model Links region by right-clicking and choosing the
Edit command from the context menu.
Updating Related Component Items
When you make a change to a managed domain model - be it a symbol, footprint model, or simulation model - the moment you release that change into a new revision of the model's Item, any Component Items that use that model will become effectively out of date, still using the previous revision. In most cases, you will no doubt want to re-release those components, with the respective model links updated to use the latest revisions available. To streamline this process a managed content server, in conjunction with Altium NEXUS, facilitates the ability to update related Component Items - at the point of re-releasing a model Item - after having made any modifications to that model through the direct editing feature.
The option to perform this update to the parent Component Items, can be found in the Create Revision dialog, that appears when releasing the modified symbol back to the target managed content server. This option - Update items related to <ModelItemRevision> - is enabled by default.
<ModelItemRevision> is the current revision of the model Item, that is, the revision currently being used by any related Component Items. Once the model itself is released, this would naturally be the previous (earlier) revision, and no longer the latest.

Accessing the option to update related Component Items that are referencing the Symbol Item being re-released.
If you want to keep all related Component Items using the current revision of the Symbol Item, disable this option. Only the model itself will then be released.
Once you click OK in the Create Revision dialog, the modified symbol is released back to the server, and its associated temporary editor closed. All Component Items referencing that Symbol Item will be re-released to use its new revision automatically (the next revision of each Component Item is automatically created and the release performed).
 Example of automatic update in action. Here, the graphics for a symbol have been changed. The Component Item that references the symbol is automatically updated - re-released into its next revision, to use the new revision of the symbol.
Downloading Released Data
Download the data stored in a revision of a Symbol Item by right-clicking on that revision (in the Explorer panel) and choosing the Operations » Download command from the context menu. The schematic library file will be downloaded into a sub-folder under the chosen directory, named using the Item Revision ID. The file can be found in the Released folder therein.
Access the Download command from the top-level entry for a Symbol Item itself, to download the schematic library file stored in the latest revision of that Item.
Click the Explore button in the Download from Server dialog, to quickly explore to the download folder.
Migrating Existing Model Libraries
Main page: Streamlined Migration of Existing Libraries to Your Managed Content Server
Models can also be created in the managed content server as part of migration of existing libraries of components. Altium NEXUS, in conjunction with your managed content server, provides a streamlined, simple process to quickly migrate your existing libraries to that server. The GUI to this process - the Library Migrator - presents an intuitive flow that takes initial selected libraries, and migrates them to your server. Catering for all types of libraries relating to older component management methodologies - SCHLIB, PCBLIB, INTLIB, DBLIB, SVNDBLIB - the Library Migrator is the perfect solution to quickly building your company's set of managed components, and the many benefits that such components enjoy (high-integrity, lifecycle management, centralized storage and management, where-used functionality, ease of design reuse).
The Library Migrator offers a minimalist Simple interface mode where the selected file-based component libraries are migrated to managed server components through a single step, while the migrator automatically takes care of type classification, the target source folder, parameter inclusion and value type, and the transfer of all relevant data. The interface is also available in an Advanced mode that provides a full preview of the proposed library migration, and access to its related data and settings. And while the migration is a single-click process by default, the migrator also offers advanced configuration options through the Properties panel for enhanced control over exactly how that migration is performed.
Access the Library Migrator from any editor by choosing the File » Library Migrator command from the main menus.
While access to the Library Migrator is available in Altium NEXUS, should you wish to access an unmanaged library to make pre-migration tweaks, or access the Available Libraries list, you will need to enable the use of legacy, unmanaged component management methodologies. Use of unmanaged content is disabled by default in Altium NEXUS, as it is not recommended. You can restore this functionality by enabling the
Legacy.UnManagedLibraries option in the
Advanced Settings dialog - accessed by clicking the

button, on the
System - General page of the
Preferences dialog. You will need to restart Altium NEXUS for the change to this setting to take effect.
All information that is present in an original source library is migrated to the server-based managed components, including all referenced domain models (schematic symbols, PCB footprints, Simulation Models), parametric information, assigned part choices, datasheet files, etc . Component Templates are also created where necessary, and may then be refined and used for subsequent library migrations. If your original components have multiple PCB footprints defined, the Library Migrator will bring those models across and keep the current default footprint. And if you only work with PCB libraries – your only concern is PCB layout – then the Library Migrator supports migration of just those libraries, or it can be switched to a models only migration mode where specified models types are migrated from Integrated or Database libraries. Libraries that include multiple component types (monolithic libraries) are automatically detected and processed as well.

The Library Migrator in its Advanced mode - the full user interface to the component migration process.
While migration may seem daunting, the defaults have been defined to enable you to get your collection of managed components without having to change a thing - start the process and design with the fruits of the Migrator's labor. The system conducts and handles a number of validations, for example to ensure no duplicate IDs for the resulting managed components, or to ensure no duplicate models or component templates are created, and that such entities are reused across (linked to) components where needed. And if issues do arise, the system flags them, with suggestions on how to resolve those issues, aiming to get the migration back on track as quickly, and as smoothly as possible.
