
Konfigurowanie uwierzytelniania Single Sign-on
Enterprise Server administrators can configure and enable Single Sign-On (SSO) capabilities for your server. The backend configuration system allows administrators to establish, test, enable and disable the SSO capability for server users. The SSO option is available when signing in to the Enterprise Server browser interface. When set up for server users, SSO offers the convenience of accessing the server using the same set of credentials that apply to your company-wide systems.

For more information about accessing the Enterprise Server browser interface, refer to the Exploring the Browser-based Interface page.
SAML Single Sign-On
When configured and enabled in the Enterprise Server, the SSO system establishes authorized identities from your company's nominated Identity Provider (IdP), for example Okta, OneLogin, etc., with the ID assertion communications based on the standardized Security Assertion Markup Language (SAML 2.0). The SSO sign-in interface for your company, if not already in place, is usually based on a template or example provided by the IdP – this instigates the SAML-based authentication assertion exchanges and provides access to company services.
When the SAML option is selected in the SSO drop-down on the Admin – Settings – Authentication page of the browser interface, the page shows the preconfigured URLs for the Enterprise Server SSO service (Altium Metadata Configuration), and the option to upload or manually enter your IdP's authorization connection data (SAML Identity Provider Configuration).
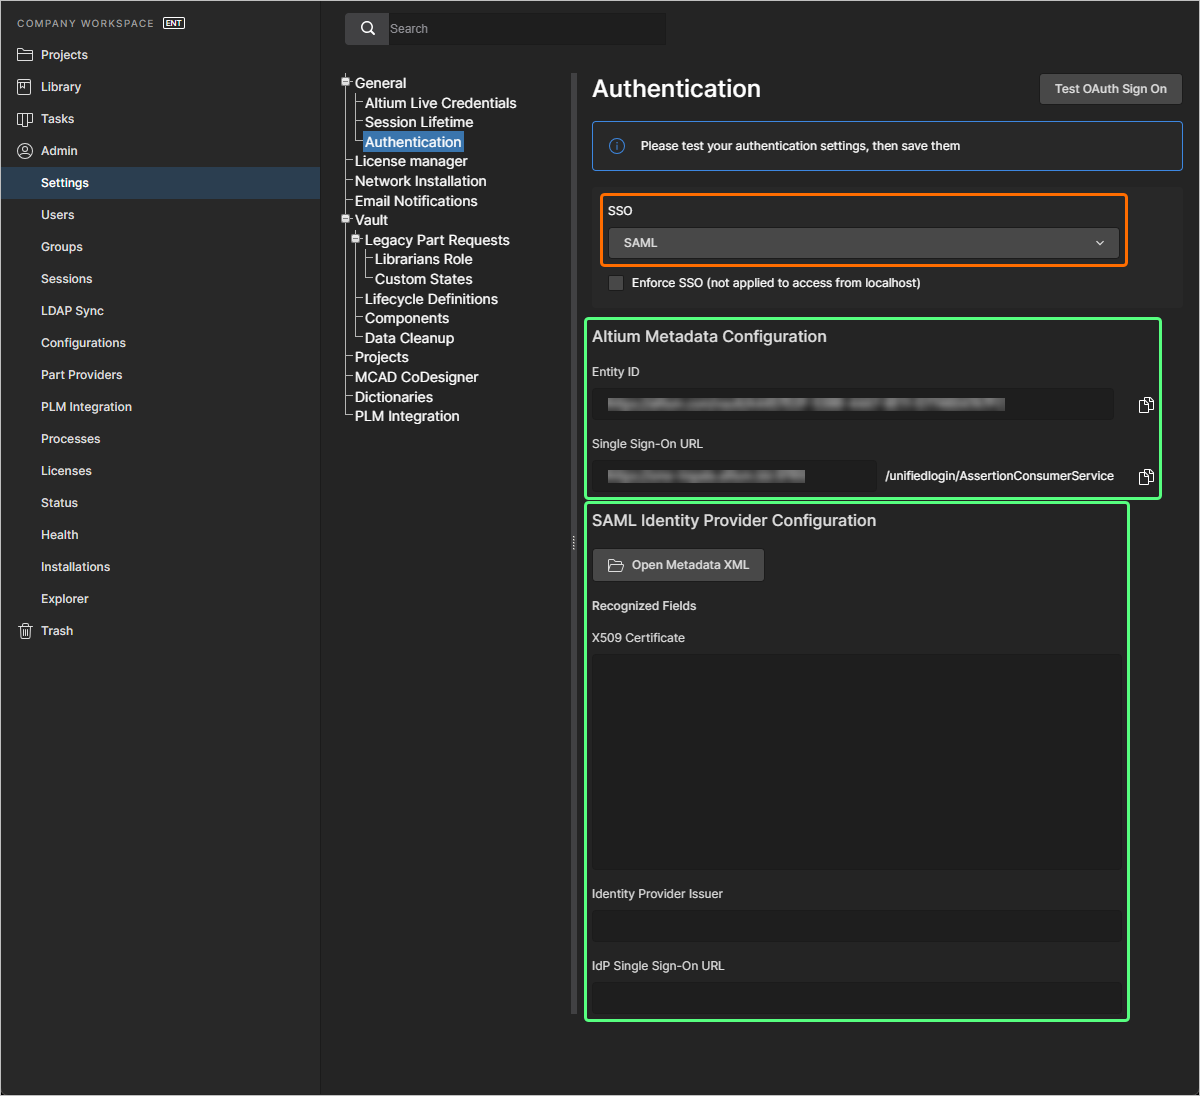
The IdP configuration metadata should be available from your Identity Provider once it is set up for integration with your company services – see IdP integration examples below. To configure the SAML SSO system in the Enterprise Server (if not already completed), use the ![]() button to locate and upload the SAML IdP configuration XML file generated by your company's IdP. An uploaded IdP XML file is parsed by the system to extract the main configuration fields (X509 Certificate, Identity Provider Issuer URL, and IdP Single Sign-On URL). Alternatively, manually add the individual elements (security certificate and URLs) of the configuration to the corresponding fields.
button to locate and upload the SAML IdP configuration XML file generated by your company's IdP. An uploaded IdP XML file is parsed by the system to extract the main configuration fields (X509 Certificate, Identity Provider Issuer URL, and IdP Single Sign-On URL). Alternatively, manually add the individual elements (security certificate and URLs) of the configuration to the corresponding fields.
SSO is not enabled until an integration test is run, which is invoked by the ![]() button. This verifies the SSO identity process and your company's SSO sign-in. Once the configuration is tested successfully, you can save the settings by clicking the
button. This verifies the SSO identity process and your company's SSO sign-in. Once the configuration is tested successfully, you can save the settings by clicking the ![]() button (
button ( ), effectively applying them to the Enterprise Server.
Identity Provider Integration Examples
Expand the collapsible section below for a step-through example of the integration process for OneLogin as an Identity Provider.
Integration with OneLogin
-
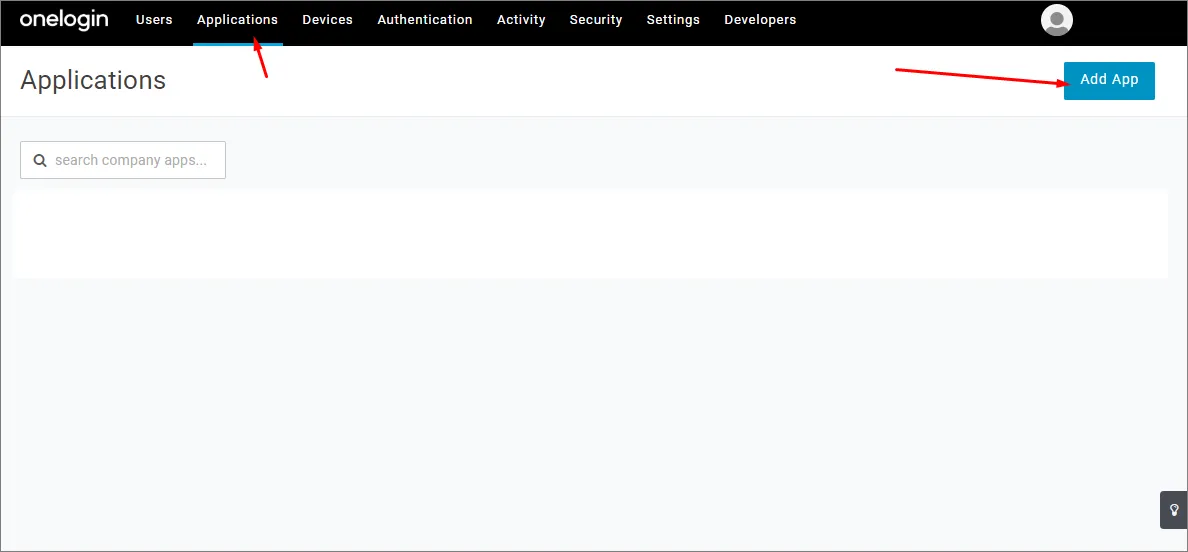
Login into OneLogin as an administrator.
-
Select Applications and then Add Apps.
-
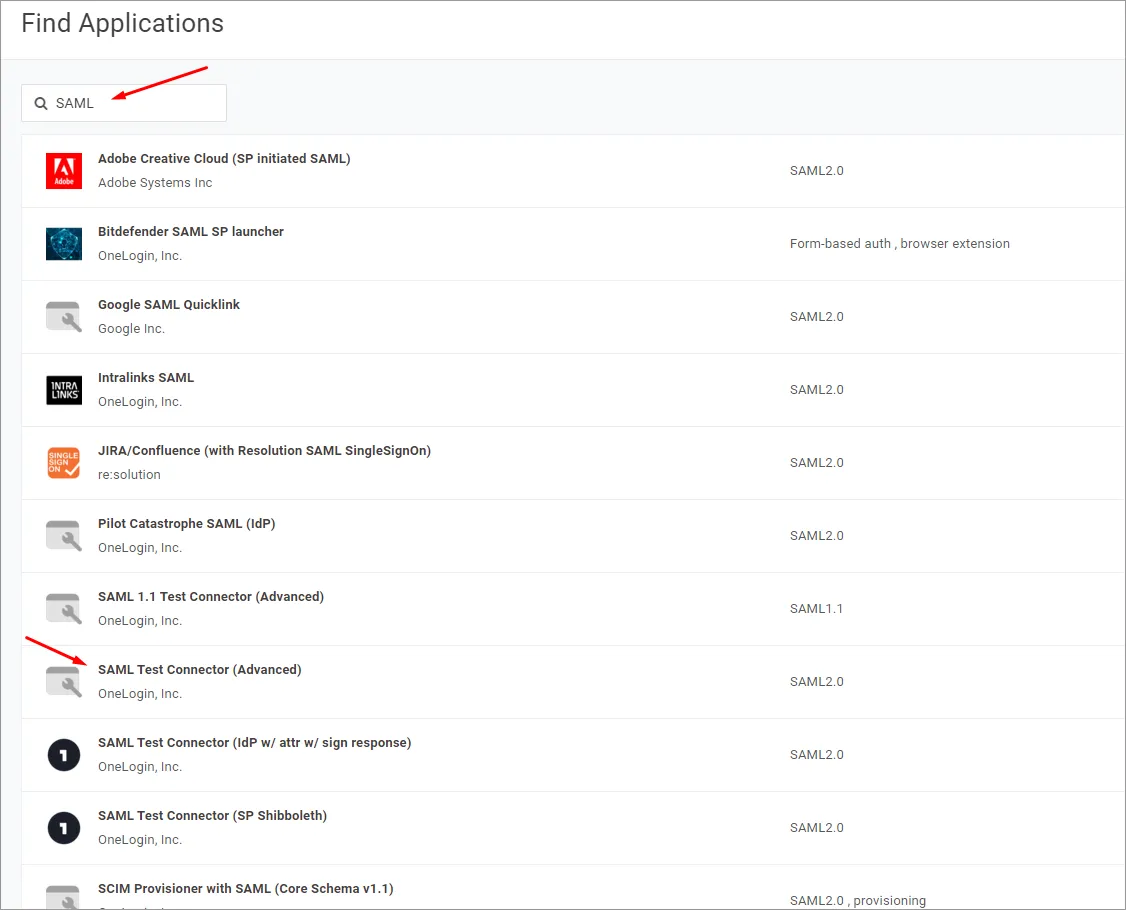
Search for 'SAML' and select the SAML Test Connector (Advanced) IdP application option.
-
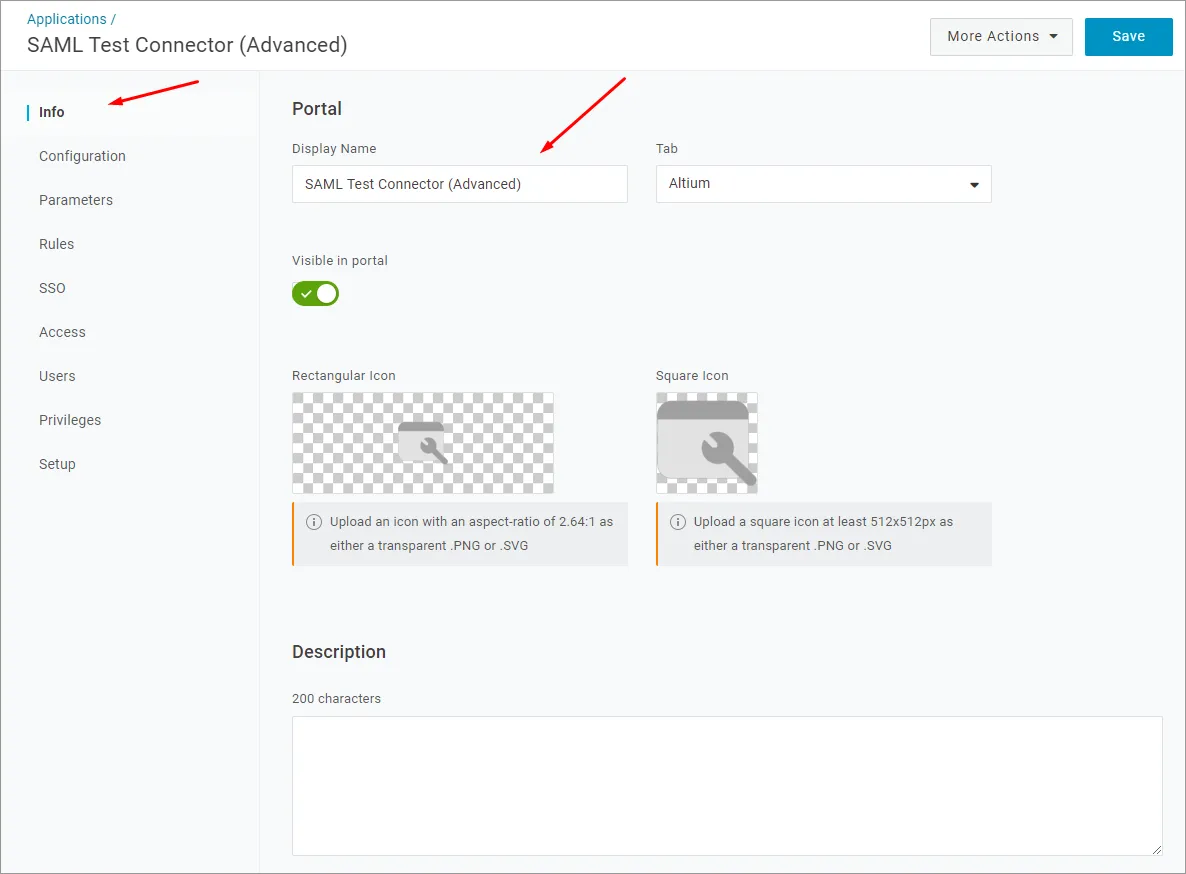
Specify an application name (Display Name). This is for display purposes only.
-
Click the Save button.
-
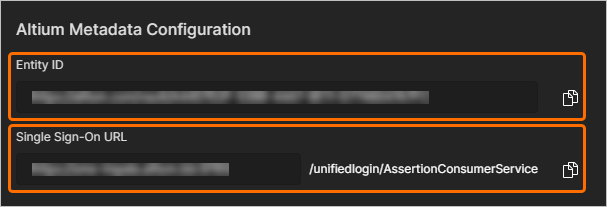
Copy (
 ) the Entity ID and Single Sign-On URL (Assertion Consumer Service) entries from the Admin – Settings – Authentication page of the Enterprise Server's browser interface to the fields as specified below.
In the OneLogin application setup:
-
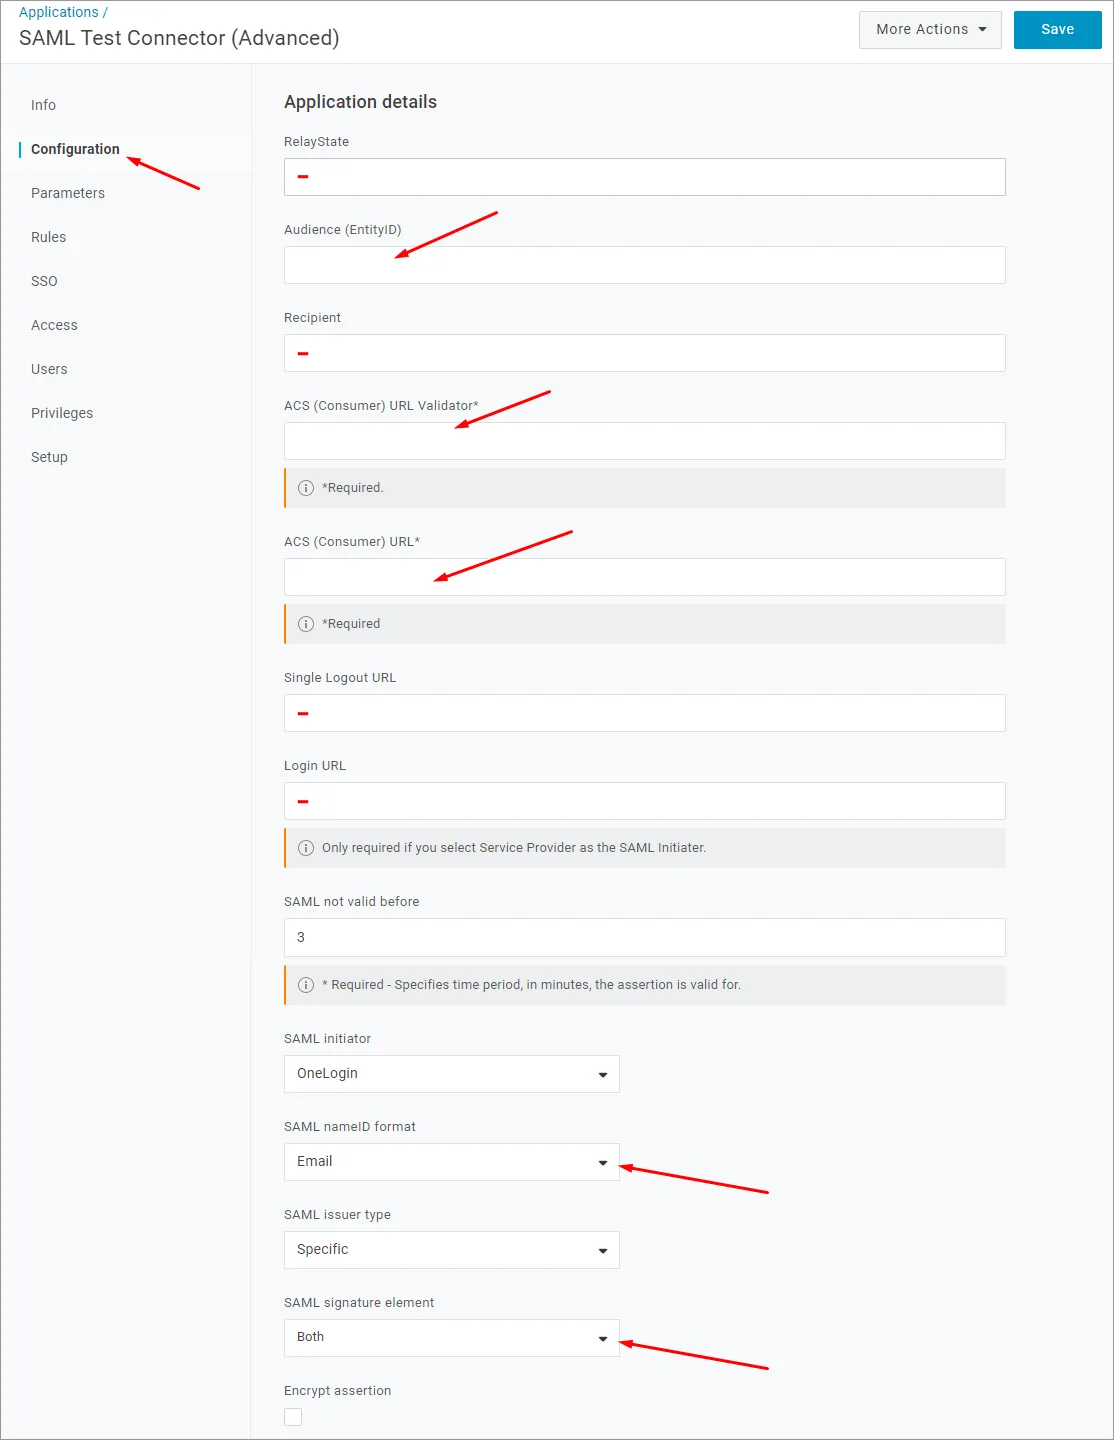
Paste the above Entity ID (service provider name) as the Audience (EntityID) URL.
-
Paste the above Single Sign-On URL (Assertion Consumer Service) as the ACS (Consumer) URL Validator.
-
Also paste the Single Sign-On URL (Assertion Consumer Service) as the ACS (Consumer) URL.
-
The RelayState, Recipient, Single Logout URL and Login URL fields may be left blank.
-
-
Ensure that the SAML nameID format option is set to Email, and the SAML signature element is set to Both. Click the Save button to confirm the settings.
-
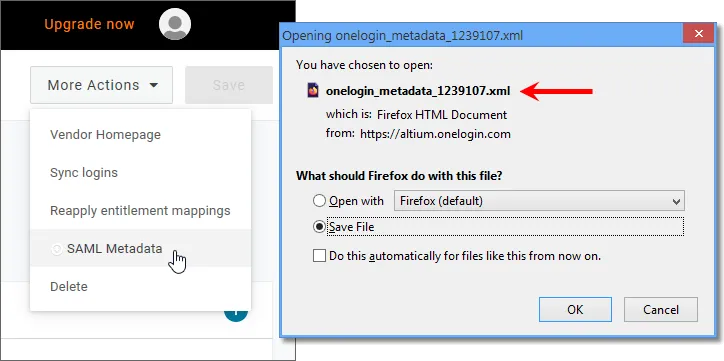
Click the More Actions button and then the SAML Metadata menu option to download the Identity Provider SAML metadata as an XML file.
-
This metadata file will be uploaded in the Admin – Settings – Authentication page of the Enterprise Server's browser interface to configure the OneLogin SSO service – see below.
-
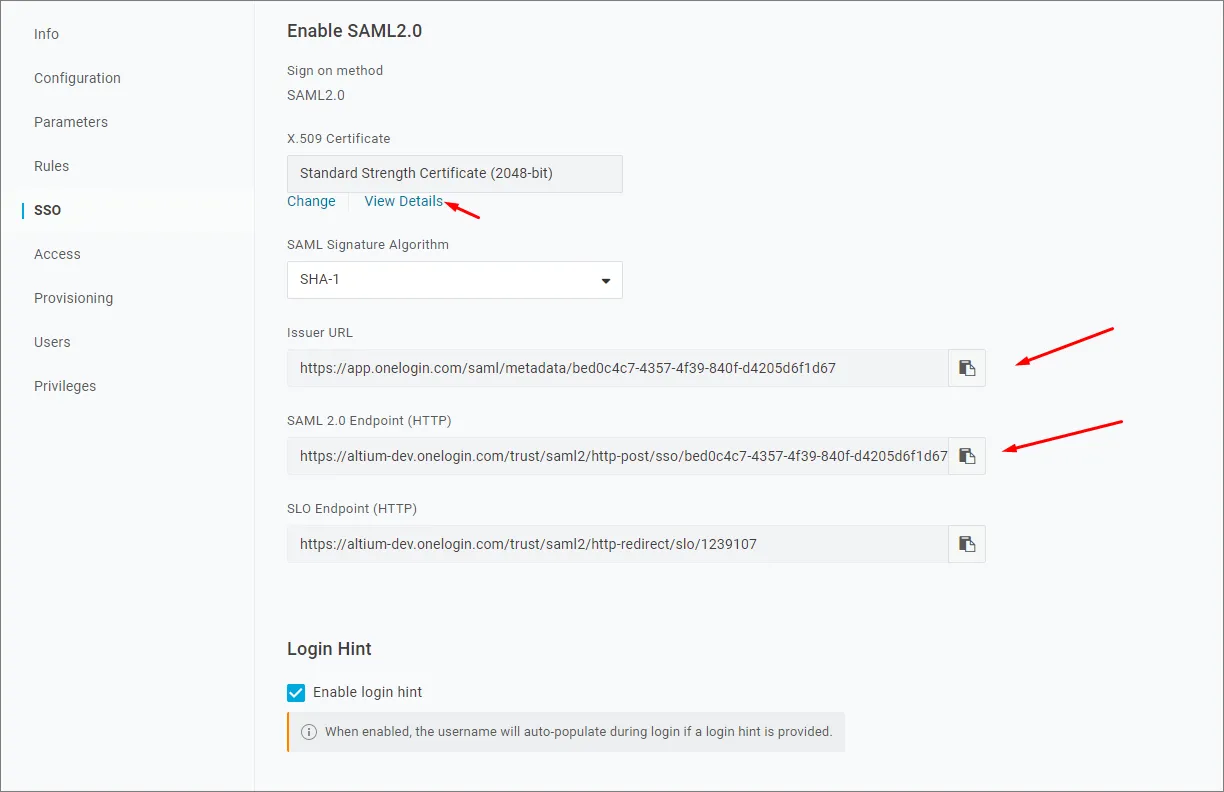
If the preference is to set up the OneLogin SSO service manually in the Enterprise Server, the required parameters can be found by selecting the SSO menu option in the OneLogin application interface.
-
-
The follow-up steps would be to add users and assign the application to those users.
Expand the collapsible section below for a step-through example of the integration process for Okta as an Identity Provider.
Integration with Okta
-
Sign in to Okta as an administrator.
-
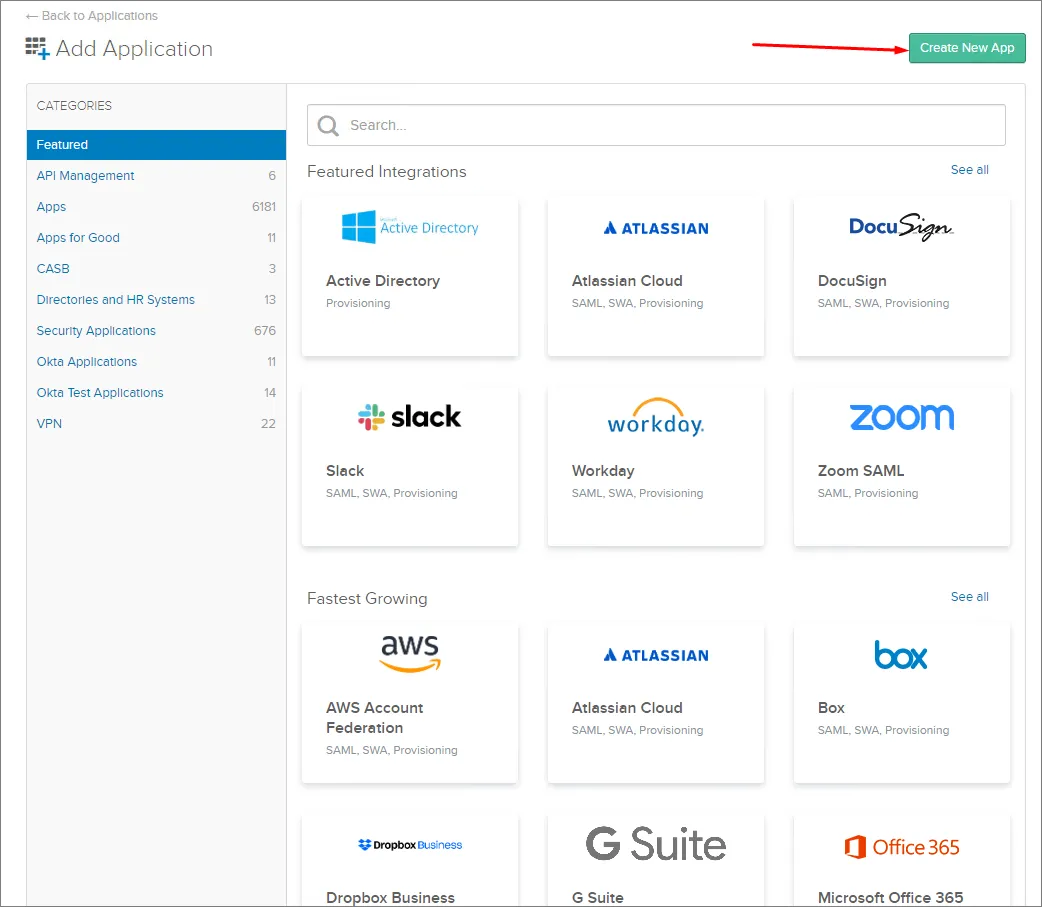
Click the Admin link/button and then the Add Application button under company Applications.

-
Click the Create New App button.
-
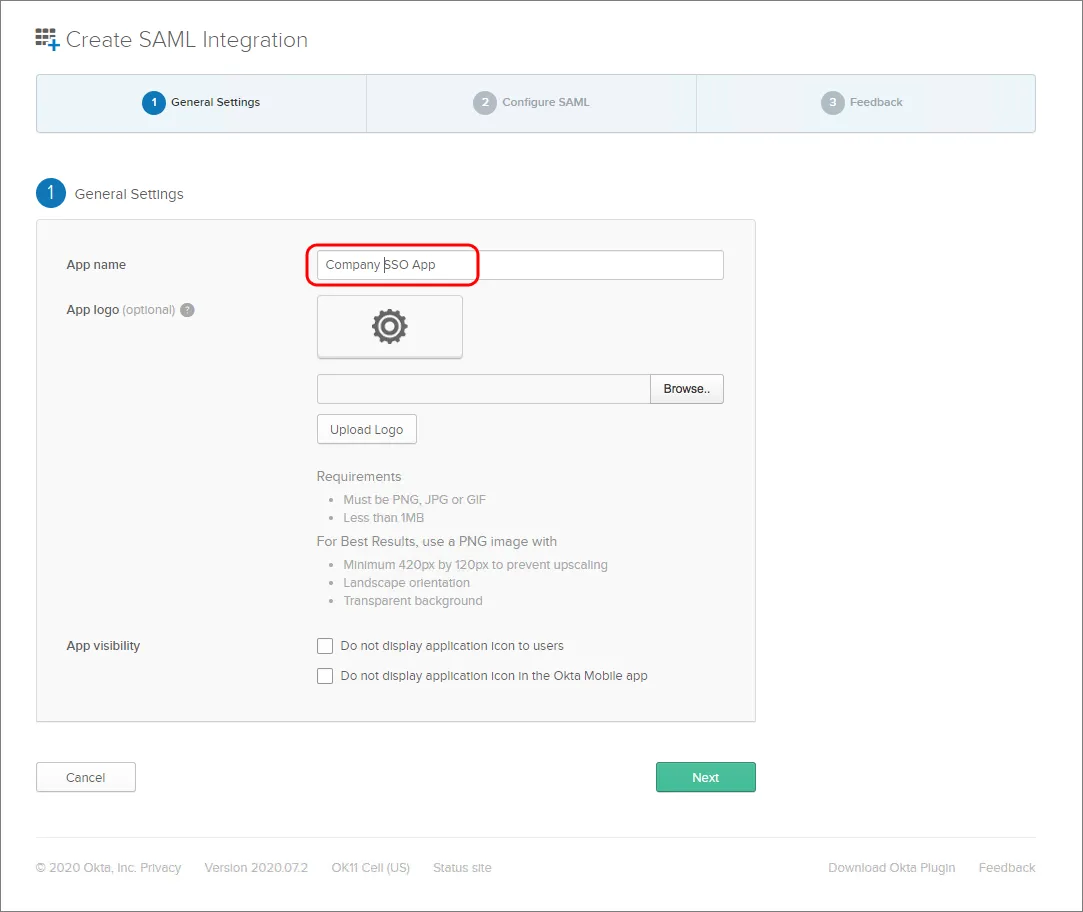
Select SAML 2.0 as the Sign-on method.

-
Specify an App name. This is for display purposes only.
-
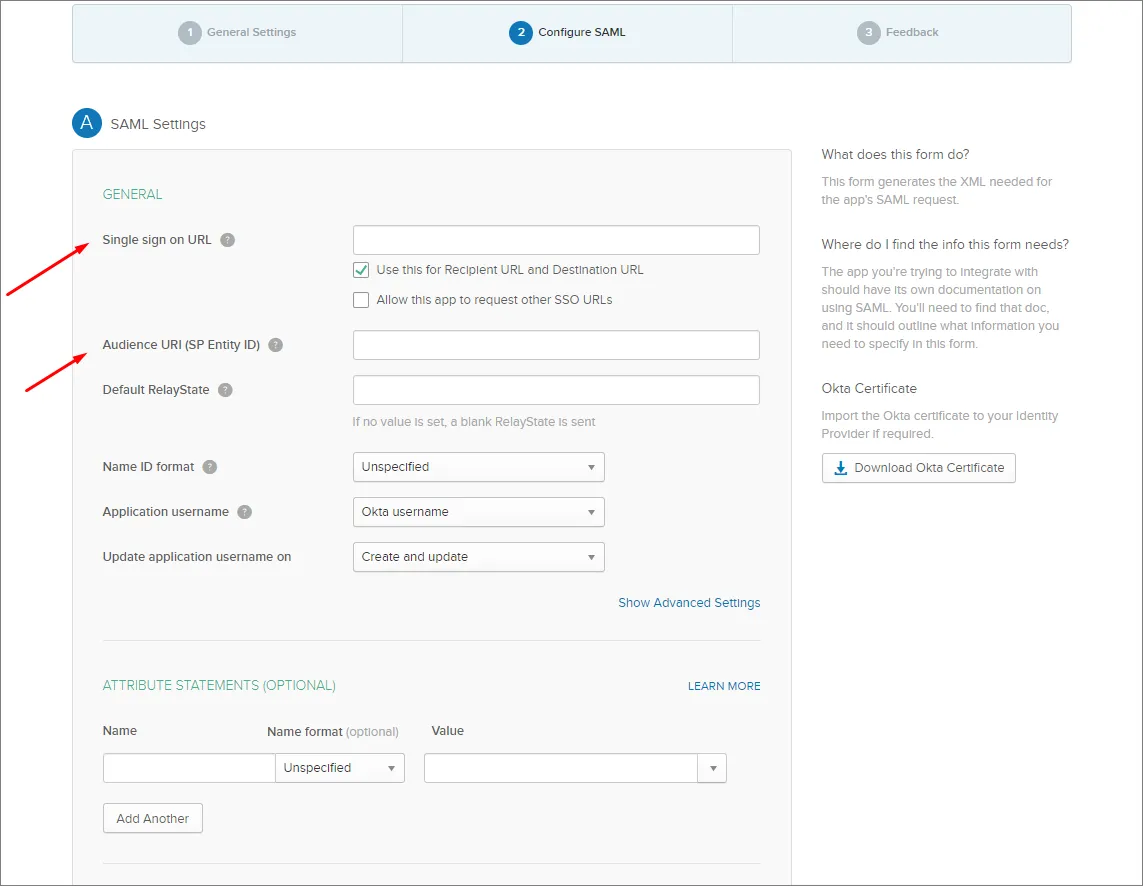
Note the Single Sign On URL (Assertion Consumer Service) and Entity ID entries in the Admin – Settings – Authentication page of the Enterprise Server's browser interface.
-
Copy (
) and paste the Enterprise Server Single Sign-On URL entry into the Okta SAML Settings Single sign on URL field.
-
Copy (
) and paste the Enterprise Server Entity ID entry into the Okta SAML Settings Audience URI field.
A Default RelayState entry is not required.
-
Set the remaining fields as follows:
-
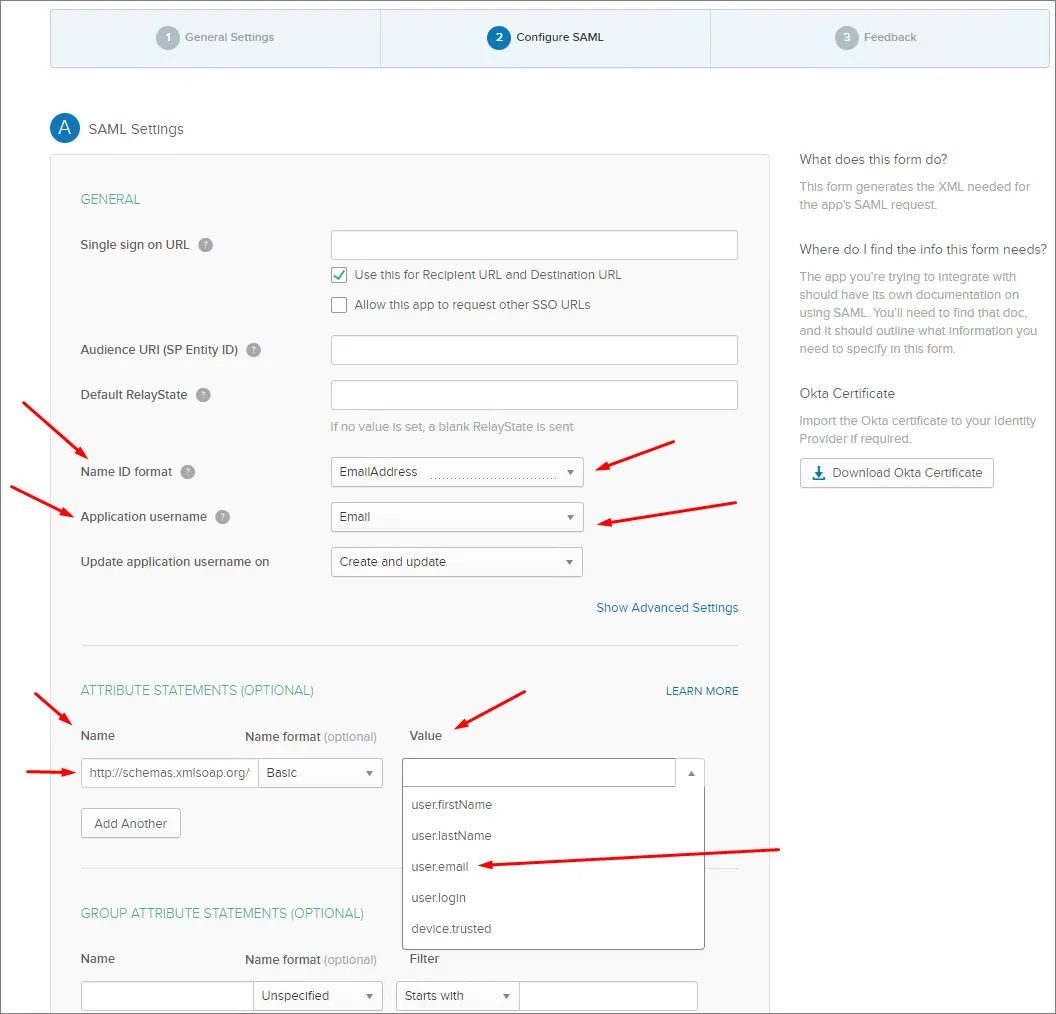
The Name ID format is
EmailAddress. -
The Application username is (Okta)
Email. -
In the ATTRIBUTE STATEMENTS section, set the Name field to:
http://schemas.xmlsoap.org/ws/2005/05/identity/claims/emailaddressand the Value to:user.email
-
-
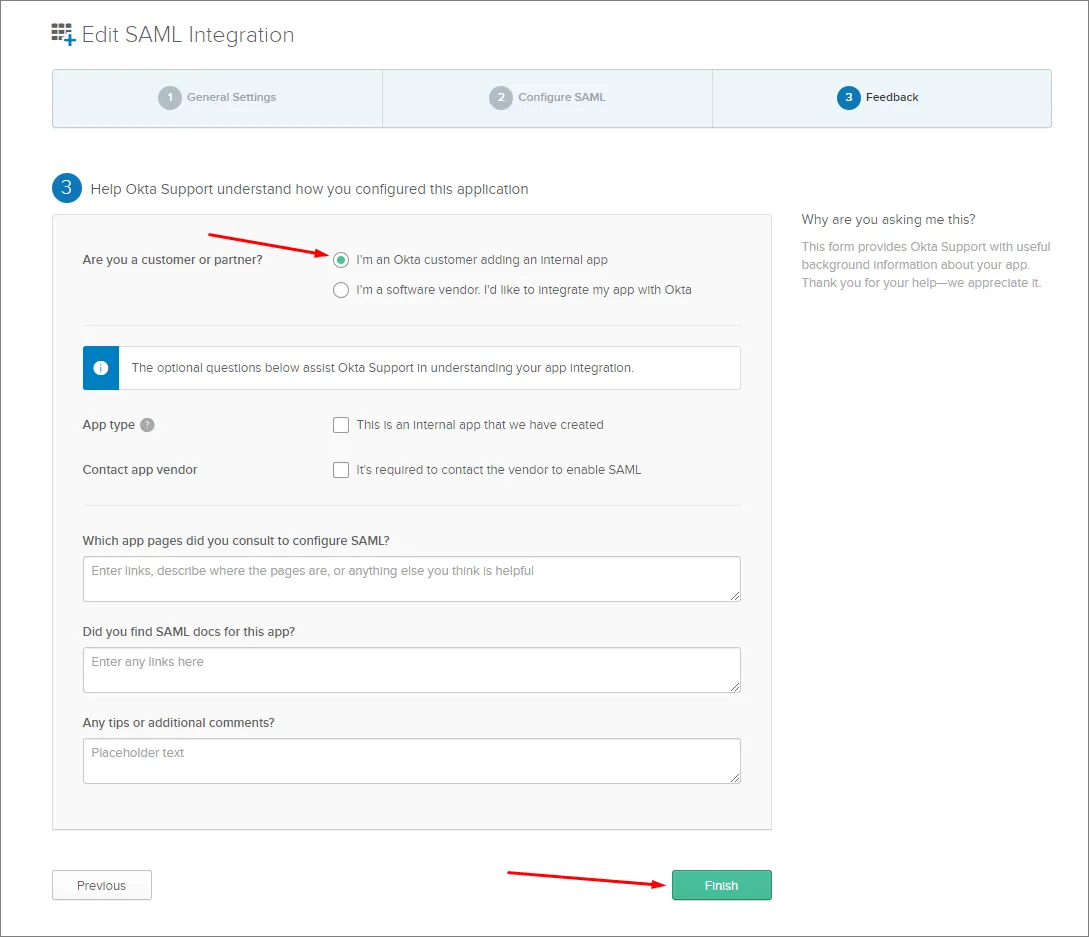
Click the Next button and select the ..Okta customer adding an internal app option.
-
Click the Finish button.
-
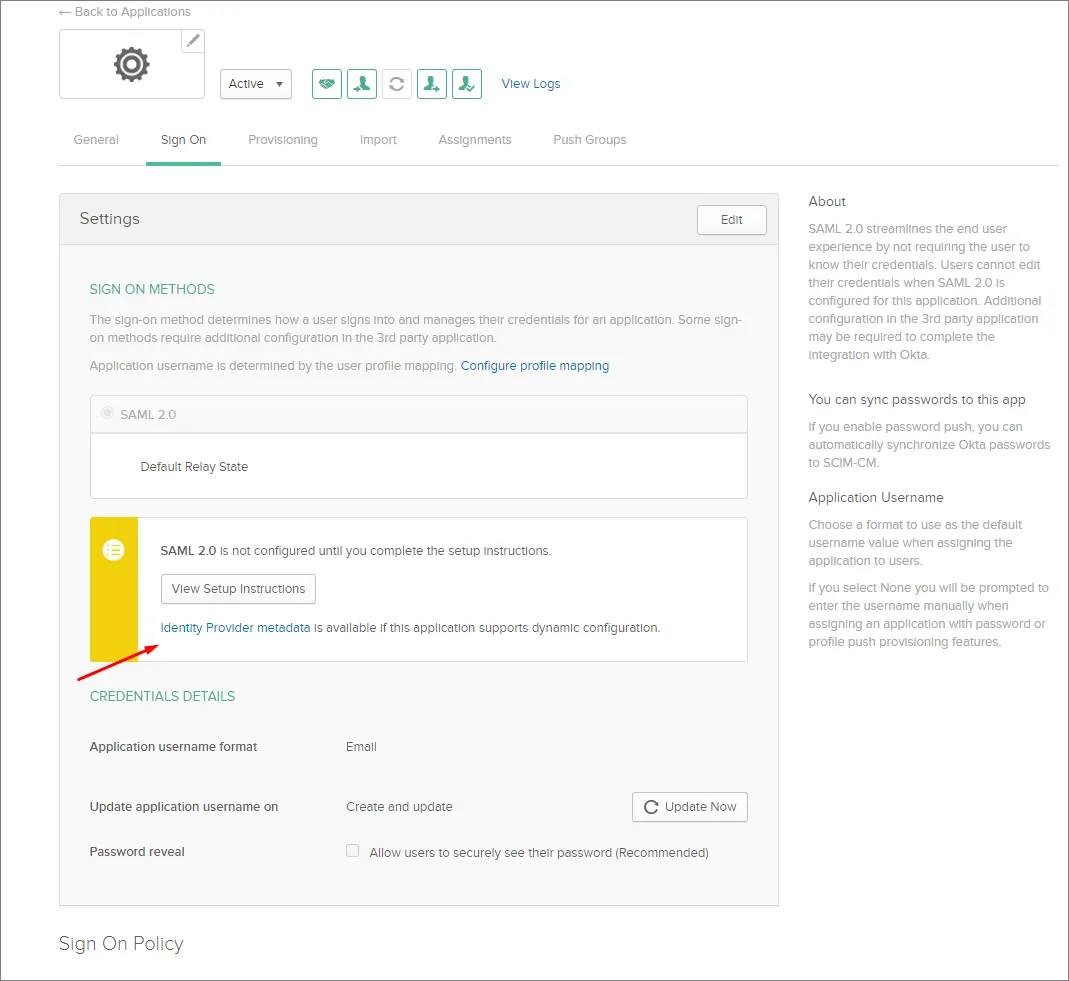
Click the Identity Provider metadata link and save the metadata XML to your computer, or click the View Setup Instructions button for manual setup options.
-
In the SAML Identity Provider configuration section of the Admin – Settings – Authentication page of the Enterprise Server's browser interface, upload the saved metadata XML file or set up the individual sections manually – see above.
-
Expand the collapsible section below for a step-through example of the integration process for Microsoft Entra ID as an Identity Provider.
Integration with Microsoft Entra ID
-
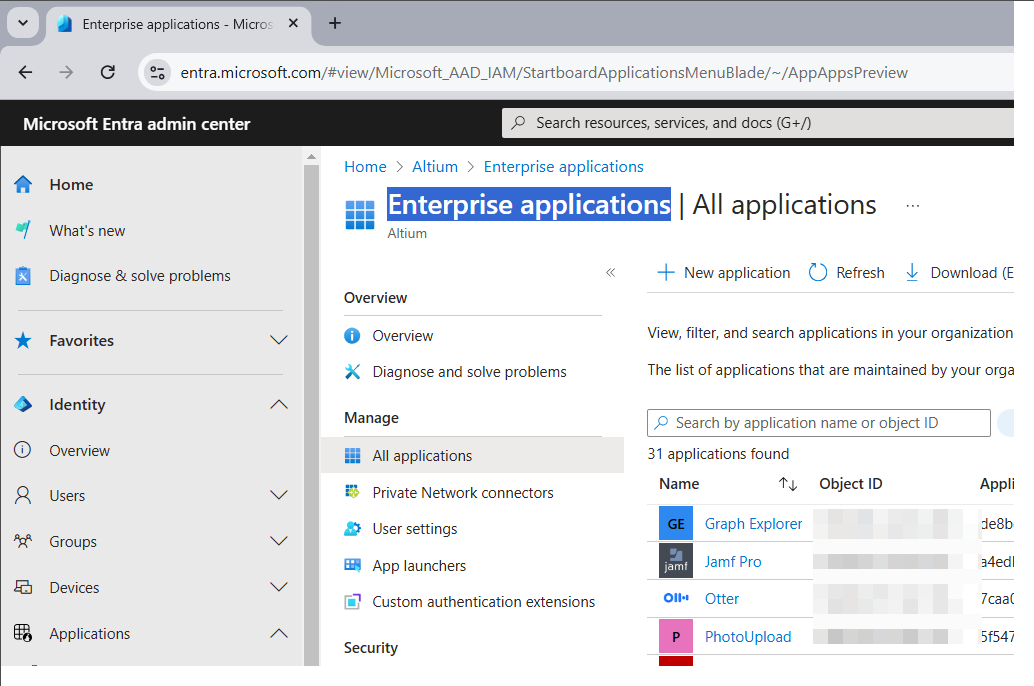
Sign in to the Microsoft Entra admin center.
-
Select Identity and then the Enterprise applications option.
-
Create your own application.

-
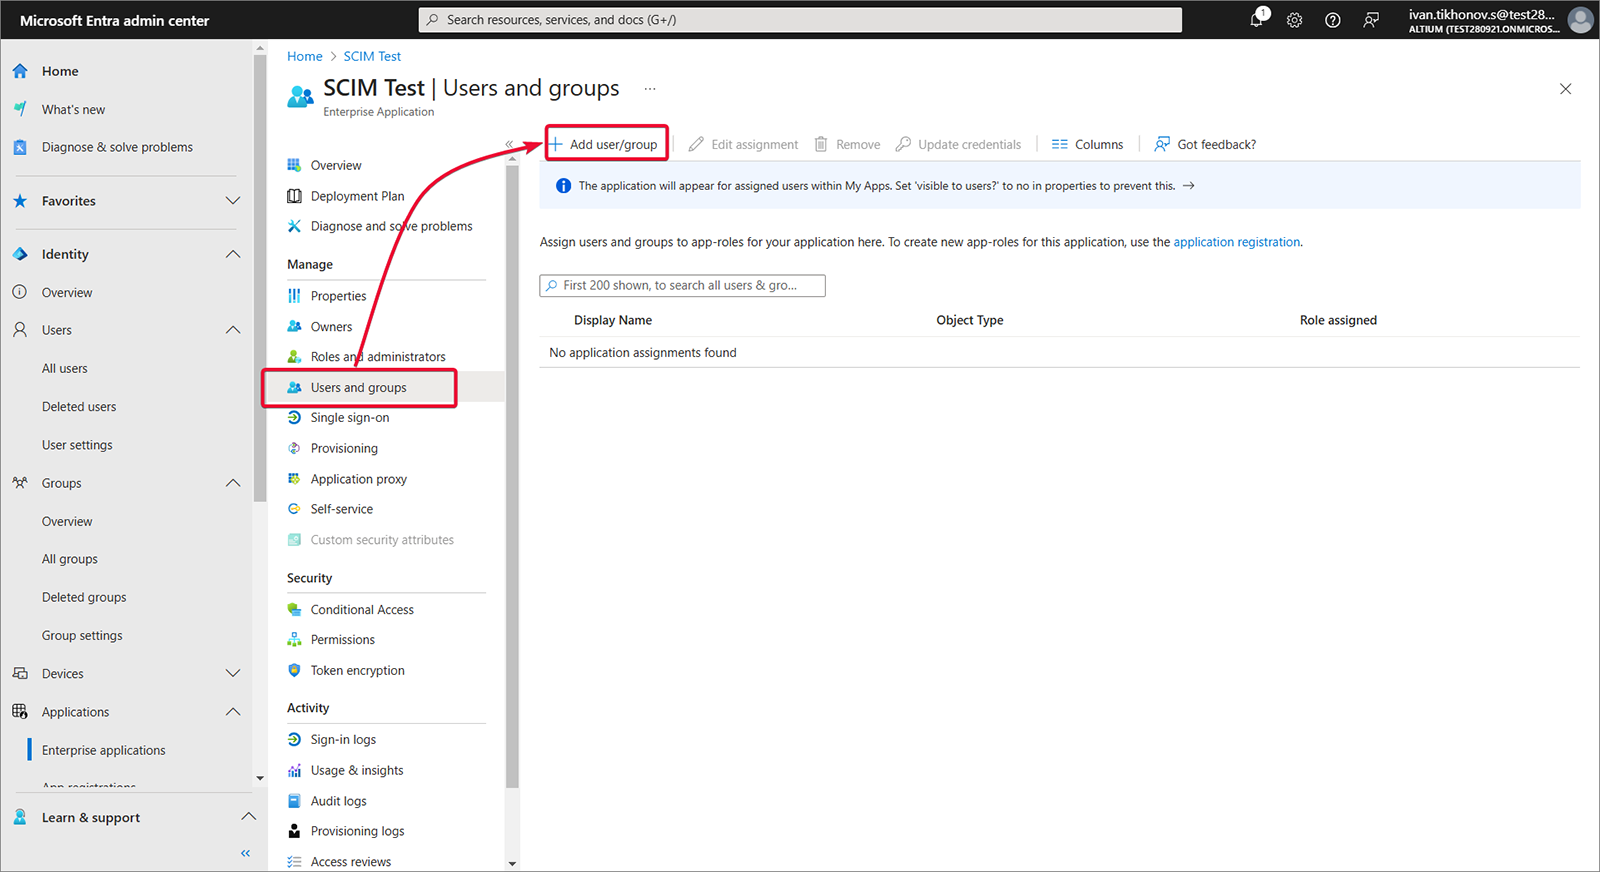
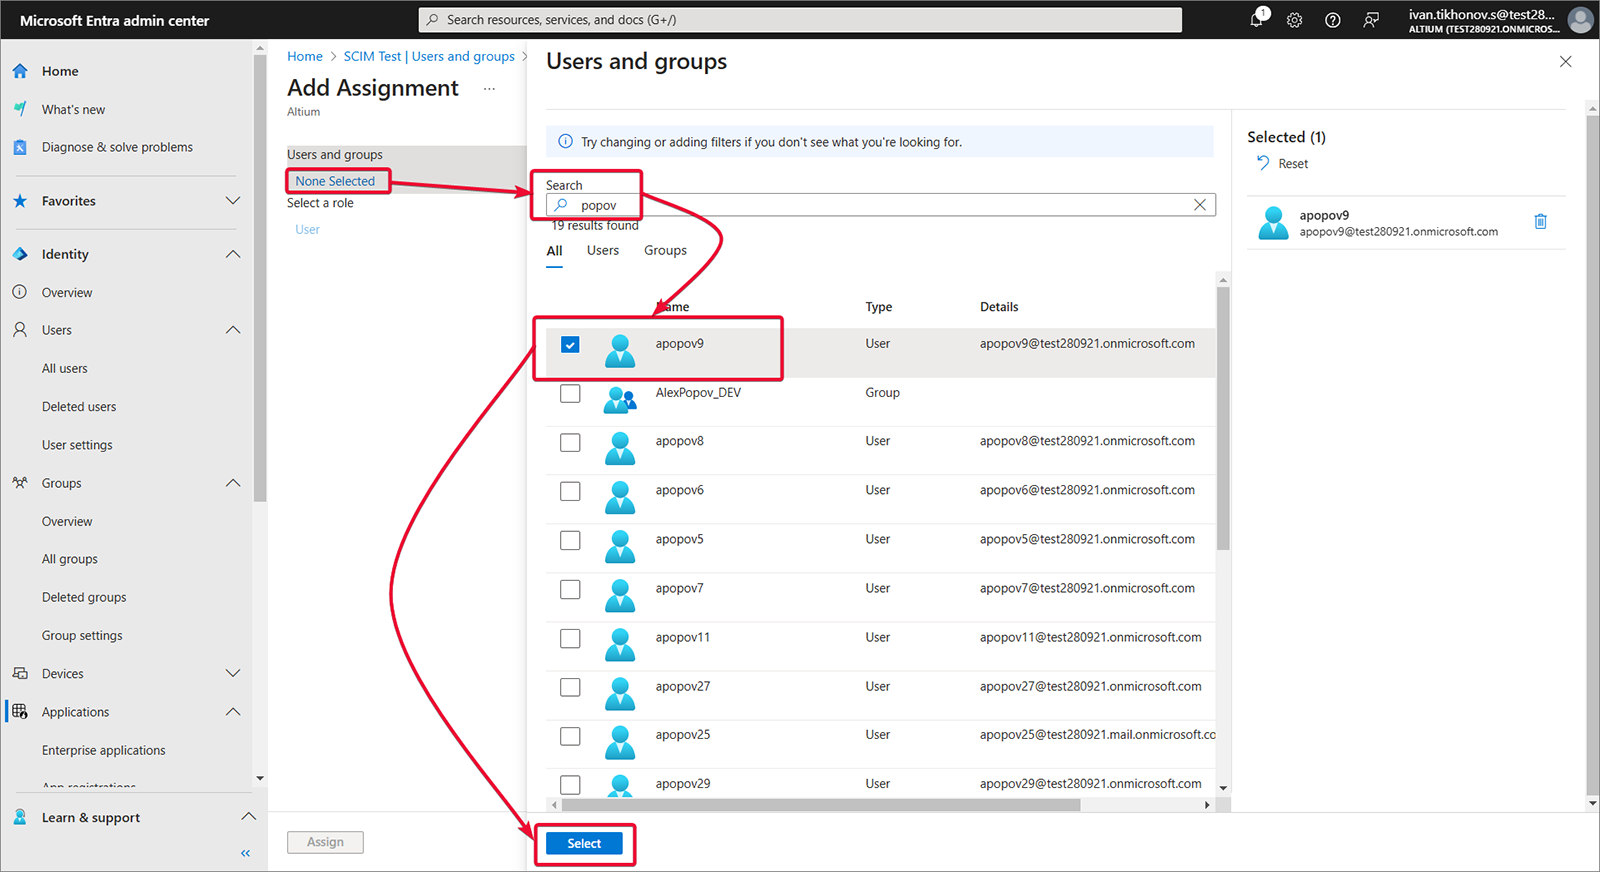
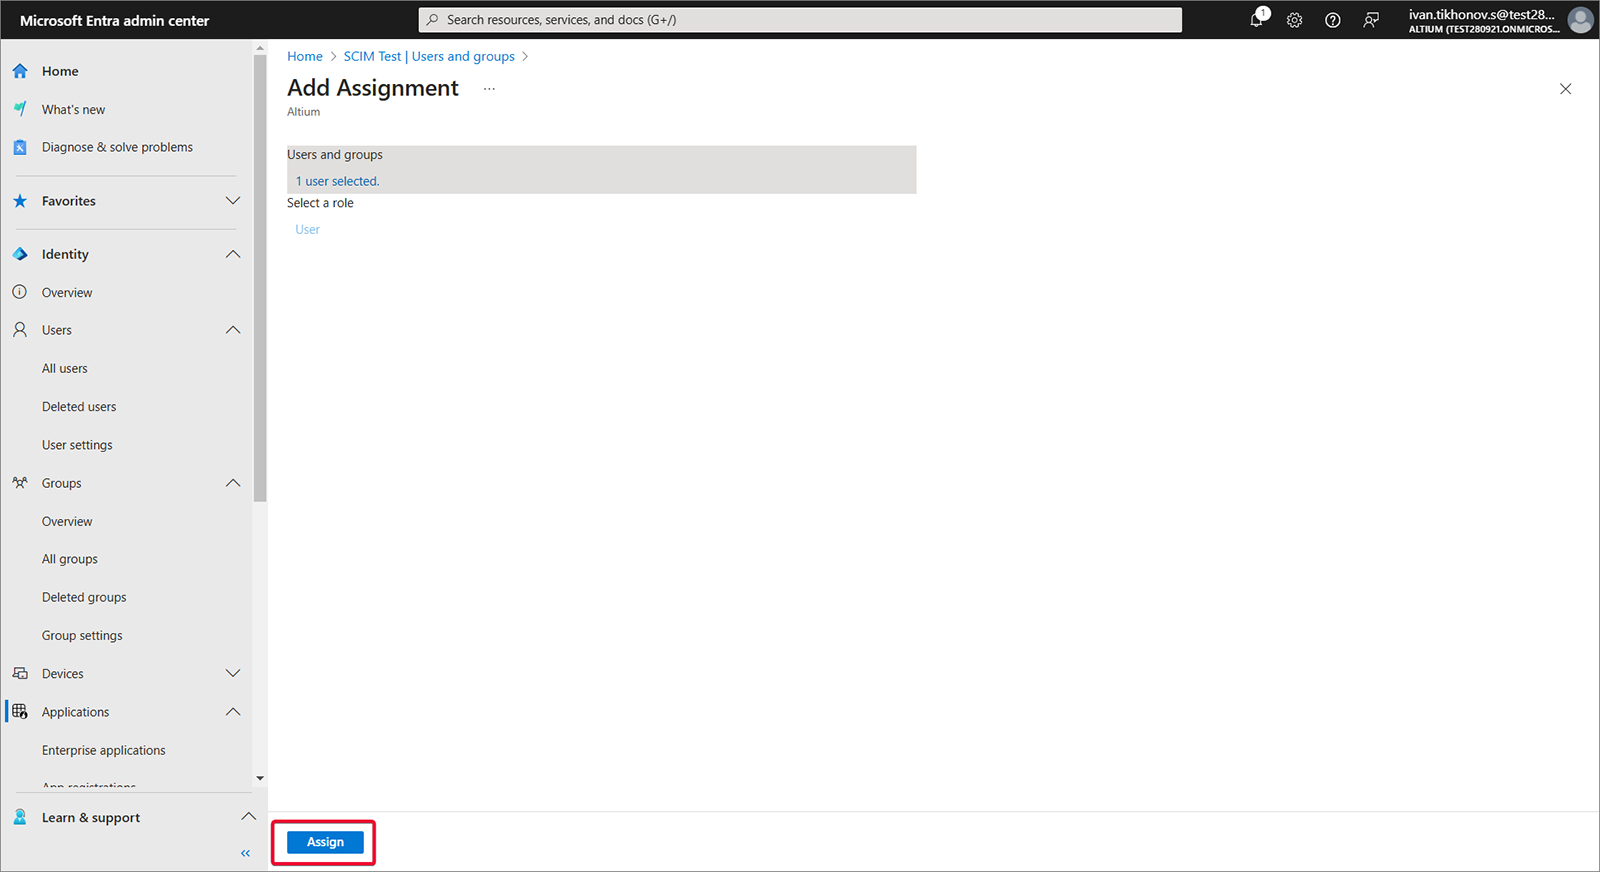
Select Users and groups and then Add user/group.
-
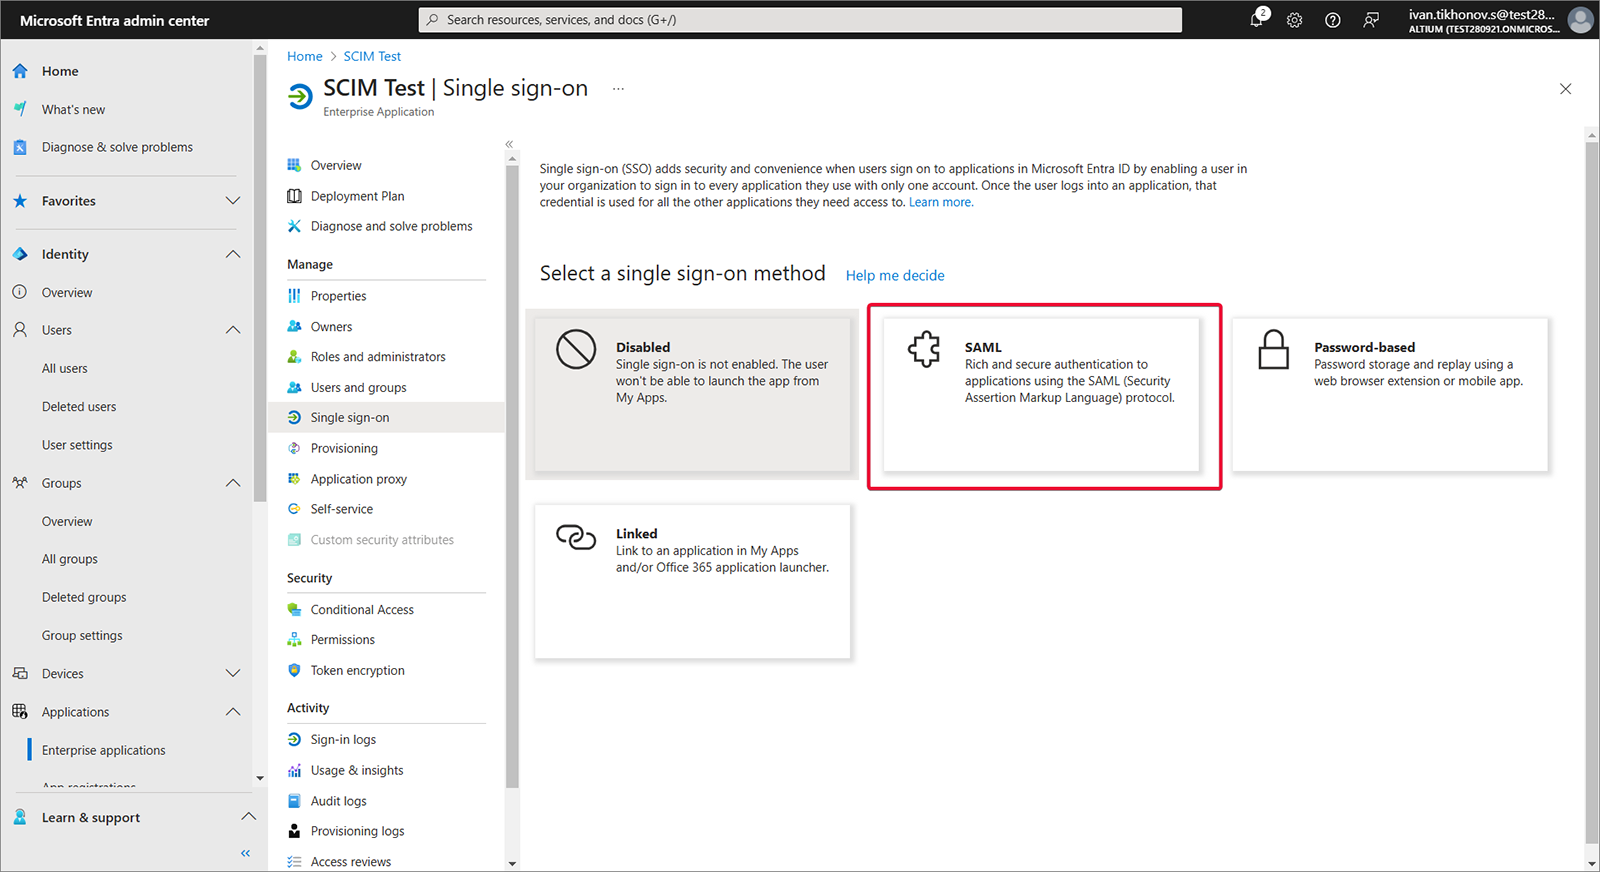
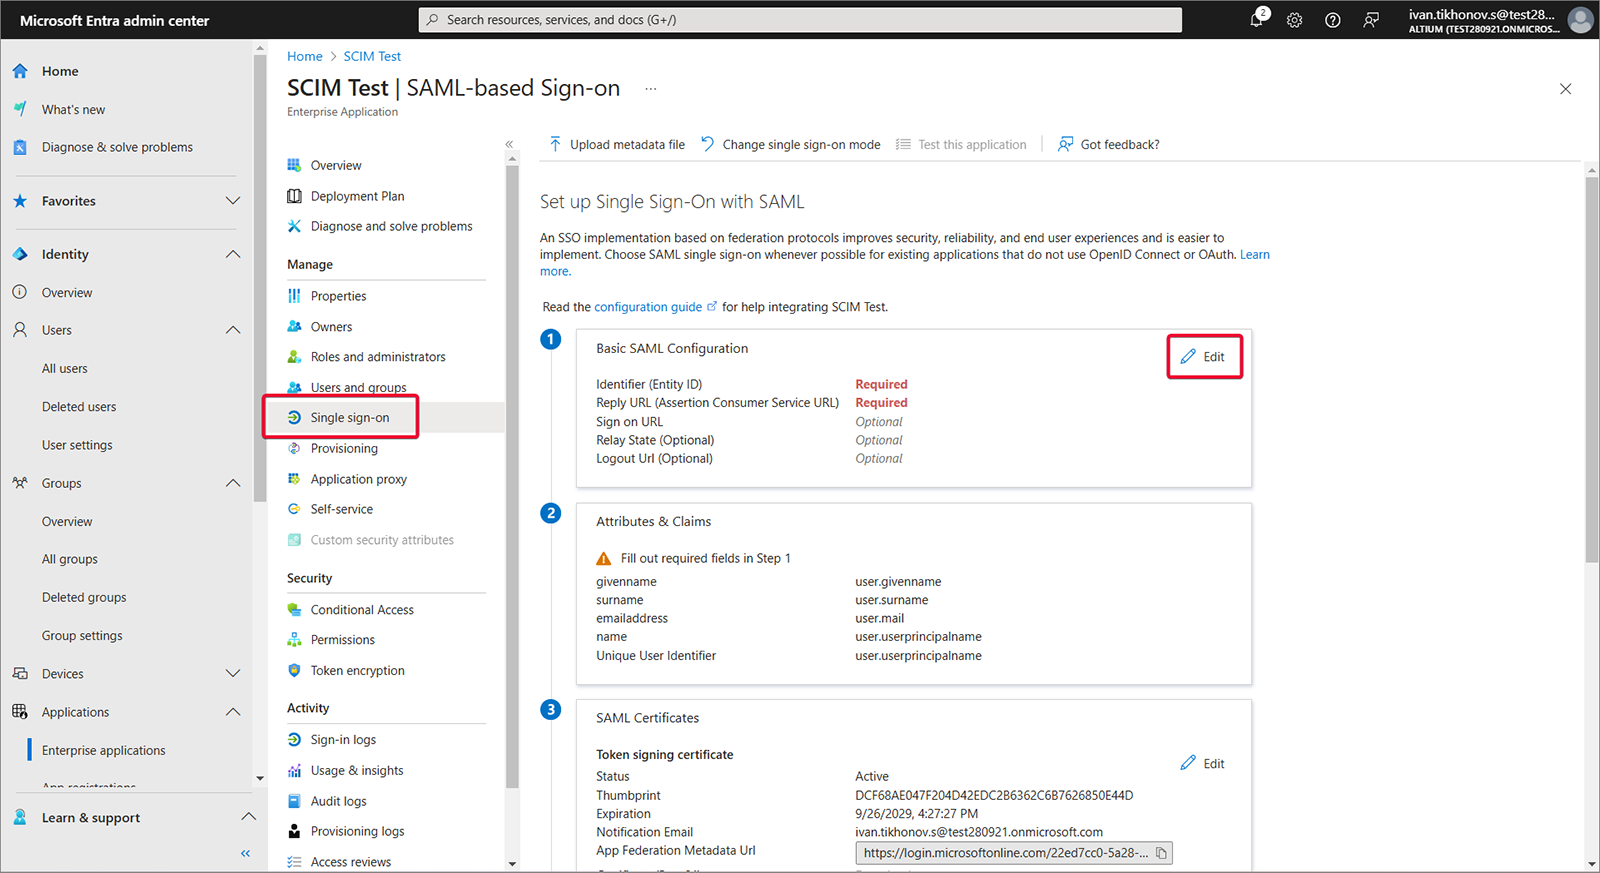
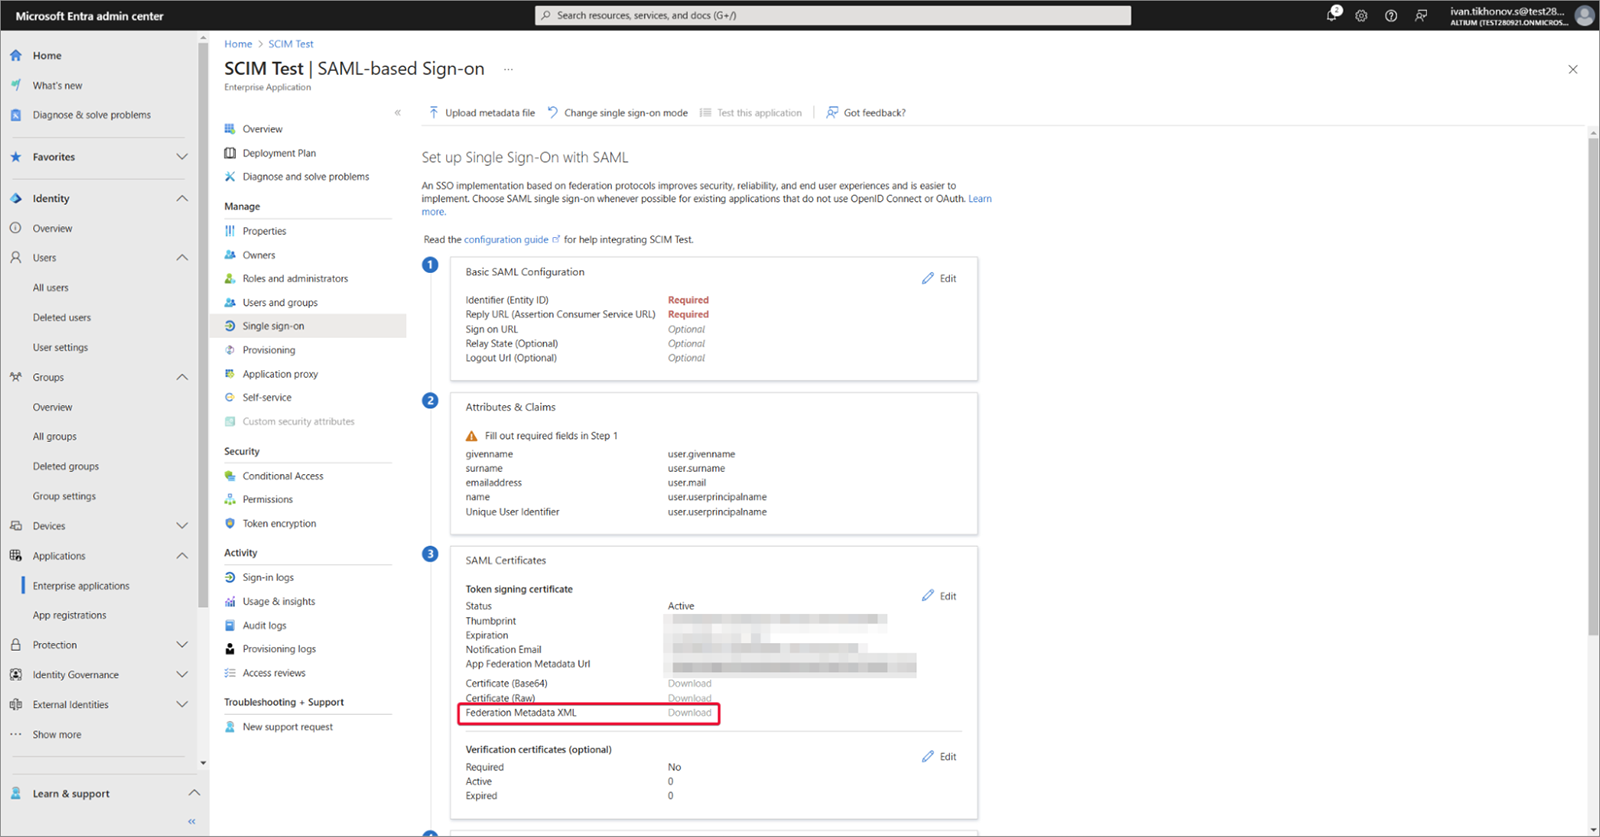
Select Single sign-on, Step 1, and then Edit.
-
Copy (
) Entity ID and Single Sign-On URL from the Admin – Settings – Authentication page of the Enterprise Server's browser interface. Paste the copied strings into the Entity ID and Assertion Consumer Service URL fields in the Microsoft Entra app SAML Configuration area. Make sure the Default boxes are checked for these fields and then save the configuration.

-
Download the created Federation Metadata XML.
-
Upload the Federation Metadata XML to the Admin – Settings – Authentication page of the Enterprise Server's browser interface and then test the SAML integration connection – see above.
Expand the collapsible section below for a step-through example of the integration process for JumpCloud as an Identity Provider.
Integration with JumpCloud
-
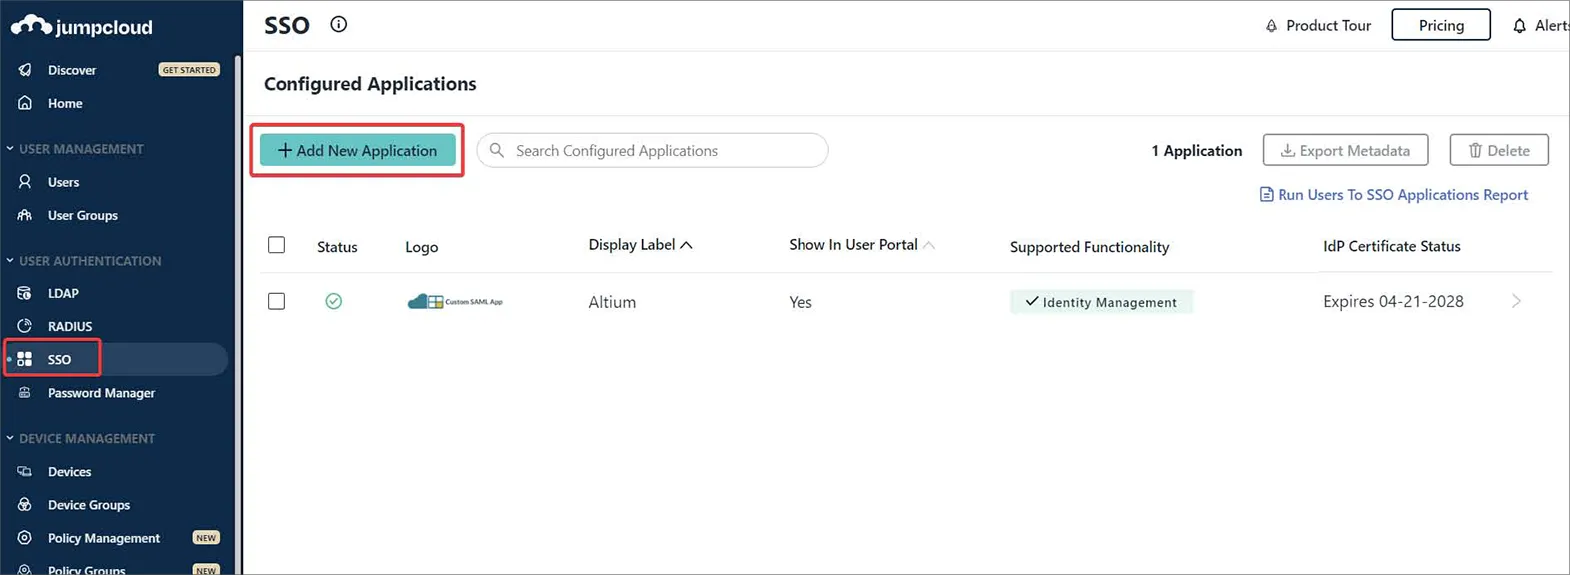
In the JumpCloud interface, select SSO from the navigation tree, and then the Add New Application button on the SSO page.
-
Enter '
saml' in the configuration window Search to locate and then install the Custom SAML App.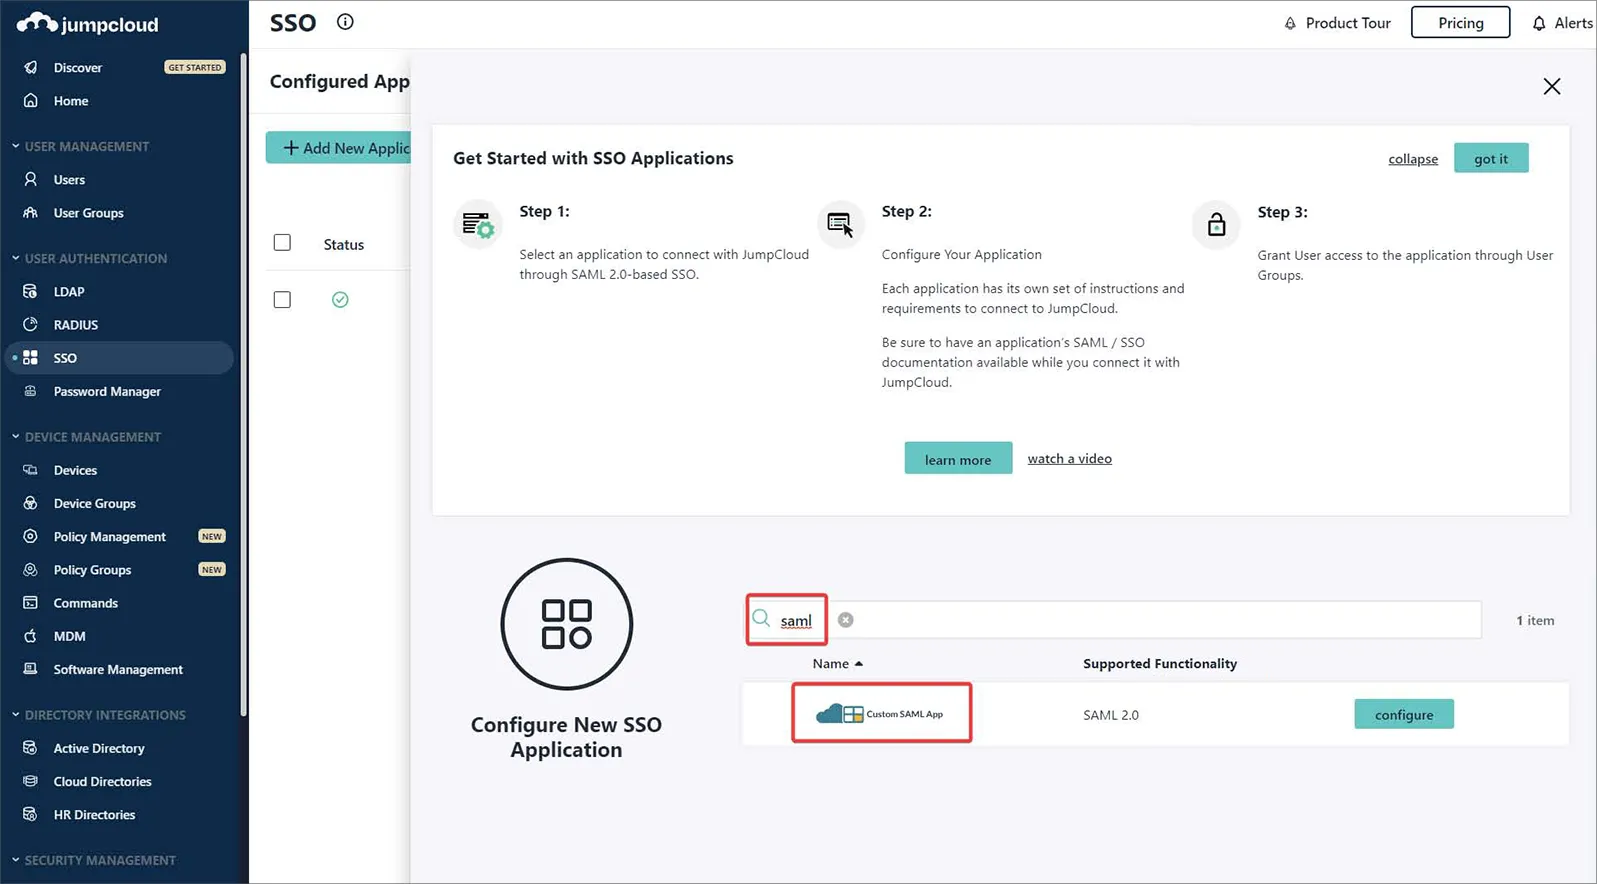
-
Name your instance of the Custom SAML App – in this example, the label is
Altium.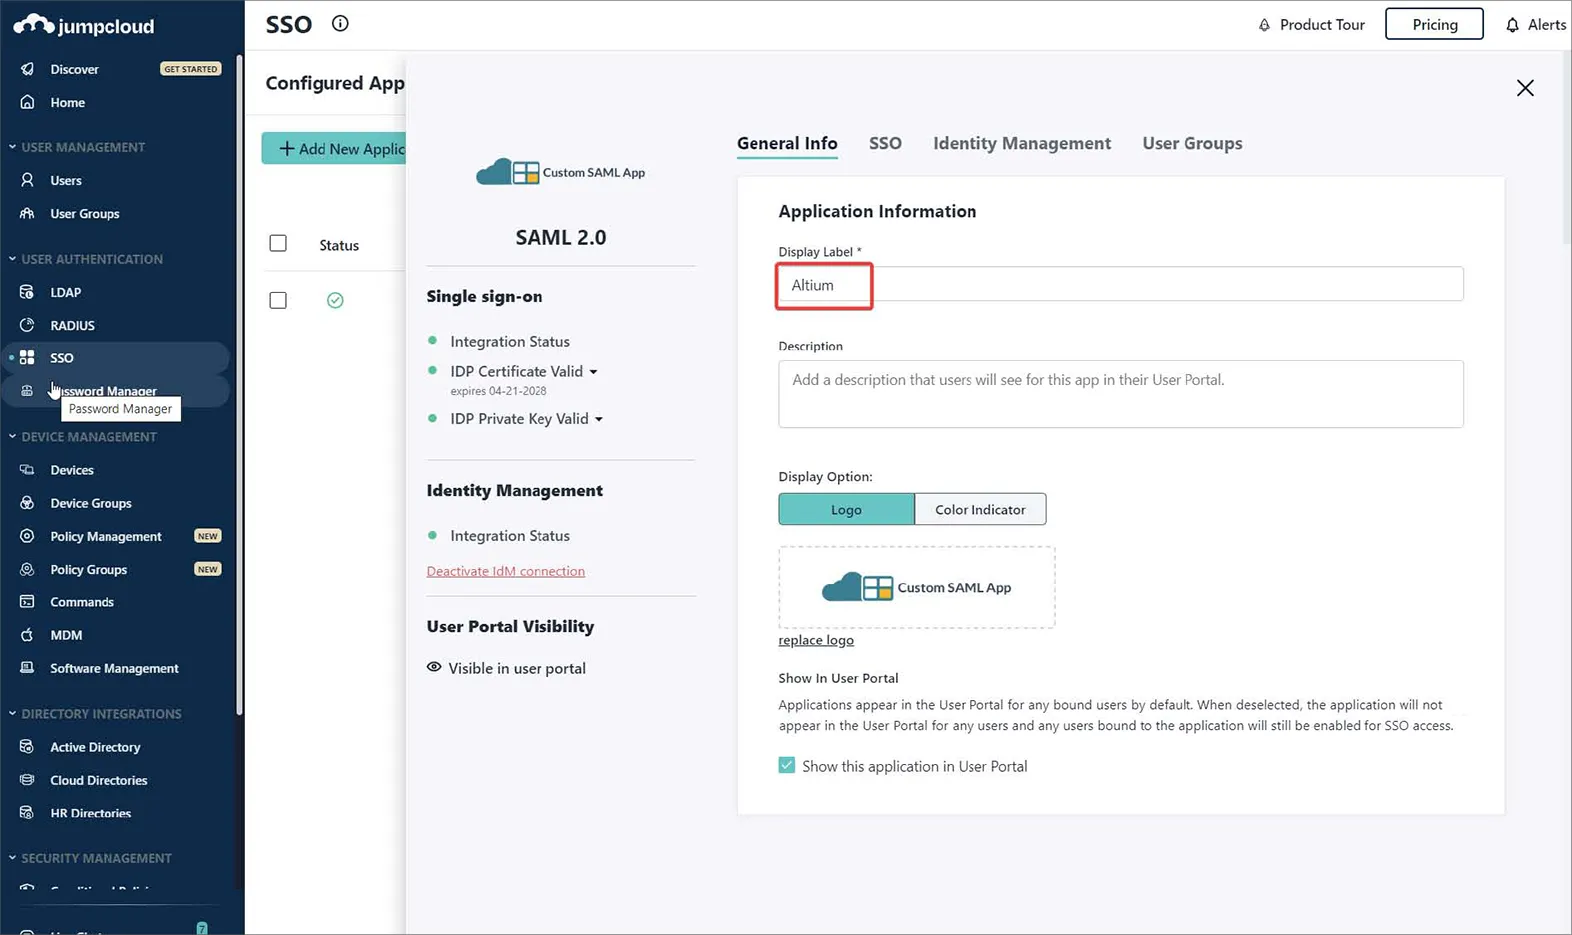
-
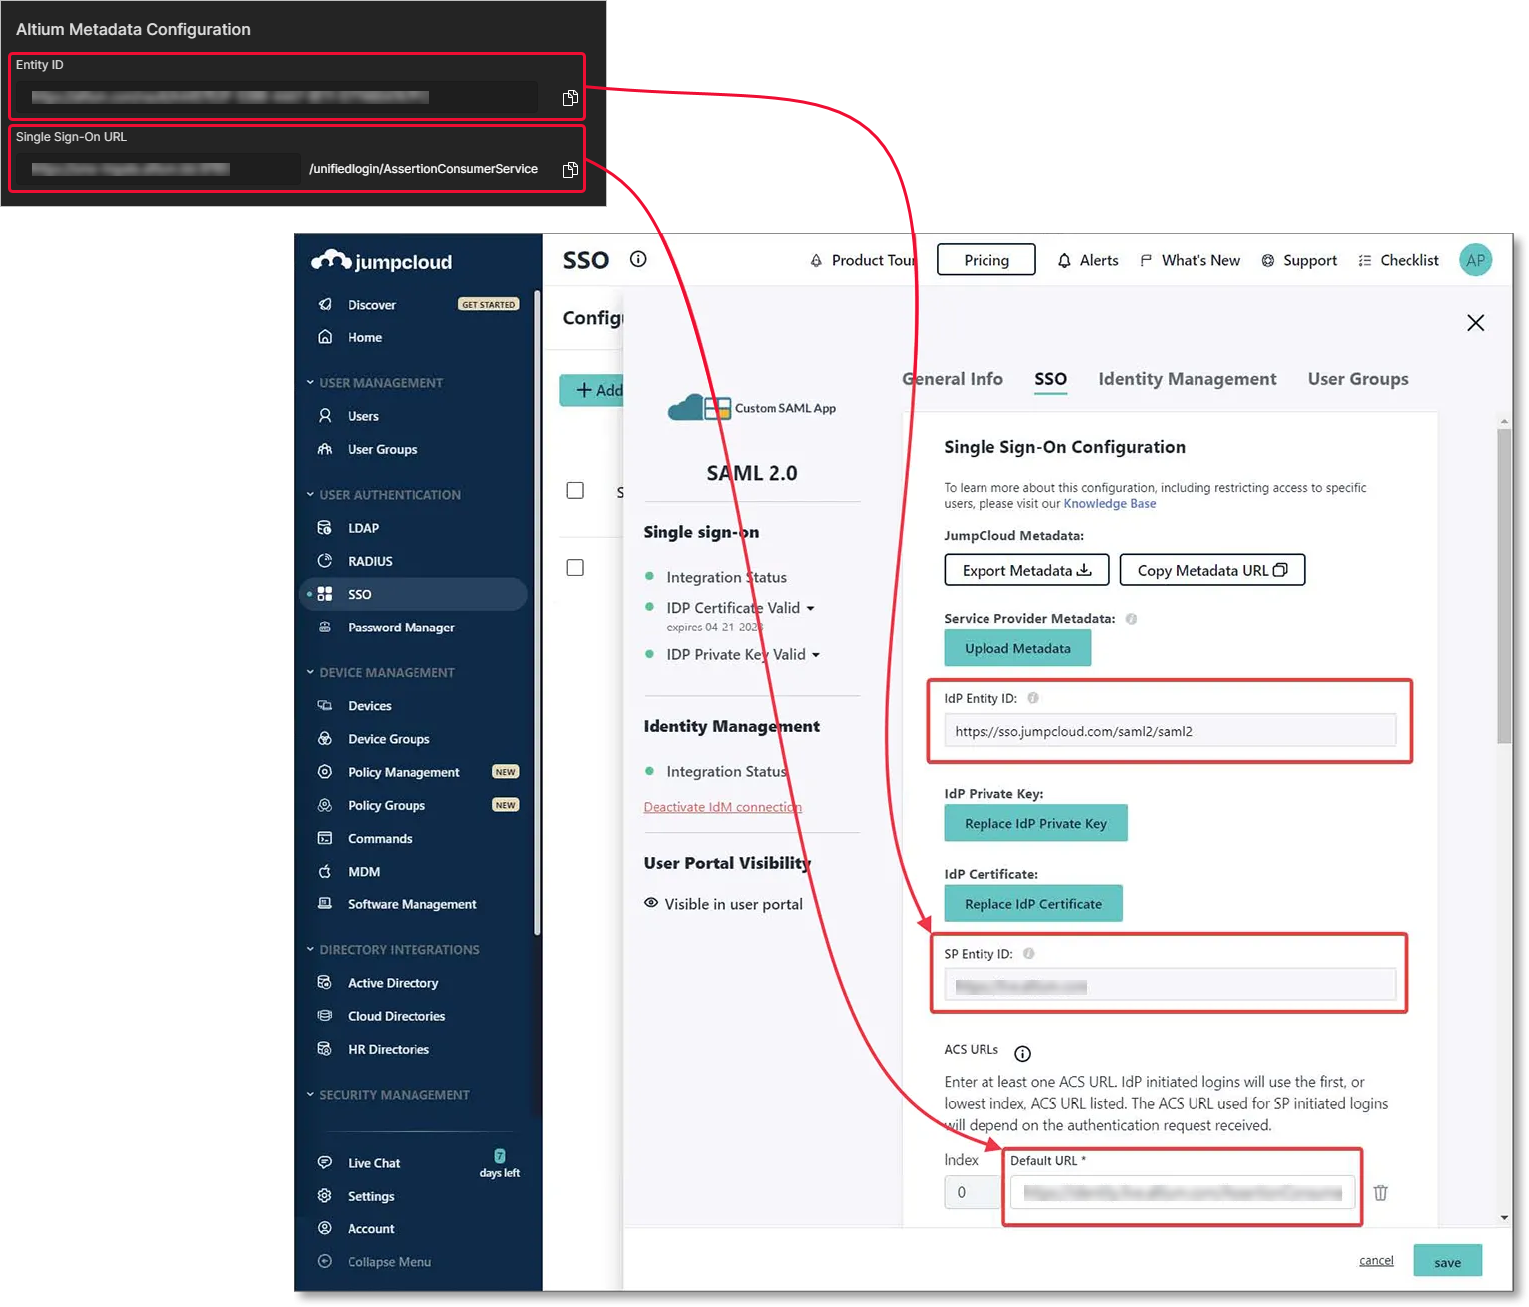
Switch to the SSO tab in the JumpCloud configuration interface and enter the Entity/URL settings from the Admin – Settings – Authentication page of the Enterprise Server's browser interface as shown.
-
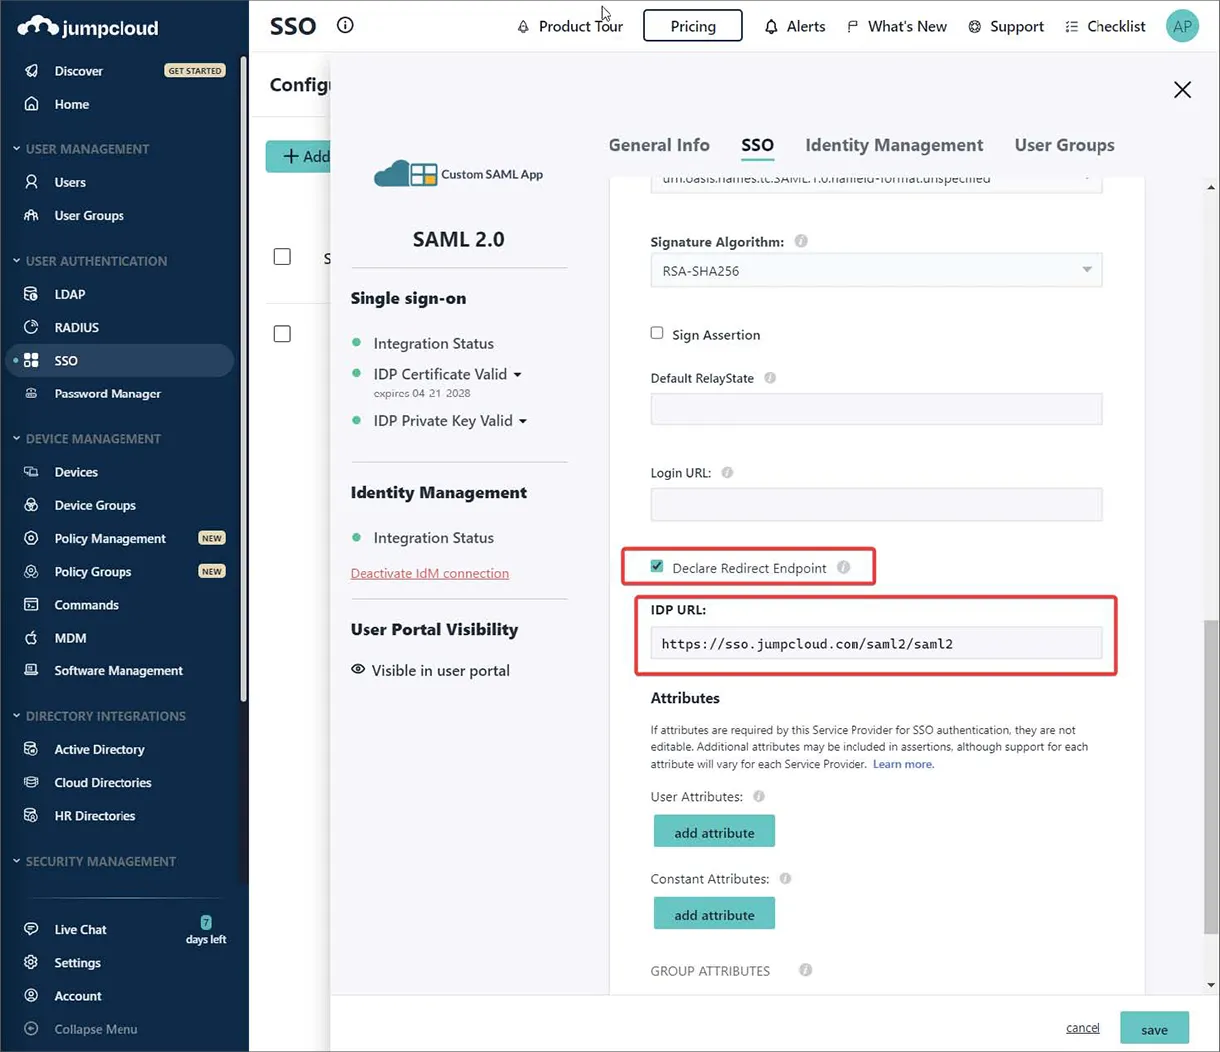
Enter the JumpCloud endpoint IDP URL and enable the Declare Redirect Endpoint option.
-
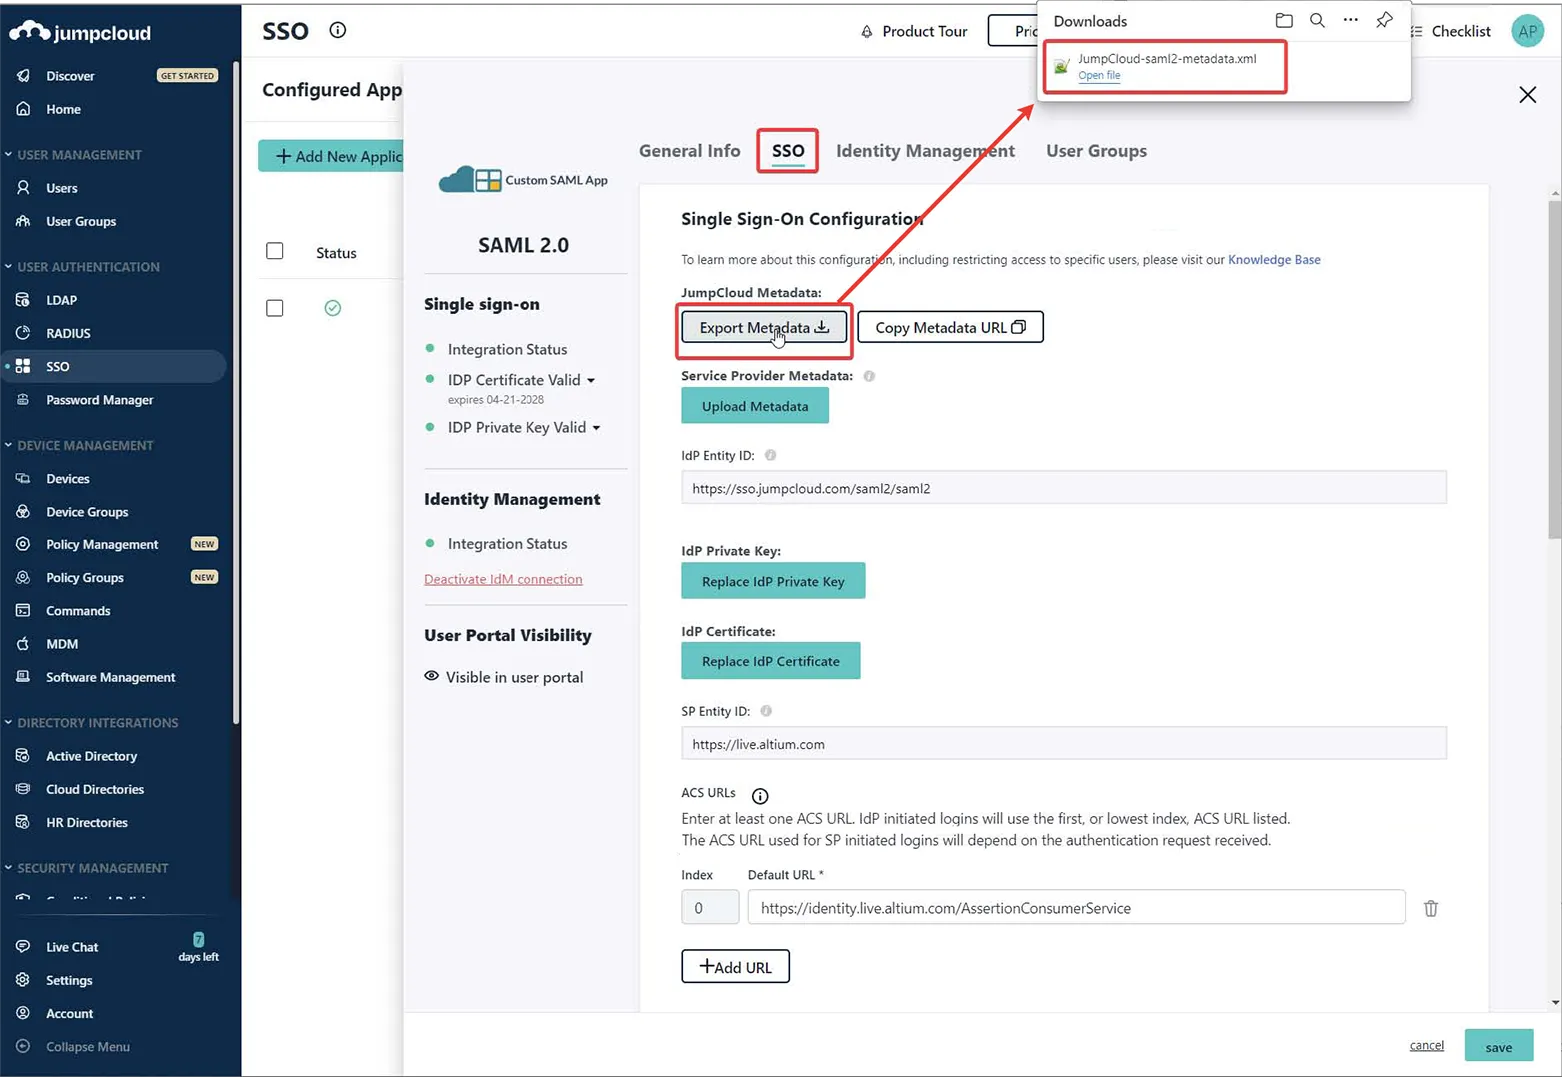
Use the Export Metadata option to download the resulting SAML metadata XML file.
-
Upload the metadata XML file to the Admin – Settings – Authentication page of the Enterprise Server's browser interface and then test the SAML integration connection – see above.
Expand the collapsible section below for a step-through example of the integration process for Microsoft Administrative Domain Federated Services (AD FS) as an Identity Provider.
Integration with Microsoft AD FS
-
Open the AD FS Management application (usually Start → Windows Administrative Tools → AD FS Management).
-
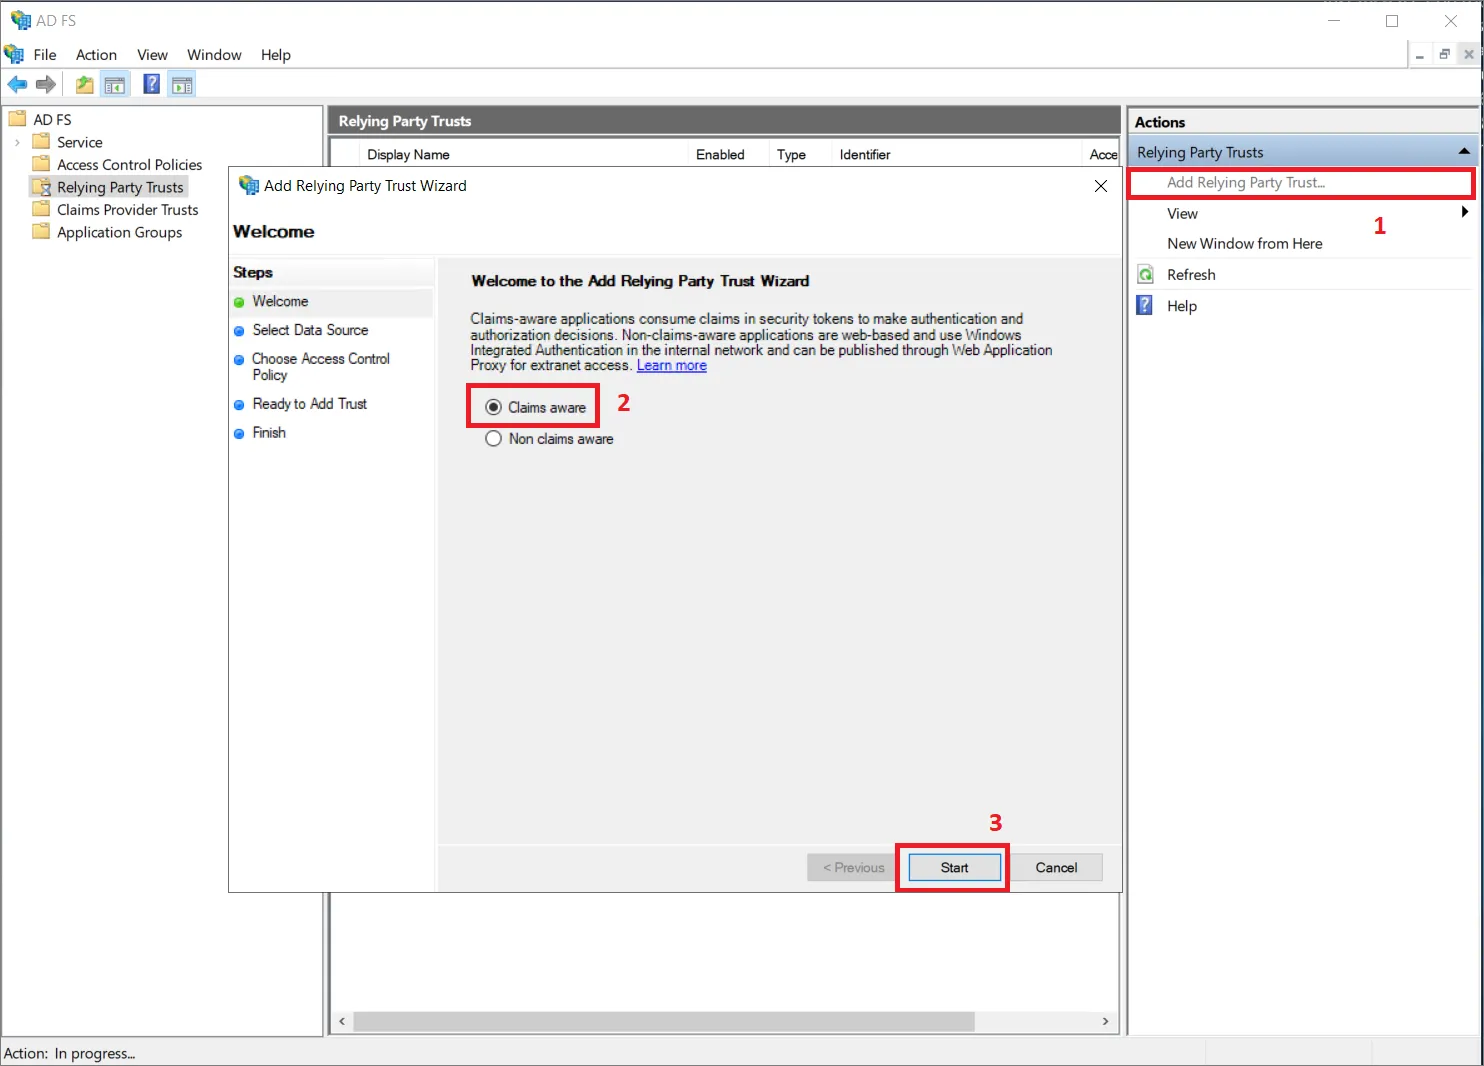
Navigate to Relying Party Trusts and click the Add Relying Party Trust... option (1).
-
In the pop-up window make sure to select Claims aware (2) and click Start (3).
-
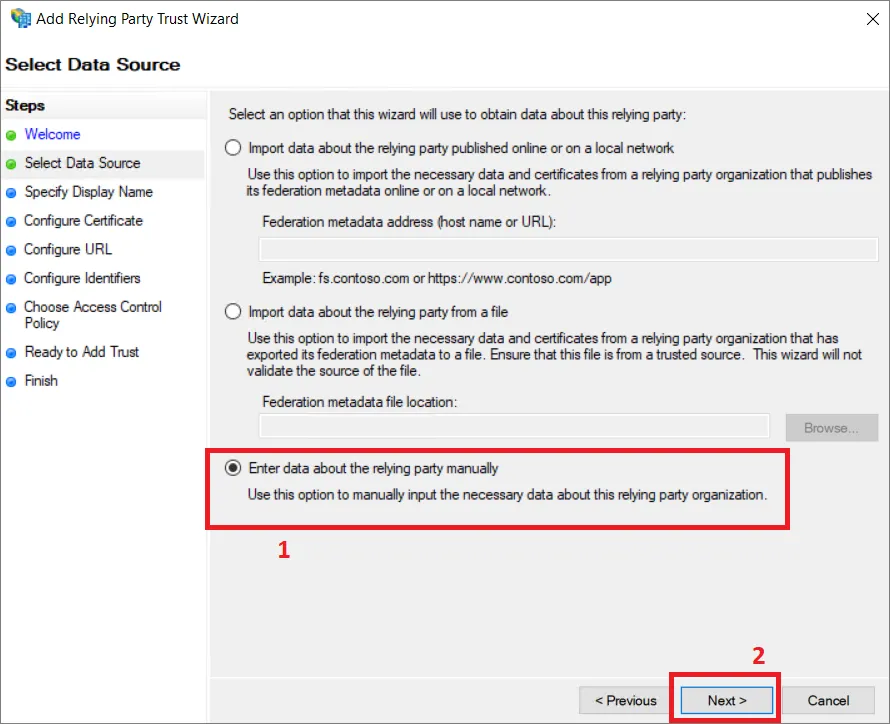
In the Select Data Source step select Enter data about the relying party manually (1) and click Next (2).
-
Provide a display name for the trust. This example uses
AltiumLivefor the display name.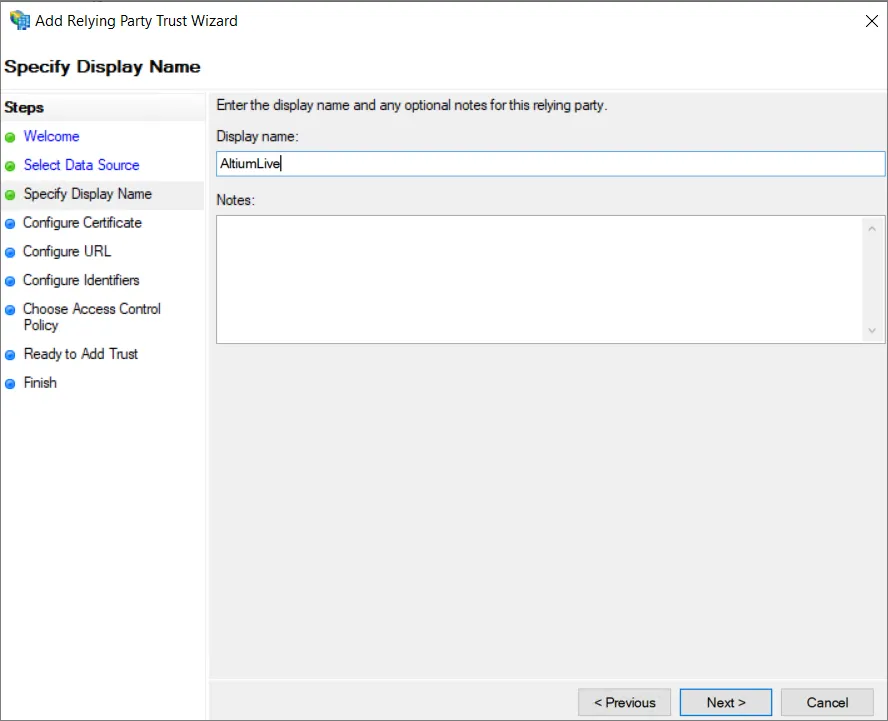
-
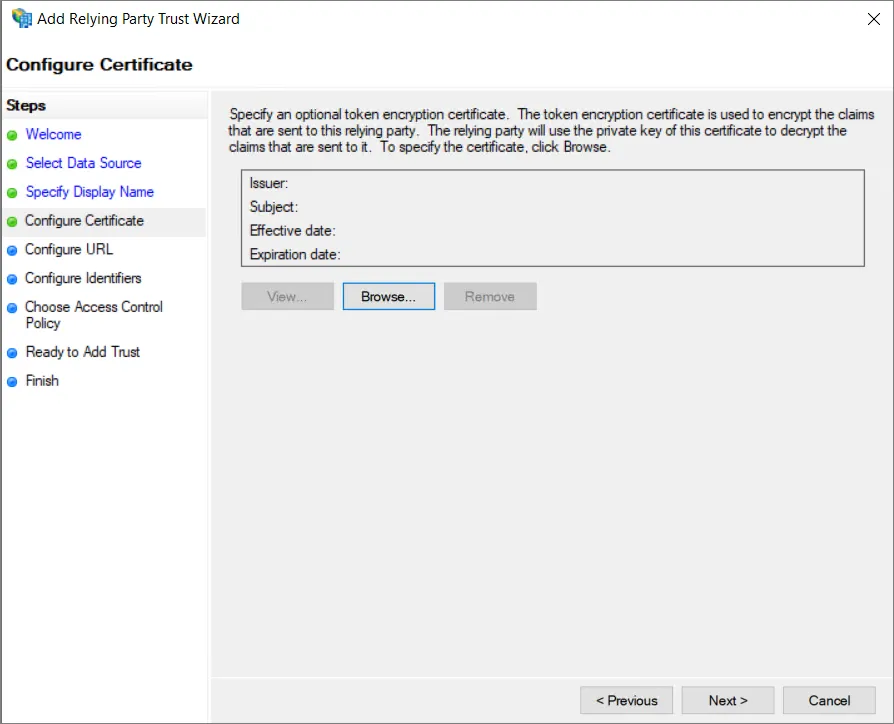
Depending on your security configuration, you may specify an optional token encryption certificate. For the purposes of this guide we will not use one.
-
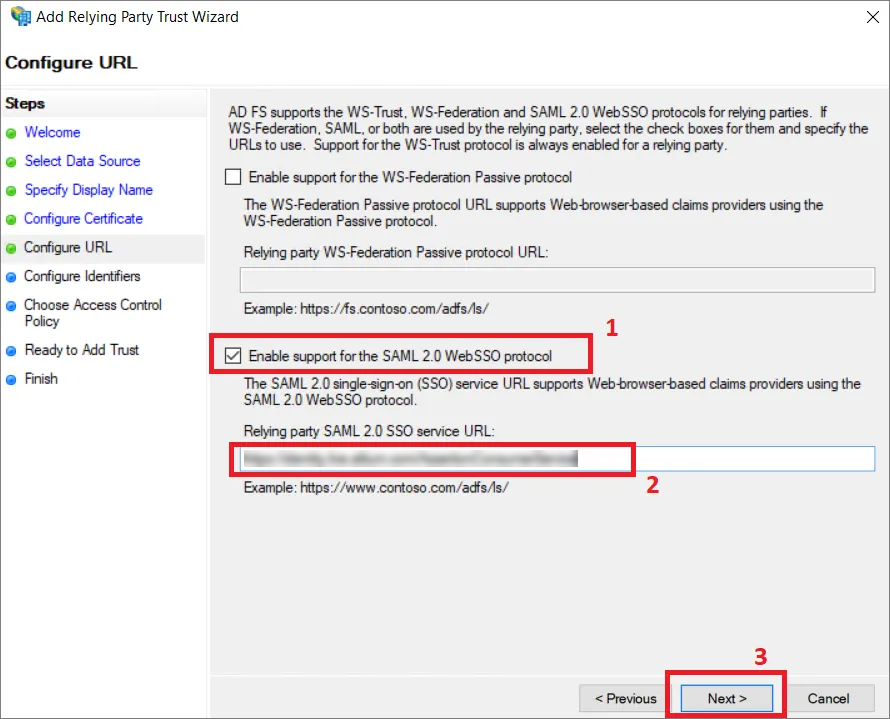
In the Configure URL step make sure to select the Enable support for the SAML 2.0 WebSSO protocol option (1) and input Single Sign-On URL copied from the Admin – Settings – Authentication page of the Enterprise Server's browser interface into the Relying party SAML 2.0 SSO service URL: field (2). Click Next (3).
-
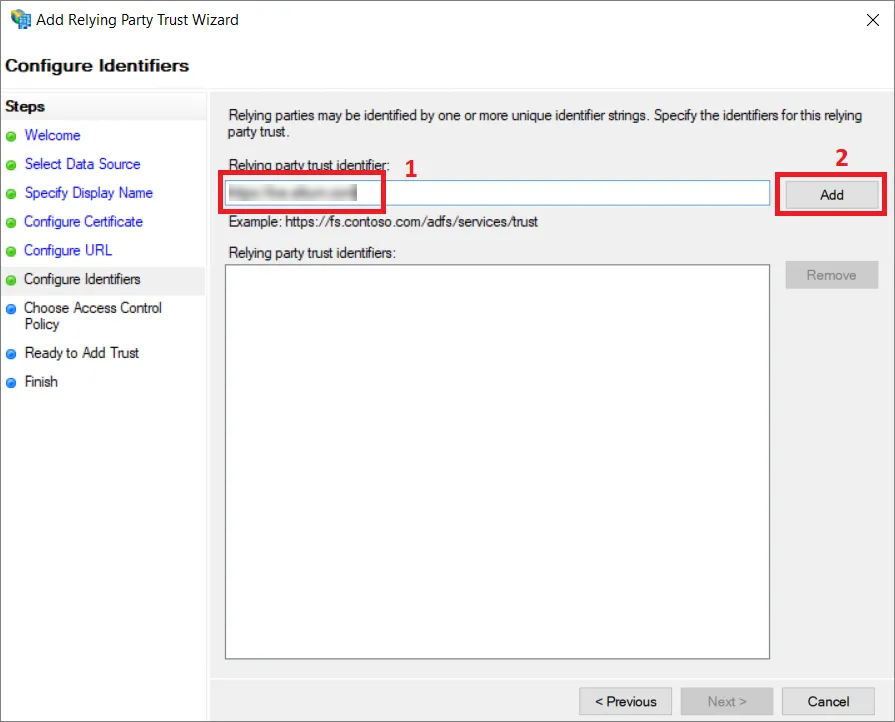
In the Configure Identifiers step provide an identifier for this trust into the input field (1). The identifier must be taken from the Entity ID entry located in the Altium Metadata Configuration region of the Admin – Settings – Authentication page of the Enterprise Server's browser interface. Make sure click the Add button (2).
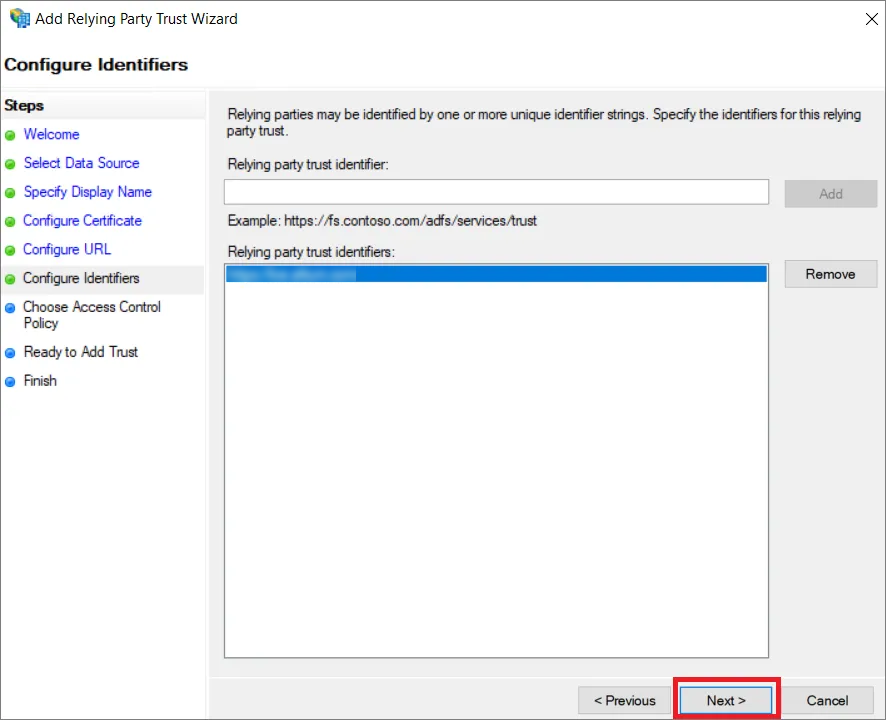
The result should look like the following. Click Next.
-
Depending on your security configuration, you may choose optional access control policies in the next step. For this example we will not select any additional policies and continue with the
Permit everyoneoption.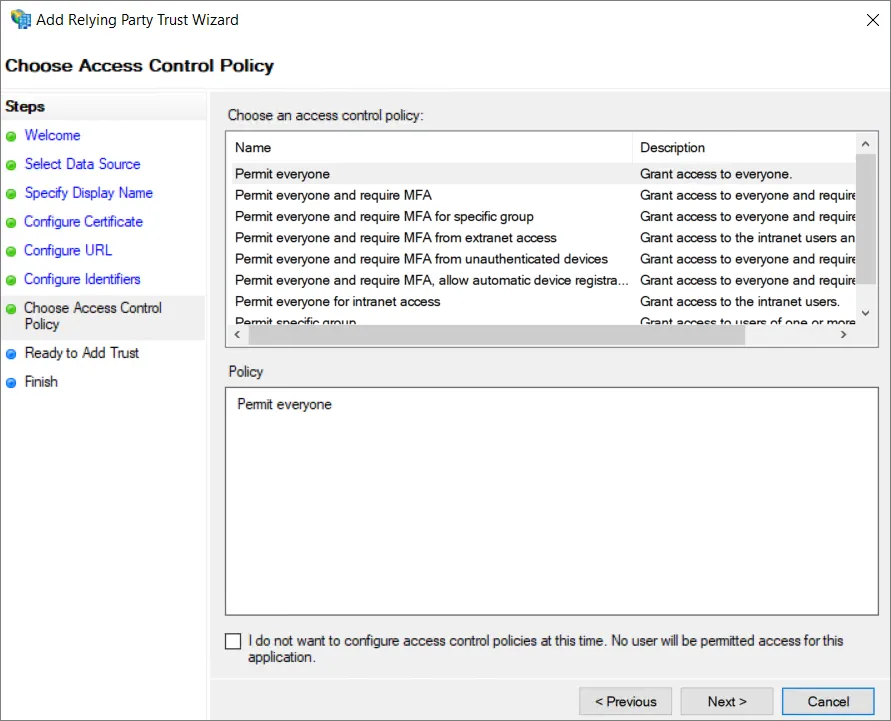
-
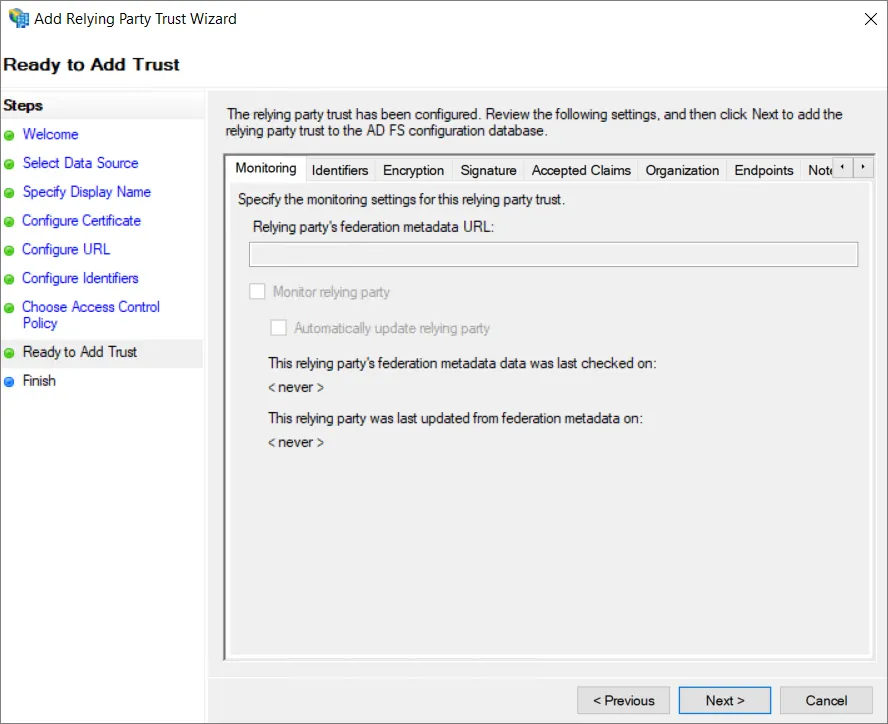
Review the configuration and select Next.
-
Not all settings are available while setting up the trust. To allow
SHA-1to be used as the secure hash algorithm, right-click on the name of the Relying Party Trust you have just added and select Properties.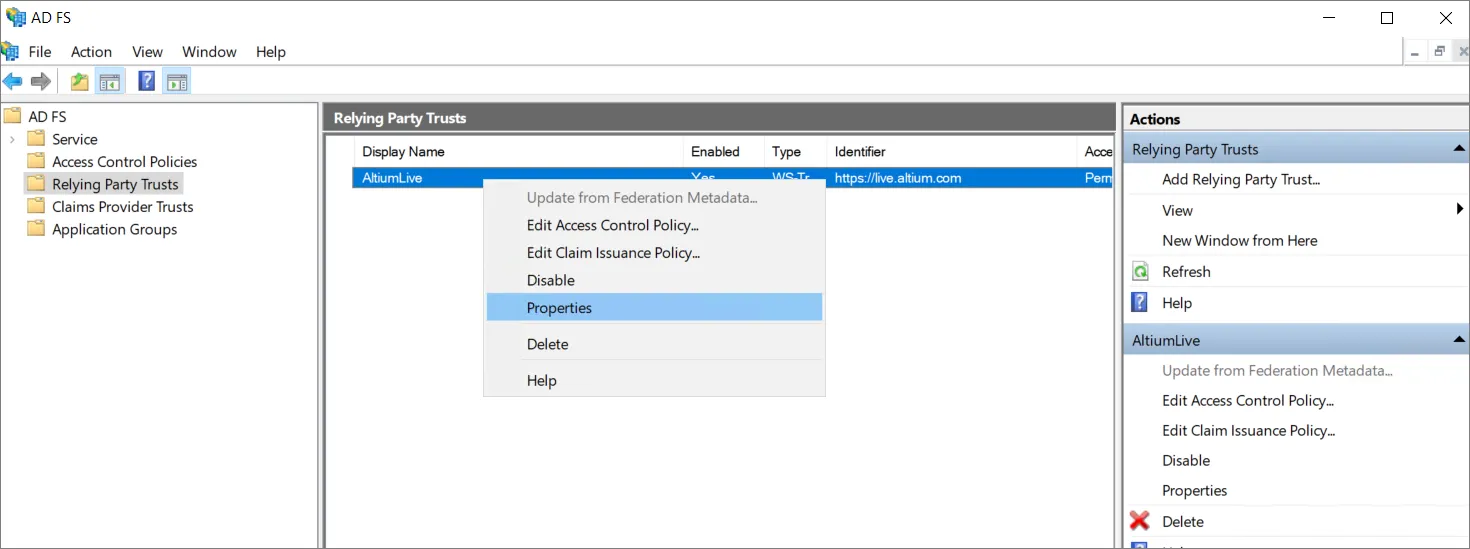
-
In the properties window select the Advanced tab (1) and set
SHA-1as the secure hash algorithm (2). Click OK to save changes.
-
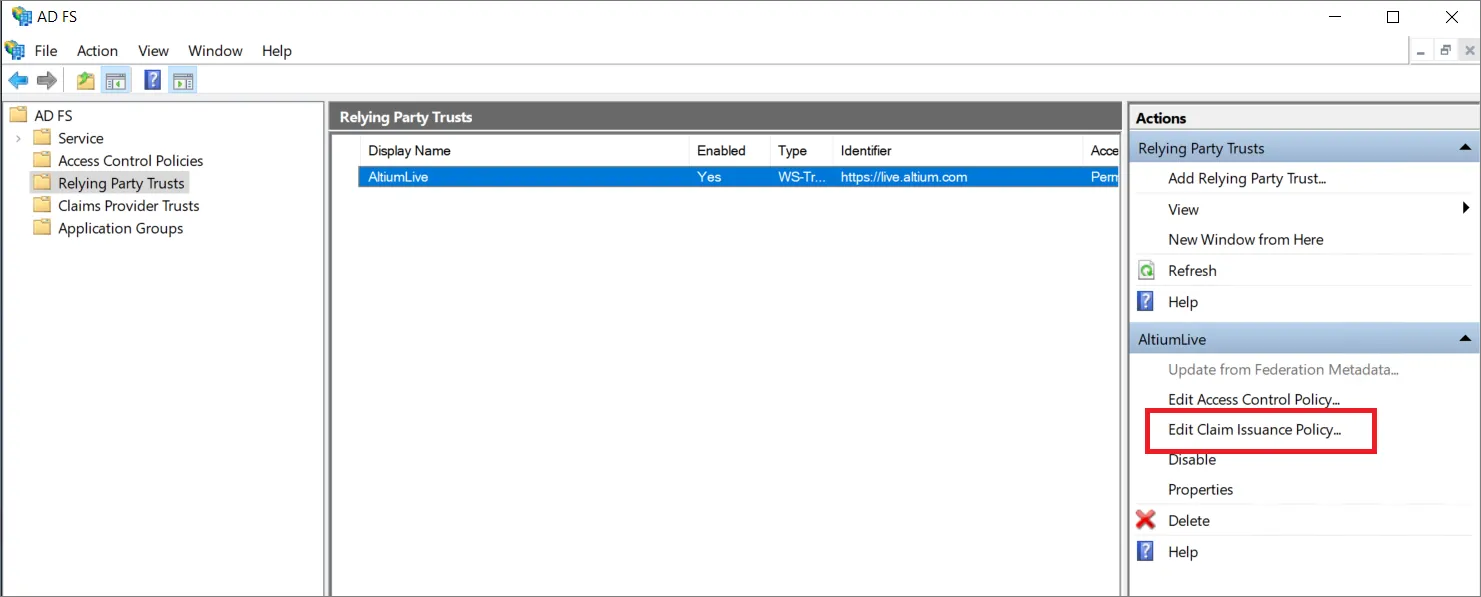
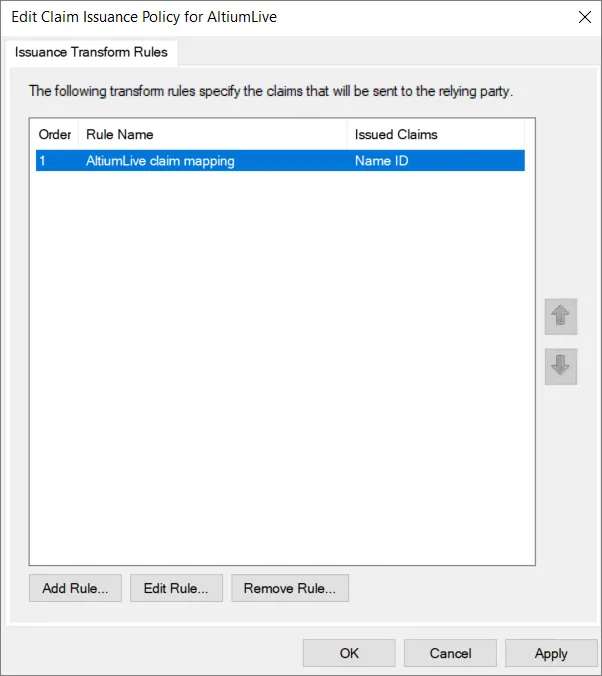
Back in the AD FS Management window select the Relaying Party Trust you have added and select the Edit Claim Issuance Policy... option.
-
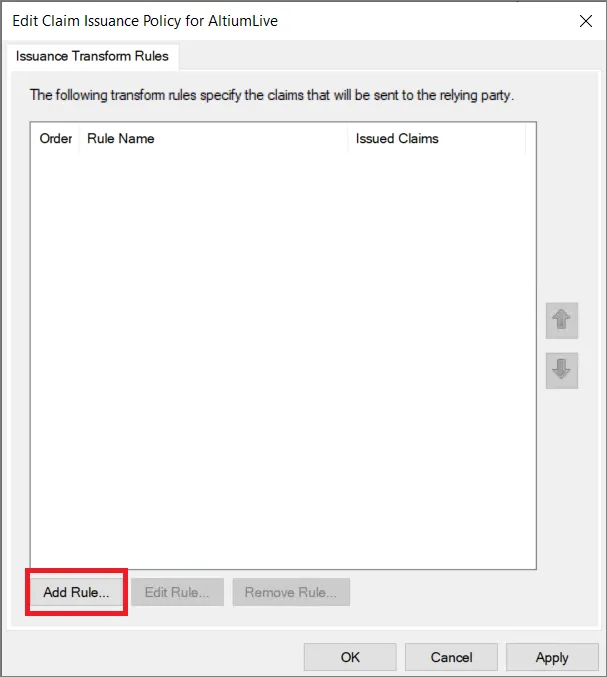
In the Edit Claim Issuance Policy window select Add Rule...
-
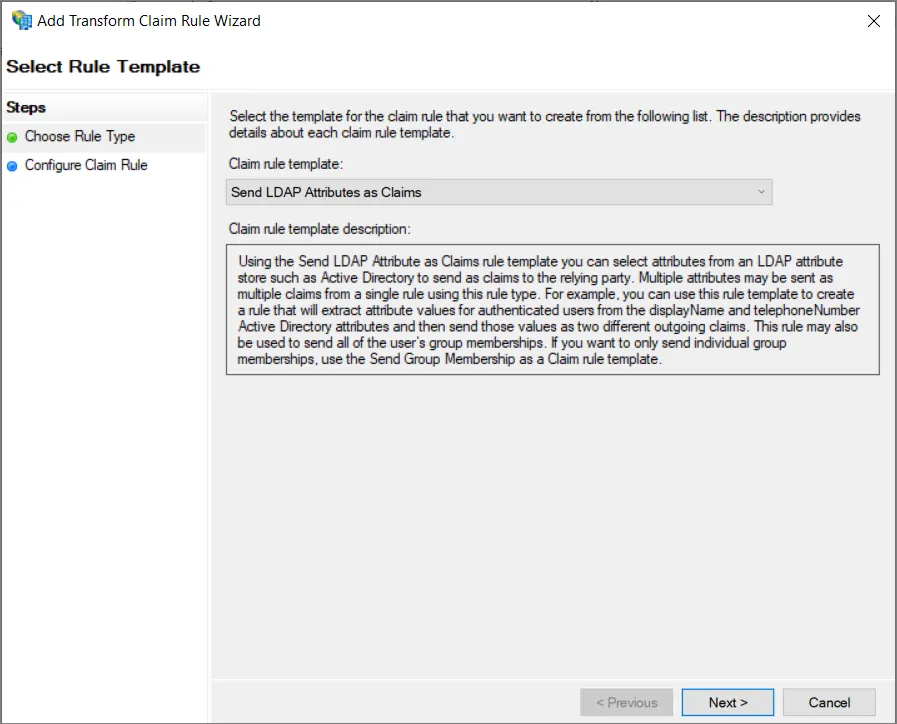
In the Choose Rule Type step of the wizard make sure that Send LDAP Attributes as Claims is selected, then click Next.
-
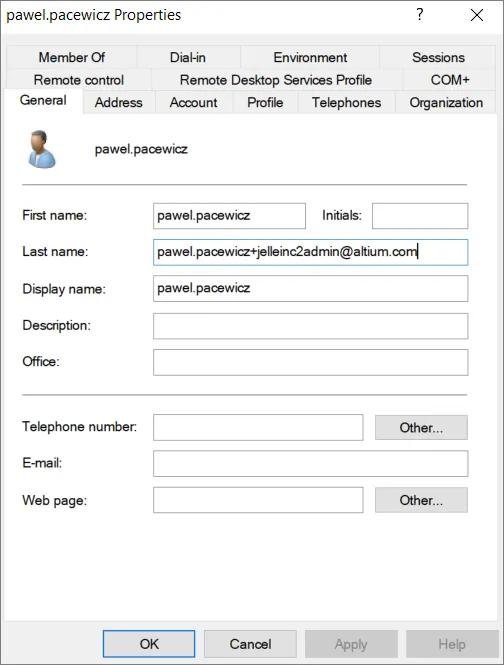
Provide a Claim rule name (1), select
Active Directoryas the Attribute store (2), and select an LDAP Attribute (3) from the ID which contains the username for the Enterprise Server user. This attribute must be mapped to Name ID in the Outgoing Claim Type (3). Click Finish (4).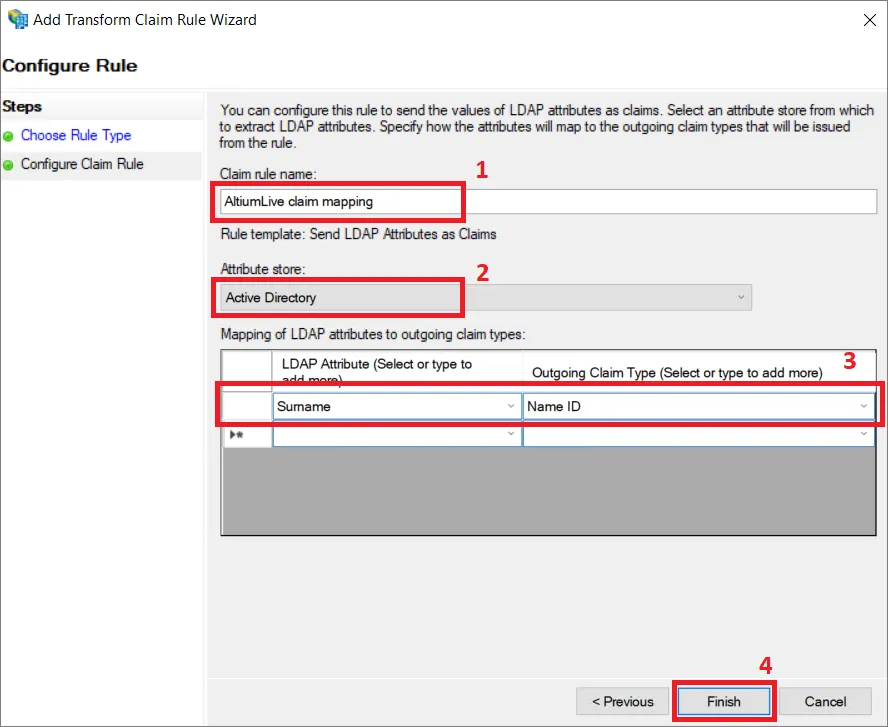
-
Ensure the claim issuance policy is saved by clicking OK.
-
Download the
FederationMetadata.xmlfile from the appropriate server. -
Upload the metadata XML file to the Admin – Settings – Authentication page of the Enterprise Server's browser interface and then test the SAML integration connection – see above.
Expand the collapsible section below for a step-through example of the integration process for AWS IAM Identity Center as an Identity Provider:
Integration with AWS IAM Identity Center
-
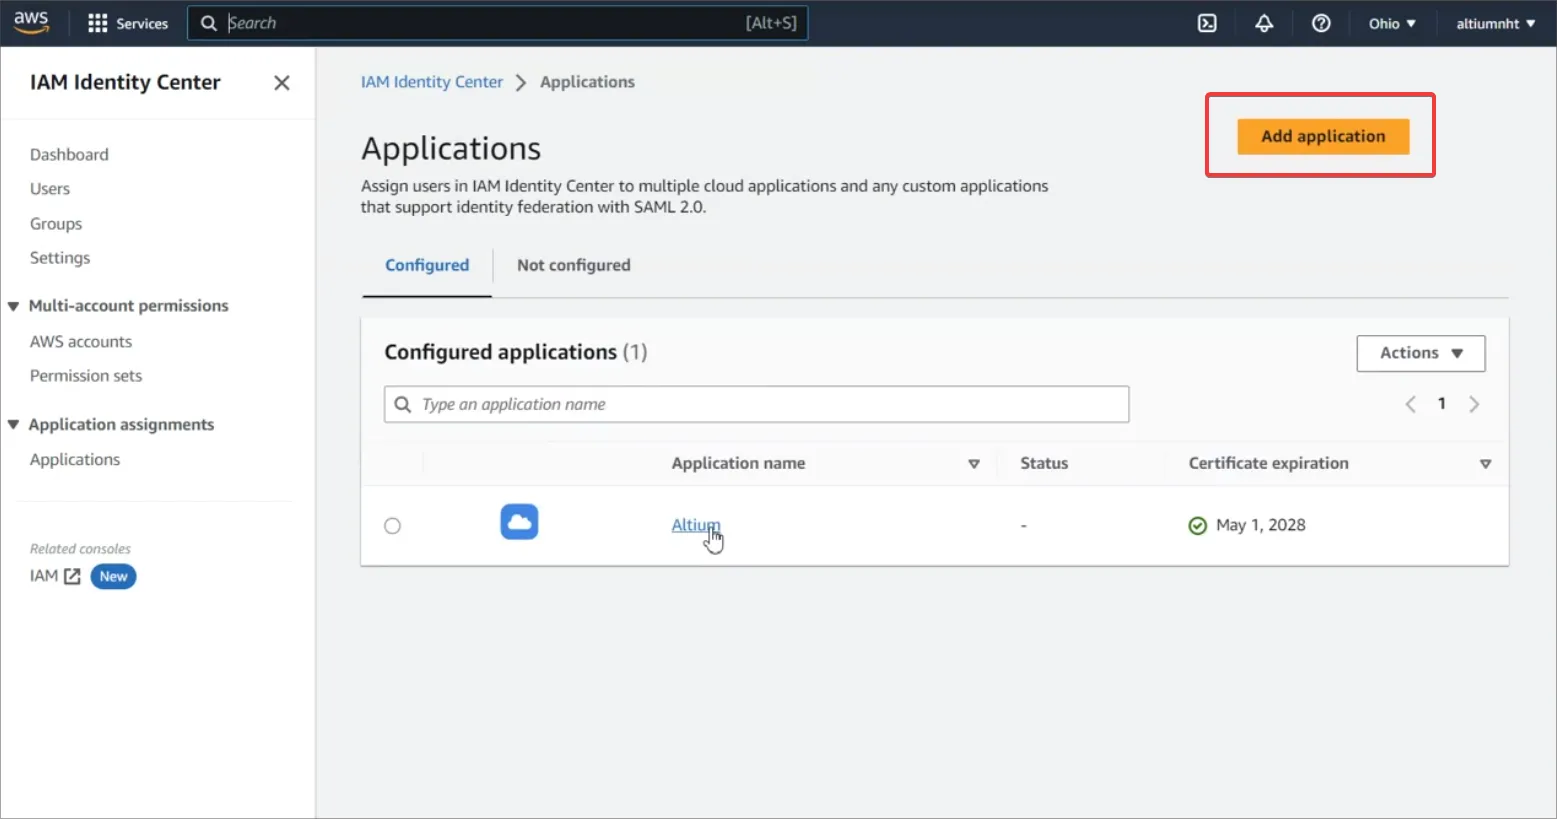
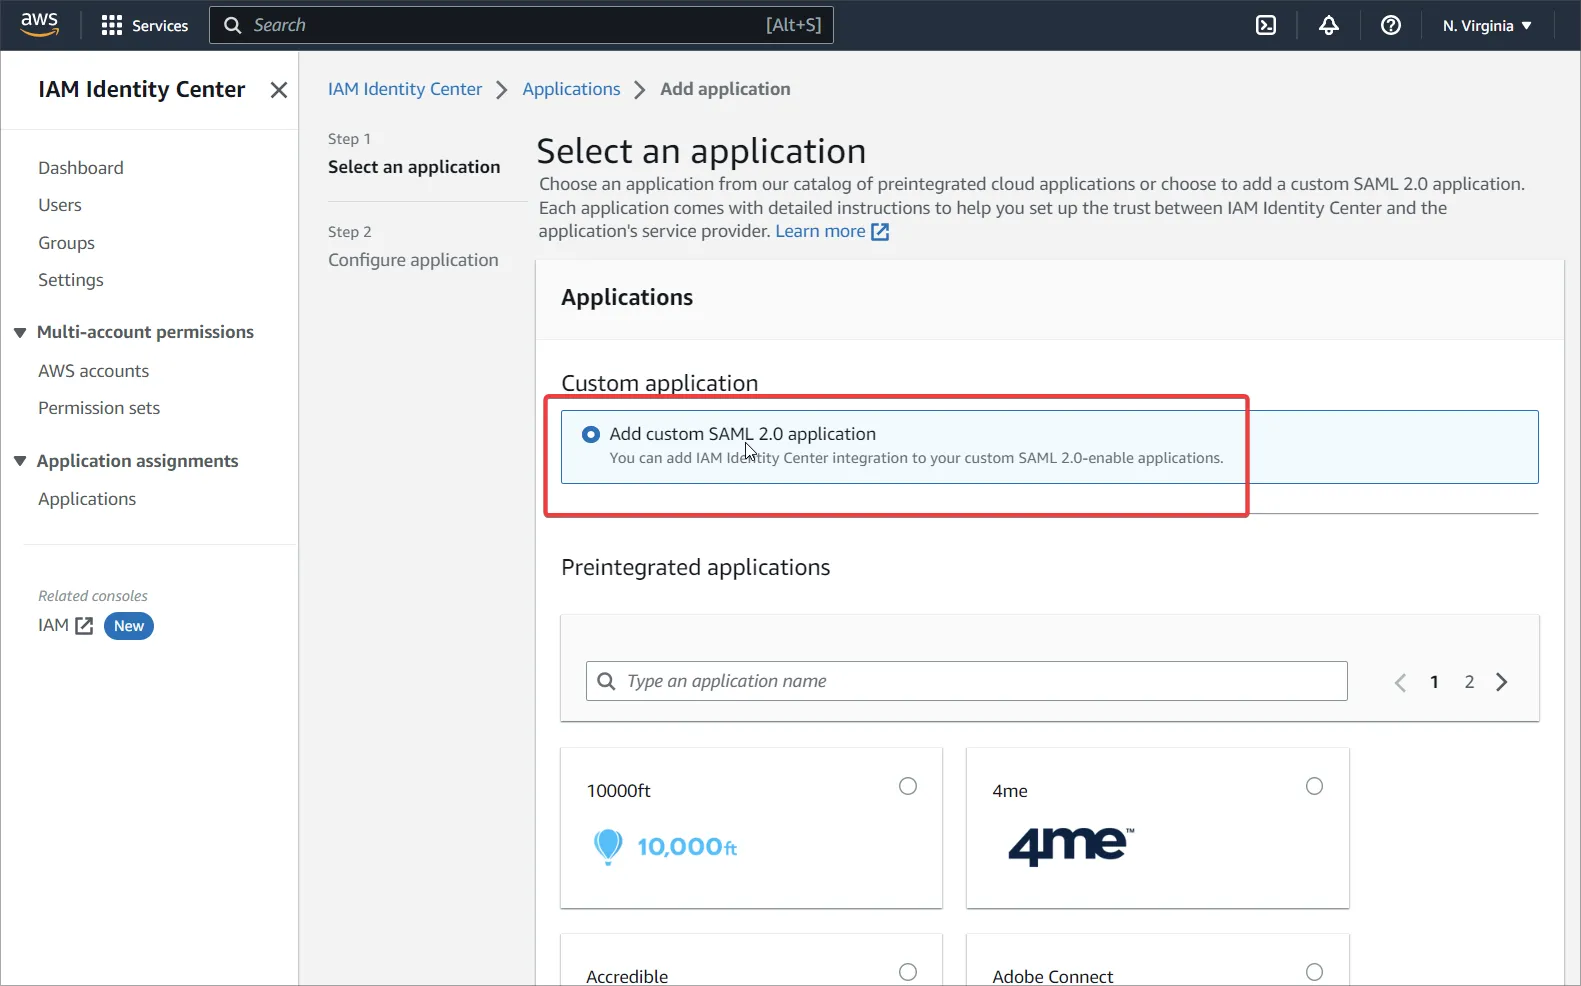
Go to the IAM Identity Center and add a Custom SAML 2.0 Application (Add Application).
-
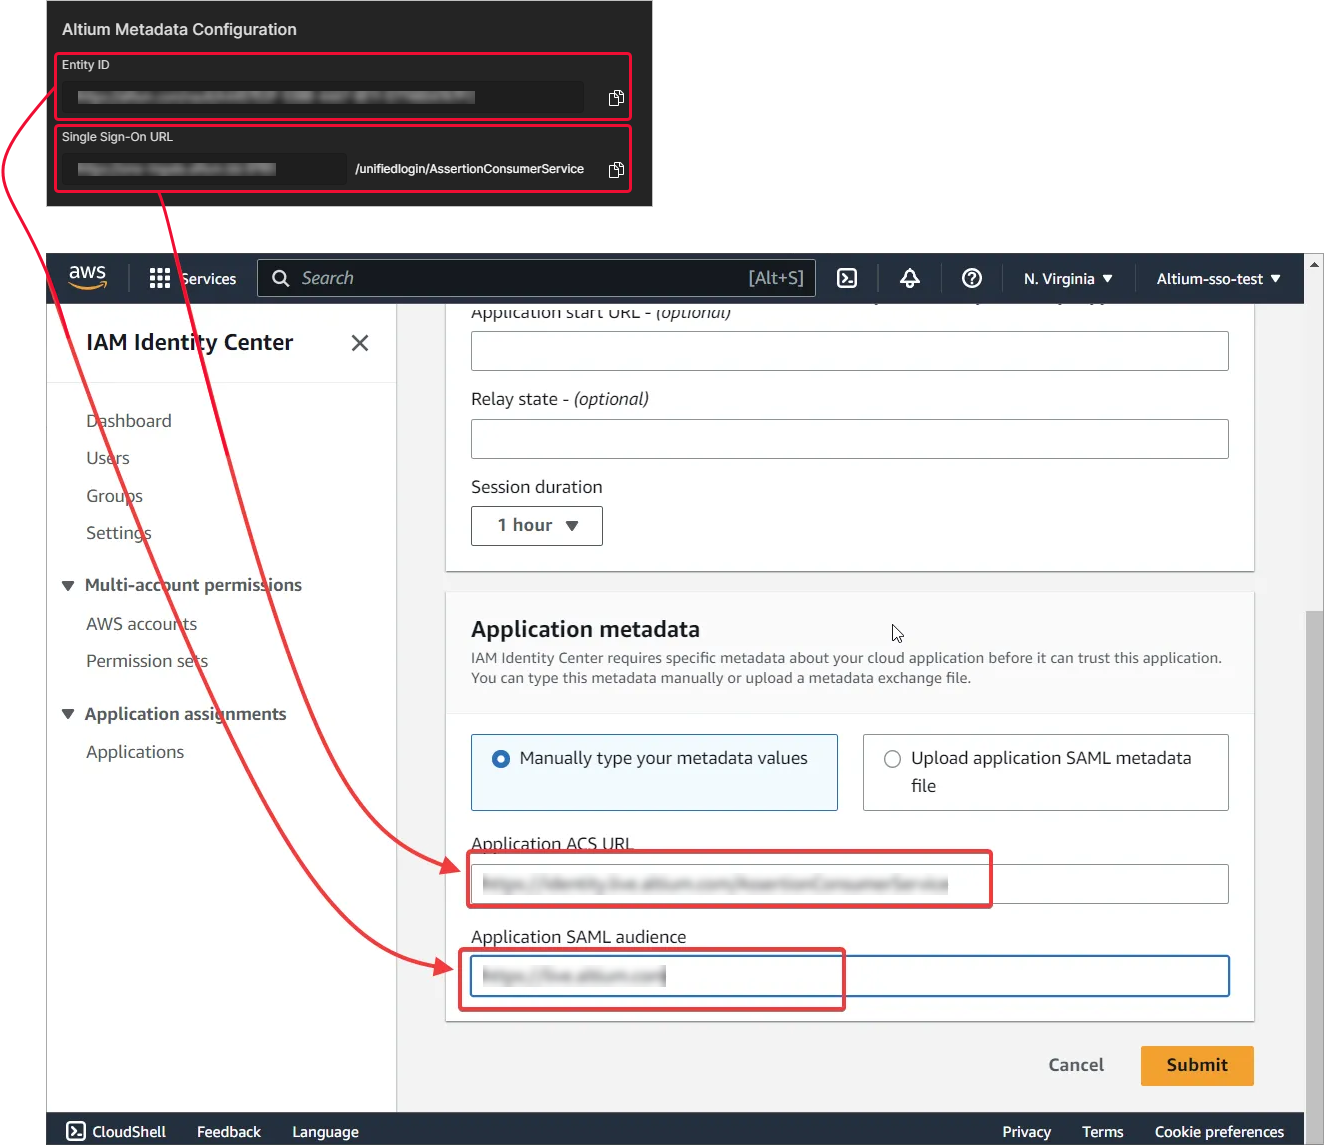
Fill in the AWS metadata URL settings from your Altium SSO page. Confirm the settings with Submit.
-
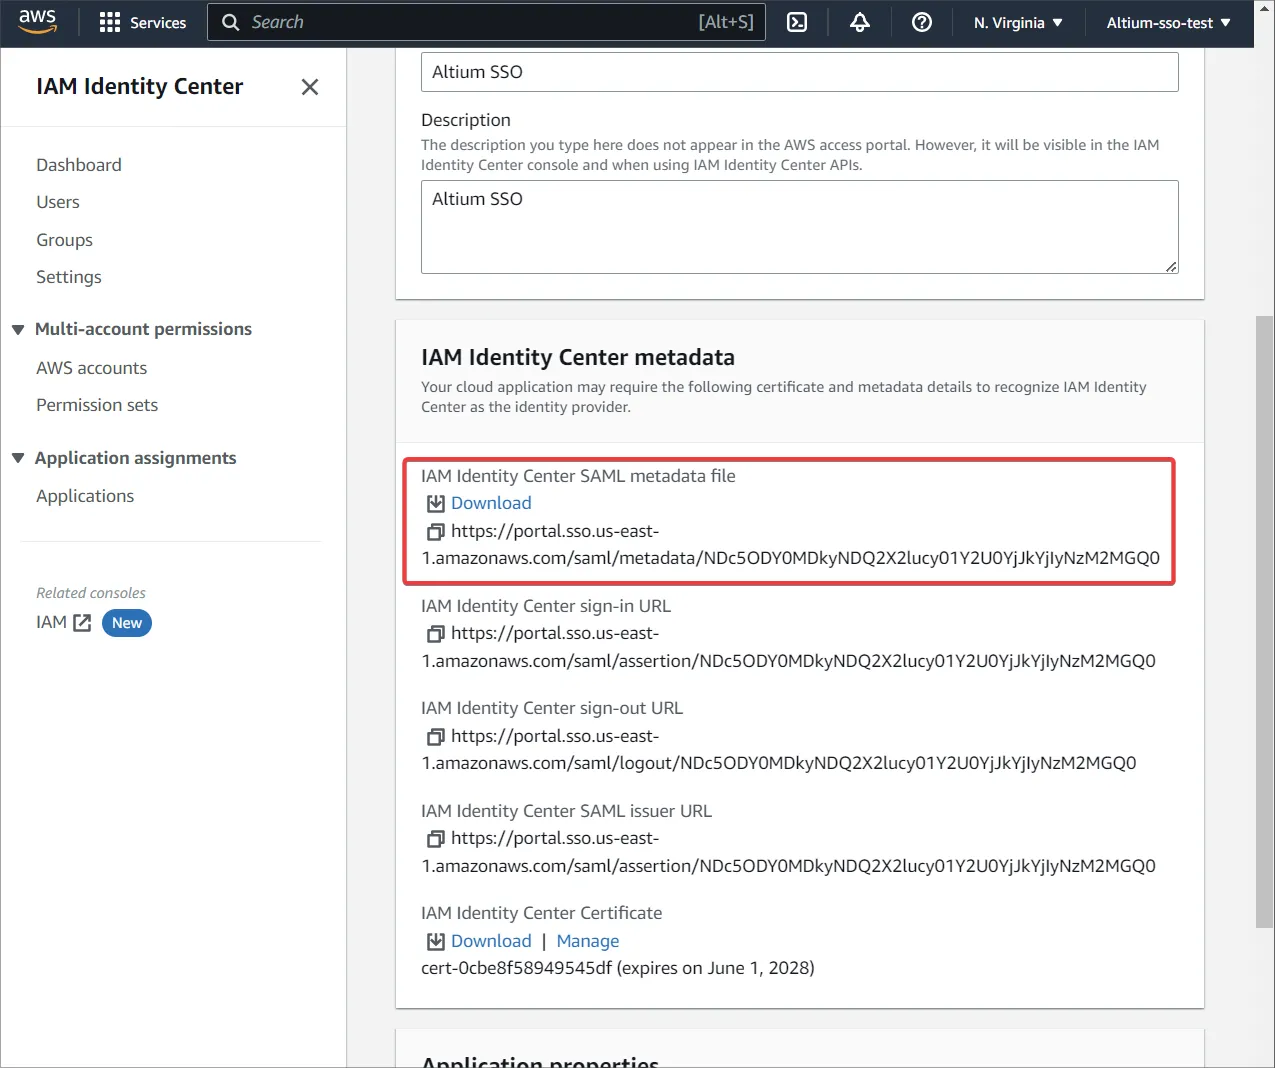
Download the metadata file from the IAM Identity Center metadata area.
-
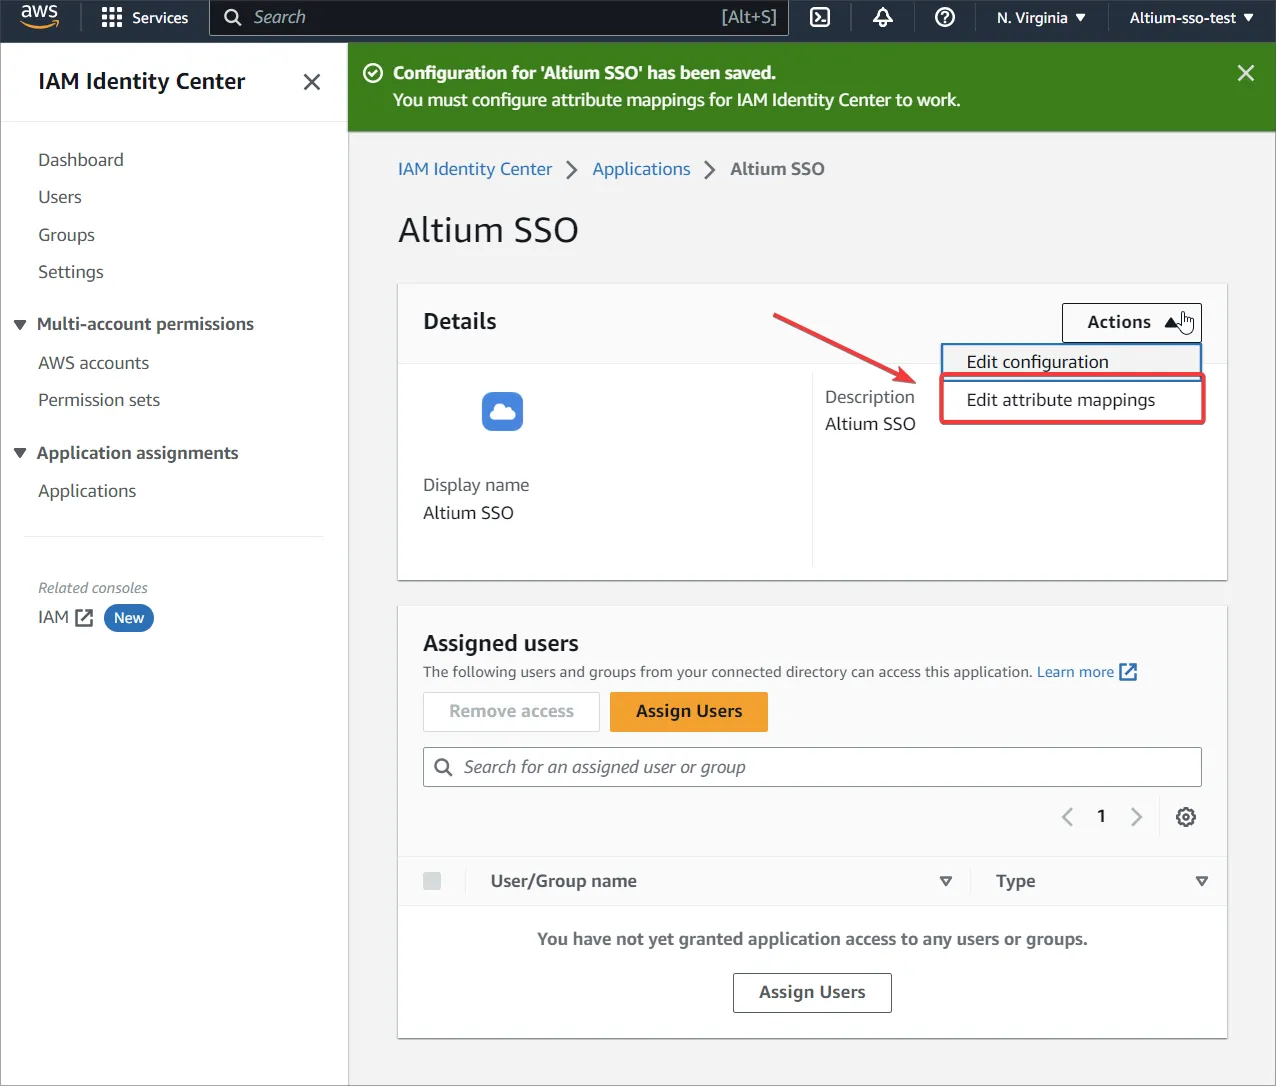
Go to Edit attribute mappings.
-
Provide an attribute that will contain the username for the Enterprise Server user and select
unspecifiedfor the Format. -
Create new users in AWS and assign the application to the created users or a group.
-
Ensure that the same users exist on both the Altium and IAM sides.
-
Upload the metadata XML file to the Admin – Settings – Authentication page of the Enterprise Server's browser interface and then test the SAML integration connection – see above.
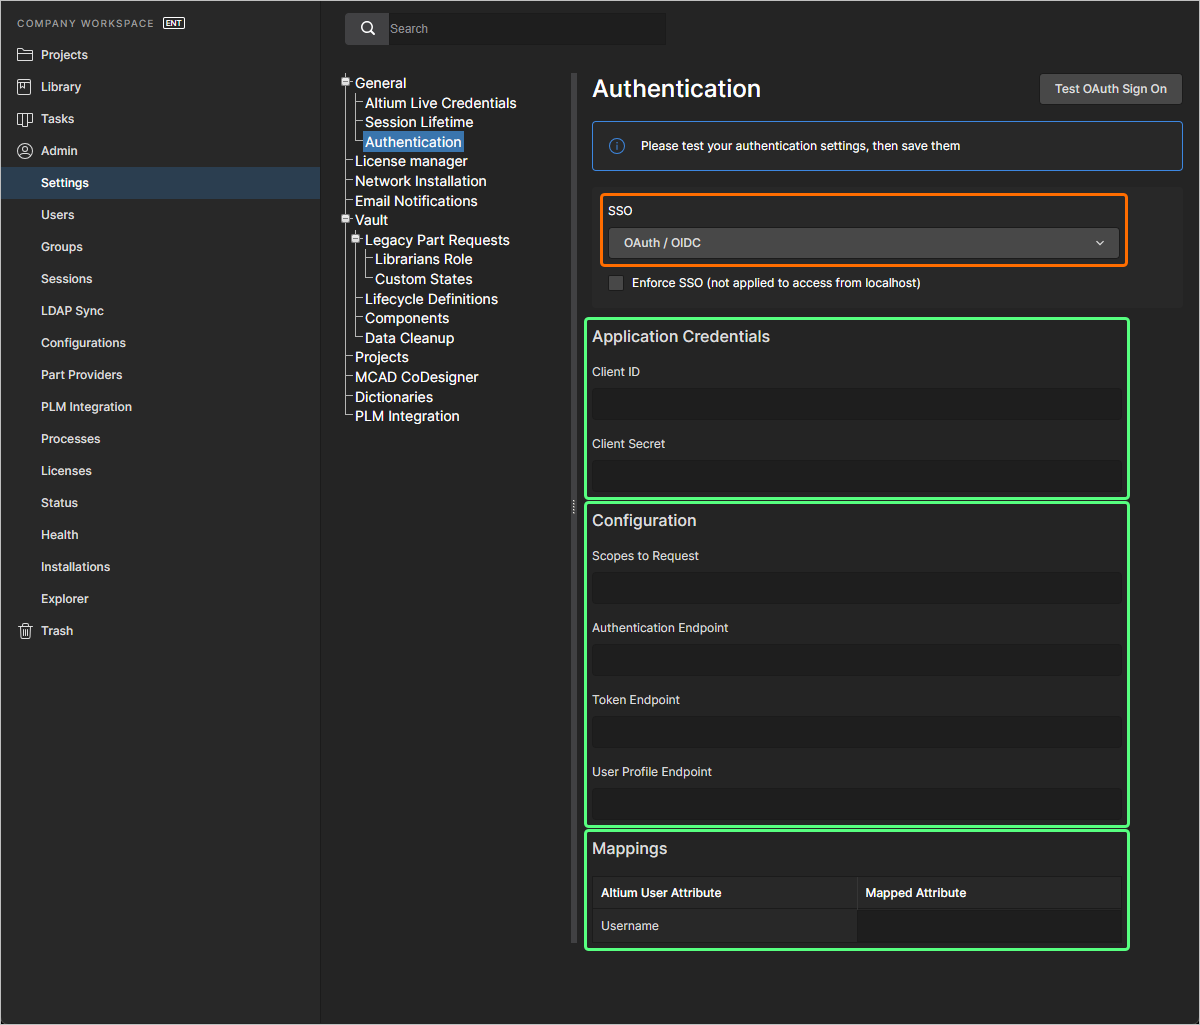
OAuth / OIDC Single Sign-On
The SSO capability for your Enterprise Server can also be configured using OAuth / OIDC standard. When the OAuth / OIDC option is selected in the SSO drop-down on the Admin – Settings – Authentication page of the browser interface, the page allows entering data provided by your chosen IdP.
-
Application Credentials:
-
Client ID – the application ID from the IdP.
-
Client Secret – the application secret from the IdP.
-
-
Configuration:
-
Scopes to Request – scopes define the level of access your application is requesting from the user.
-
Authentication Endpoint – this endpoint handles user authentication and consent. Your application redirects users to this endpoint to log in and grant permissions.
-
Token Endpoint – this endpoint is used to exchange an authorization code or refresh token for an access token. It is a secure back-channel communication between the application and the authorization server.
-
User Profile Endpoint – this endpoint retrieves user profile information (e.g., name, email) using an access token. The data returned depends on the scopes granted during authorization.
-
-
Mappings – in the Mapped Attribute field of the table, enter the attribute that will be mapped to the username of the user on the Enterprise Server side.
SSO is not enabled until an integration test is run, which is invoked by the ![]() button. This verifies the SSO identity process and your company's SSO sign-in. Once the configuration is tested successfully, you can save the settings by clicking the
button. This verifies the SSO identity process and your company's SSO sign-in. Once the configuration is tested successfully, you can save the settings by clicking the ![]() button (
button ( ), effectively applying them to the Enterprise Server.
 Tłumaczenie SI