
Server Actions
The Server Actions region is used to save your design, share your design projects with others, clone projects, and open projects in a web browser interface.

The region is accessed from any editor by choosing Project | Server Actions from the main ribbon.
Share
CircuitMaker supports the ability to share your design projects with specific people, anywhere around the world, directly from within the software. This complements the ability to share designs from within the browser-based Altium 365 platform itself.
The live (or WIP) design can be shared with any user of the CircuitMaker Community for viewing and/or editing, through email invite. An invited user can view the design through CircuitMaker, or through the Altium 365 Personal Space Interface. Editing is performed only through CircuitMaker.
Additional Means of Access
Apart from the Server Actions region, controls for sharing a design from within CircuitMaker can be found in the following ways:
- For the active project, click the
 button at the top-right of the main application window.
 - For the focused project in the Projects panel, right-click on the entry for the project and then choose the Share command from the context menu.
 Accessing the Share dialog, which is command central for sharing a design with specific people from within CircuitMaker.
Sharing a Design
With the Share dialog, you can specify which person (or people) the project is to be shared with. To add an entry, type a full email in the provided text field and press Enter. Multiple emails can be specified. To remove an entered email, click the  control associated with the entry.
Set the sharing access permissions for the added people from the associated drop-down menu by selecting Can View ( ) or Can Edit (
 ), where the latter option inherently includes viewing capability. The setting initially applies to all entries included in the field. Use the optional note field to include information that relates to the sharing arrangement for this project.
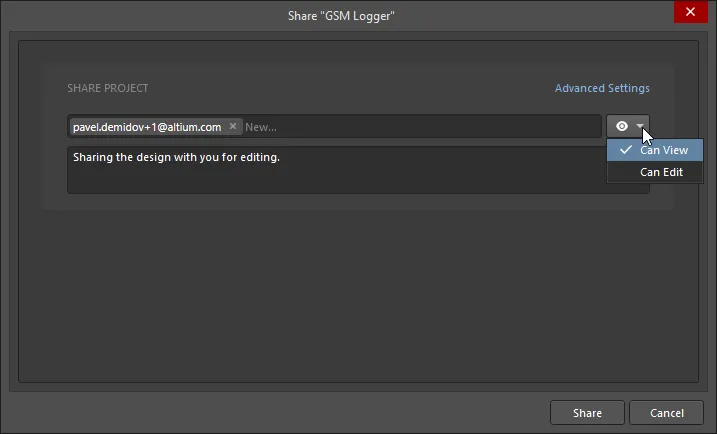
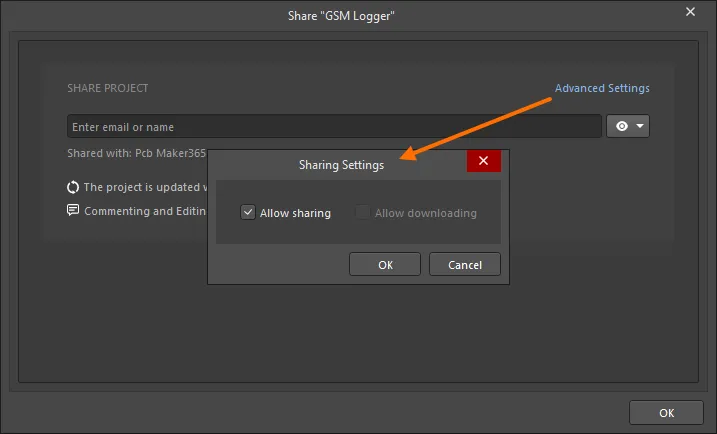
Use the Advanced Settings control (available to project owner only) to open the Sharing Settings dialog for specifying the re-sharing rights for users that the design is to be shared with.
With target recipient(s) defined and access rights specified, click the  button to proceed with sharing the project. The project will be shared with the nominated person (people) and they will receive an email notifying them that the project has been shared with them. They can open the project in CircuitMaker, or access it through the Altium 365 Personal Space (from the Shared with Me page). The email provides direct access to the design through Altium 365. Once they click
  in the email, they will be taken to the Altium 365 Sign In page (unless already signed into the platform or their AltiumLive account). Upon signing in, they will be taken to the Viewer with the shared design loaded.
 Accessing a design from the email invite received by the user with whom the design was shared.
Modifying Access Rights for Existing People
At any time, the project owner (or, if Allow Sharing has been enabled in the Sharing Settings dialog, a user with whom a project has been shared for editing) can modify the existing access permissions for a project. To check who already has access to the project, click on the Shared with control. The region will expand to show with whom the project is shared and whether they have editing rights (Can Edit), or can view and comment on the project only (Can View).

Check with whom the project is currently shared by clicking the Share with control. Hover over the image to see the result.
With the exception of the Owner, permissions for all included people may be individually set as Can View or Can Edit or access rights completely removed. Click on the current permission state to access controls.
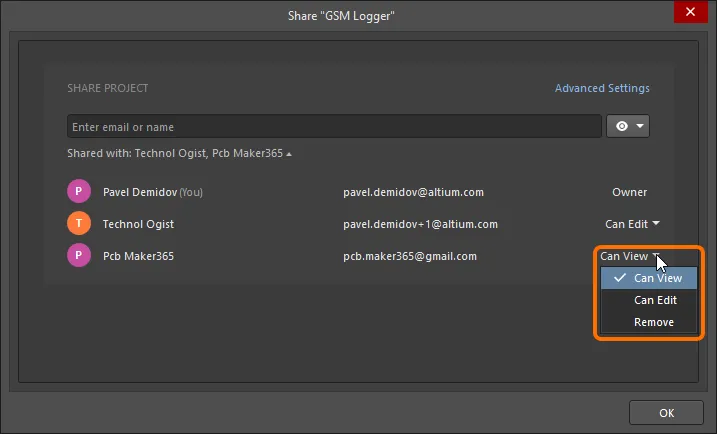
Make changes to access permissions as required. Each changed entity is highlighted in the list with a lighter background.
 Example changes to the permissions for an existing user with which a project is currently shared.
To affect changes, click  . The changes will be applied, with confirmation reflected through the dialog. To see the updated list of shared access, click the Who has access link.
 After saving permission changes, you can view the updated result directly through the Share dialog.
Accessing a Shared Design at Any Stage
A user can access the shared project through CircuitMaker or through the Altium 365 Personal Space (from the Shared with Me page of the Personal Space's interface). Note that editing of the project (if they have editing rights) is only possible through CircuitMaker.
Within CircuitMaker, access the project using the File » Open Project command. The Open Project dialog will open in which you can choose which project to open from the Shared With Me location.
Once opened, the project will appear in the Projects panel. What you can do with the project depends on the access rights you have been given. If editing rights were assigned to you, you will be able to edit the design normally. If you have viewing rights only, you will be able to comment on the design.

Choose which project to open from within CircuitMaker from those currently shared with you.
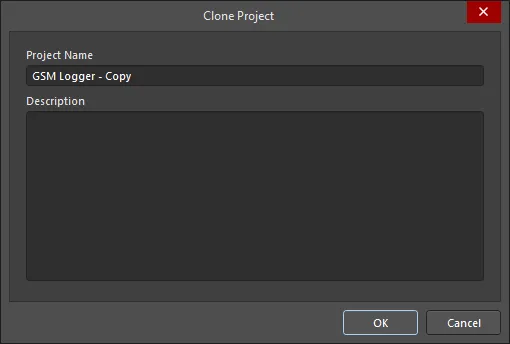
Clone Project
The Clone Project dialog is used to copy a project. By default, the original project name will be used with the suffix ' - Copy'. You may enter a description if required.
Show in Browser
This command is used to open a detailed, CAD-centric management web page of an active project. This page will appear in a new tab in your default web browser.
After launching the command, the web browser interface opens. After signing in, the browser then opens showing the Workspace project that was selected upon access.
Quick Access Controls
A Quick Access bar is located in the upper-left corner of the application window. The bar allows quick access to often-used commands, such as saving the currently focused document and opening any existing document using the appropriate button.
 |
This command is used to open the Open Project dialog, which allows you to open an existing project. |
 |
This command is used to save the active changed document. |
 |
This command is used to save all changed documents. |
 |
This command is used to undo the last action made on the current document. |
 |
This command is used to restore changes made by the Undo feature. Multiple levels of redo are supported. |