Parent page: Configuration
User Management for the Altium NEXUS Server is performed by an Administrator through the Admin area of the server's browser interface, accessed from an external browser. This provides the interface to the Identity Service (IDS), with which to define NEXUS Server (and other service) access, through specification of Users and Roles.
 User management is performed by an Administrator through the Admin area of the NEXUS Server's browser interface.
Controls are spread over the following sub-pages:
- Users - use this page to create and manage a list of users; people who are to have access to the NEXUS Server and/or the associated technologies installed with it.
- Roles - use this page to create and manage a list of roles; roles allow you to further organize your users according to, for example, the particular section of the organization in which they are involved, or the design team they are in. Roles also make the sharing of NEXUS Server content, and the configuration of other NEXUS Server-served technologies, more streamlined.
- Sessions - use this page to quickly assess which of your users are currently signed into the NEXUS Server. Provision is made for an administrator to terminate a users' access to the NEXUS Server by effectively 'killing' their active session, thereby freeing connections to the NEXUS Server for use by others.
- LDAP Sync - use this page to configure and run an LDAP Sync task. This allows an administrator of your NEXUS Server to leverage the network domain’s existing username and password credentials, so that user credentials do not have to be created manually one at a time on the Users page. When setup correctly the Users page will automatically populate with user credentials, enabling any user listed to sign into the NEXUS Server using their regular corporate network username and password.
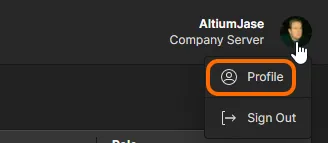
Only an administrative user has full access to management controls. A non-administrative cannot see the listing of users or roles, but they are able to change the profile of their own user through the Edit User window. Access this window by clicking on the active user area at the top-right of the browser interface and then choosing Profile from the associated menu.
Users
Management of users for access to the NEXUS Server and related services is performed from the Users page (Admin - Users), by an administrator of that NEXUS Server. A user is simply a person who it is intended will need access to the NEXUS Server.
Two administrative users are provided with a new NEXUS Server installation - admin and System. The former, which is visible from the Users page, allows you to quickly get access to the NEXUS Server as an administrator. Once you have added other users, you can keep and edit the admin user (change its name and password for example), or delete it. The System user, which is not visible from the Users page, is used for all background tasks (including LDAP Sync, and Notifications). This user is permanently online. It does not, however, use a connector license.
 Create a 'database' of people who are to have access to the Altium NEXUS Server, from the Users page of the browser interface.
All defined users are presented in a flat listing.
Within the main listing, each user is displayed in terms of the following information:
- User - the name of the user (<First Name> <Last Name>).
An accompanying icon for the user will also be presented, including the first letter of their forename (e.g.

). An image can be uploaded while editing the information for an existing user, replacing the default icon. This could be the user's actual photo, so that other users can quickly put a face to a name (e.g.

). For the default
admin user, the following image is used:

.
- Email - the user's email address.
- Role - the role(s) of which the user is currently a member.
A user that is currently accessing the NEXUS Server is distinguished by a green dot (e.g.  ). An active session can be 'dropped' if needed (without removing the user from the server). This is performed from the Sessions page.
Click the  button and choose to Sort by Name (by first name) or Sort by Email. In addition, you can search for a user by their name (User field) using the dedicated Search field at the top-left.
The Edit ( ) and Remove (
 ) buttons at the top-right of the listing (and also available from the menu associated to the
  control for a user) enable you to edit the details for that user, or to remove them (preventing access to the NEXUS Server) respectively.
A user can change the profile of their own user through the
Edit User window. Access this window by clicking on the active user area at the top-right of the browser interface and then choosing
Profile from the associated menu. This is the only way for a non-administrative user to perform changes.
Any number of users may be registered to access and use the NEXUS Server, but only a licensed number will be allowed to connect to it simultaneously. This number is determined by the seats of the purchased Client Access Licensing.
Adding a New User
To add a new user for NEXUS Server access, click on the  button, located at the top-left of the page. The Create User window will appear with which to specify the contact details, login credentials, and additional role membership for that user.
 When you click to add a new user you will be presented with a window in which to specify that user and their role membership.
Specify details for the user. The following are required fields:
- First Name
- Last Name
- Username
- Password
The Username and Password become that user's login credentials for access to the NEXUS Server.
You will be prevented from trying to add another user with the same Username as an existing user.
Authentication
The Altium NEXUS Server supports two modes of user authentication when accessing the server:
- Build In - this is provided courtesy of the NEXUS Server's own Identity Service (IDS). The user accesses the NEXUS Server by entering the credentials initially supplied to them by an administrator for the NEXUS Server.
- Windows - using Windows Domain Authentication. The user accesses the NEXUS Server by entering their Windows login credentials. Windows authentication is only available for an Altium NEXUS Server installed on a PC that is part of a domain.
Setting the required mode of authentication is performed when initially adding a user to the NEXUS Server, but can be switched at any stage thereafter.
Mode is specified using the Authentication field. By default, Build In mode is used. To use Windows Domain Authentication, click on this field and choose Windows from the drop-down. The sub-fields change from Username and Password, to Username and Domain respectively. The Domain field is pre-filled with the name of the domain of which the PC is currently part. Enter the Username to be exactly the same as the Username for that user's Windows login.
Under Windows Domain Authentication, users need to be managed externally as part of the organization's Windows network administration. Username and Password maintenance (and issues) are handled by your Windows Network Administrator. If a user's Windows Domain Username changes, this must be updated for that user on the NEXUS Server-side too, otherwise access to the NEXUS Server will not be possible.
Use the
LDAP Sync page to configure and run an LDAP Sync task. This allows an administrator of your NEXUS Server to leverage the network domain’s existing username and password credentials, so that user credentials do not have to be created manually one at a time on the
Users page. When setup correctly, the
Users page will automatically populate with user credentials, enabling any user listed to sign into the NEXUS Server using their regular corporate network username and password. When signing in to your NEXUS Server, to use your Windows login credentials - taking advantage of the NEXUS Server's support for Windows Authentication - enable the
Use Windows Session option (browser interface), or
Use Windows Session credentials option (
Sign in dialog in Altium NEXUS).
Role Assignment
You can also specify which of the existing roles (if defined) the user is to be made a member of, if required. Clicking within the Add Roles field will pop-up a list of all currently defined roles for the server. As you type within the field, the list will reduce to present matching roles accordingly. Select the required role from the list. If the user is required to have administrative powers, select the Administrators role. Multiple roles can be chosen for assignment. Assigned roles will appear in an Existing Roles region, once the user has been created. To remove a role prior to final assignment click the delete cross, to the far right of its name.
Role assignment may be specified at any stage from the
Roles page but if roles exist, it can be easier to do this at the time of user creation.
Once all details are filled out and specified as required, click the  button - the new user will be created and added to the list of users with access to the NEXUS Server.
 An example new user added to the list of users who can access the NEXUS Server.
Password
When using Build In authentication, the access credentials for a new user need to be defined initially by an administrative user, since a non-administrative user cannot add new users (and therefore themselves). However once added, a non-administrative user can access and change their own details - including Username and Password - at any stage. This allows non-admins to securely register their own access credentials without sharing their password with anyone else, including an administrative user.
A non-administrative user is able to change the profile of their own user through the Edit User window. Access this window by clicking on the active user area at the top-right of the browser interface and then choosing Profile from the associated menu.
Of course if a non-administrative user forgets their password, they will not be able to sign in through the browser interface to access and change it! In this case, they will need to notify an Admin to effectively 'reset' their password for them. This simply involves the administrator:
- Accessing the details for the user and entering a new password in the Password field.
- Clicking
 to effect the change.
- Communicating the new password back to that user.
The non-administrative user can then access their user and switch out this new, temporary password, with another one of their own creation.
Under Windows Domain Authentication, Password maintenance (and issues) are handled by your Windows Network Administrator.
Editing an Existing User
You can edit an existing user by:
- Selecting that user and clicking the Edit () button at the top-right of the listing.
- Selecting that user, clicking the control to the far right, then choosing the Edit command from the associated menu.
The Edit User window will appear, from where you can make changes to the contact details for that user, their login credentials, and role assignment as required. You can also upload a photo for the user, which will replace the default icon (click the  control). If a photo already exists, click on it to modify.
For a non-administrative user, access to the Edit User window is made by clicking on the active user area at the top-right of the browser interface and then choosing Profile from the associated menu.
 Access and make changes to a user as required.
To remove the user from a particular role in which they are currently a member, click the

control for that existing role.
When all modifications have been made as required, click the button to effect those changes.
Removing a User
You can remove an existing user from the NEXUS Server by:
- Selecting that user and clicking the Remove () button at the top-right of the listing.
- Selecting that user, clicking the control to the far right, then choosing the Remove command from the associated menu.
A dialog will appear asking for confirmation to proceed with the deletion. Click  to proceed, after which the user will be removed from the NEXUS Server's user database. They will no longer have access to the NEXUS Server.
The current user cannot remove themselves. The remove operation cannot be undone. If you remove a user by mistake you will need to add that user back, in the same way that you would add any new user.
Roles
Management of roles for the Altium NEXUS Server is performed from the Roles page (Admin - Roles), by an administrator of that NEXUS Server. Roles allow you to further organize your users according to, for example, the particular section of the organization in which they are involved, or the design team they are in. Roles also make the sharing of NEXUS Server content and the configuration of other NEXUS Server-served technologies, more streamlined.
Several sample roles are defined for a NEXUS Server installation. This includes the role Administrators. This role gives administrative privileges to its members. Anyone who is a member of this role has complete access to the NEXUS Server and all associated technologies and services through its browser interface.
The same user can be a member of any number of defined roles.
 of users from the Roles page of the browser interface.") Create specific roles (or 'memberships') of users from the Roles page of the browser interface.
Create specific roles (or 'memberships') of users from the Roles page of the browser interface.
All defined roles are presented in a flat listing.
Within the main listing, each role is displayed in terms of the following information:
- Roles - the name of the role.
- Members - how many defined users are part of this role.
The Edit () and Remove () buttons at the top-right of the listing (and also available from the menu associated to the control for a role) enable you to edit the selected role, or to remove it, respectively. The Administrators role cannot be removed.
Click the
button and choose to
Sort by Role, or
Sort by Members. In addition, you can search for a role by name (
Roles field) using the dedicated
Search field at the top-left.
Adding a New Role
To add a new role, click on the  button, located at the top-left of the page. The Create Role window will appear with which to define the role, in terms of its name and members.
 When you click to add a new role, you will be presented with a window in which to specify that role and its members.
Use the Role Name field to enter a meaningful name for the new role. For example this may be a name that is reflective of the task performed by its members. This is a required field.
You will be prevented from trying to create two roles with the same name.
You can also specify constituent users for the role (its members). Start typing the full name, username, or email address of a user in the Add Members field, to pop-up a list of matching users. Select the required user from this list. Multiple users can be chosen as members of the role. Assigned users will appear in an Existing Members region, once the role has been created. To remove a user prior to final membership click the delete cross, to the far right of their name.
Role membership may be specified at any stage but if users exist, it can be easier to do this at the time of role creation.
With name and members defined as required, click  to effect creation of the role. The role will now be available in the list of roles for use in applicable areas elsewhere in the NEXUS Server's browser interface. For example when adding/editing a user, or sharing permissions for access to shareable data within the server.
 An example new role added to the list of roles available for the NEXUS Server.
Editing an Existing Role
You can edit an existing role by:
- Selecting that role and clicking the Edit () button at the top-right of the listing.
- Selecting that role, clicking the control to the far right, then choosing the Edit command from the associated menu.
The Edit Role window will appear, from where you can make any changes to the role's name and/or user membership as required.
The Administrators role cannot have its name changed. You can however manage members for this role, as with any other user-created role.
 Access and make changes to a role as required.
To remove an existing user from the role, select their entry then click the
control at the far right.
When all modifications have been made as required, click the button to effect those changes.
Removing a Role
You can remove an existing role from the NEXUS Server by:
- Selecting that role and clicking the Remove () button at the top-right of the listing.
- Selecting that role, clicking the control to the far right, then choosing the Remove command from the associated menu.
A dialog will appear asking for confirmation to proceed with the deletion. Click to proceed, after which the role will be removed from the server.
The Administrators role cannot be removed. The remove operation cannot be undone. If you remove a role by mistake you will need to add that role back, in the same way that you would create any new role.
Sessions
The Altium NEXUS Server supports users signing into it using the same credentials, but from different computers. If you have an abundance of NEXUS Server Connector licenses (CAL) remaining this will not be a problem. But if you have a limited number of connections you can't afford to have them 'in use' if they are not, in reality, being used. Similarly, if you have more users requiring access to the NEXUS Server than there are connector licenses. An administrator for the NEXUS Server has the power to logout any user that is currently signed into the server. This enables licensed NEXUS Server connections to be 'freed up' as it were, for assignment to other users, should the route of purchasing additional licensed connections not be viable. This is performed from the Sessions page (Admin - Sessions) of the browser interface.
 As an Administrator for your Altium NEXUS Server you have the ability to not only view active NEXUS Server connections, but also to terminate a session for any user currently signed into that server.
All users that are currently signed into the NEXUS Server - either through an instance of Altium NEXUS, or through the NEXUS Server's browser interface - are listed, in terms of their name (<First Name> <Last Name>) and Identity Address (reflecting the IP address of the computer from which a connection to the NEXUS Server is being made).
If a user is logged into the NEXUS Server from the same computer upon which that server is installed and running, the Identity Address entry will appear as ::1.
The act of being signed into the NEXUS Server creates an 'active session'. You can terminate a user's session - logging them out of the NEXUS Server - by:
- Selecting that user and clicking the
 button at the top-right of the listing.
- Selecting that user, then clicking the
 control to the far right.
A dialog will appear asking for confirmation to drop the session. Click  to proceed, after which the user will be logged out from the NEXUS Server on all devices and browsers.
You can also drop your own session - the session that has you logged into the NEXUS Server's browser interface. If you do, you will be signed out of the interface moments later.
LDAP Sync
Related page: Configuring LDAP Sync with the Altium NEXUS Server
This page (Admin - LDAP Sync) allows you to configure and run one or more LDAP Sync tasks. An LDAP Sync task allows an administrator of the NEXUS Server to leverage the network domain’s existing username and password credentials, so that user credentials do not have to be created manually one at a time on the Users page of the interface. When setup correctly, the Users page will automatically populate with user credentials, enabling any user listed to sign into the NEXUS Server using their regular corporate network username and password.
When signing in to your NEXUS Server, to use your Windows login credentials - taking advantage of the NEXUS Server's support for Windows Authentication - enable the Use Windows Session option (browser interface), or Use Windows Session credentials option (Sign in dialog in Altium NEXUS).
The Altium NEXUS Server supports both Standard LDAP and LDAPS (LDAP over SSL).
If you are intending to create user credentials from LDAP automatically, then you probably want to remove any existing manually-created users. So ideally just start with the default user - admin.
To add a new sync task click on the  button, located at the top-left of the page. The LDAP Sync Creation window will appear with which to define the sync task.
 Adding an LDAP Sync task through the NEXUS Server's browser interface.
Fill in the information, based on the domain structure in effect within your company.
When you have completed entering all settings, click . This will initiate the Sync process, which may take a minute or two, as it processes the information you have entered. Once complete, access the Users page. This will be populated with all users as defined by the OU=<GroupName> setting in the sync task. Authentication for each user will be Windows Domain Authentication, so all of those users can sign into the NEXUS Server using their regular Windows login.
If you have multiple sync tasks defined, these can be run by clicking the
button.
 Example population of users for an Altium NEXUS Server through use of an LDAP Sync task.
Additional users can be manually added outside of the LDAP Sync group - so you can indeed have a mixture of manually created users, as well as LDAP-specified (automatically created) users.
Working with LDAP Sync tasks:
- You can define any number of sync tasks.
- If you have multiple sync tasks defined, these can be run by clicking the button.
- Edit a sync task by selecting that task and either clicking the Edit () button at the top-right of the listing or by clicking the control to the far right, then choosing the Edit command from the associated menu. The LDAP Sync Editing window will open, in which to make any changes. With any changes made, click the button to save those changes and run the task.
- Remove a sync task by selecting that task and either clicking the Remove () button at the top-right of the listing or by clicking the control to the far right, then choosing the Remove command from the associated menu. A dialog will appear asking for confirmation to proceed with the deletion. Click to proceed, after which the sync task will be removed from the server.
