구성 및 사용자 지정 개요
듀얼 모니터 사용, 모든 문서 동시 보기, 고유한 데스크톱 레이아웃 저장 등 Altium Designer를 자신에게 가장 적합하도록 구성할 수 있는 방법은 다양합니다.
Altium Designer 디자인 공간은 디자인 작업의 생산성을 높이기 위해 사용자 지정할 수 있습니다. 리소스는 메뉴 모음, 도구 모음 및 바로 가기 키 표입니다. 각 리소스 항목 뒤에는 해당 리소스 항목을 선택하면 명령을 활성화하는 사전 패키지 프로세스 런처가 있습니다. 메뉴에서 사용할 수 있는 모든 명령은 이 리소스에 추가하거나 삭제할 수 있습니다. 미리 패키지된 프로세스 실행기는 명령이 선택되었을 때 실행되는 프로세스와 모든 매개변수, 비트맵(아이콘), 캡션(리소스에 표시되는 항목의 이름), 설명 및 관련 바로 가기 키를 함께 묶어 놓습니다. 프로세스 런처가 수정되면 모든 바에 연결된 명령의 모든 인스턴스가 업데이트됩니다.
디자인 환경 구성하기
다음 섹션에서는 필요에 맞게 Altium Designer를 구성할 수 있는 방법을 설명합니다.
듀얼 모니터 지원
Altium Designer는 권장 해상도 2560 x 1440의 듀얼 모니터 사용을 지원합니다. 여러 문서, 여러 패널, 도구 모음 및 지원 문서를 동시에 열어두면 이 기능을 통해 보다 편안한 작업 환경을 구성할 수 있는 충분한 공간을 확보할 수 있습니다. 예를 들어 한 모니터는 디자인 전용으로 사용하고 다른 모니터에는 다양한 패널과 추가 문서를 배치할 수 있습니다. 컴퓨터 설정을 사용하여 필요에 따라 모니터 설정을 구성하세요.
데스크톱 레이아웃
디자인 환경 설정에 대한 추가 지원으로 Altium Designer는 데스크톱 레이아웃이라는 개념을 지원합니다. 이 기능을 사용하면 애플리케이션의 문서 창, 패널 및 도구 모음을 필요에 따라 데스크톱에 배치한 다음 해당 레이아웃을 파일에 저장할 수 있습니다. 이 기능을 사용하면 여러 사용자가 선호하는 레이아웃을 불러와서 각자의 디자인 습관에 맞게 디자인 공간을 빠르게 정렬할 수 있습니다. 소프트웨어와 함께 제공되는 기본 레이아웃으로 재설정하는 것을 포함하여 레이아웃을 저장하고 로드하는 옵션은 Preferences 대화 상자의 시스템 - 보기 페이지에서 사용할 수 있습니다.

메뉴 및 도구 모음 사용자 지정
디자이너마다 작업 방식이 다릅니다. Altium 디자이너는 이를 인식하여 디자인 공간을 사용자 지정할 수 있으므로 생산성을 높일 수 있습니다. 예를 들어 새 도구 모음과 명령을 만들거나 도구 모음이나 메뉴에 명령을 추가하고 드롭다운 메뉴를 만들 수도 있습니다.
메뉴와 도구 모음을 모니터의 어느 곳에나 필요에 맞게 배치하여 Altium Designer를 쉽게 사용자 지정할 수 있습니다. 디자인 공간 사용자 지정의 핵심 요소는 편집기에서 리소스를 사용자 지정하고 리소스를 추가하거나 삭제하는 데 사용되는 Customizing Editor 대화상자입니다. Customizing Editor 대화 상자가 열리면 활성 메뉴와 도구 모음 사이에서 명령을 클릭하고 끌어서 이동할 수 있습니다. 다음 방법 중 하나를 사용하여 대화 상자에 접근할 수 있습니다.
-
메뉴 모음 또는 툴바를 마우스 오른쪽 버튼으로 클릭한 다음 드롭다운 메뉴에서 Customize 을 선택합니다;
-
메뉴 모음 또는 도구 모음의 빈 영역(명령어에서 떨어진 곳)을 두 번 클릭합니다;
-
주 메뉴에서 View » Toolbars » Customize 명령을 선택합니다;
-
특정 편집기(예: 회로도, 회로도 기호, PCB, PCB 풋프린트, 출력 작업)에서는 B 을 눌러 Toolbar 팝업에 액세스하고 Customize 항목을 선택하여 이 명령에 액세스할 수도 있습니다.
아래 예시 이미지에 표시된 것처럼 각 편집기에는 고유한 버전의 대화 상자가 있습니다.
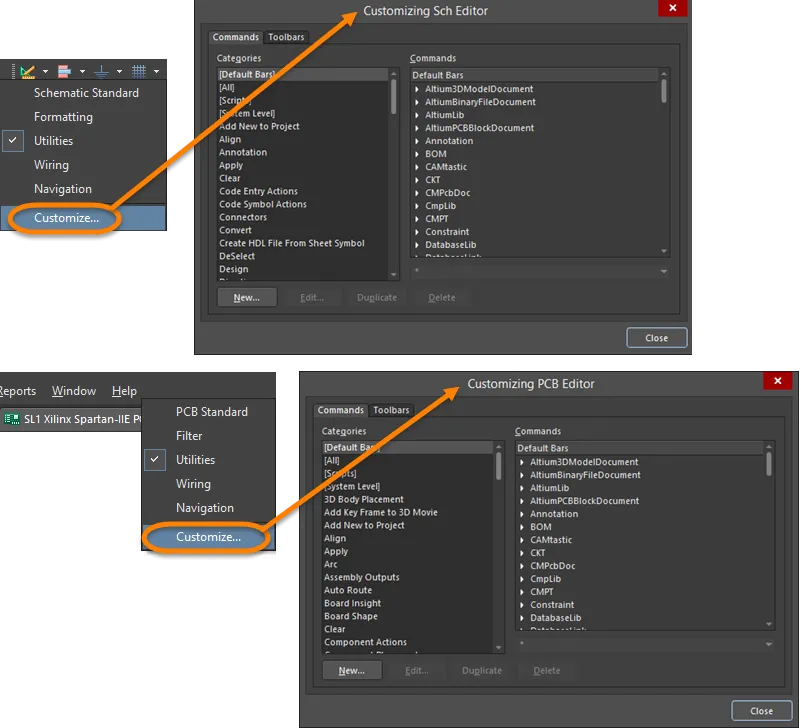
Customizing Editor 대화 상자 액세스: 위쪽 이미지 - 회로도에서 Utilities 도구 모음 액세스, 아래쪽 이미지 - PCB에서 메인 메뉴 모음 액세스.
도구 모음 아이콘이나 메뉴 항목과 같은 각 리소스 항목 뒤에는 해당 리소스 항목을 선택하면 명령을 활성화하는 사전 패키징된 프로세스 실행기가 있습니다. 사전 패키지된 프로세스 실행기는 명령이 선택되었을 때 실행되는 프로세스와 모든 매개변수, 비트맵(아이콘), 캡션(리소스에 표시되는 항목의 이름), 설명 및 관련 바로 가기 키를 함께 묶습니다. 프로세스 런처가 수정되면 모든 바에 연결된 명령의 모든 인스턴스가 업데이트됩니다.
사용자 지정은
\Users\\AppData\Roaming\Altium\Altium Designer \DXP.rcs 파일에 저장됩니다(소프트웨어의 기본 설치용).
메뉴 또는 도구 모음에 명령 추가하기
명령은 바에 추가할 때 링크하거나 복제할 수 있습니다. 연결된 명령은 원래 프로세스 실행기가 수정되면 업데이트됩니다. 그러나 복제된 명령은 원래 프로세스 실행기의 복사본으로 유지되며 업데이트되지 않습니다. 복제된 명령은 프로세스 실행기 속성을 변경하여 새 명령을 만들도록 수정할 수 있습니다. 바에 명령을 추가하려면 다음 단계를 따르세요.
-
메뉴 모음 또는 도구 모음을 마우스 오른쪽 버튼으로 클릭한 다음 메뉴에서 Customize 을 선택합니다. 적절한 Customizing Editor 대화 상자가 열립니다.

-
대화 상자의 Commands 탭에 있는 Categories 은 메뉴 및 하위 메뉴 제목이 알파벳순으로 정렬되어 있습니다. 기본적으로 기본 제공 막대(기본 메뉴 및 도구 모음)는 Commands 목록에 표시됩니다. 카테고리를 클릭하면 해당 메뉴 모음과 연결된 모든 명령이 표시됩니다. 선택한 카테고리에 대해 설치된 모든 명령이 표시됩니다.
-
Customizing Editor 대화 상자의 Commands 탭에 있는 Commands 영역에서 도구 모음 또는 메뉴에 추가할 명령을 선택합니다.
-
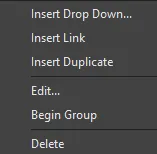
대화 상자가 계속 열려 있는 상태에서 명령을 추가하려는 메뉴 또는 도구 모음으로 이동하여 마우스 오른쪽 버튼을 클릭하면 사용자 지정 드롭다운 메뉴가 표시됩니다.
-
Insert Link 을 선택하여 원본 프로세스 런처에 연결하거나 Insert Duplicate 을 선택하여 명령의 복사본을 만듭니다.
-
마우스 버튼을 놓으면 명령이 메뉴 또는 도구 모음에 추가됩니다.
새 명령 만들기
새 명령을 만들려면 다음 단계를 따르세요:
-
Customizing Editor 대화 상자의 탭에서 을 클릭하여 대화 상자를 엽니다. Commands New Edit Command
-
Browse 버튼을 클릭하여 대화 상자를 열어 새 명령에 대해 원하는 프로세스를 선택합니다. Process Browser

Process Browser 대화 상자
Options and Controls of the Process Browser Dialog
-
- 에 표시된 프로세스를 필터링할 텍스트를 입력하여 . Filter List Region
-
- 소프트웨어에서 사용되는 프로세스가 나열됩니다. 프로세스를 클릭하여 선택합니다. List region
-
- 드롭다운을 사용하여 에 표시할 프로세스의 특정 영역을 보고 선택합니다. 모든 프로세스를 표시하려면 을 선택합니다. Show processes List Region All
-
- 선택한 프로세스에 대한 간단한 설명이 표시됩니다. Description
-
Process Browser 대화 상자의 컨트롤을 사용하여 필요한 프로세스를 검색하고 찾은 다음 을 클릭하여 대화 상자로 돌아갑니다 OK Edit Command.
-
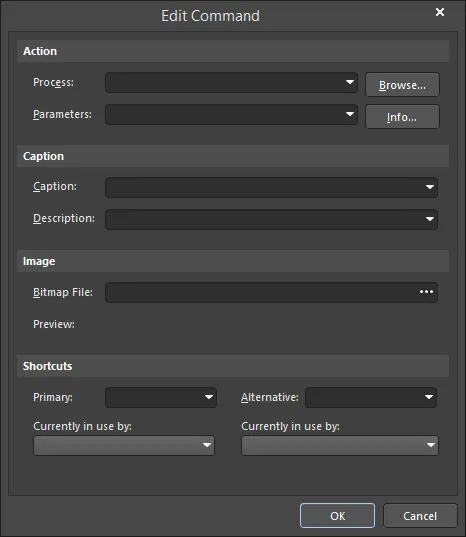
Edit Command 대화 상자에서 이 해당 메뉴의 명령 이름이 되므로 새 명령으로 쉽게 알아볼 수 있는 이름을 사용하세요. 단축키 키는 단축키로 사용할 문자 바로 앞에 앰퍼샌드(&) 문자를 추가하여 명령 캡션의 일부로 지정할 수 있습니다. Caption
-
새 프로세스 실행기와 연결할 이미지가 필요한 경우에는 필드에서 을 클릭하여 비트맵 파일을 찾습니다. 이 이미지(또는 아이콘)는 새 명령이 도구 모음에 추가될 때 표시됩니다(예: 명령은 설치의 에 있는 Zoomin.bmp 비트맵을 사용합니다). Bitmap File  Zoom In \System\Buttons folder
-
원하는 경우 영역에서 각각에 대한 드롭다운을 사용하여 및 바로가기를 추가할 수 있습니다. 새 명령을 정의했으면 을 클릭합니다. Shortcuts Primary Alternative OK
-
Customizing Editor 대화 상자의 영역에 카테고리가 추가됩니다. 선택하면 새 명령이 영역에 표시됩니다. Categories [Custom] Commands
-
이제 관련 바에 새 명령을 추가할 수 있습니다. 자세한 내용은 메뉴 또는 도구 모음에 명령 추가하기 섹션을 참조하세요.
명령 복제하기
유사한 기존 명령을 복제하여 새 명령을 만든 다음 해당 매개변수를 수정하는 것이 더 쉬운 경우가 많습니다. 명령을 복제하려면 다음 단계를 따르세요.
-
대화 상자의 탭에서 복제하려는 명령을 선택한 다음 을 클릭하여 선택한 명령의 새 복사본을 만듭니다. Customizing Editor Commands Duplicate
-
영역에서 을 클릭하면 목록에 새(복제된) 명령이 표시됩니다. Categories [Custom] Commands
-
새(중복된) 명령을 선택한 다음 을 클릭(또는 명령을 두 번 클릭)하여 대화 상자를 열어 해당 속성을 수정(예: 새 매개변수 및 새 캡션 추가)한 다음 을 클릭합니다. Edit Edit Command OK
-
새 명령을 선택한 다음 도구 모음이나 메뉴로 드래그할 수 있습니다.
사용자 지정 명령 삭제하기
메뉴 또는 도구 모음에서 사용자 지정 명령의 인스턴스 하나 또는 모든 인스턴스를 삭제할 수 있습니다. 기본 명령은 삭제할 수 없다는 점에 유의하세요.
Custom 카테고리에 저장된 사용자 지정 명령을 삭제하면 모든 리소스에서 사용자 지정 명령의 모든 인스턴스가 삭제됩니다.
-
대화 상자에서 카테고리를 클릭한 다음 영역에서 삭제하려는 명령을 선택합니다. Customizing Editor [Custom] Commands
-
을 클릭합니다. 명령의 모든 인스턴스가 바에서 제거됩니다. Delete

하나의 리소스에서 명령 삭제
다른 인스턴스에 영향을 주지 않고 명령의 한 인스턴스만 삭제하려는 경우:
-
Customizing 대화 상자가 열린 상태에서 디자인 공간 상단의 메뉴 또는 도구 모음에서 삭제하려는 명령을 선택합니다. 명령 주위의 흰색 상자는 해당 명령이 선택되었음을 나타냅니다. Editor
-
마우스 오른쪽 버튼을 클릭한 다음 Delete 을선택합니다. 또는 메뉴 항목 또는 도구 모음 아이콘을 길게 클릭한 다음 해당 막대에서 드래그합니다. 드래그하는 동안 커서가 로 변경됩니다. 
새 툴바 만들기
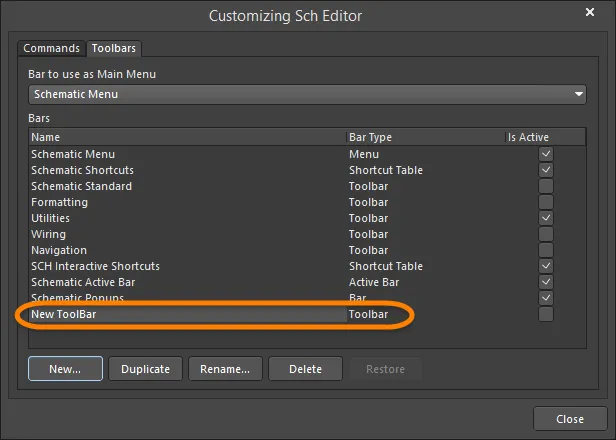
Customizing Editor 대화 상자의 탭에서 표시할 주 메뉴 및 도구 모음을 선택하고, 도구 모음을 새로 만들거나 복제하고, 도구 모음 이름을 바꾸거나 삭제 또는 복원할 수 있습니다. 새 도구 모음을 만들려면 다음 단계를 따르세요. Toolbars
-
대화 상자에서 탭을 클릭합니다. Customizing Editor Toolbars
-
을 클릭하여 새 툴바를 만듭니다. 이 영역에 나타납니다. New New Toolbar Bars
-
을 선택한 상태에서 을 클릭한 다음 새 툴바의 원하는 이름을 입력합니다. New Toolbar Rename
-
연결된 상자를 활성화하여 툴바를 활성화합니다. 빈 툴바가 화면의 메뉴 영역에 도킹되어 나타납니다. Is Active
-
이제 새 도구 모음에 명령을 추가할 수 있습니다. 자세한 내용은 메뉴 또는 도구 모음에 명령 추가하기 섹션을 참조하세요.
도구 모음 복제하기
기존 도구 모음을 기반으로 새 도구 모음을 만들려면 원래 도구 모음을 복제하고 명령을 편집하는 것이 더 쉽습니다.
-
Customizing Editor 대화 상자의 탭에서 버튼을 클릭하여 선택한 툴바의 새 인스턴스를 만듭니다. Toolbars Duplicate
-
Copy of 영역에 나타납니다. Bars

-
Copy of 을 선택한 상태에서 을 클릭한 다음 복제 툴바의 원하는 이름을 입력합니다. Rename
-
이제 새 도구 모음에 명령을 추가할 수 있습니다. 자세한 내용은 메뉴 또는 도구 모음에 명령 추가하기 섹션을 참조하세요.
도구 모음 활성화하기
도구 모음은 활성화된 경우에만 화면에 표시됩니다. 대화 상자의 탭에서 활성화(표시)할 도구 모음을 선택합니다. 상자가 활성화(체크)되어 있으면 관련 툴바가 활성화되어 표시됩니다. Customizing Editor Toolbars Is Active
또는 디자인 공간( 대화 상자가 열려 있는 경우)에서 커서를 도구 모음 또는 메뉴 위에 놓고 마우스 오른쪽 버튼을 클릭한 다음 드롭다운에서 활성화하려는 도구 모음을 선택합니다. Customizing Editor not
기존 도구 모음에 명령을 추가하는 단축키
Customizing Editor 대화 상자가 열린 상태에서 복제하거나 연결하려는 메뉴 또는 도구 모음에서 명령을 선택합니다. 를 사용하여 명령을 새 위치( )로 드래그하거나, 를 사용하여 명령을 새 위치( )로 드래그합니다. Ctrl+Click Insert Duplicate Shift+Ctrl+Click Insert Link
주 메뉴 설정하기
Customizing Editor 대화 상자의 탭에 있는 드롭다운에서 메뉴를 선택하여 활성화(표시)할 기본 메뉴 모음을 지정할 수 있습니다. Toolbars Bar to use as Main Menu

메뉴 및 도구 모음 기본값 복원하기
다음 단계에 따라 원래 기본 메뉴 및 도구 모음을 복원하고 모든 사용자 지정을 삭제할 수 있습니다.
-
지역의 대화 상자에 있는 탭에서 복원하려는 바를 선택한 다음 버튼을 클릭합니다. Bars Customizing Editor Toolbars Restore
버튼은 선택한 바에 대해 사용자 지정이 생성된 경우에만 사용할 수 있습니다. Restore
-
을 클릭하여 선택한 모음에서 모든 사용자 지정 제거를 확인하고 원래의 기본 메뉴 및 도구 모음을 복원합니다. OK
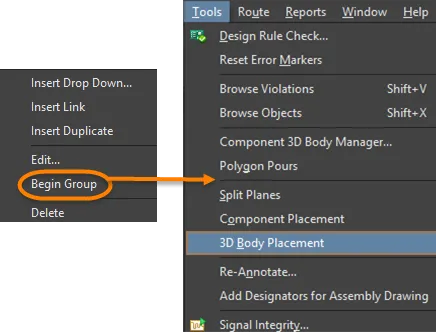
드롭다운 메뉴에 그룹 구분 기호 추가하기
메뉴의 항목 위나 툴바의 아이콘 앞에 줄 바꿈 기호를 추가할 수 있습니다. 대화 상자가 열린 상태에서 메뉴 또는 툴바 항목을 마우스 오른쪽 버튼으로 클릭한 다음 을 선택합니다. Customizing Editor Begin Group
새 드롭다운 메뉴 만들기
-
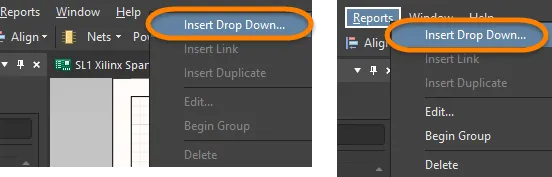
Customizing Editor 대화 상자가 열린 상태에서 새 드롭다운 메뉴를 추가할 위치에 커서를 놓습니다. 드롭다운 메뉴를 추가하여 새 주 메뉴를 만들거나 기존 메뉴 내에 하위 메뉴를 만들 수 있습니다. 주 메뉴를 만들려면 새 메뉴를 표시할 위치의 오른쪽에 있는 기존 메뉴를 선택합니다. 하위 메뉴를 만들려면 새 하위 메뉴를 표시할 위치 아래의 기존 메뉴에서 명령을 선택합니다.
-
커서를 위치시킨 상태에서 마우스 오른쪽 버튼을 클릭하고 상황에 맞는 메뉴에서 명령을 선택합니다. Insert Drop Down
-
대화 상자가 열립니다. Edit Drop Down Menu

-
(메뉴 이름), 메뉴에 빠르게 액세스할 수 있는 팝업 키(선택 사항), 아이콘의 비트맵(필요한 경우)을 입력한 다음 을 클릭합니다. 새 메뉴 이름( )이 메뉴에 나타납니다. Caption OKCaption
가속기 키는 가속기로 사용할 문자 바로 앞에 앰퍼샌드(&) 문자를 추가하여 메뉴 캡션의 일부로 지정할 수 있습니다.
-
이제 새 메뉴에 명령을 추가할 수 있습니다. 자세한 내용은 메뉴 또는 도구 모음에 명령 추가하기 섹션을 참조하세요.
사용자 정의 파일 위치
사용자 지정 파일은 다음 위치에 저장됩니다: \Users\\AppData\Roaming\Altium\Altium Designer . These files are:
시스템 수준 명령
Customizing Editor 대화 상자의 탭에 있는 에는 '플로팅 패널 표시 여부 토글' 및 '플로팅 패널 포커스 토글' 명령이 포함되어 있습니다. 이 범주에 추가되는 모든 새 명령은 시스템 명령이 되며 모든 편집기에서 해당 단축키를 사용할 수 있습니다. Commands [System Level]
단축키 테이블로 작업하기
바로가기 키 표에는 편집기에서 현재 사용 가능한 모든 바로가기 키가 나열됩니다. 편집기당 바로가기 키 테이블은 하나만 활성화할 수 있습니다. 예를 들어 은 회로도 편집기의 기본 바로가기 키 테이블 이름입니다. 명령에서 바로가기 키가 변경되면 활성 테이블에서 자동으로 업데이트됩니다. Schematic Shortcuts
바로가기 키 테이블은 메뉴 및 도구 모음과 같은 방식으로 추가, 생성, 삭제 또는 수정할 수 있습니다.
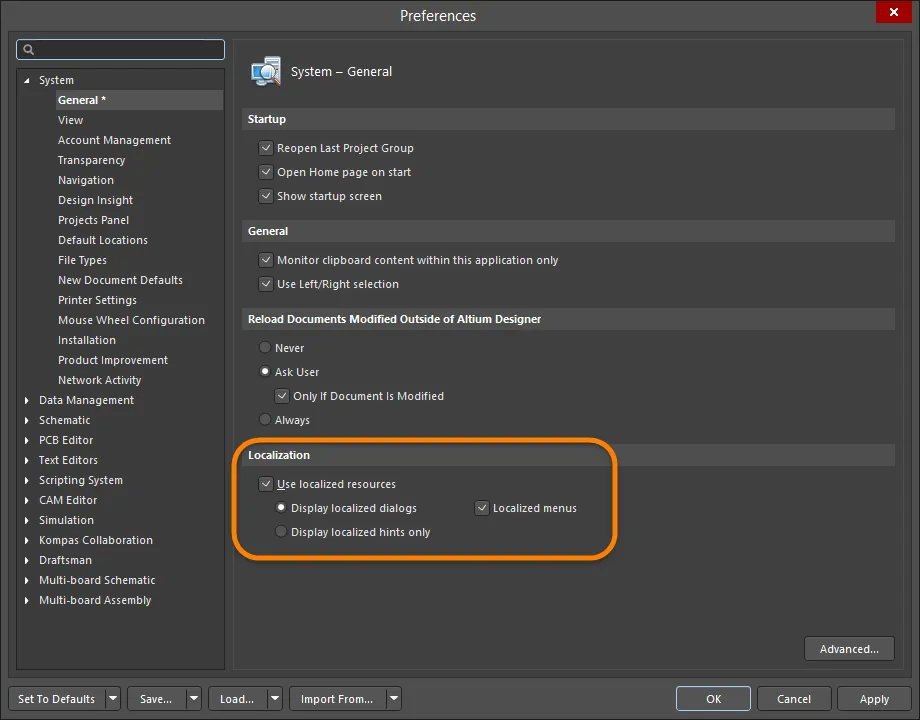
외국어 현지화
Altium Designer는 영어 이외의 여러 언어 모드를 지원합니다. 모든 메뉴 항목과 대부분의 대화 상자 텍스트는 Altium Designer가 설치된 컴퓨터의 Windows에서 선택한 언어로 표시됩니다. 은 대화 상자의 Localization Preferences 시스템 - 일반 페이지에서 구성됩니다. 설정을 변경한 후에는 Altium Designer를 다시 시작해야 합니다. Localization

 AI로 번역됨