
メール通知の設定
Enterprise Server Workspace では、Workspace からのメール通知を設定でき、さまざまなイベントを主要な関係者に通知(フラグ付け)できます。
機能の有効化と設定
Workspace から通知メールを送信する機能は、Workspace のブラウザインターフェースの

既定では、Workspace のメール通知機能は無効です。
以下に詳述するページの各フィールドを設定し、組織向けに機能をセットアップします。
-
Email From – メールの送信元となるメールアカウントです。メールのFrom フィールドに送信者として表示されます(例:notificationsbot@yourcompany.com )。Gmail を使用する場合、通知メールの送信元となるメールアドレスです(例:mycompanynotifications@gmail.com )。 -
Send a notification when no updates have been made to a workflow task for – 保留中の Process Task が割り当てられているユーザーに対する、リマインダー通知メールの日数を有効化して定義するために使用します。<x>days -
Smtp User Name – SMTP サーバーにアクセスするための資格情報のうち、ユーザー名部分です(例:smtpserver@yourcompany.com )。Gmail を使用する場合、通知メールの送信元となるメールアドレスです(例:mycompanynotifications@gmail.com )。 -
Smtp User Password – SMTP サーバーにアクセスするための資格情報のうち、パスワード部分です。Gmail を使用する場合、通知の送信に使用するメールアカウントへアクセスするためのパスワードです。 -
Smtp Host – SMTP サーバーのホスト名です(例:smtp.yourcompany.com )。Gmail 経由で送信する場合、この入力はsmtp.gmail.com になります。 -
Smtp Port – SMTP ポート(通常は25 、Gmail 経由で送信する場合は587 )。 -
Smtp SSL Enabled – SMTP 通信を有効化するために使用します。SMTP サーバーが TLS/SSL を使用する場合はチェックボックスをオンにします。 -
Interval to check notification (ms) – サーバー内で新しい通知を配信する間隔(ミリ秒)です。既定では20000ms に設定されています。 -
Send email notifications interval (ms) – メール送信する新しい通知をチェックする間隔(ミリ秒)です。既定では35000ms に設定されています。

定義した Gmail アカウントを使用して SMTP でメール通知を送信する場合のメール設定例。
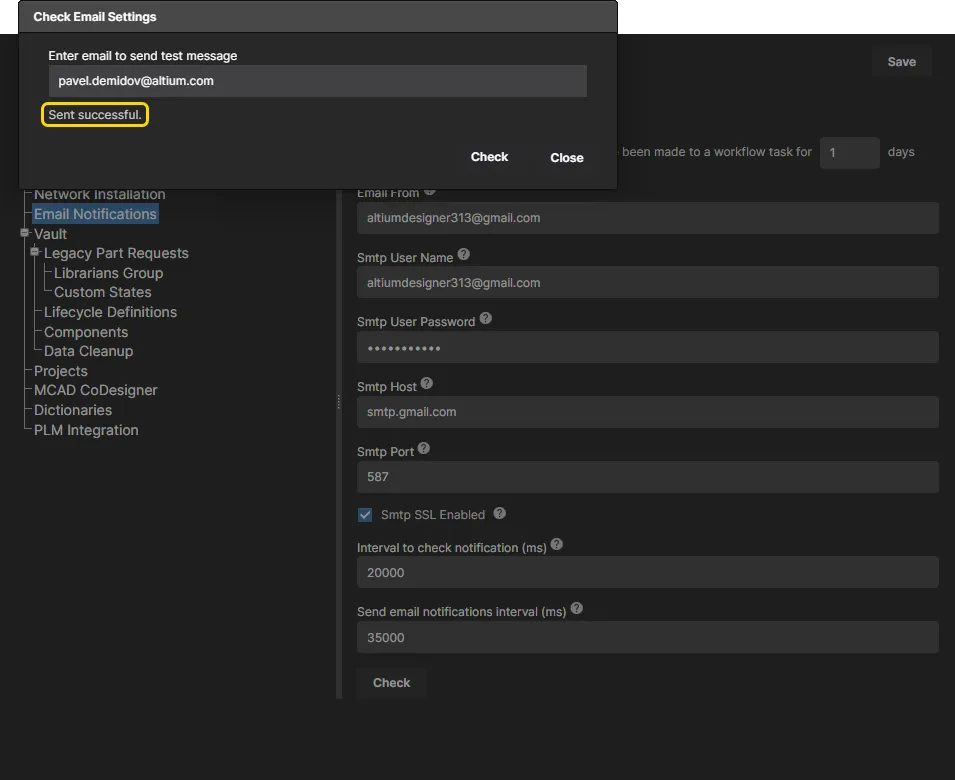
必要に応じて有効化と設定を行ったら、![]() ボタンをクリックして、指定したアカウントからのメール送信をテストします。
ボタンをクリックして、指定したアカウントからのメール送信をテストします。![]() をクリックします。ダイアログには
をクリックします。ダイアログには
|
ターゲットアカウントにテストメールを送信して、メール通知の設定を確認します。 確認が成功した結果。 |

もちろん、送信先メールを確認すると、送信元メールアカウントからの
 確認用に指定した送信先メールで受信した、Workspace の通知サービスからのテストメール。
サポートされる通知
この機能では、以下のメール通知イベントがサポートされています。
Workspace プロジェクトに関連するイベント
通知内容:
-
Project Commit – プロジェクトが Workspace にコミットされたときの通知。 -
Project Update – プロジェクトのプロパティが何らかの形で変更されたときの通知(プロジェクトのName および/またはDescription )。 -
Project Release – プロジェクトが Workspace にリリースされたときの通知。 -
Project Revision State Change – プロジェクトのライフサイクル状態が変更されたときの通知。 -
Project Activity Start – プロジェクト関連アクティビティ(Ad Hoc Review、Handoff Review、または Milestone Review)の開始通知。 -
Project Activity Complete – プロジェクト関連アクティビティ(Ad Hoc Review、Handoff Review、または Milestone Review)の完了通知。 -
Project Delete – プロジェクトが削除されたときの通知。
Workspace ライブラリコンポーネントに関連するイベント
通知内容:
-
Component Create – Workspace で新しいコンポーネントが作成されたときの通知。 -
Component Release – コンポーネントの新しいリビジョンが Workspace にリリースされたときの通知。 -
Component Revision State Change – コンポーネントのライフサイクル状態が変更されたときの通知。 -
Component Delete – コンポーネントが削除されたときの通知。
承認リクエストに関連するイベント
通知内容:
-
New Approval Request – Component Item のリビジョンについて、ライフサイクル状態間の遷移リクエストが承認申請として提出されたときの通知。 -
Approval Request Reminder – 元の申請者が、保留中の承認リクエストに対して Reminder 機能を使用したときの通知。 -
State Change Request Processed – 保留中の承認リクエストが、該当する承認グループのメンバーによって処理されたときの通知。リクエストに対して実行されたアクション種別は次のいずれかです。-
Cancelled – 承認の元の申請者がリクエストのキャンセルを決定した。 -
Rejected – 該当する承認グループのメンバーがリクエストを却下した。 -
Approved – リクエストが複数の定義済み承認グループを経由する場合、中間の承認グループのメンバーがリクエストを承認したときにこのアクションが適用されます。 -
Completed – 承認グループのメンバー(複数グループが定義されている場合は最終承認グループのメンバー)がリクエストを承認した。
-
タスクに関連するイベント
通知内容:
-
Task Assigned – タスクが割り当てられ、対応が必要になったときの通知(例:プロジェクトのレビュー活動に関連するタスク、または部品リクエスト)。
部品リクエストに関連するイベント
通知内容:
-
Part Request Created – 新しい部品リクエストが提出されたときの通知。 -
Part Request Complete – 部品リクエストが完了したときの通知(部品が正常に作成された、または最終的にリクエストが却下された場合)。
Workspace プロジェクトをウォッチする
Workspace プロジェクトに関するメール通知を受け取るには、そのプロジェクトのコラボレーターであるだけでなく、そのプロジェクトに「サブスクライブ」している必要があります。これは、
Workspace プロジェクトのウォッチは、Workspace のブラウザインターフェースからのみ行えます。手順は次のとおりです。
-
Workspace の
Projects ページで、対象の Workspace プロジェクトを参照し、クリックして選択します。 -
プロジェクト一覧の右上にある
 コントロールをクリックし、表示されるメニューから
Watch エントリを選択します。
 Workspace プロジェクトを
(有効になっている場合)メール通知システムを通じて、プロジェクトに関連する該当通知を受け取ります。
Workspace プロジェクトのウォッチを停止するには:
-
Workspace の
Projects ページで、対象の Workspace プロジェクトを参照し、クリックして選択します。 -
プロジェクト一覧の右上にあるコントロールをクリックし、表示されるメニューから
Unwatch エントリを選択します。
できます。")
(有効になっている場合)メール通知システムを通じて、そのプロジェクトに関する該当通知も受け取らなくなります。
コンポーネントフォルダをフォローする
コンポーネントに関するメール通知を受け取るには、そのコンポーネントが格納されている親フォルダに「サブスクライブ」している必要があります。これは、
-
Workspace の
Explorer ページで、対象のコンポーネントフォルダを参照します。 -
フォルダのエントリを右クリックし、コンテキストメニューから
Follow コマンドを選択します。
 コンポーネントフォルダを
(有効になっている場合)メール通知システムを通じて、そのフォルダ内のコンポーネントアクティビティに関連する該当通知を受け取ります。
コンポーネントフォルダのフォローを停止するには、フォルダのエントリを右クリックし、コンテキストメニューから
できます。")
(有効になっている場合)メール通知システムを通じて該当通知も受け取らなくなります。
 AI で翻訳