
Browsing Items

Altium Essentials: Workspace Folder Structure
This content is part of the official Altium Professional Training Program. For full courses, materials and certification, visit Altium Training.
You can navigate the content in a Workspace in several ways:
- Click on a folder whose contents you want to peruse in the Server Folders region of the Explorer panel.
- Use the Address Bar at the top of the panel. The Address Bar reflects the current folder being browsed along with the hierarchical path to that folder.
-
Use a Workspace's search feature. Enter a keyword-based on a comment or description then press Enter or click the magnifying glass icon. The entire Workspace will be scanned and the results of the search listed in terms of matching Items.
The content of the selected folder will be shown in the Items region of the panel.
Commands for the Items Region
-
Place – use to place an instance of the currently selected Item-Revision where such placement is supported, for example, placement of a component or managed sheet onto an active schematic sheet. The symbol for the component or the managed sheet symbol will appear floating on the cursor ready for placement.
-
Edit – use to open an item, such as a component, managed sheet, or template, in its associated editor. Once edited, it is saved back to the Workspace as a new revision of the item.
-
Upload – use to upload a constituent object into an Item, such as a schematic document into a Managed Schematic Sheet or an OutJob file into an Output Job Template, via the Create New Revision dialog.
-
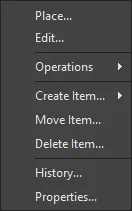
Operations – use to access a sub-menu of commands including:
-
Add to Content Cart – use to add the currently selected Item(s) to your Content Cart using the Content Cart dialog.
-
Download – use to download the currently selected Item and save it to another location using the Browse for Folder dialog.
-
Change state – use to open the Batch State Change dialog to change the state of the currently selected Item Revision.
-
Make a copy – use to copy the currently selected Item-Revision. A copied Item is opened for editing in its associated editor, such as the Component Editor when cloning a component.
-
Change component type – use to access the Choose component type dialog, where the selected component's
ComponentTypeparameter may be set to a different type. -
Export Grid – use to open the Select columns for data export dialog to specify the column data to be exported. The exported, semicolon-delimited, CSV file will include the data for all items in the current list grid view.
-
-
Create Item – use to add a new content item of the type that matches the current folder (Components, Templates, Managed Schematic Sheets, etc), which then will be opened in its associated editor. To create a different type of item, select the Other Item Type sub-option and then select an alternative type from the Content Type menu of the Create New Item dialog.
-
Move Item – use to access the Move Item dialog to determine the new placement of Items.
-
Delete Item – use to delete an Item.
-
History – use to access a detailed view for the currently selected Item, opened as a new tabbed view within the software. The Item View provides a highly detailed view of the Revision and Lifecycle history of a specific Item, as well as showing all of the elements that make up that Item. The view also includes a Timeline. Use the Timeline to examine the exact time and date of any change made to the Revision level or Lifecycle State of that Item and who made the change.
-
Properties – use to access the View Item Properties dialog in which you can view the properties for the currently selected Item. If no revisions for that Item have yet been released, the properties can be modified.
-
Navigate To <item> – from the Item ID column, use to open the selected item preview in the Explorer panel.
For each Item revision in a Workspace, the Explorer panel allows you to browse different aspects of that revision, where applicable. This is done using one or more views for that revision by using the tabs at the bottom of the panel.
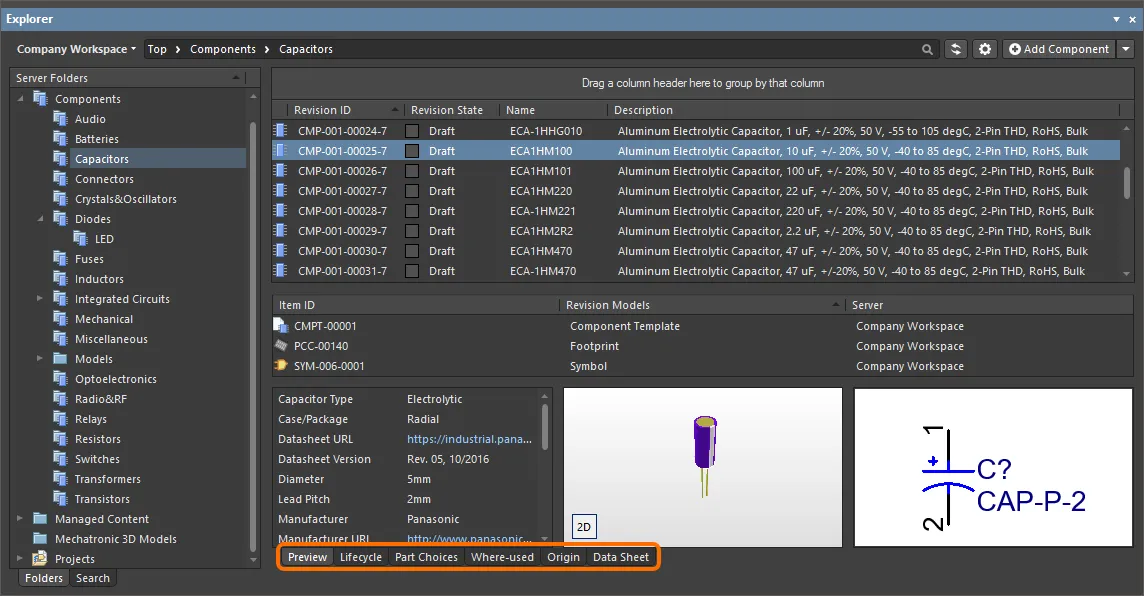
The default-level view is the Preview. Click additional tabs to view more information (the available tabs will depend upon the type of Item that is currently selected):
-
Preview – view a composite depiction of the selected Item that includes graphic representations of documents and models, parameter data, associated sub-items, etc. The view is automatically set for different types of Items and whether the Classic or interpreted view modes (see above) are selected for Components and Projects.
-
Lifecycle – explore the Item's revisions levels and Lifecycle state change. The Lifecycle may be progressed through the states that are assigned to the item type – for example, the Component Lifecycles states (
Draft,Prototype, etc) for a component. -
Children – view sub-elements of an Item, such as the generated fabrication documents (Gerber, NC Drill, etc) in the Fabrication package (
FAB-<project name>) of a released project or the schematic document and components used in a Managed Schematic Sheet. -
Part Choices – view or add to the Part Choices (manufacturer part entries with associated supplier data) that are assigned to a component.
-
Where-used – view where the selected Item revision is used by another Workspace item, for example, a project that uses the currently selected component.
-
Origin – view from where the Item originated, such as a Component that has been acquired from Altium's cloud resources. Full details of the source item are shown, where possible.
-
Data Sheet – view or add file-based datasheets stored with the selected component.


Browse different aspects of an Item revision using its associated views.
Clickable URLs
Further improving the usability of Workspaces, the Explorer panel supports clickable URLs. This functionality can be found in a variety of relevant areas, including:
- Clicking on a component parameter whose value is a URL, opening the target page in an external web browser.
- Clicking on a URL in the supply chain data for a component, opening the target page in an external web browser.
- Clicking on a document in the Released Documents region – from the Preview aspect view tab for a revision of a PCB Fabrication Data Item, PCB Assembly Data Item, or PCB Project Design Item – to open that document.
Clickable Component Parameter URLs
For a released component in a Workspace, the Preview aspect view tab presents a region for that component's parameters. For a parameter whose value is a URL – such as a datasheet, package specification, or manufacturer's website - click the URL to open it in an external web browser.

Example clickable Parameter URLs on the Preview aspect view tab for a Component Item in the Explorer panel.
Clickable Supply Chain URLs
Each released component in a Workspace can have defined supply chain data, in the form of Part Choices. These are presented on the Part Choices aspect view tab. The actual supply chain intelligence is sourced from the Workspace's local Part Catalog and the relevant Part Source – either the aggregate parts database of the Altium Parts Provider (which itself interfaces to, and gathers the parts from, enabled Suppliers), or a linked local parts database (a Part Source configured as a Custom Database Parts Provider, and where supported by your specific type of the Workspace). Clickable URLs associated with each part choice are:
- Manufacturer Name and Manufacturer Part Number – a clickable link to the manufacturer site, providing detailed information on that manufacturer part.
- Supplier part number (in an SPN tile) – a clickable link to that part on the supplier's site.
Click a URL to open it in an external browser.

Example clickable URLs associated with a defined Part Choice for a component in the Workspace.
Clickable Released Document URLs
After releasing a board design project – either the fabricated bare board (PCB Fabrication Data Item) or an assembled board (PCB Assembly Data Item) – you can open any of that design's documents. First, ensure you are viewing the folder for the required project in its Classic View (click the ![]() button at the top right of the Explorer panel and choose the Classic View command from the context menu). Browse to the applicable Item Revision and switch to that revision's Preview aspect view tab. Then, in the Released Documents region, hover over a generated output document – the cursor will change to a hand cursor, synonymous with URLs. Click on one of these URLs to open that document. Those documents native to Altium Designer will be opened directly for viewing within Altium Designer. For non-Altium Designer documents, such as output PDF files, or Excel-format BOMs, these will be opened directly in the relevant software application (provided it is installed).
button at the top right of the Explorer panel and choose the Classic View command from the context menu). Browse to the applicable Item Revision and switch to that revision's Preview aspect view tab. Then, in the Released Documents region, hover over a generated output document – the cursor will change to a hand cursor, synonymous with URLs. Click on one of these URLs to open that document. Those documents native to Altium Designer will be opened directly for viewing within Altium Designer. For non-Altium Designer documents, such as output PDF files, or Excel-format BOMs, these will be opened directly in the relevant software application (provided it is installed).
.")
Click to open a released document. Those document types that are not native to Altium Designer will be opened in their respective applications (where available).
Viewing Revisions
You can configure the revisions that are displayed in the panel by clicking the ![]() icon to access a drop-down of revision choices.
icon to access a drop-down of revision choices.
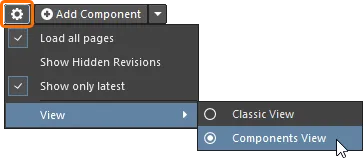
- Load all pages – select to load all revisions.
- Show Hidden Revisions – select to show any hidden revisions.
- Show only latest – select to only show the latest revisions.
- View – select whether you'd like to view the items in Classic View or interpreted view (Components View/Project View).
Folder Content Loading
When you click on any folder within the Server Folders structure region of the Explorer panel, only a portion of that folder content will be initially loaded, where applicable to do so. This greatly decreases the folder's initial load time. As you scroll to the end of the initial content, an additional portion of the folder content will be loaded.
Showing Hidden Revisions
Related page: Defining Lifecycle Definitions for a Workspace – Controlling Item Revision Visibility and Applicability
For an Item Revision entering a lifecycle state that has its Visible in Vault panels attribute disabled, that revision will, by default, not be displayed in the Explorer panel. And if it is the latest revision of the Item, then the entire entry for that Item will effectively be hidden from view. This visibility state – defined at the state level – can be overridden globally for all Items.
To display all Item Revisions that are currently not visible, click the ![]() control, at the top-right of the Items region of the panel, and enable the Show Hidden Revisions option, on the associated menu.
control, at the top-right of the Items region of the panel, and enable the Show Hidden Revisions option, on the associated menu.

Displaying hidden Item Revisions while browsing content in the Explorer panel. Hover over the image to see the result.
Showing Only the Latest Item Revisions
Over time, the content in your Workspace may undergo changes as they evolve, with each change resulting in a new revision to accommodate the modified data. When browsing Items, it is typically only the latest revision that is required. All other previous revisions tend to become a level of noise, cluttering the designer's field of view. To alleviate this, the Explorer panel defaults to show only the latest revisions of Items.
To display all revisions of Items in the Explorer panel, click the ![]() control at the top-right of the Items region of the panel, and disable the Show only latest option from the associated menu.
control at the top-right of the Items region of the panel, and disable the Show only latest option from the associated menu.

By default, the Explorer panel shows only the latest revisions of Items. Hover over the image to see an example of the command disabled.
Interpreted Views
The panel also offers two special, interpreted views that apply to Components and Projects. The view will automatically switch to this style when a Component or Project is selected unless the panel display option has been changed to the Classic View mode.
The Classic or interpreted view (Component View / Project View) options are available from the view menu when one of the special item types has been selected.
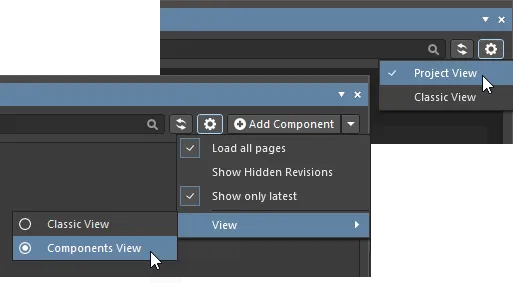
- Classic View – select to show just Items and their Revisions.
- Components View – select to show revisions and interpreted component data. See Component View for more information.
- Project View – select to show a structured graphic version of the project that includes access to Project Release data and project Parameters. See Project View for more information.
Item Revision Comparison
Using the power of Altium Designer's native file format comparison technology, the Workspace supports the visual comparison of two revisions – of the same, or different Items – for a range of supported content types, directly from within the Explorer panel. Revisions of Items of the following content types can be compared:
- Component Item
- Symbol Item
- Footprint Item
- Managed Schematic Sheet Item
- Schematic Template Item
- PCB Fabrication Data Item
- PCB Assembly Data Item
- PCB Project Design Item
Within the Explorer panel, browse to the relevant folder, select the two Item-Revisions that you wish to compare, then right-click and choose Operations » Compare from the context menu.
Comparing Two Component Item Revisions
When comparing two Component Item revisions, after clicking Compare a sequence of events takes place:
- The referenced Footprint Item revisions are compared.
- The referenced Symbol Item revisions are compared.
- The parametric data for the two Component Item revisions are compared.
The results of the comparison are presented in the Compare component revisions dialog.

Example comparison of two revisions of a component.
The dialog is divided into three distinct sections, showing the results of comparison for the parametric data, footprints, and symbols. If values for parameters are not identical, they will be highlighted with a reddish background. For footprints and symbols, the text will either state they are Identical or Not identical.
Comparing Two Symbol Item Revisions
When comparing two revisions of Symbol Items, after clicking Compare a graphical comparison is made and any differences that are detected will be listed in the Differences panel. The SchLib documents for the two revisions are opened within the design space – by displaying them side by side in the design editor window, you can peruse the differences graphically. Clicking on a top-level folder for a detected difference will highlight that difference on both documents simultaneously.

Example comparison of two revisions of a symbol.
Comparing Two Footprint Item Revisions
When comparing two revisions of Footprint Items, after clicking Compare a graphical comparison is made and the differences detected are listed in the Compare Components dialog.

Example comparison of two revisions of a footprint. The source libraries are not opened in the design space – previews of the footprints are included here to show the differences that actually exist.
The footprint is divided up into square cells and each cell has been analyzed for the differences. Cells where differences exist are shown in full color, with the differences highlighted. The layer tabs show how many primitive objects have differences for each layer that was compared, and clicking on a tab allows you to browse the differences more thoroughly.
Comparing Two Managed Schematic Sheet Item Revisions
When comparing two revisions of Managed Schematic Sheet Items, after clicking Compare a graphical comparison is made and the differences detected are listed in the Differences panel. The SchDoc documents for the two revisions are opened within the design space – by displaying them side by side in the design editor window, you can peruse the differences graphically. Clicking on a top-level folder for a detected difference will highlight that difference on both documents simultaneously.

Example comparison of two revisions of a Managed Schematic Sheet Item.
Comparing Two Schematic Template Item Revisions
When comparing two revisions of Schematic Template Items, after clicking Compare a graphical comparison is made and the differences detected are listed in the Differences panel. The SchDot documents for the two revisions are opened within the design space – by displaying them side by side in the design editor window, you can peruse the differences graphically. Clicking on a top-level folder for a detected difference will highlight that difference on both documents simultaneously.

Example comparison of revisions of two different Schematic Template Items.
Comparing Released Board Content
When comparing two revisions of a PCB Fabrication Data Item, PCB Assembly Data Item, or PCB Project Design Item, the results of the comparison will be presented in the Compare Project Revisions dialog. This will simply be a comparison of the generated file structure, and a check of the files within that structure. Color-coded options are used to show files that have changed, or not changed, and those that have been added, or removed. Enable/disable to toggle the display of these entries.

Example comparison of two revisions of a PCB Assembly Data Item.
Export of Grid Data
The Explorer panel supports the export of data from grid views, to a csv- or xls-formatted file. Examples of where this functionality is available include:
- Component Items grid (both Classic and Component views).
- Items grid.
- Linked models grid on the Preview aspect view tab (for a selected Component Item).
- Search results grid.
- Item grid on the Where-used aspect view tab.
- Item grid on the Children aspect view tab.
Right-click within a grid and choose the Operations » Export Grid command from the context menu. The Select columns for data export dialog will appear. Enable/disable the desired data you want to export by using the checkboxes in the column list or by clicking the Select All / Deselect All buttons. The dialog contains all possible columns for the grid, with those that are currently displayed in the panel enabled for export by default. After clicking OK, the standard Windows Save As dialog will appear. Use the dialog to define where, and with what name, the exported file is to be saved. Use the Save as type field to choose the format of the file – either Comma-Separated Values Files (*.csv) or Excel Files (*.xls).

An example of exporting data – the linked models for a selected Component Item revision – to an Excel-formatted file.
Project View
The panel's interpreted Project View displays the selected project in a process-orientated view that provides direct access to the relevant project data and its releases.

The Project View will show a preview of the project, core descriptions, parameters, and releases.
The Releases region will display a compilation of the Project Release(s) associated with the selected project, which includes a summary of each release and its constituent packages. Click the ![]() button in this region to open the Batch state change dialog, which you may use to change the lifecycle state of multiple items related to the same release at once in a single batch process.
button in this region to open the Batch state change dialog, which you may use to change the lifecycle state of multiple items related to the same release at once in a single batch process.
Controls at the top-right of the project view include:
- Open – use to open the target project in Altium Designer.
- Open in Web – use to open the project in the Workspace's browser-based interface.
- Share – use to open the Share dialog, which supports the ability to share your design projects with others, anywhere around the world, directly from within the software.
-
 – click the button to access the following commands:
-
Make a copy – use to open the Create Project Copy dialog, which is used to copy a project, which is then stored in the connected Workspace. By default, the original project name will be used with the suffix
' - Copy'. - History – use to open the History view for a project is gained from the detailed CAD-centric management page for that project.
- Delete – use this to delete the project, its folder, and all project content. Before the deletion is complete, you'll be asked to confirm.
-
Make a copy – use to open the Create Project Copy dialog, which is used to copy a project, which is then stored in the connected Workspace. By default, the original project name will be used with the suffix