
Извлечение данных из Workspace
Данные можно извлечь из вашего подключенного Workspace следующими способами:
-
Пакетная загрузка компонентов и моделей. Для компонентов они, по сути, экспортируются в формат IntLib. Компоненты также можно получить в IntLib с помощью Content Cart.
-
Получение (check out) проектов (если они находятся под собственным контролем версий подключенного Workspace и у вас ещё нет локальной рабочей копии).
-
Остановка синхронизации для проектов, которые были сделаны доступными в (зарегистрированы в) вашем Workspace Altium 365.
-
Загрузка пакетов релиза.
В следующих разделах рассматривается, как выполняются эти действия.
Пакетная загрузка элементов
Панель Explorer panel в Altium Designer поддерживает возможность выбрать несколько Items в подключенном Workspace и массово скачать исходные сущности для этих Items в одну вновь созданную исходную библиотеку или папку — в зависимости от типа. Этой функцией поддерживаются следующие типы Items:
-
Components – выбранные компоненты загружаются в Zip-архив, содержащий исходные библиотеки символов и моделей, а также исходный пакет Integrated Library Package (
*.LibPkg). -
Symbols – выбранные символы загружаются в Schematic Library (
*.SchLib). -
Footprints – выбранные 2D/3D модели компонентов загружаются в PCB Library (
*.PcbLib). -
Simulation Models – релизные данные, относящиеся к каждому Item в выбранном наборе (
*.SimModel,*.mdl,*.ckt), загружаются в отдельную подпапку.
Batch Download of Components
Чтобы скачать несколько компонентов:
- Перейдите в папку Workspace, содержащую компоненты, которые вы хотите скачать.
- Выберите ревизию компонента(ов), которую нужно включить в загрузку. Для конкретного компонента можно выбрать только одну ревизию (обычно последнюю), но в загрузку можно включить сколько угодно разных компонентов.
- Щёлкните правой кнопкой по записи в выбранном наборе и выберите команду Operations » Download selected component to zip в контекстном меню.
-
В диалоге Save As задайте имя и расположение создаваемого Zip-файла. По умолчанию файл будет назван в формате
Components - <Date> - <Time>.zip. -
Когда всё готово, нажмите кнопку Save, чтобы начать загрузку и формирование Zip-файла. Будет создан Integrated Library Package (
*.LibPkg), в который будут сгенерированы и добавлены исходные файлы SchLib (с символами, параметрами и ссылками на модели) и PcbLib (с моделями посадочных мест). Затем всё это будет сжато в Zip-файл, который будет создан в указанной папке. Информационное окно подтвердит успешное создание файла.
Пример загрузки нескольких выбранных компонентов в ZIP-архив.
Используйте исходники в Zip-архиве, чтобы быстро сформировать интегрированную библиотеку с выбранными компонентами.

Итоговый Zip-архив с исходными данными для скачанных компонентов.
Batch Download of Schematic Symbols
Чтобы скачать несколько условных графических обозначений (схемных символов):
- Перейдите в папку Workspace, содержащую интересующие символы.
- Выберите символы, которые нужно скачать, используя стандартные средства множественного выбора (Ctrl+Click, Shift+Click).
- Щёлкните правой кнопкой по выбранному набору и выберите команду Operations » Download selected symbol in library.
- В диалоге Choose destination file укажите, где и под каким именем должен быть создан новый файл Schematic Library.
- Нажмите Save — будет создан SchLib, а ход выполнения будет показан в отдельном диалоге Downloading.
После завершения загрузки диалог Downloading позволяет открыть скачанное содержимое в Windows Explorer (нажмите Explore) или открыть библиотеку в Altium Designer (нажмите Open).

Пример загрузки нескольких выбранных символов в документ Schematic Library.
Каждый символ именуется по значению поля Name исходного символа.

Итоговый документ Schematic Library со скачанными символами.
Batch Download of Footprints
Чтобы скачать несколько посадочных мест:
- Перейдите в папку Workspace, содержащую интересующие посадочные места.
- Выберите посадочные места, которые нужно скачать, используя стандартные средства множественного выбора (Ctrl+Click, Shift+Click).
- Щёлкните правой кнопкой по выбранному набору и выберите команду Operations » Download selected footprint in library.
- В диалоге Choose destination file укажите, где и под каким именем должен быть создан новый файл PCB Library.
- Нажмите Save — будет создан PcbLib, а ход выполнения будет показан в отдельном диалоге Downloading.
После завершения загрузки диалог Downloading позволяет открыть скачанное содержимое в Windows Explorer (нажмите Explore) или открыть библиотеку в Altium Designer (нажмите Open).

Пример загрузки нескольких выбранных посадочных мест в документ PCB Library.
Каждое посадочное место именуется по значению поля Name исходного посадочного места.

Итоговый документ PCB Library со скачанными посадочными местами.
Batch Download of Simulation Models
Чтобы скачать несколько моделей для симуляции:
- Перейдите в папку Workspace, содержащую интересующие модели для симуляции.
- Выберите модели для симуляции, которые нужно скачать, используя стандартные средства множественного выбора (Ctrl+Click, Shift+Click).
- Щёлкните правой кнопкой по выбранному набору и выберите команду Operations » Download selected sim model to folder.
- В диалоге Choose destination folder укажите родительскую папку загрузки для моделей.
- Нажмите Select Folder — начнётся загрузка, а ход выполнения будет показан в отдельном диалоге Downloading.
После завершения загрузки диалог Downloading позволяет открыть скачанное содержимое в Windows Explorer (нажмите Explore).

Пример загрузки нескольких выбранных моделей для симуляции в указанную папку.
В папке назначения будет создана подпапка для каждого Item из выбранного набора; имя подпапки формируется по Item-Revision ID. Релизные данные находятся в подпапке Released внутри неё.

Доступ к данным для Item «Simulation Model», включённого в пакетную загрузку.
Извлечение компонентов с помощью Content Cart
Также вы можете получить компоненты из подключенного Workspace в Integrated Library (*.IntLib). Инструмент, через который это выполняется — ваш интерфейс к службе Data Acquisition Service Workspace — это Content Cart. Доступ к диалогу Content Cart осуществляется из панели Explorer panel в Altium Designer. При просмотре Workspace, из которого вы хотите получить данные, щёлкните правой кнопкой по Item Revision, которую нужно получить, и выберите команду Operations » Add to Content Cart в контекстном меню.
В диалоге Content Cart процесс получения в IntLib выглядит так:
-
Нажмите ссылку Select target server и выберите IntLib file в меню.

Установите в качестве цели Content Cart файл IntLib. -
Укажите имя и расположение создаваемого файла IntLib. По умолчанию файл будет назван в формате
Integrated_Library - <Date> - <Time>.IntLibи создан в расположении\Users\Public\Documents\Altium\AD<Solution/Version>\Library\ExportCmpLib. При необходимости измените это в диалоге Save As, который открывается нажатием ссылки Change.
Примите папку назначения и имя файла по умолчанию или измените их при необходимости. -
Если нужно добавить дополнительные компоненты в тот же IntLib, нажмите ссылку Add More Items и выберите пункт Select, чтобы открыть диалог Choose Item. Там можно просмотреть исходный Workspace и выбрать дополнительные компоненты. Либо выберите пункт Add manually, чтобы открыть диалог Add new items. Этот диалог позволяет вставить внешний список требуемых компонентов (по одному элементу в строке), после чего выполнить поиск по исходному Workspace с использованием выбранного критерия поиска (GUID, Item ID, Name или MPN).
-
Когда всё готово, нажмите кнопку
 , чтобы начать формирование IntLib. Будет создан временный Integrated Library Package (
*.LibPkg), в который будут сгенерированы и добавлены исходные файлы SchLib (с символами, параметрами и ссылками на модели) и PcbLib (с моделями посадочных мест). Затем он будет скомпилирован для получения файла IntLib, который будет создан в указанной папке. Информационное окно подтвердит успешное создание файла.
Выгрузите содержимое корзины в целевую папку, в которой будет находиться требуемый файл Integrated Library.
После создания IntLib можно добавить его в список доступных файловых библиотек программы (через вкладку Installed диалога Available File-based Libraries dialog). После этого он будет доступен для использования из панели Components panel. Размещайте компоненты из IntLib в проекте по мере необходимости.
Получение проектов (Check Out) под родным контролем версий Workspace
Для проекта, находящегося под родным контролем версий Workspace — созданного и хранящегося в Versioned Storage Git design repository подключенного Workspace — извлечение из Workspace сводится к получению проекта (check out) как локальной рабочей копии. Это выполняется непосредственно в Altium Designer с помощью команды File » Open Project. Появится диалог Open Project dialog, где можно выбрать, какой проект открыть из Workspace — при подключении к Workspace он будет отображаться в области Locations диалога, отличаясь значком ![]() (для Workspace Altium 365) или значком
(для Workspace Altium 365) или значком ![]() (для Workspace Enterprise Server) и отображаясь под именем, заданным для Workspace.
(для Workspace Enterprise Server) и отображаясь под именем, заданным для Workspace.
После открытия проект появится под записью вашего Workspace на панели Projects panel в Altium Designer.
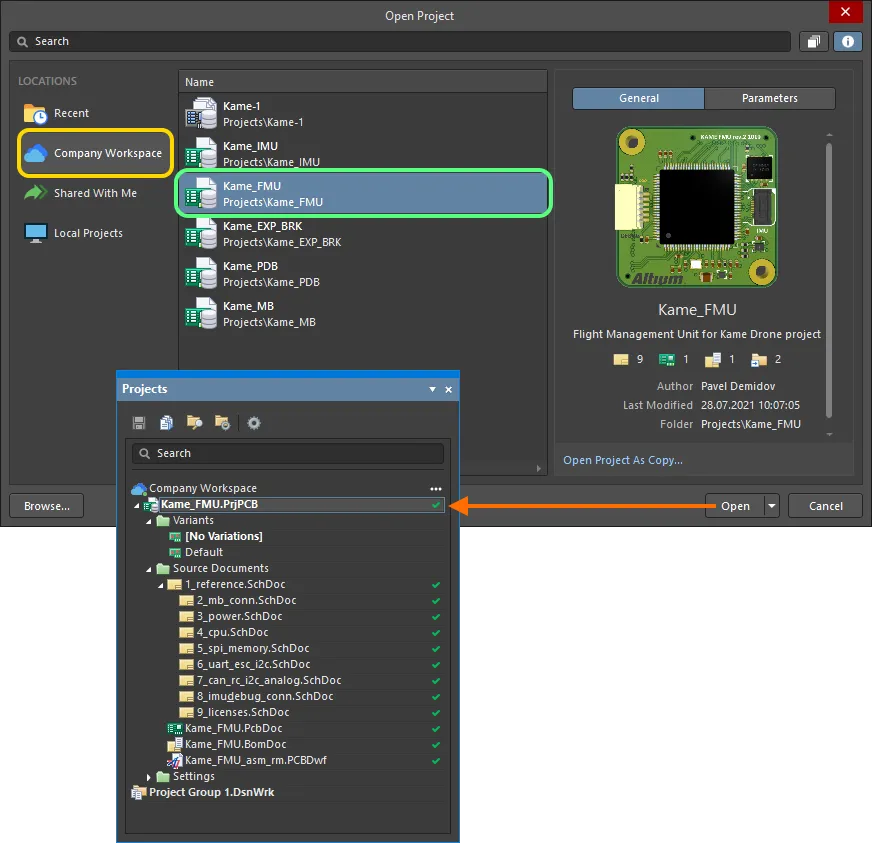
Получите локальную копию проекта, открыв его (по сути, выполнив checkout из подключённого Workspace). Здесь показан пример открытия проекта из подключённого Altium 365 Workspace. Наведите курсор на изображение, чтобы увидеть пример открытия проекта из подключённого Enterprise Server Workspace.
Остановка синхронизации для зарегистрированных проектов (только для Altium 365 Workspace)
Если вы «зарегистрировали» существующий проект (локальный проект или проект, который сейчас находится под внешним контролем версий) в своём Workspace с помощью функции Make Project Available Online, не переводя его под «родной» контроль версий Workspace, то проект у вас уже есть. Версия в Workspace — это его «зеркало»: синхронизированная копия, которая позволяет пользоваться совместными возможностями, доступными через платформу Altium 365. Если проект опубликован и находится под полным управлением контроля версий Workspace, то вы можете просто открыть проект (если он ещё не открыт), чтобы получить его локальную копию.
Если вы хотите остановить синхронизацию между вашим локальным проектом и его экземпляром, опубликованным в Workspace, — тем самым удалив все связи с Workspace, — нажмите кнопку ![]() на вкладке General tab диалога Project Options. Появится окно Turn off project synchronization. Выберите опцию Unlink, затем нажмите OK в диалоге Project Options. Локальный проект больше не будет связан с проектом в Workspace.
на вкладке General tab диалога Project Options. Появится окно Turn off project synchronization. Выберите опцию Unlink, затем нажмите OK в диалоге Project Options. Локальный проект больше не будет связан с проектом в Workspace.
Это отразится на панели Projects panel после сохранения локального проекта: проект будет показан в активной группе проектов (*.DsnWrk), а не как запись под активным Workspace. Сохранение требуется, поскольку ссылки на проект в Workspace удаляются из файла проекта.
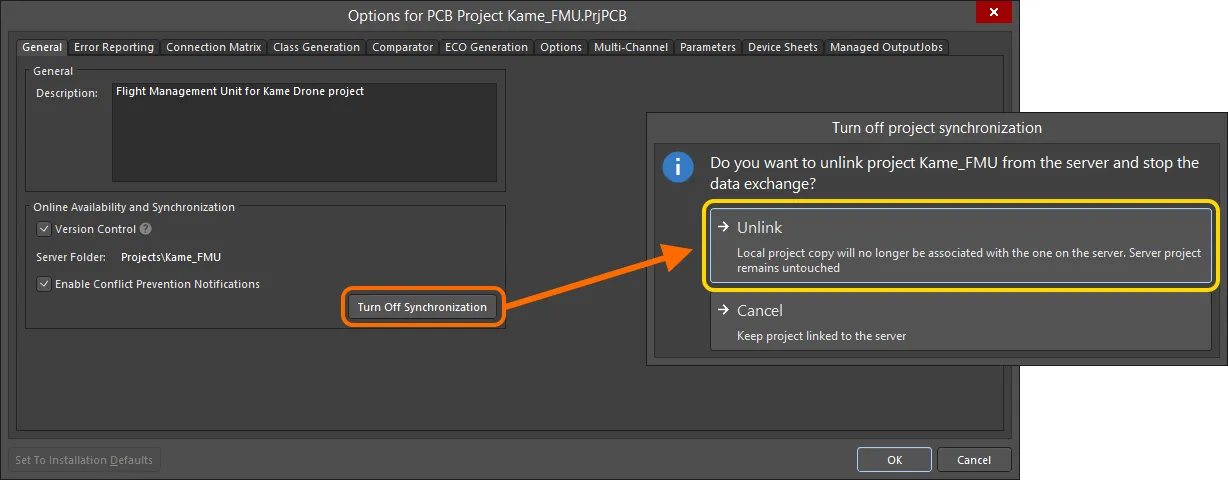
Вы можете разорвать связь между локальным проектом и его экземпляром, опубликованным в Workspace.
Загрузка пакетов релизов
Извлечение любых и всех релизов проектов — released into your connected Workspace с использованием Project Releaser в Altium Designer — сводится к скачиванию этих пакетов релизов через браузерный интерфейс Workspace.
Пакеты релизов отображаются в представлении Releases (для Altium 365 Workspace) / представлении Manufacture (для Enterprise Server Workspace) при просмотре конкретного проекта на странице детального управления проектом — подробном, CAD-ориентированном представлении проекта.
Можно скачать любые наборы данных, входящие в релиз. Нажмите кнопку ![]() , связанную с релизом, чтобы открыть окно, в котором можно указать, какие наборы данных этого релиза нужно скачать. После нажатия кнопки
, связанную с релизом, чтобы открыть окно, в котором можно указать, какие наборы данных этого релиза нужно скачать. После нажатия кнопки ![]() будет загружен один Zip-архив, содержащий папку для каждого включённого набора данных, — в папку загрузок браузера по умолчанию.
будет загружен один Zip-архив, содержащий папку для каждого включённого набора данных, — в папку загрузок браузера по умолчанию.
Нажмите элемент управления Show Files, чтобы просмотреть файлы, входящие в каждый набор данных релиза. Загрузка поддерживается на любом уровне детализации — от всего набора данных, до конкретной папки/типа выходных данных, вплоть до отдельного файла. Наведите курсор на запись и нажмите кнопку ![]() , чтобы начать загрузку. Для набора данных или конкретной папки выходных данных будет загружен Zip-архив. Для отдельного файла будет загружен сам файл (без архивации).
, чтобы начать загрузку. Для набора данных или конкретной папки выходных данных будет загружен Zip-архив. Для отдельного файла будет загружен сам файл (без архивации).
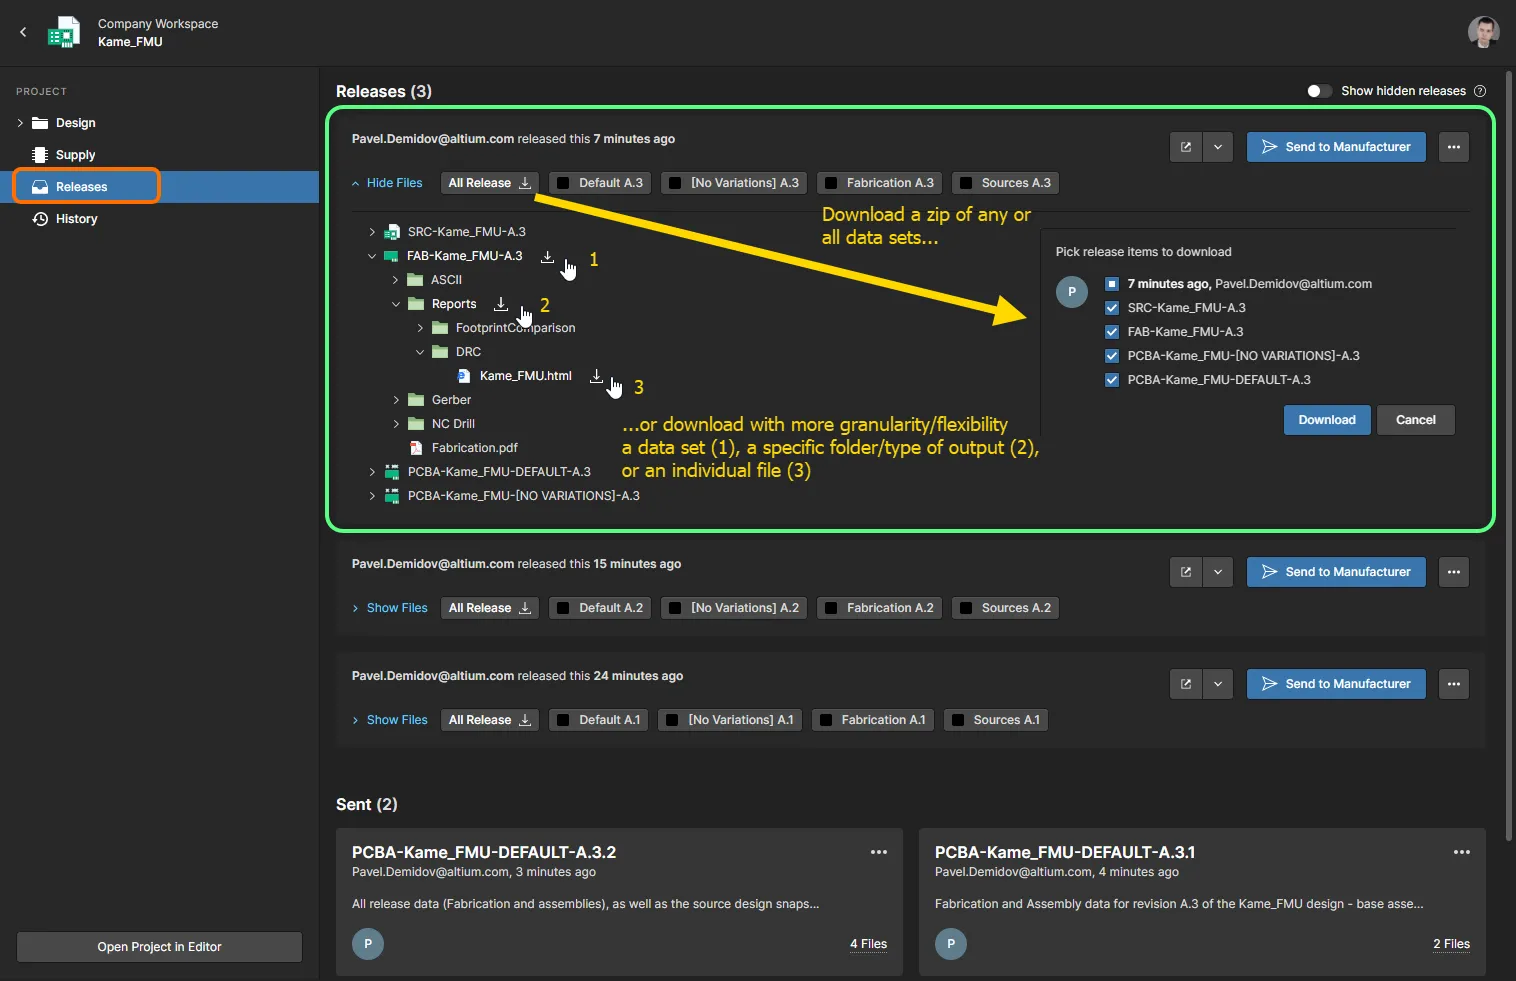
Представление Releases в браузерном интерфейсе Altium 365 Workspace предоставляет доступ к выпущенным пакетам данных с возможностью скачивания выпущенных данных на разных уровнях детализации. Наведите курсор на изображение, чтобы увидеть пример загрузки выпущенных данных из представления Manufacture в браузерном интерфейсе Enterprise Server Workspace.
 Локализовано с помощью ИИ