完結された設計のチュートリアル
Altiumの世界クラスの電子設計ソフトウェアでの電子製品開発の世界へようこそ。このチュートリアルは、アイデアから出力ファイルまで、シンプルなPCBを設計する全過程を通じてあなたを導くことで、始めるのに役立ちます。
デザイン
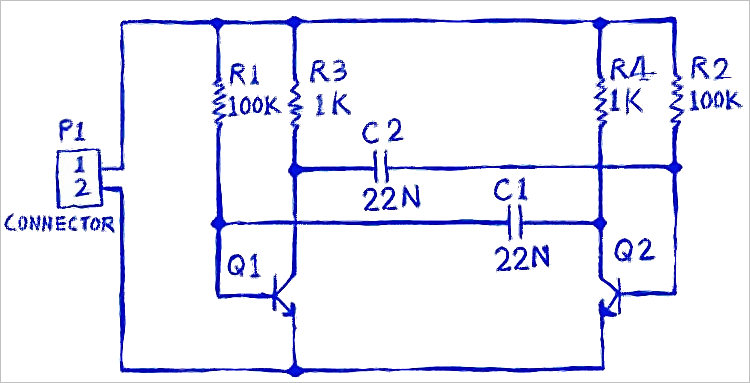
あなたが回路図を作成し、プリント基板(PCB)を設計するデザインは、シンプルなアスタブルマルチバイブレータです。下に示された回路は、自己実行型のアスタブルマルチバイブレータとして構成された2つの汎用NPNトランジスタを使用しています。

設計されたPCBのアニメーション
Altiumアカウントにサインインしてワークスペースに接続する
メインページ: Altiumアカウントにサインインする、 ワークスペースにアクセスする
Altium Designerは、ワークスペースに接続することで、単一の安全なデータソースとストレージを提供し、比類のないコラボレーションを実現します。それはAltium 365 Workspace – Altium 365クラウドベースのインフラストラクチャプラットフォーム上にホストされたワークスペース、または Enterprise Server Workspace – あなたのIT部門によってインストールされ管理される Altium On-Prem Enterprise Serverを通じて提供されるワークスペースであるかもしれません。
接続されたワークスペースでの設計についてもっと学ぶ
このチュートリアルは、接続されたワークスペースを使用してAltium Designerを使用することに焦点を当てています – あなたの設計ニーズに最も合理化され、強化された環境です。このチュートリアルを完了するには、ワークスペースに接続している必要があります。サンプルデータがアクティベート/インストールされたワークスペースがあると仮定します。
まず、まだ行っていない場合は、Altiumアカウントに接続する必要があります。Altiumアカウントは、Altium 365 Workspaceや製造部品データへの接続を含む、Altiumのオンデマンドサービスへのアクセスを提供します。
-
Altiumアカウントにサインインしていない場合、デザインスペースの右上にある現在のユーザーコントロールは
 として表示されます。それをクリックし、関連するメニューから
  エントリを選択します。

-
開いたSign Inダイアログで、Altiumアカウントの認証情報(EmailとPassword)を入力し、
 ボタンをクリックします。現在のユーザーコントロールは、Altiumプロファイルの写真やアバター(例えば、
  )を表示して、あなたがAltiumアカウントにサインインしたことを反映します。

-
有効なAltium Designerライセンスを使用していることを確認してください。ライセンスの選択は、現在のユーザーコントロールをクリックしてアクセスされるライセンス管理ビューで行われます。
 エントリをメニューから選択します。

利用可能なライセンスタイプとその管理方法については、ライセンス管理ページを参照してください。
-
ライセンス管理ビューを閉じるには、デザインスペースの上部にあるそのタブを右クリックして、コンテキストメニューからClose License Managementコマンドを選択します。

その後、Altium 365 WorkspaceまたはEnterprise Server Workspaceに接続します。Workspaceに接続していない場合、デザインスペースの右上にあるアクティブなWorkspaceコントロールは![]() として表示されます。
として表示されます。
Altium 365 Workspaceへの接続
アクティブなWorkspaceコントロールをクリックし、関連するメニューから接続したいAltium 365 Workspaceのエントリを選択します。アクティブなWorkspaceコントロールは、接続したAltium 365 Workspaceの名前(例:![]() )を表示することで変更されます。
)を表示することで変更されます。

Enterprise Server Workspaceへの接続
-
デザインスペースの右上にある現在のユーザーコントロール(例:
 )をクリックし、関連するメニューから
 エントリを選択します。

-
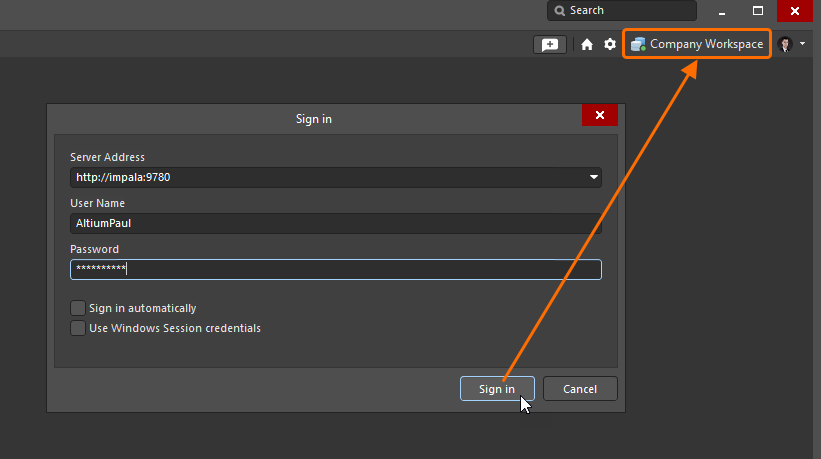
開いたサインインダイアログで、WorkspaceのURL(Server Address)とWorkspaceアクセス資格情報(User NameとPassword)を入力し、
 ボタンをクリックします。アクティブなWorkspaceコントロールは、Enterprise Server Workspaceに接続したことを示すために、Workspaceの名前を表示するように変更されます。


 AI で翻訳