Altium Designer の PCB プロジェクトの印刷ベースの出力は、出力ジョブ設定ファイル(*.OutJob)を作成することで利用できます。ジョブ出力を作成すると、コンポジット図面や回路図のような一般的な二次元 PCB 印刷物を含む、出力可能な製造ドキュメントの範囲があります。
OutputJob ファイルは、デザインのための出力と、その後の高統合プロジェクトリリースプロセスを使用した生成の合理化された準備を容易にしますが、アクティブなドキュメントの印刷ベースの出力は、メインメニューからFile » Printコマンドを使用して適切なエディタから直接生成することもできます。ここで定義される設定オプションは、出力ジョブファイルで同じ出力タイプに対して定義されるものとは別個のものです。前者の場合、設定はプロジェクトファイルに保存され、後者の場合は出力ジョブファイルに保存されます。ページとプリンターに関してFileメニューからアクセスされるセットアップオプションも、出力ジョブファイルからアクセスされるときに定義されるものとは別です。この場合も、前者はプロジェクトファイルに、後者は出力ジョブファイルに保存されます。
回路図印刷ベース出力の準備
回路図印刷ベースの出力は、ファイルのDocumentation Outputs領域にある[Add New Documentation Outputs]コントロールのSchematic Printsメニューからオプションを選択するか、メインメニューのEdit » Add Documentation Outputs » Schematic Printsサブメニューから選択することで、アクティブなOutput Jobファイルに追加することができます。

回路図プリントはPrintダイアログで設定します。
Printダイアログのオプションとコントロール(回路図プリント用)
一般タブ

Generalタブには、プリンタとページの設定を行うためのオプションがあります。
印刷とプリセットの設定
-
Printer- このフィールドは、印刷出力を送信する現在のプリンタを反映します。ドロップダウンを使用して、現在コンピュータにインストールされているすべてのプリンタから別のプリンタを選択します。次のオプションにアクセスするには、
 ボタンをクリックします:
-
Printer Settings-Microsoft Print to PDF Document Propertiesダイアログを開き、プリンタまたはオペレーティングシステムに基づいてプリンタファイルを設定します。
-
Set as Default - 選択したプリンタを既定値として設定します。
-
Add Printer - Windowsシステムから新しいプリンタを追加します。
-
Print to file- プロジェクトファイル内にOutフォルダを作成します。すべてのページに関する(*.ini)ファイルを作成し、すべてのページを(*.emf)形式でエクスポートできます。
このオプションは、Outjobファイルからダイアログにアクセスした場合には使用できません。この場合、プリンタオプションは、選択された出力で有効になっている出力コンテナによって定義されます。
-
Copies- このフィールドを使用して、印刷するページ(またはページセット)の部数を指定します。
-
Print Range-この領域のコントロールを使用して、見込み印刷ジョブに複数ページが含まれる場合に印刷するページを指定します。次のオプションのいずれかを選択します:
-
All Pages- このオプションを有効にすると、生成される印刷ベースの出力に関連するすべてのページが印刷されます。
-
Current Page- 回路図エディタからダイアログにアクセスした場合、このオプションを有効にすると、ダイアログを開いた回路図シートが印刷されます。
-
Page From- ページの範囲を印刷するには、このオプションを有効にします。フィールドを使用して、必要な範囲の開始ページと終了ページ(含む)を指定します。
ページ設定
-
Color Set- このオプションを使用して、印刷出力に使用するカラーセットを選択します。使用可能なカラーセットは次のとおりです:Gray、Mono、Color。
-
Page Size- ドロップダウンから用紙サイズを選択します。
-
Orientation- これらのオプションを使用して、Portrait向きまたはLandscape向きの印刷を選択します。
スケールと位置の設定
-
Scale Mode- ドロップダウンを使用して、必要なスケーリングモードを選択します。Actual SizeまたはFit On Pageから選択します。
-
Scale- このフィールドは、Scale Modeが Actual Sizeに設定されている場合に使用できます。このフィールドを使用して、ドキュメントの拡大縮小率を定義します。1より大きい値を入力すると実質的に印刷が拡大され(拡大効果)、1より小さい値を入力すると縮小されます(縮小効果)。
-
Horizontal Offset- ページ上の印刷コンテンツの水平面での位置を手動で調整するために使用します。正の値を入力するとページ上の印刷コンテンツが右に移動し、負の値を入力すると左に移動します。このフィールドがゼロに設定されている場合、プリンタが必要とする最小の左水平マージンが使用されます。Centerオプションを有効にすると、印刷コンテンツがページの水平方向の中央に自動的に配置されます。
-
Vertical Offset- ページ上の印刷コンテンツの垂直方向の位置を手動で調整する場合に使用します。正の値を入力するとページ上の印刷コンテンツが上方に移動し、負の値を入力すると下方に移動します。このフィールドがゼロに設定されている場合、プリンターが要求する最小垂直下マージンが使用されます。Centerオプションを有効にすると、印刷コンテンツがページの垂直方向の中央に自動的に配置されます。
図面タブ

図面
これらのコントロールを使用して、印刷出力に以下のオブジェクトを含めるように設定します:
-
No-ERC Markers with Symbols- 無効/チェックを外すと、生成される印刷物からすべての ERCなしマーカーを除外する; 有効/チェックを外すと、ERCなしマーカーを含める。このオプションを有効にすると、サブオプションを使用して、表示されるシンボルタイプに関連して含めるERCなしマーカーのタイプを微調整する:Thin Cross、Thick Cross、Small Cross、Checkbox、Triangle。
-
Parameter Sets- 印刷出力にパラメータ・セットを含める場合はチェックする。
-
Probes- プローブをプリントアウトに含める場合にチェックします。
-
Blankets- ブランケットをプリントアウトに含めるかチェックする。
-
Notes- このオプションを無効にすると、生成されるプリントからすべてのノートオブジェクトが除外されます。このオプションが有効な場合、Include collapsed notesを使用して、すべてのノートを描画するか(有効/チェックあり)、完全に展開されたノートのみを描画するか(無効/チェックなし)を制御します。
OutjobファイルのSchematic Prints出力からこのダイアログにアクセスし、出力のData Sourceとして [Project Physical Documents]オプションが選択されている場合、Name Expansionsオプションが使用でき、印刷時に物理名を拡張する項目を選択できます。

Net Labelsオプションは、Power Portオブジェクトの拡張も決定することに注意してください。
プレビュー右クリックメニュー
プレビューエリア内で右クリックすると、以下のメニューが表示されます:
-
Copy- このコマンドを使用して、現在のプレビューをWindowsのクリップボードにコピーします。
-
Zoom In - このコマンドを使用すると、徐々にズームインすることができます。
-
Zoom Out- このコマンドを使用すると、徐々にズームアウトします。
-
Show Print Region - 印刷領域を表示するコマンドです。
-
Show Grid- このコマンドを使用すると、プレビュー領域にグリッド線が表示されます。グリッド線は印刷物には表示されません。
-
Export to Image- このコマンドを使用すると、現在のプレビューをイメージ(PNG、JPEG、BMP、GIF、WMF、EMF)としてエクスポートできます。
追加コントロール
Set as Default- 回路図エディタからダイアログにアクセスした場合、ダイアログのDrawingsタブにある所定の設定をデフォルトとして設定します。
ソース回路図ドキュメントからの PDF 生成は、グラフィックイメージの上に配置されたテキストやその他の描画オブジェクトを鮮明に表示します。この機能は、Advanced Settings ダイアログの Schematic.ExportPDF.UseBitmapTransparencyオプションが有効な場合に使用できます。
2D プリントベースの PCB 出力の準備
PCB プリントアウトは、他のプリントアウトとは異なり、任意の数のプリントアウト(ページ)を含むように設定でき、各プリントアウトは、機械層やシステム層を含むデザインで使用されるレイヤの任意の組み合わせを含むことができます。
印刷ベースの PCB 出力は、以下のコントロールのメニューからアクティブな Output Job ファイルに追加できます:
-
Documentation Outputs領域の[Add New Documentation Output]コントロール(またはメインメニューのEdit » Add Documentation Outputsサブメニュー) -Composite Drawing,PCB Prints.
-
Assembly Outputs領域(またはメインメニューのEdit » Add Assembly Outputsサブメニュー)の[Add New Assembly Output]コントロール -Assembly Drawings。
-
[Add New Fabrication Outputs]コントロール(またはメインメニューのEdit » Add Fabrication Outputsサブメニュー) -Composite Drill Guide、Drill Drawings、Final、Mask Set、Power-Plane Set。
必要な出力を右クリックし、Configureを選択すると、Printダイアログが表示され、印刷内容の定義、印刷物の表示、設定定義の編集ができます。
-
OutjobファイルからPrintダイアログにアクセスした場合、プレビューは自動的に生成されないことに注意してください。プレビューを生成するには、F5キーを押すか、プレビュー領域の上またはプレビュー領域内のRefresh(F5)リンクをクリックしてください。
-
バリアントが Not Fitted に設定されていても、フィットしていないコンポーネントの銅形状とソルダーマスクは PCB プリントアウトに表示されることに注意してください。この機能は、PCB.PrintNotFittedComponentsオプションがAdvanced Settingsダイアログで有効になっている時に利用できます。

Printダイアログのオプションとコントロールは、3つのタブにあります:
-
Generalタブには、プリンタとページ設定を設定するオプションがあります。
-
Pagesタブには、表示オプション、レイヤー設定の管理オプション、ページの追加/削除オプションがあります。
-
Advancedタブには、指定子ーの設定オプション、フォントや色のオプションがあります。
ダイアログ右側のプレビュー領域は、設定の変更を反映します。設定が変更された場合は、更新(F5)が必要です。
印刷の一般設定の構成
印刷の基本設定はPrintダイアログのGeneralタブで行います。

このタブの設定には以下が含まれます:
-
プリンタとプリセット設定(OutJobファイルから印刷ダイアログにアクセスする場合、プリンタ設定はOutJobファイル自体で定義されるため、Printerフィールドは設定できないことに注意してください)。
-
印刷出力に使用するカラーセット(グレースケール、モノクロ、カラー)、ページサイズ、向きを含むページ設定。
-
スケールと位置の設定。
-
印刷する PCB ドキュメントの領域(シート全体、または領域の対向点の座標を入力するか、PCB ドキュメントでインタラクティブに定義できる特定の領域)。
新しいページの追加
ダイアログのPagesタブでAdd Pageボタンをクリックすることで、新しい印刷ページを現在の設定に追加できます。
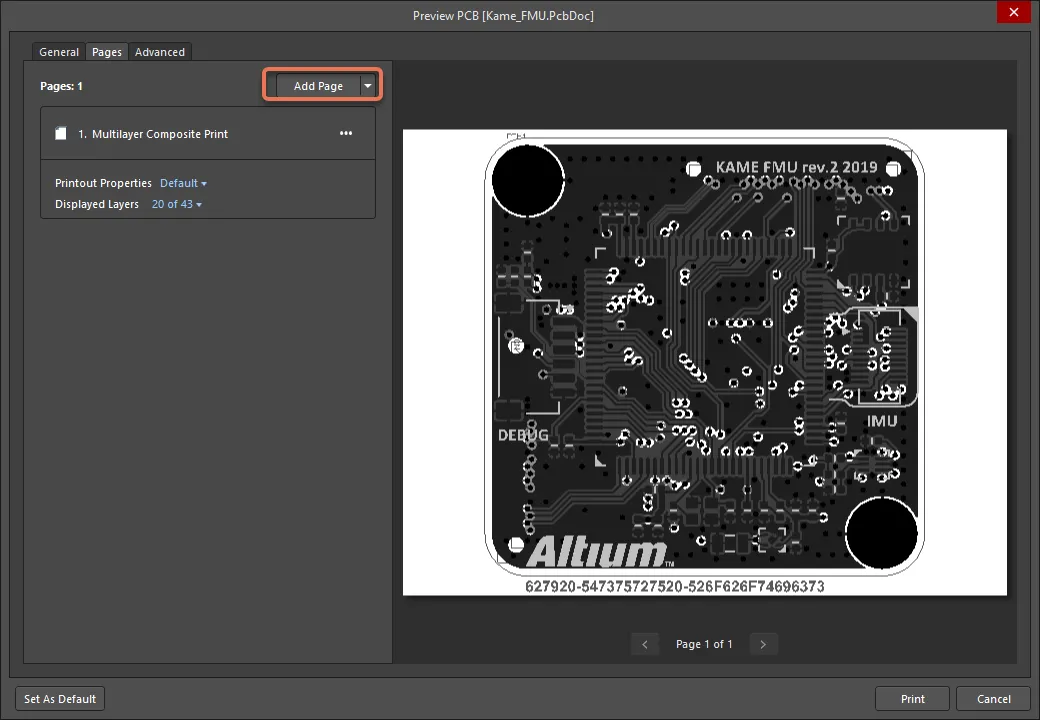
印刷物に新しいページを追加する。
ページは既存の印刷物の下に追加され、デフォルト名としてNew PrintOutが付けられます。Move Page Up/Move Page Down( をクリックしてアクセス)を使用して、選択したページをリストの上または下に移動し、ページの印刷順序を変更します。
ページの設定
新しく追加された印刷出力ページは、ダイアログのPagesタブのページリストでページが選択されると、関連するPrintout Properties領域を通じて設定できます(既存のページの設定も編集できます)。
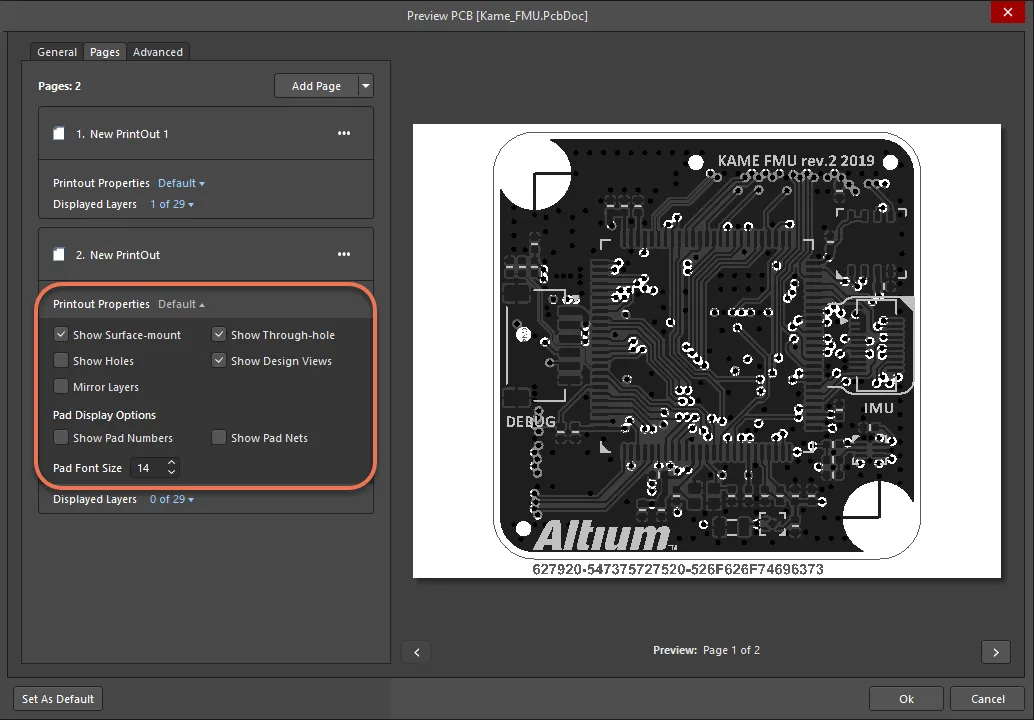
ダイアログのPrintout Properties領域で選択したページを設定します。
選択したページを設定する際には、以下のオプションとコントロールが使用できます:
-
Edit コマンド( 
 をクリックしてアクセス)では、必要に応じてページの名前を変更し、ページの性質と目的を容易に識別できる、より意味のある名前を割り当てることができます。
-
ページ名の下にあるオプションを有効にすると、関連する印刷物にどのコンポーネントを含めるか(表面実装可能なコンポーネントを表示するかどうかなど)や、追加のコントロール(ミラーレイヤーの表示など)を制御できます。
-
Pad Display Options領域は、プリントアウト上のパッドの表示、つまりパッド番号と関連するネットを表示するかどうかをコントロールできるオプションを提供します。
-
Pad Font Sizeオプションはパッド番号とネットテキストに使用されるフォントのサイズを決めることができます。
ページレイヤーの管理
Printダイアログのレイヤー管理エリアは、ページのレイヤーセットを定義し、ページを構成するレイヤーを並べ替え、各レイヤーの設定を行うために必要なコントロールを提供します。このエリアにアクセスするには、ダイアログのPagesタブにあるリストでページを選択し、Edit Layerボタンをクリックするか、リストでページを直接ダブルクリックします。
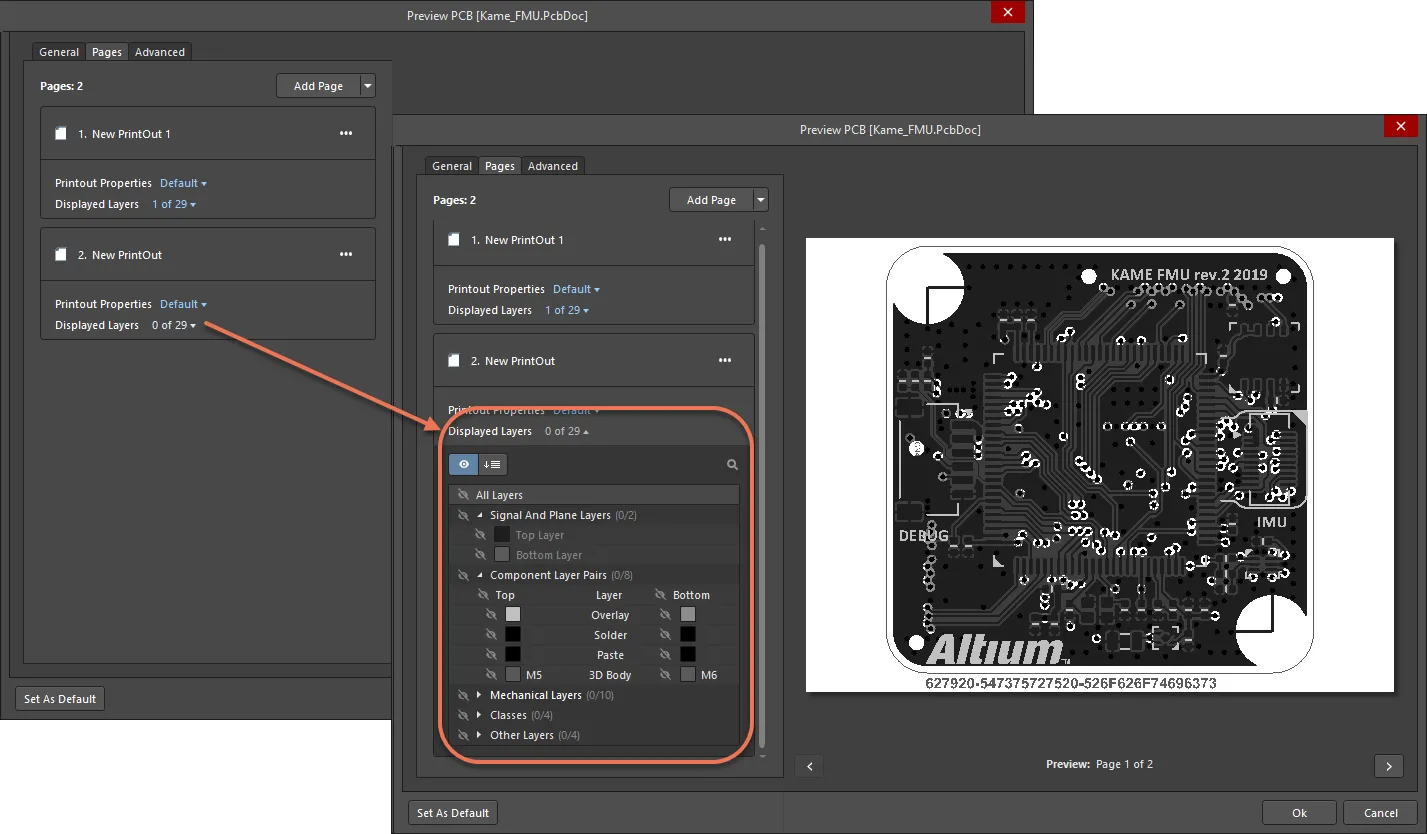
Printダイアログの適切な領域にアクセスして、選択したページのレイヤーを設定します。
チェックボックスを使用して、印刷するレイヤーを有効にします。色見本を使用して、そのレイヤーに使用されるカラーリングを制御します。
レイヤーの設定
印刷ページのレイヤーセット内のレイヤーは、レイヤーリストでレイヤーが選択されているときに、関連するSettings領域を通して設定することができます。
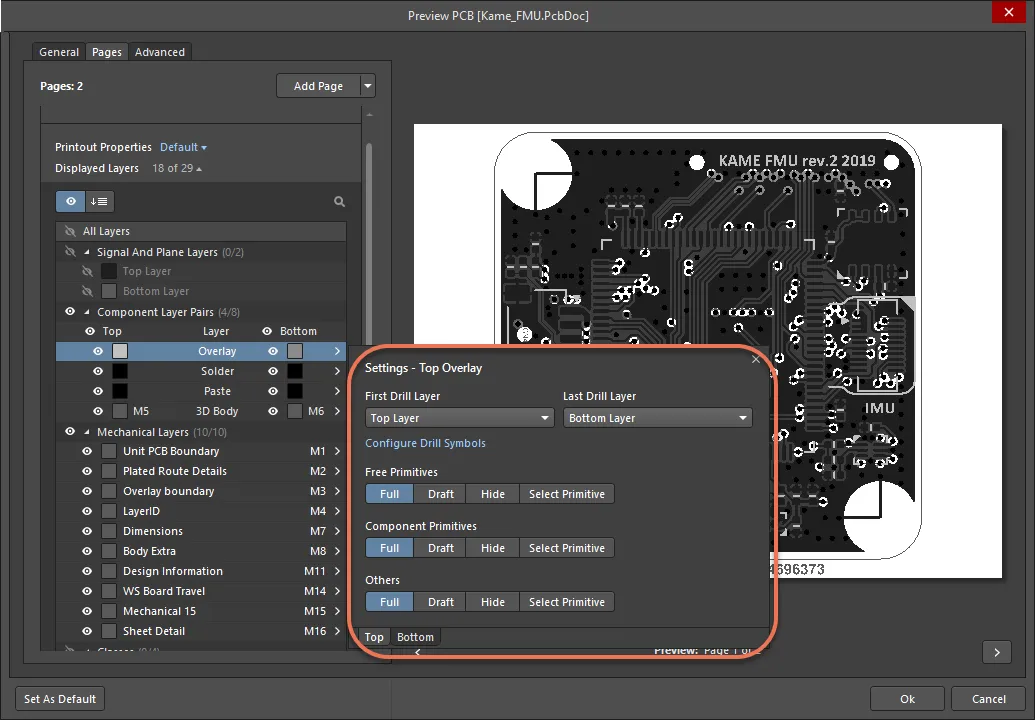
Settings領域を通して選択されたレイヤーを設定します。
選択したレイヤーを設定する際、以下のオプションとコントロールが利用できます:
-
First Drill Layer - ドロップダウンを使用して、必要なドリルペアの開始レイヤーを指定します。ドロップダウンには、ボードのレイヤスタックに定義されている、利用可能なすべての信号レイヤと内部プレーンレイヤが一覧表示されます。
-
Last Drill Layer- ドロップダウンを使用して、必要なドリルペアの終了レイヤーを指定します。ドロップダウンには、ボードのレイヤスタックに定義された利用可能なすべての信号レイヤと内部プレーンレイヤがリストされます。
-
Configure Drill Symbols- クリックしてDrill Symbolダイアログを開き、各ドリルサイズにシンボル/文字を割り当てることができます。
-
Free Primitives- レイヤーのフリーのプリミティブを印刷物にどのように表示するかを選択します。
-
Component Primitives- レイヤー上のコンポーネントプリミティブをどのように印刷物に表示するかを選択します。
-
Other - レイヤー上の他のオブジェクトを印刷物にどのように表示するかを選択します。
例として、以下のレイヤーを含むアセンブリ図面を考えてみましょう:
-
コンポーネントオーバーレイ
-
トップレイヤー(表面実装パッド用)
-
多層(スルーホールパッド用)
トップレイヤーは、表面実装パッドが見えるようにコンポーネントプリミティブを表示し、配線が見えないようにフリープリミティブを非表示にするように構成する。また、マルチレイヤーは、スルーホールの部品パッドが見えるように部品プリミティブを表示し、ビアが見えないようにフリープリミティブを隠すように構成される。
プリントアウトの詳細設定
プリントアウトの詳細設定は、PrintダイアログのAdvancedタブで行います。
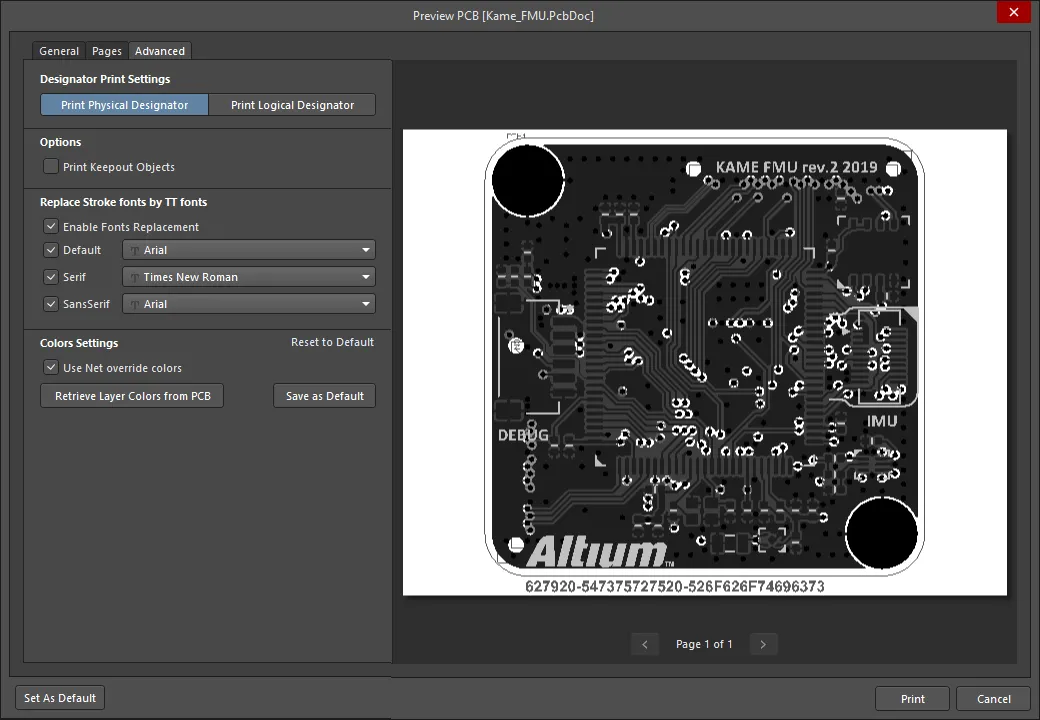
印刷の詳細設定は、PrintダイアログのAdvancedタブで設定します。
このタブの設定には以下が含まれます:
-
Designator Print Settings- 印刷物に含める指定子情報のタイプを選択します。
-
Print Keepout Objectsオプションを使用すると、印刷ドキュメントにキープアウト・デザイン・オブジェクトを含めるかどうかを完全に制御できます。
-
Font replacement - PCB エディタで使用される3つの標準フォント(Default、Serif、SansSerif)のそれぞれは、印刷が生成される時、異なる Windows フォントに置き換えることができます。フォント置換とフォントを有効にするには、Replace Stroke fonts by TT fonts領域のオプションを使用します。
-
カラー設定 -Color Settings領域のコントロールを使用して、現在の印刷出力に使用されるカラーリングのグローバル設定を定義します。オプションには、レイヤカラーではなくネットオーバーライドカラーを使用したり(Use Net override colorオプション)、PCB エディタで PCB デザイン用に設定されたカラーを適用したり(Retrieve Layer Colors from PCBボタン)します。現在のカラー設定をデフォルトとして設定し、現在の設定をデフォルトにリセットするコントロールも提供されています。
2D PCB印刷のためのPrintダイアログのオプションとコントロール
一般タブ

Generalタブには、プリンタとページの設定を行うためのオプションがあります。
印刷とプリセットの設定
-
Printer- このフィールドは、印刷出力を送信する現在のプリンタを反映します。ドロップダウンを使用して、現在コンピュータにインストールされているすべてのプリンタから別のプリンタを選択します。次のオプションにアクセスするには、
 ボタンをクリックします:
-
Printer Settings- Microsoft Print to PDF Document Propertiesダイアログを開き、プリンタまたはオペレーティングシステムに基づいてプリンタファイルを設定します。
-
Set as Default - 選択したプリンタを既定値として設定します。
-
Add Printer - Windowsシステムからプリンタを追加します。
-
Print to file- プロジェクトファイル内にOutフォルダを作成します。すべてのページに関する(*.ini)ファイルを作成し、すべてのページを(*.emf)形式でエクスポートできます。
このオプションは、Outjobファイルからダイアログにアクセスした場合には使用できません。この場合、プリンタオプションは、選択された出力で有効になっている出力コンテナによって定義されます。
-
Copies- このフィールドを使用して、印刷するページ(またはページセット)の部数を指定します。
-
Print Range-この領域のコントロールを使用して、見込み印刷ジョブに複数ページが含まれる場合に印刷するページを指定します。次のオプションのいずれかを選択します:
ページ設定
-
Color Set- このオプションを使用して、印刷出力に使用するカラーセットを選択します。使用可能なカラーセットは次のとおりです:Gray、Mono、Color。
-
Page Size- ドロップダウンから用紙サイズを選択します。
-
Orientation- これらのオプションを使用して、Portrait向きまたはLandscape向きの印刷を選択します。
スケールと位置の設定
-
Scale Mode- ドロップダウンを使用して、必要なスケーリングモードを選択します。Actual SizeまたはFit On Pageから選択します。
-
Scale- このフィールドは、Scale Modeが Actual Sizeに設定されている場合に使用できます。このフィールドを使用して、ドキュメントの拡大縮小率を定義します。1より大きい値を入力すると実質的に印刷が拡大され(拡大効果)、1より小さい値を入力すると縮小されます(縮小効果)。
-
Horizontal Offset- ページ上の印刷コンテンツの水平面での位置を手動で調整するために使用します。正の値を入力するとページ上の印刷コンテンツが右に移動し、負の値を入力すると左に移動します。このフィールドがゼロに設定されている場合、プリンタが必要とする最小の左水平マージンが使用されます。Centerオプションを有効にすると、印刷コンテンツがページの水平方向の中央に自動的に配置されます。
-
Vertical Offset- ページ上の印刷コンテンツの垂直方向の位置を手動で調整する場合に使用します。正の値を入力するとページ上の印刷コンテンツが上方に移動し、負の値を入力すると下方に移動します。このフィールドがゼロに設定されている場合、プリンターが要求する最小垂直下マージンが使用されます。Centerオプションを有効にすると、印刷コンテンツがページの垂直方向の中央に自動的に配置されます。
印刷領域
ページタブ

Pagesタブには、表示オプション、レイヤー設定の管理オプション、ページの追加/削除があります。
-
Add Page- このボタンをクリックすると、デフォルト設定でレイヤーが選択されていない新しいページが追加されます。ボタンに関連するドロップダウン矢印をクリックすると、以下のように利用可能なオプションにアクセスできます:
-
Create Final- ソース PCB ドキュメント用の完全な、定義済みの最終アートワーク印刷セットを素早く作成するために使用します。
-
Create Composite- ソース PCB ドキュメント用の定義済みのマルチレイヤーコンポジット印刷を素早く作成します。
-
Create Power-Plane Set- ソース PCB ドキュメントの定義済みのパワープレーン図を素早く作成します。
-
Create Mask Set- ソース PCB ドキュメント用の定義済みのはんだ/ペーストマスク図面を素早く作成します。
-
Create Drill Drawings- ソース PCB ドキュメントのドリル図面やガイドの定義済みのセットを素早く作成します。
-
Create Assembly Drawings- ソース PCB ドキュメント用の定義済みのアセンブリ図面を素早く作成します。
-
Create Composite Drill Guide- ソース PCB ドキュメントの定義済みの複合ドリル図面を素早く作成します。
-
Page list- 印刷するページのリスト。各ページはタイルで表され、以下のオプションにアクセスできます:
-
 - 省略記号ボタンを使用して、ページ管理オプションにアクセスします:
-
Edit - このオプションを使ってページの名前を変更します。
-
Move Page Up/Move Page Down- これらのオプションを使用して、リスト内のページの位置を変更し、印刷レンダリングの順序を変更します。
-
Delete Page- このオプションを使用して、リストからページを削除します。
-
Printout Properties- 右側のコントロールを使用して、さまざまなプリントアウト・プロパティ・オプションにアクセスします。これらのオプションの状態に応じて、コントロールはDefaultまたはCustomとして表示されます。オプションを有効にすると、関連するプリントアウトにどのコンポーネントを含めるか(サーフェスマウントを表示するかどうかなど)を制御したり、追加の制御(レイヤーのミラーリング、パッド番号やネットテキストに使用するフォントのサイズなど)を行うことができます。

-
Displayed Layers- 右のコントロールを使用して、現在のページのレイヤーリストとその表示設定を管理するオプションにアクセスします。コントロール内の数字は、全体の PCB レイヤ数から、ページで選択されているレイヤ数を表します。

-
 - このコントロールを使用して、印刷するレイヤを選択する
Displayed Layersモードと、選択したレイヤの順序を定義するDisplayed Layer Orderモードを切り替えます。
-
 - をクリックして、検索フィールドにアクセスします。検索文字列をレイヤー名に含むレイヤーのみが表示されます。
-
レイヤーの色を変更するには、色ボタンをクリックします。
-
有効なレイヤの名前をクリックすると、設定ポップアップが表示され、選択したレイヤの追加設定を行うことができます。
両方のレイヤーが選択されているコンポーネントレイヤーペアの名前をDisplayed Layersでクリックすると、ポップアップの下部にあるタブを使用して、ペアのTopレイヤーとBottomレイヤーの設定を切り替えることができます。

-
First Drill Layer/Last Drill Layer- これらのフィールドを使用して、必要なドリルペアの開始レイヤーと終了レイヤーを指定します。ドロップダウンには、ボードのレイヤスタックに定義されている利用可能なすべての信号レイヤと内部プレーンレイヤが一覧表示されます。
-
Configure Drill Symbols-Drill Symbolダイアログを開くには、このコントロールをクリックします。
-
Free Primitives- このドロップダウンは、レイヤーのフリーのプリミティブを印刷物にどのように表示するかを決定するコントロールを提供します。以下のフリープリミティブオブジェクトについて、関連するドロップダウンフィールドを使用して、オブジェクトを完全に表示するか(Full)、アウトラインモードのみで表示するか(Draft)、または非表示にするか(Hide)を選択します。Select Primitiveを選択すると、関連するオブジェクトタイプごとに個別の設定を行うことができます。
-
Component Primitives- このドロップダウンでは、レイヤー上のコンポーネントプリミティブを印刷物にどのように表示するかを決定するコントロールを提供します。以下のコンポーネント・プリミティブ・オブジェクトについて、関連するドロップダウン・フィールドを使用して、オブジェクトを完全に表示するか(Full)、アウトライン・モードのみで表示するか(Draft)、または非表示にするか(Hide)を選択します。Select Primitiveを選択すると、関連するオブジェクトタイプごとに個別の設定を行うことができます。
-
Other- この領域は、レイヤー上の他のオブジェクトを印刷物にどのように表示するかを決定するコントロールを提供します。以下のオブジェクトについては、関連するドロップダウンフィールドを使用して、オブジェクトを完全に表示するか(Full)、アウトラインモードのみで表示するか(Draft)、オブジェクトを非表示にするか(Hide)を選択します。Select Primitiveを選択すると、関連するオブジェクトの種類ごとに個別の設定を行うことができます。
詳細タブ

Advancedタブには、指定子の設定オプションのほか、フォントや色のオプションが用意されている。
指定子印刷設定
この領域のコントロールを使用して、印刷物に含まれる指定子情報のタイプを指定します。ドロップダウンから、Print Physical DesignatorsまたはPrint Logical Designatorsのいずれかを選択します。
オプション
Print Keepout Objects- キープアウト指定されたデザインオブジェクトを印刷ドキュメントに含めるには、このオプションを有効にします。
ストロークフォントを TT フォントで置き換える
-
Enable Fonts Replacement- フォントの置き換え機能を有効にするには、このボックスにチェックを入れます。
-
Default- このボックスをチェックすると、デフォルトの設定が使用されます。ドロップダウンを使用してフォントを変更できます。
-
Serif- Serifフォントを使用するには、このボックスにチェックを入れます。ドロップダウンでフォントを変更できます。
-
Sans Serif- Sans Serifフォントを使用するには、このボックスにチェックを入れます。ドロップダウンでフォントを変更できます。
色の設定
-
Use Net override color- このオプションを有効にすると、レイヤーの色ではなくネットの色が印刷に使用されます。
-
Retrieve Layer Colors from PCB-PCB エディタで PCB デザインに設定した同じ色を使用して印刷したい場合、このボタンをクリック。
-
Save as Default- ローカルカラーセットでデフォルトカラーセットを上書きする場合にクリックします。
プレビュー右クリックメニュー
プレビューエリア内で右クリックすると、以下のメニューが表示されます:
-
Copy- このコマンドを使用して、現在のプレビューをWindowsのクリップボードにコピーします。
-
Zoom In - このコマンドを使用すると、徐々にズームインすることができます。
-
Zoom Out- このコマンドを使用すると、徐々にズームアウトします。
-
Show Print Region - 印刷領域を表示するコマンドです。
-
Show Grid- このコマンドを使用すると、プレビュー領域にグリッド線が表示されます。グリッド線は印刷物には表示されません。
-
Export to Image- このコマンドを使用すると、現在のプレビューをイメージ(PNG、JPEG、BMP、GIF、WMF、EMF)としてエクスポートできます。
追加コントロール
Set as Default- ダイアログのPagesタブとAdvancedタブにある所定の設定をデフォルトとして設定します。
3D プリントベースの PCB 出力の準備
PCB 3D Print Settingsダイアログで、ジョブ出力ファイルに含める PCB の 3D プリントを選択または作成できます。プリントアウトの複数のインスタンスを持つことができます(これを行うにはOutput Containers領域の OutJob からAdd New Documentation Outputコントロールを使用)。
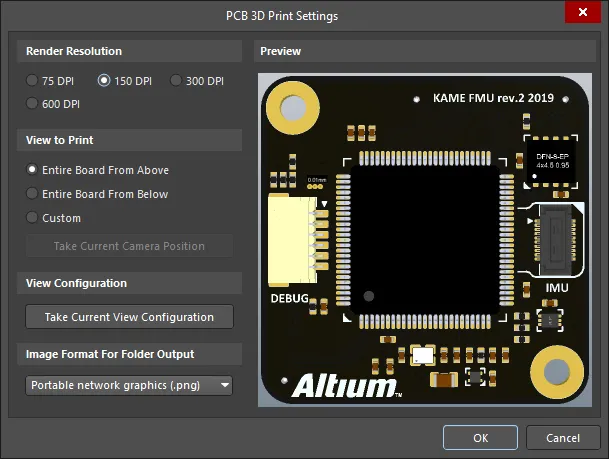
PCB 3D Print Settingsダイアログ
ダイアログは4つの領域に分かれています:
-
Render Resolution- プリントする3Dモデルの "画像 "の品質のオプションを含みます。利用可能な解像度はプリンタに依存しません。
-
View to Print - ボードのフラットビュー、つまり、ボードに垂直なカメラ視点、上からのビュー、下からのビュー、またはCustomビューから選択できます。
-
View Configuration- サーフェスカラー、可視性、不透明度、ボード厚の現在のビュー構成を適用することができます。
-
プレビュー- 印刷されるものを正確に表示します。
PCB 3D Printダイアログのオプションとコントロール
レンダリング解像度
この領域を使用して、解像度の面で印刷する3Dモデルの品質を指定します。サポートされている解像度は、75 DPI、150 DPI、300 DPI、600 DPIです。
使用可能な解像度はプリンターに依存しません。
印刷する
この領域を使用して、印刷するボードのビューを選択します。以下のオプションから選択してください:
-
Entire Board From Above- ボードの真上から見下ろしたボードの3Dビューを印刷する(カメラの視点はボードに垂直)。
-
Entire Board From Below- ボードの下から真上を見たボードの3Dビューを印刷するように選択します(カメラの視点はボードに垂直です)。
-
Custom- このオプションを選択し、PCB エディタで現在表示されているボードの 3D ビューを印刷するためにTake Current Camera Positionをクリックします。
3Dデザインスペースでボードの向きを変更した場合、このダイアログにアクセスし、Take Current Camera Positionを再度クリックして印刷設定を更新する必要があります。
Customビューオプションを使用すると、さまざまな視点からボードのビューを印刷することができます。
ビュー設定
Take Current View Configurationをクリックすると、サーフェスカラー、可視性、不透明度、ボードの厚さなど、現在のデザインスペースのビュー構成設定が適用されます。
3Dビューの設定を変更した場合は、このダイアログにアクセスし、印刷設定を更新するために再度Take Current View Configurationをクリックする必要があります。
フォルダ出力の画像フォーマット
ドロップダウンメニューを使用して、生成されるプリントの画像形式を選択します。.bmp、.jpg、.pngから選択します。
プレビュー
この領域は印刷のプレビューを表示します。ダイアログのView to Printおよび/またはView Configuration領域で変更が加えられると、動的に更新されます。
カスタム3Dプリントアウトの作成
あなたのボードのカスタムビューは、斜めに回転させたり、ズームしたり、表面の色、可視性、不透明度、ボードの厚さの様々な設定を含むことができます。これらのオプションを使用して、デザインの領域を強調したり、エフェクトを作成するために高レベルの詳細を提供するビューを生成することができます。
プリントアウトとしてボードのカスタム 3D ビューを作成するには、以下の手順を実行します:
-
PCB Editor ウィンドウに移動し、3D モードに入ります(ショートカット:3)。
-
3D ビューコントロールを使用して、希望のパースペクティブにします。
-
ジョブ出力ファイルに戻り、PCB 3D Printの行のどこかをダブルクリック(または右クリックし、ショートカットメニューからConfigureを選択)してPCB 3D Print Settingsダイアログを開きます。
-
Customオプションをクリックし、Take Current Camera Positionボタンを押します。Previewペインが新しいパースで更新されます。
-
現在の PCB 3D プリントアウトにカスタム設定を適用するにはOKをクリックします。
カスタムサーフェスカラーなどを適用したい場合は、以下の手順を実行します:
-
PCB エディタウィンドウに移動し、View Configurationパネルを開きます(メインメニューからView » Panels » View Configuration、またはメインエディタの右下にあるPanelsボタンをクリックし、View Configuration を選択、またはLショートカットを使用)。
-
必要なオプションを設定します。PCB 3D プリントアウトに適用するためにオプションを保存する必要はないことに注意してください。
-
ジョブ出力ファイルに戻り、PCB 3D Print Settingsダイアログを開き、Customオプションを有効にし、Take Current View Configurationボタンを押します。Previewペインが新しいビュー構成設定で更新されます。一度、ビュー設定を適用すると、View to Printオプションの全てに適用されます。
-
現在の PCB 3D プリントアウトにビュー設定を適用するにはOKをクリックします。
-
新しい 3D プリントアウトを保持するために OutJob ファイルを保存します。
Draftsman プリントベース出力の準備
Draftsman 印刷ベースの出力は、ファイルのDocumentation Outputs領域にある[Add New Documentation Outputs]コントロールのDraftsmanメニュー、またはメインメニューのEdit » Add Documentation Outputs » Draftsmanサブメニューからオプションを選択することで、アクティブな Output Job ファイルに追加できます。

必要な出力を右クリックし、Page Setupを選択すると、PCBDrawing Propertiesダイアログが表示されます。
Draftsman からFile » Printメニューコマンドを使って直接出力を生成する場合は、Printダイアログを使って出力を設定します。
ドラフトマン印刷のPrintダイアログのオプションとコントロール
.
全般タブ

Generalタブには、プリンタとページの設定を行うためのオプションがあります。
-
Printer- このフィールドには、印刷出力を送信する現在のプリンタが表示されます。ドロップダウンを使用して、現在コンピュータにインストールされているすべてのプリンタから別のプリンタを選択します。次のオプションにアクセスするには、 ボタンをクリックします:
-
Printer- Microsoft Print to PDF Document Propertiesダイアログを開き、プリンタまたはオペレーティングシステムに基づいてプリンタファイルを設定します。
-
Set as Default - 選択したプリンタを既定値として設定します。
-
Add Printer - Windowsシステムからプリンタを追加します。
-
Print to file- プロジェクトファイル内にOutフォルダを作成します。すべてのページに関する(*.ini)ファイルを作成し、すべてのページを(*.emf)形式でエクスポートできます。
-
Copies- このフィールドを使用して、印刷するページ(またはページセット)の部数を指定します。
-
Print Range-この領域のコントロールを使用して、見込み印刷ジョブに複数ページが含まれる場合に印刷するページを指定します。次のオプションのいずれかを選択します:
ページ設定
スケールと位置の設定
-
Scale Mode- ドロップダウンを使用して、必要なスケーリングモードを選択します。Actual SizeまたはFit On Pageから選択します。
-
Scale- このフィールドは、Scale Modeが Actual Sizeに設定されている場合に使用できます。このフィールドを使用して、ドキュメントの拡大縮小率を定義します。1より大きい値を入力すると実質的に印刷が拡大され(拡大効果)、1より小さい値を入力すると縮小されます(縮小効果)。
プレビュー右クリックメニュー
プレビューエリア内で右クリックすると、以下のメニューが表示されます:
-
Copy- このコマンドを使用して、現在のプレビューをWindowsのクリップボードにコピーします。
-
Zoom In - このコマンドを使用すると、徐々にズームインすることができます。
-
Zoom Out- このコマンドを使用すると、徐々にズームアウトします。
-
Show Print Region - 印刷領域を表示するコマンドです。
-
Show Grid- このコマンドを使用すると、プレビュー領域にグリッド線が表示されます。グリッド線は印刷物には表示されません。
スマート PDF ウィザードによる印刷物の準備
Smart PDF Wizardは、選択したドキュメント、または回路図、PCB、部品表を含むプロジェクト全体の PDF を生成します。PDF のしおりは、設計の各ネットやコンポーネントに作成されます。Smart PDF の設定を OutJob ファイルに保存し、ワンクリックで PDF を再生成できます。
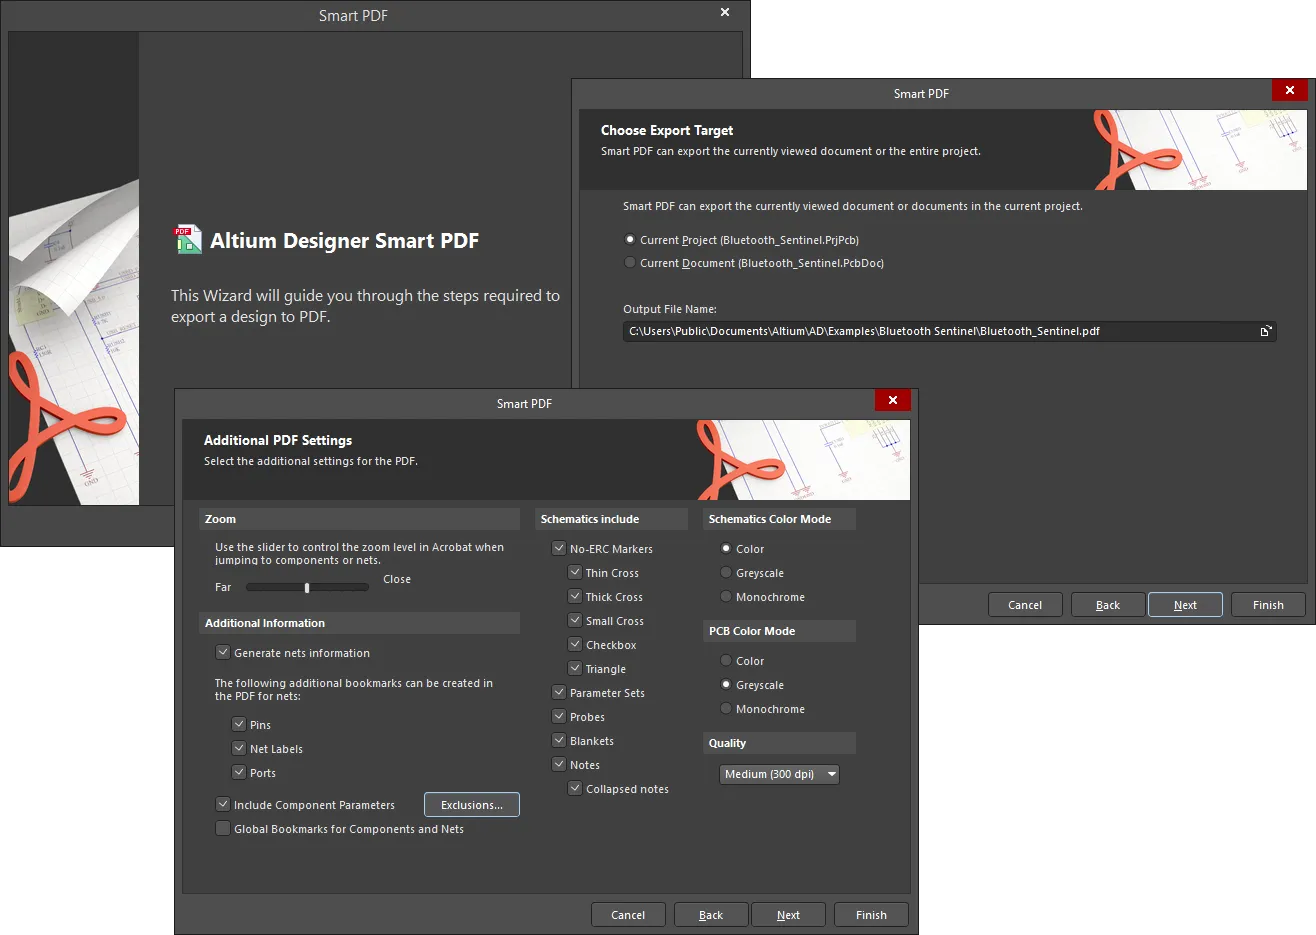
Smart PDF Wizard
メインメニューからFile » Smart PDFを選択すると、Smart PDF Wizardが 起動します。
コマンドを起動すると、Smart PDF Wizardが表示されます。ウィザードの一連のプログレッシブな(そして直感的な)ページに従って、あなたのデザインを1つのPDFドキュメントに効果的にエクスポートするための情報を収集します。 ウィザードは以下をサポートします:
-
アクティブなドキュメント、またはプロジェクト全体のドキュメント(回路図、PCB、部品表を含む)をドキュメント化します。
-
PCB ドキュメントをエクスポートする時の印刷設定。
-
ネット情報(ピンおよび/またはネットラベルおよび/またはポートブックマークとして追加)、コンポーネントパラメータ、コンポーネントやネットのグローバルブックマークを含む追加情報の追加。
-
回路図と PCB コンテンツのカラーリングの制御 - カラー、グレースケール、またはモノクロ。
-
ERCマーカー、パラメータセット、プローブ、ブランケット、ノートなど、回路図シートに含める、または回路図シートから除外できる特定のアイテムの管理。
-
印刷品質をドット/インチ(dpi)で定義する機能。
-
論理設計と物理設計のどちらをエクスポートするかを選択。後者の場合、どのデザインバリアントを使用するか、また、さまざまなネット識別子に拡張物理名を使用するかどうかを制御できます。
-
Output Jobコンフィグレーションファイル(*.OutJob)に設定を保存 - この方法で、毎回ウィザードの手順を踏むことなく、同じ設定で同じジョブを何度もパブリッシュできます。
ウィザードの様々なページが必要に応じて設定されたら、PDFを生成するためにFinishをクリックしてください。生成後にPDFを開くことを選択した場合は、PCにインストールされているデフォルトのAcrobat Readerで表示されます。生成された PDF は、タイプに従ってドキュメントをグループ化します:回路図、PCB または BOM:
-
それぞれの回路図に対して、設定に基づいたブックマークが提供され、ドキュメントだけでなく、そのドキュメントに存在する個々のコンポーネントやネットをブラウズすることができます。ソース回路図が階層構造になっている場合、トップレベルのシートが 1 レベルに表示され、全てのサブシートがサブブックマークとして表示されます。エクスポート処理でUse Physical Structureオプションを有効にした場合、生成されるPDFドキュメントにはマルチチャンネルデザインの各チャンネルごとに個別のシートが含まれます。
-
PCB ドキュメントでは、しおりはエクスポートされた印刷物のそれぞれに提供されます。
-
部品表については、各コンポーネントを参照できるようにブックマークが提供されています。
もし、Pins、Net Labels、Ports のネット情報を生成するために Additional Bookmark 設定を有効にしている場合、回路図や PCB(ピンのみ)をブラウズする時にこれらが表示されます。
ブックマークをクリックすると、そのオブジェクトが存在するドキュメントの領域にズームします。適用されるズームのレベルは、ウィザードで設定したズームコントロールスライダバー設定によって決まります。可能であれば、オブジェクトはPDF Viewerのメイン表示ウィンドウの中央に表示されます。コンポーネント、ピン、ポート、ネットラベルでブラウズする場合、参照しやすいようにハイライトが適用されます。
-
回路図、PCB、BOM ドキュメントのみ、スマート PDF ウィザードを使用して PDF 形式でエクスポートできます。
-
ネット情報を生成するオプションを有効にしなかった場合、生成された PDF ではコンポーネント情報のみが利用可能です。
-
ウィザード内で定義されたエクスポート・オプションは、デザイン・プロジェクトと共に保存されます。
-
出力ジョブファイルからPDF出力を生成する場合も、スマートPDFウィザードを使用して直接PDFを生成する場合と同じスマートPDFジェネレーターが使用されます。
-
アウトプットの設定は、生成されたOutJobドキュメントから再設定することができます。例えば、BOMを別のテンプレートを使用するように再設定し、PDF発行コマンドで再度発行することができます。
Smart PDF Wizardのオプションとコントロール
.

Smart PDF Wizardのページに従って、デザインをPDF形式で出力します。
ウィザードのナビゲーション
エクスポート先を選択

Choose Export Targetページでは、エクスポート対象 と保存先を指定することができます。Current ProjectまたはCurrent Documentのいずれかを選択してエクスポートします。どちらの選択でも、現在のプロジェクトと現在のドキュメントの名前が表示されます。
現在のプロジェクトをエクスポートすることを選択した場合、ウィザードの次のページでドキュメントを選択するためのさらなるオプションが表示されます。
Output File Nameテキストボックスを使用して、PDFの名前と保存先を指定します。参照ボタンをクリックしてダイアログを開き、必要なパスを選択します。
プロジェクトファイルの選択

前のページ(Choose Export Target)でCurrent Documentを選択した場合、このページは表示されません。
前のページ(Choose Export Target)でCurrent Projectを選択した場合、Choose Project Filesページが表示され、PDFに含めるドキュメントをさらに定義することができます。標準の複数選択機能(Ctrl+クリック、Shift +クリック)を使って、必要なファイルを選択します。また、右クリックメニューから利用可能な選択オプションを使用することもできます:Select All はリストされた全てのドキュメントを選択し、 Select All PCBはリストされた全ての PCB ドキュメントを選択し、Select All Schematicは全ての回路図ドキュメントを選択します。
部品表のエクスポート

Export Bill of Materialsページで、Export a Bill of Materialsオプションを有効にして、BOMをPDFでエクスポートします。
必要に応じて、Variantドロップダウンメニューを使用して、アセンブリバリアントとテンプレートを選択します。
Template ドロップダウンメニューで必要なテンプレートを選択するか、 をクリックして標準ダイアログを開き、必要なテンプレートを選択します。Relative Path to Template Fileチェックボックスを有効にして、選択したテンプレートの相対パスを表示します。
PCB プリントアウト設定
Choose Export Targetページで、PCB 文書がエクスポート用に選択されていない場合、このページは表示されません。

Choose Project Filesページで PCB ドキュメントをエクスポートすることを選択した場合、プリントアウトを設定できるPCB Printout Settingsページが表示されます。
このページは、3つの主要な領域で構成されています(詳細は後述):
-
Printouts & Layers Grid- 各レイヤーのプリントアウトを設定します。
-
Designator Print Settings - 印刷するコンポーネント・指定子を設定します。
-
Area to Print- 印刷する領域を指定します。
プリントアウトとレイヤーのグリッド
Multilayer Composite Printで、必要なInclude ComponentsチェックボックスとPrintout Optionsチェックボックスを有効にします。
右クリックメニュー
各レイヤーの印刷をさらに設定するには、右クリックメニューを使用します。右クリックメニューのオプションには以下が含まれます:
-
Create Final - 完全な最終アートワーク・セットを作成します。先に進む前に確認を求めるダイアログが表示されます。
このオプションを選択すると、現在の印刷設定がすべて削除されます。
-
Create Composite- マルチレイヤーのコンポジット印刷セットを作成するために使用します。続行する前に確認を求めるダイアログが表示されます。
このオプションを選択すると、現在の印刷設定がすべて削除されます。
-
Create Power-Plane Set- パワープレーン図面セットを作成するために使用します。続行する前に確認を求めるダイアログが表示されます。
このオプションを選択すると、現在の印刷設定がすべて削除されます。
-
Create Mask Set- ペースト/はんだマスク図を作成するために使用します。続行する前に確認を求めるダイアログが表示されます。
このオプションを選択すると、現在の印刷設定がすべて削除されます。
-
Create Drill Drawings- ドリル図面とガイドのセットを作成します。先に進む前に確認を求めるダイアログが表示されます。
このオプションを選択すると、現在の印刷設定がすべて削除されます。
-
Create Assembly Drawings- 組立図を作成します。ダイアログが表示され、確認を求められます。
このオプションを選択すると、現在の印刷設定がすべて削除されます。
-
Create Composite Drill Guide- 複合ドリル図面を作成するために使用します。続行する前に確認を求めるダイアログが表示されます。
このオプションを選択すると、現在の印刷設定がすべて削除されます。
-
Insert Printout- 新しい印刷物をリストの一番上に挿入する場合に使用します。 新しい印刷物の名前には、New Printout x(xは1、2、3など)という形式で連番が付けられます。新しい印刷物の名前を変更するには、Name フィールドをクリックし、必要な新しい名前を入力します。
-
Insert Printout Set -Printout Set for Class All Layersを挿入する場合に使用します。
-
Insert Drill Printout Set - 新しいDrill Guide Printout Setを挿入するときに使用します。
-
Insert Layer- 新しいレイヤーを挿入します。Layer Propertiesダイアログが開き、新しいレイヤーを設定できます。

Layer Propertiesダイアログ
-
Insert Layer Class- 新しいレイヤークラスを挿入します。Layer Class Propertiesダイアログが開き、新しいレイヤークラスを設定できます。

Layer Class Propertiesダイアログ
-
Move Up - 選択したレイヤーをリスト内で1つ上に移動します。
-
Move Down - 選択したレイヤーをリスト内で1つ下に移動します。
-
Delete- 選択したレイヤーを削除します。
-
Properties-Layer Properties ダイアログを開きます。
-
Preferences -PCB Print Preferencesダイアログを開きます。

PCB Print Preferencesダイアログ
指定子印刷設定
ドロップダウンを使用して、印刷するコンポーネント指定子データを選択します。選択肢には以下が含まれます:
印刷領域
追加コントロール
追加 PDF 設定

Additional PDF Settingsページ には、いくつかの追加エクスポートオプションが用意されています:
-
Zoom- コンポーネントやネットをブラウズするときにPDFで使用されるズームレベルをコントロールするには、スライダーバーを使用します。
-
Additional Information- PDFにネット情報を生成するかどうかをコントロールできます。このオプションを有効にすると、Pins、Net Labels、Portsのネットについて、PDFに追加のしおりを生成するかどうかを選択できます。
-
Include Component Parameters - コンポーネントのパラメータを含める。このオプションの使用方法については、後述のComponent Parameters in PDF Outputのセクションを参照してください。
-
Global Bookmarks for Components and Nets- コンポーネントとネットにグローバルブックマークを使用できます。生成されたグローバルブックマークは、生成されたPDFに含まれる回路図シートのリストの下に表示されます。
ネット用のグローバルブックマークは、Generate nets informationオプションも有効になっている場合にのみ生成されます。
-
Schematics include- チェックボックスを使用して、PDFに以下を含める(チェックする)、または含めない(チェックしない):
-
No ERC Markers- 回路図シートをエクスポートする際に、No ERC指示マーカーを含めるかどうかをコントロールします。No ERC Markers - 回路図シートをエクスポートする際に、ERCディレクティブ・マーカーを含めないかどうかを設定します:
-
Thin Cross
-
Thick Cross
-
Small Cross
-
Checkbox
-
Triangle
-
ParameterSets- 回路図シートをエクスポートする際に、パラメータセットオブジェクトを含めるかどうかをコントロールします。
-
Probes- 回路図シートのエクスポート時にプローブオブジェクトを含めるかどうかをコントロールします。
-
Blankets - 回路図シートのエクスポート時にブランケットを含めるかどうかをコントロールします。
-
Notes - 回路図シートのエクスポート時にノートを含めるかどうかをコントロールします。
-
Schematics Color Mode- 回路図シートのエクスポート時に使用するカラーリングを指定できます。Color、Greyscale、Monochromeのいずれかを選択します。このオプションは、回路図ドキュメントをエクスポートする時のみアクセス可能です。
-
PCB Color Mode- PCB 印刷物をエクスポートする時に使用するカラーリングを指定できます。Color、Greyscale、またはMonochromeから選択。このオプションは、PCB ドキュメントをエクスポートする時のみアクセスできます。
-
Quality - ドロップダウンを使用して、PDF プリントアウトの希望の品質を選択します。選択肢は以下の通りです:
-
High (600 dpi)
-
Medium (300 dpi)
-
Low (150 dpi)
-
Draft (75 dpi)
このオプションは、PDF出力コンテナがターゲットメディアである場合に、該当するPrint Propertiesダイアログでも使用できます。
構造設定を構成する

Structure Settingsページは、PDFの構造を設定するために使用されます。
Use Physical Structureをチェックすると、エクスポートされた回路図シートは論理シートではなく物理シートに展開されます。このオプションがチェックされていない場合、その他のオプションは使用できません。
必要なら、Variantドロップダウンを使って、どの variant を使うか選択します。
拡張物理名を表示したい場合は、以下のチェックボックスを有効にします:
最終ステップ

Final Stepsのページでは、PDFを生成する前に、いくつかの追加設定オプションを提示します。
-
Open PDF file after export- エクスポート完了後に生成されたPDFを開くことができます。
-
Save Settings to Output Job document- 設定を出力ジョブ文書に保存します。このオプションを有効にすると、 Smart PDF Wizardを使用せずに、同じジョブを同じ設定で繰り返し発行できます。
-
File Name of Output Job Document- ファイルパスを含む出力ジョブ文書のファイル名を指定します。既存の出力ジョブ文書を上書きするか、新規に作成するかを選択できます。
-
Open Output Job file after export - PDFエクスポート後に出力ジョブファイルを開くことができます。
OutputJobエディタ
スマートPDFの設定はOutput Jobドキュメントに保存することができます。このドキュメントはOutputJobエディタで変更できます。このエディタはアクティブドキュメントが*.OutJobファイルである場合にアクティブになります。

生成されるPDFの用紙サイズ
PDFジェネレータによって使用される用紙サイズは、コンピュータの現在のWindowsデフォルトプリンタから「取得」されたものではありません。PDF生成で利用可能なサイズは、デフォルトプリンタによって提供されるサイズとは独立して固定されており、デフォルトとして選択されたプリンタのタイプに関係なく独立したままです。言い換えると、Output Jobファイルを使ってPDFを生成するときにA3の用紙サイズを選択すると、デフォルトのプリンターを小さなA4 Inkjetに切り替えても、そのサイズのままです。PDF Printerで使用可能な用紙サイズは以下の通りです:
-
A0
-
A1
-
A2
-
A3
-
A4
-
A5
-
A6
-
A
-
B
-
C
-
D
-
E
-
リーガル
-
手紙
-
タブロイド
システムプリンター設定
PDFフォーマットで生成される出力に関して、カスタムページサイジングを定義することもできます。カスタムページサイジングは、PreferencesダイアログのSystem - Printer Settingsページで定義します。環境設定 ダイアログのAddボタンに関連するドロップダウンメニューには、定義済みのさまざまなカスタムサイズが表示されます:
-
ARCH A
-
アーチB
-
アーチC
-
アーチD
-
アーチE
-
アーチE1
-
C5封筒(162 x 229 mm)
-
DL封筒(110 x 220 mm)
-
フォリオ(8.5 x 13インチ)
-
JIS B1
-
JIS B2
-
JIS B3
-
JIS B4
-
JIS B5
-
レジャー(17×11インチ)
-
モナーク封筒(3.87 x 7.5インチ)
-
No.10封筒(4.125 x 9.5インチ)
-
ノート(7.5 x 10インチ)
-
ステートメント(5.5×8.5インチ)
エントリーを選択すると、そのサイズがリストに追加されます。別のサイズが必要な場合は、定義済みのサイズを追加し、そのエントリーをリストで選択してから、Edit Pageボタンをクリックします。ダイアログが表示されますので、そこでサイズを指定します:
定義されたカスタムページサイズは、PDFにエクスポートする前にページプロパティを設定する際に、サイズフィールドメニューに表示されます。
ターゲット内のサポートされていない用紙サイズの表示
該当する出力ジェネレーターのターゲットがPDF出力コンテナから物理的なプリンター(ハードコピー)に変更された場合、関連するプロパティダイアログ(右クリック→Page Setup)を通してジェネレーターに定義された用紙サイズが、ターゲット媒体でサポートされていない可能性があります。この場合、ジェネレーターから媒体への接続線は赤く色付けされます。
この状態では、コンテンツの生成(PDF出力コンテナ)やプレビュー/印刷(ハードコピー)ができません。該当する出力を正常に生成する前に、出力ジェネレーターの用紙サイズを変更するか(したがって接続線を緑の状態に戻す)、ターゲット媒体を選択した用紙サイズをサポートしているものに変更します。
用紙サイズの不一致が存在し、設定されている出力ジェネレーターの用紙サイ ズを変更する場合、ジェネレーターのPage Setupコマンドを使用すると、情報ダイアロ グが表示されます。これは問題を警告し、用紙サイズがデフォルトに戻されたことを通知します。これが意味するのは、設定ダイアログの用紙サイズドロップダウンが、サポートされている用紙サイズの標準セット(PDF出力コンテナ)またはターゲットプリンタでサポートされている用紙サイズのセット(ハードコピー)で更新されるということです。
生成 PDF の閲覧
生成された PDF は、タイプに従ってドキュメントをグループ化します:回路図、PCB、BOM。それぞれの回路図に対して、設定に基づいたブックマークが提供され、ドキュメントだけでなく、そのドキュメントに存在する個々のコンポーネントやネットをブラウズすることができます。
ソース回路図が階層構造になっている場合、PDF のブックマークに階層が反映され、トップレベルのシートが 1 つのレベルに表示され、全てのサブシートがサブブックマークとして表示されます。エクスポート処理でUse Physical Structureオプションを有効にすると、マルチチャンネルデザインの各チャンネルに別々のシートが含まれます。
PCB ドキュメントでは、しおりはエクスポートされた印刷物のそれぞれに提供されます。
部品表では、各コンポーネントを参照できるようにしおりが提供されます。
Wizard のAdditional PDF Settingsページで Pins、Net Labels、Ports のネット情報を生成するために追加のしおりを有効にした場合、回路図や PCB(ピンのみ)を参照する時にこれらが表示されます。
ブックマークをクリックすると、そのオブジェクトが存在するドキュメントの領域にズームします。適用されるズームのレベルは、Additional PDF Settingsページのズームコントロールスライダバーの設定によって決まります。可能な場合、オブジェクトはPDF Viewerのメイン表示ウィンドウの中央に表示されます。コンポーネント、ピン、ポート、ネットラベルでブラウズすると、参照しやすいようにハイライトが適用されます。
ネット情報を生成するオプションを有効にしなかった場合、生成されるPDFではコンポーネント情報のみが利用可能になります。
PDF 出力のコンポーネントパラメータ
Altium Designer は、生成された PDF 出力にコンポーネントパラメータを含みます。一旦生成されると、PDF 内のシート上のコンポーネントをクリックして、便利なポップアップでそのパラメータを見ることができます。この方法でコンポーネントパラメータを表示させたくない場合は、 Additional PDF SettingsページのAdditional Information領域のInclude Component Parametersオプションを無効にします(チェックを外します)。
この機能は、1つの回路図シートのPDFを生成する場合でも、プロジェクト全体のPDFを生成する場合でも機能します。
コンポーネントにパラメータがあり、その値がhttp:// という形式のウェブページへのURLである場合、そのエントリはパラメータポップアップにライブリンクとして表示されます。これをクリックしてリンクを辿り、外部のウェブブラウザでURLにアクセスすることができます。
「http://」というプレフィックスを含める必要があります。www.altium.com やlive.altium.com のような短縮形の URL はサポートされていません。
注意
File » Printメニューコマンドを使用して適切なエディタから直接印刷ベースの出力を生成する場合、この機能は OutJob ファイルで定義された設定とは別に設定されます。この場合、Project Options ダイアログのDefault Prints タブ(Project » Project Options)を使用して、生成可能な印刷関連出力のそれぞれのデフォルトの印刷設定とページレイアウトを設定します。
Project OptionsダイアログのDefault Printsタブにアクセスするには、Advanced Settingsダイアログの UI.ProjectOptions.DefaultPrintsの Valueフィールドを有効にする必要があります。
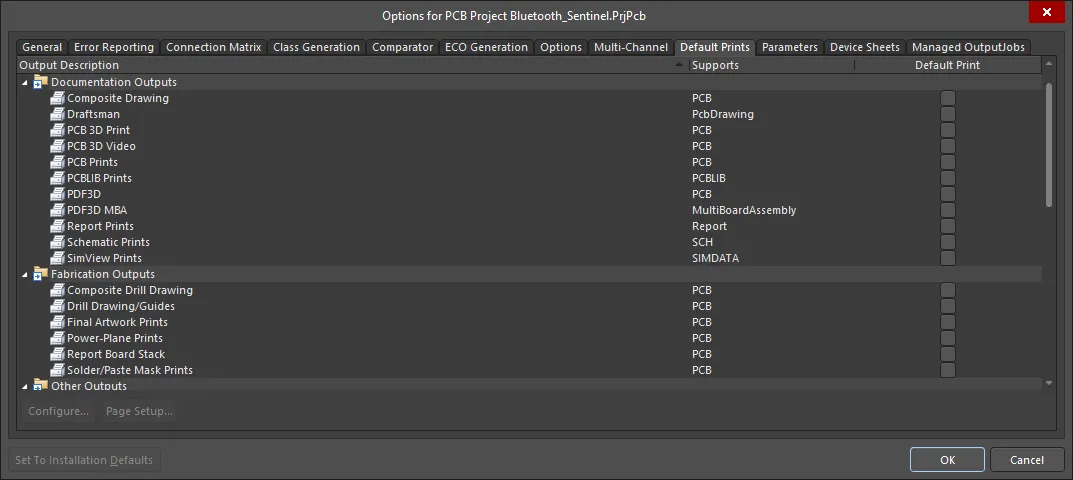
Project Optionsダイアログの Default Printsタブ