
IT部門向け情報
While installation and use of the Altium On-Prem Enterprise Server and its related services is detailed across other pages within this documentation site, the aim of this page is to provide a single, detailed resource for an organization's IT department. A place to come for answers to typically asked questions regarding this technology, including:
-
What are the hardware requirements to install the Enterprise Server?
-
What is installed?
-
What programs and processes are running?
-
Where is the data stored?
-
What ports are used?
-
What protocol is used for communications?
-
How is data backed up?
The following sections provide detailed answers to these and other questions, including a high-level overview of the architecture and data flows.
IIS Configuration
As part of IIS configuration, the ISAPI Extensions feature is enabled. This feature can be found in the \Internet Information Services\World Wide Web Services\Application Development Features section of the Windows Features dialog – accessed from Window's Programs and Features window.

Installation of the Enterprise Server enables the Windows ISAPI Extensions feature, part of IIS configuration.
Application Pools Installed on IIS
Verification that the Enterprise Server is running can be performed from the Windows Internet Information Services (IIS) Manager panel – accessed from Window's Administrative Tools window. Simply check to confirm each of the server-related application pools are in the Started state (as highlighted in the following image).

Enterprise Server-related application pools running on the IIS server.
HTTPS Protocol Support
The Enterprise Server provides for secure communication over networks using the HTTPS protocol to protect the privacy and integrity of the data.
Configuring a Certificate
When installing the Enterprise Server, you have the ability to configure an SSL certificate (learn more). While it is possible to create a self-signed certificate, it is recommended to generate your own certificate (using your standard/preferable tools) and then configure this certificate in IIS for security reasons. You can either create a certificate request and send that request to a known certificate authority (CA) such as VeriSign or GeoTrust, or obtain a certificate from an online CA in your intranet domain. Refer to the How to Set Up SSL on IIS 7 or later page in the Microsoft documentation to learn more.
Configuring HTTPS
The configuration and server bindings for the Enterprise Server can be accessed from the Windows Internet Information Services (IIS) Manager panel – available from the Administration Tools window (Control Panel\System and Security\Administrative Tools). Select the 'Altium On-Prem Enterprise Server' entry in the panel's Connections list, and choose the Features View tab.

Access configuration and server binding settings for the Enterprise Server.
The available ports and server names for the Enterprise Server are shown as selectable links in the Actions pane. Use the links to note and test the server connection protocols, or access the current name/port bindings by selecting the Bindings link in the Edit Site section of the pane.
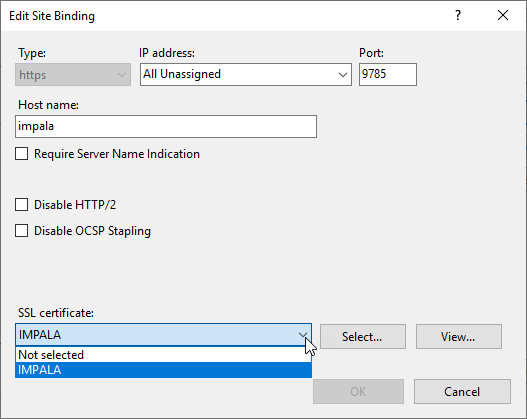
A Binding, including its protocol port number, can be edited from the Site Bindings dialog via the Edit button.

Configure bindings through the Site Bindings dialog.
Note that the server name localhost only applies to the local machine, so PCs other than the one that is hosting the Enterprise Server need to use the actual (server) name of that host machine to connect.
To confirm the name of the host PC on which the Enterprise Server is installed and running, on that machine go to Control Panel\System and Security\System and note both the Computer name and Full computer name (its qualified domain name) – the latter will be that used by the Enterprise Server for secure connections over the network.
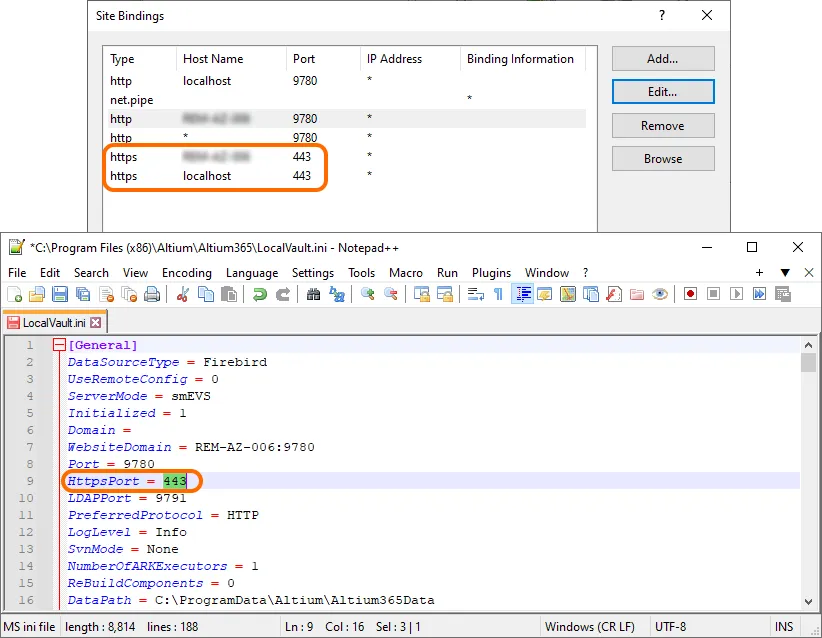
If you have edited the Enterprise Server's site bindings to use a Port number that is different from the default value, that change will need to be reflected in the Enterprise Server's LocalVault.ini file also. This is because its port references are accessed when connections are made to the Enterprise Server by Altium Designer. The LocalVault.ini is file can be found in the Enterprise Server installation's root folder – typically Program Files (x86)\Altium\Altium365.
For example, if you have changed the Enterprise Server's site binding to use the standard 443 port for HTTPS connections, update the corresponding HttpsPort=9785 line in the LocalVault.ini file to HttpsPort=443.
When Reconfiguring Site Bindings
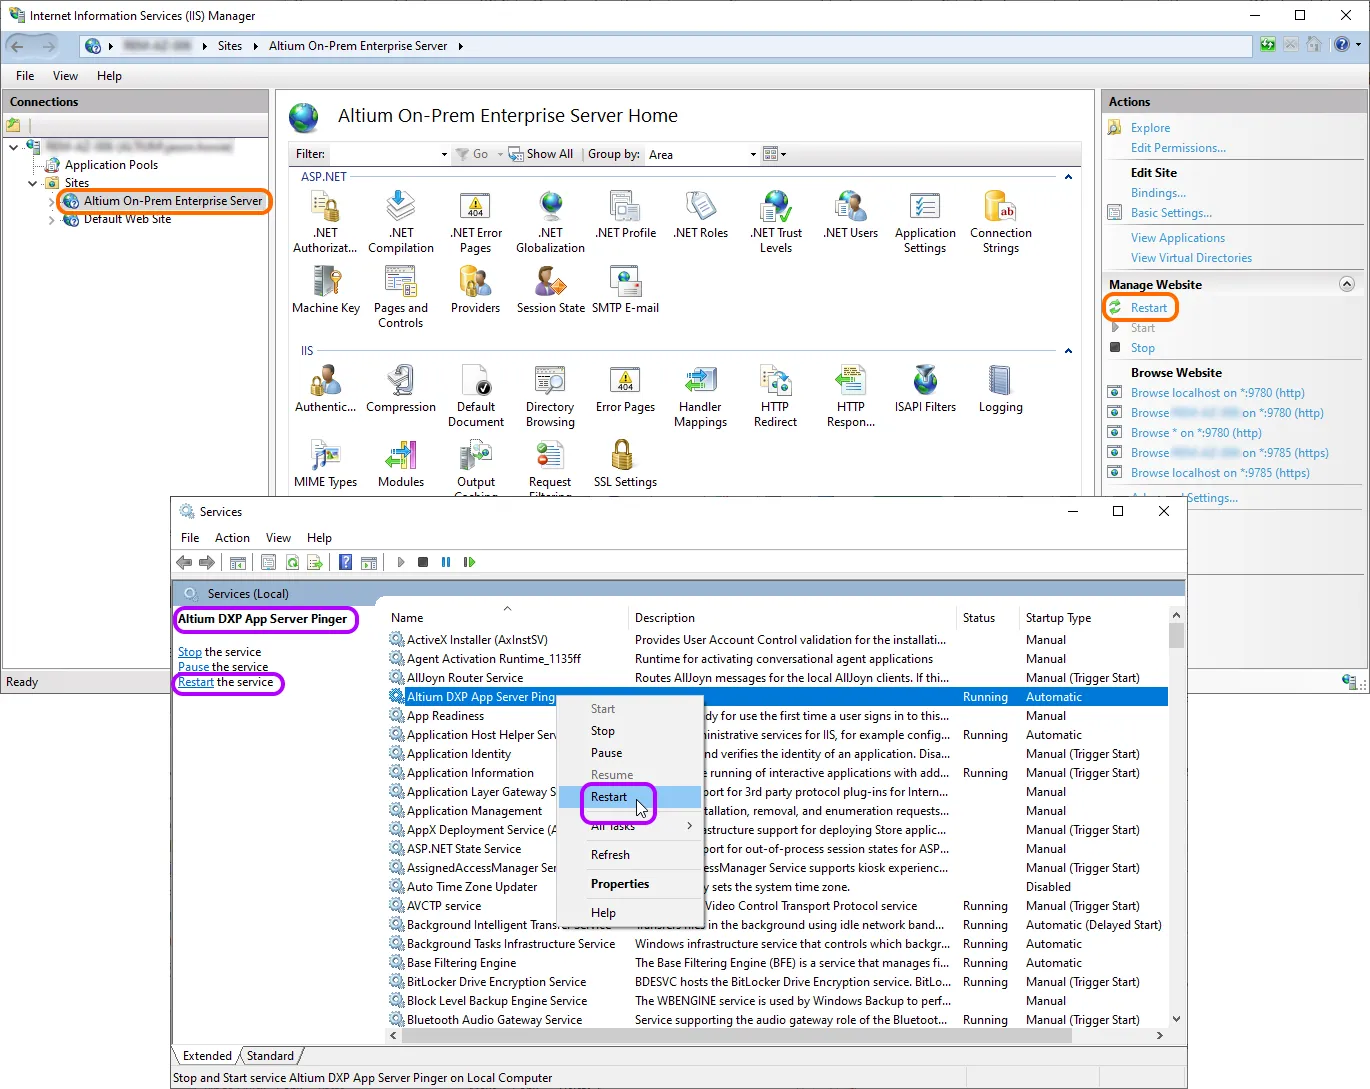
If you have added a new IIS Site Binding for the Enterprise Server, or edited an existing Site Binding entry (see above), the server PC should be restarted to correctly establish the new configuration. Typical Site Binding changes might be editing the Port number for a host entry, or adding a new binding for a domain alias.
When it is not practical to restart the server host machine, the alternative process is to restart the server service on the IIS platform – Restart under Manage Website – and also restart the Altium DXP App Server Pinger service (a Windows service).
Access over HTTPS
To establish a secure connection to the Enterprise Server:
-
From Altium Designer – use an HTTPS prefixed server address and the configured HTTPS port. By default, this is
https://<computername>:9785(where[computername]is the host machine's Computer Name or qualified domain name). -
From a browser – enter the address of the host computer name service (
https://<computername>:9785).
Network
Default Ports
The following default communication port numbers are used by the Enterprise Server:
-
HTTP Port –
9780 -
HTTPS Port –
9785 -
LDAP Synchronisation Service Port –
9791 -
Websocket Port –
4649 -
Firebird Server Port –
3050 -
SVN Port –
3690 -
Elasticsearch Ports –
9200and9300
The first three in the list can be configured during initial installation, on the Altium On-Prem Enterprise Server Configuration page of the Installer.
When choosing a port, note that it must not clash with any ports used by other applications – if a port is currently in use, you will be notified by the installer.
See information on ports and IP addresses for Altium Design software.
Protocol Used for Service-to-Service Communications
SOAP over HTTP.
Connection to the AltiumLive Identity Subsystem
Connections to the AltiumLive Identity subsystem are carried out over HTTPS by default, and the IdentityCloudServiceUrl entry in the LocalVault.ini file (located in the C:\Program Files (x86)\Altium\Altium365 folder for the default installation) is https://ids.api.altium.com/ids?cls=soap by default.
Configuring Platform API
Some responses from the Platform API return URLs based on the WebsiteDomain set during the initial configuration. In rare cases (for example, if your server is behind a load balancer or proxy), these URLs might not work. To fix this, update the FilesServiceUrl entry under the [PublicServices] section in the LocalVault.ini file (located in the C:\Program Files (x86)\Altium\Altium365 folder for the default installation). The entry's value should be set to <PubliclyAccessibleUrl>/napi/files, where <PubliclyAccessibleUrl> is the external URL that can be reached from outside the Enterprise Server.
Reverse Proxy and Load Balancer Scenarios
A reverse proxy server can be used to intercept inbound connection from the outside world into the Enterprise Server. In this context, a load balancer would play the same role.
The following are the key parameters that can be configured in the [General] section of the LocalVault.ini file (located in the C:\Program Files (x86)\Altium\Altium365 folder for the default installation).
-
PreferredProtocol– the value can be eitherHTTPorHTTPS, depending on the chosen scenario (HTTPSis recommended). -
WebsiteDomain– this is a public-facing FQDN and port as seen by clients (reverse proxy address). Do not include the scheme – e.g., useaes.example.com:443, nothttps://aes.example.com:443. -
HttpsPort– when using HTTPS, the value must match the port inWebsiteDomain. -
Port– this is the IIS HTTP listening port. In direct-access scenarios, this matchesWebsiteDomain. In reverse proxy scenarios, this is the internal HTTP port on which the Enterprise Server listen.
Scenario 1 – The Enterprise Server is exposed via HTTPS IIS directly onto Web with standard 443 port
IIS listens on HTTPS port 443 and is publicly accessible without a reverse proxy.
[General]
WebsiteDomain=aes.example.com:443
HttpsPort=443
PreferredProtocol=HTTPS
Port=9780
IIS binding: <https://aes.example.com:443> (or <https://*:443> if the queried hostname cannot be determined in advance – note that a wildcard binding still requires a TLS certificate that covers the actual hostname clients will use, otherwise clients will receive certificate errors).
Scenario 2 – Reverse Proxy is on Port 443, the Enterprise Server (IIS) is on a Different Internal Port
The reverse proxy listens on 443 and forwards to the Enterprise Server on a different port (e.g., 9785). This works but requires manual config correction after any Enterprise Server upgrade.
[General]
WebsiteDomain=aes.example.com:443
HttpsPort=443
PreferredProtocol=HTTPS
Port=9780
IIS binding: <http://*:9780> (internal only). The reverse proxy terminates TLS on 443 and forwards to :9780.
Scenario 3 – AWS / Azure ALB (or Similar Load Balancer) with TLS Bridging
ALB terminates TLS on port 443 and forwards to the Enterprise Server over HTTPS on an internal port (e.g., 9780 with a corporate CA certificate). This is essentially the same port topology as in the Scenario 2; the distinction is the load balancer's handling of backend TLS.
[General]
WebsiteDomain=aes.example.com:443
HttpsPort=443
Port=9780
PreferredProtocol=HTTPS
[Services]
UnifiedLoginUrl=https://aes.example.com/unifiedlogin
IIS binding: <http://*:9780>
If the ALB does not trust the Enterprise Server certificate (e.g., internal corporate CA), either configure the ALB to skip certificate validation for backend connections, or install the CA certificate on the ALB.
Quick Reference
| Setup | WebsiteDomain |
HttpsPort |
IIS Binding | Notes |
|---|---|---|---|---|
| Direct access or proxy on 443, Enterprise Server also on 443 | fqdn:443 |
443 |
<https://*:443> |
Recommended, installer-safe (Scenarios 1 & proxy-on-443) |
| Proxy on 443, Enterprise Server on 9785 | fqdn:443 |
443 |
<https://*:9785> |
Works; manual fix needed post-upgrade (Scenarios 2 & 3) |
| HTTP only (not recommended) | fqdn:80 |
N/A | <http://localhost:80> |
PreferredProtocol=HTTP; avoid in production instance |
Default Installation Paths
The following is a list of default installation paths when installing the Enterprise Server:
-
Enterprise Server Installation Folder –
\Program Files (x86)\Altium\Altium365. -
Firebird Installation Folder –
\Program Files\Firebird\Firebird_3_0. -
Firebird Database –
\ProgramData\Altium\Altium365Data\DXPSERVER.DAT. -
Revision Files Folder –
\ProgramData\Altium\Altium365Data\Revisions. -
Search Index Data Folder –
\ProgramData\Altium\Altium365Data\SearchData.
Service Architecture – Overview
The Enterprise Server installs a number of core services, as well as browser-based management consoles, and an Explorer (also browser-based). In order to access any of these services, a user's identity must be recognized and authenticated. The Enterprise Server comes with one predefined user (Username: admin, Password: admin). The Users page of the Enterprise Server Workspace's browser-based interface can be used to add and manage more users. There is no limit to the number of users that may be registered to access and use the Enterprise Server, but there is a limit on simultaneous connections, as determined and enforced by required licensing.
Altium Designer uses an unencrypted channel (SOAP over HTTP) for communicating with the following services:
-
Applications Registry Service (when the Network Installation Service is being used as a source for extensions/updates)
-
Collaboration Service
-
Comments Service
-
Data Acquisition Service
-
Data Storage Service (DSS)
-
Identity Service (IDS)
-
Notifications Service
-
Part Catalog Service
-
Projects Service
-
Simple Lock Service (SLS)
-
SVN (through the SVN:// protocol)
-
Tasks Service
-
Team Configuration Service (TC2)
-
Vault Service
All other services communicate with each other.
The majority of services require access to the same Enterprise Server database, in which to store data applicable to them. The following are examples of the data stored by some of these services:
-
Part Catalog Service – stores supplier and manufacturer items, price and quantity history changes, etc...
-
Identity Service – stores users, groups, licensing configuration, and session information.
-
Vault Service – stores its structure (folders, items, revisions, content types, lifecycle states, etc...).
Actual documents are stored on the file system, in the Revisions folder (\ProgramData\Altium\Altium365Data\Revisions).
The following browser-based applications use SOAP API to communicate to the applicable services – they do not require access to the Enterprise Server database, nor are any other files required for them to function:
-
User Management – the application behind the Users page and sub-pages in the Enterprise Server Workspace's browser interface.
-
Vault Explorer – the application behind the Explorer page of the Enterprise Server Workspace's browser interface.
-
Catalog Management – the application behind the Part Providers page of the Enterprise Server Workspace's browser interface.
-
Projects Management – the application behind the Projects page of the Enterprise Server Workspace's browser interface.
-
TC2 Console – the application behind the Configurations page of the Enterprise Server Workspace's browser interface.
Operations
Backup/Restore of Server Data
Backup and restoration of your Enterprise Server data is performed from the command line, in an automated fashion, using the dedicated Backup & Restore Tool. This tool – avbackup.exe – can be found in the folder \Program Files (x86)\Altium\Altium365\Tools\BackupTool\ (for a default installation of the Enterprise Server).
Refer to the Backing up & Restoring Your Installation page to learn more.
Re-Indexing Server Content after Data Migration
To re-index Enterprise Server content, for example after data migration:
-
Stop all IIS application pools associated to the Enterprise Server.
-
Stop the
Elasticsearch (AltiumElasticSearch)service. This is performed from the Windows Services panel – accessed from Window's Administrative Tools window. -
Delete the content of the
SearchDatafolder, which contains the search indexing data (\ProgramData\Altium\Altium365Data\SearchDatafor a default install). -
Restart the
Elasticsearch (AltiumElasticSearch)service. -
Restart the IIS application pools associated to the Enterprise Server.
On finding the SearchData folder empty, the Enterprise Server will re-index its content once it starts.
Increasing Java Heap Size
Insufficient Java heap size can break the component search index and make component data unavailable from Altium Designer. If you have search index issues (the Health Monitor Status Report has SearchService Schema not found: 'vault1ex2_04 errors in the logs), consider increasing the Java heap size.
The current Java heap size can be checked by opening http://localhost:9200/_cat/nodes?h=heap*&v on the machine hosting the Enterprise Server. If the heap.max value is around 1 GB, increase this value as described below.
-
Run the Command Prompt in administrator mode.
-
Run the following prompt:
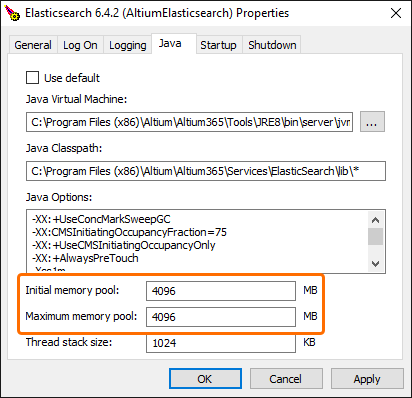
"C:\Program Files (x86)\Altium\Altium365\Services\ElasticSearch\bin\service-nexus-server.bat" manager AltiumElasticsearch -
On the Java tab of the dialog that opens, make the following changes:
-
In the Java Options field, remove
-Xms1gand-Xmx1gentries. -
Update values in the Initial memory pool and Maximum memory pool fields with
4096.
-
-
Click Apply and OK in the dialog.
-
From the Windows Services panel (accessed from Windows' Administrative Tools window), restart the AltiumElasticsearch service.
-
Verify that the changes are applied by opening
http://localhost:9200/_cat/nodes?h=heap*&vand checking the heap.max parameter value.
Configuration of Maximum Component Parameter Values per Filter Category
The LocalVault.ini file includes the MaxHitsPerFacet configuration option in the [Search] section. The specified value limits the number of individual entries (with checkboxes) presented per category in the Filters pane of Altium Designer's Components panel, when searching for a component. As an Administrator, lowering this value reduces the results per filter category, significantly reducing the load on the search service and increasing search performance.
Increasing the Allowed URL Segment Length
To use Release & Publish to PLM functionality in Altium Designer (learn more), a registry update in Windows is required on the machine where the Enterprise Server is installed. In a Windows Command window (CMD) with Administrator privileges, run the following:
reg add "HKLM\SYSTEM\CurrentControlSet\Services\HTTP\Parameters" /v UrlSegmentMaxLength /t REG_DWORD /d 2048
This change increases the allowed URL segment length, which is necessary for supporting the system's features. Note that after applying this change, you must restart your computer for the modification to take effect.
 AI で翻訳