
Workspace Projects
Altium Designer, in conjunction with the Altium 365 Workspace, brings support for an advanced project construct that targets the development stage of the project lifecycle, simplifying the creation and ongoing workflow for version-controlled projects. Centralized storage under the control of the Workspace also enables this feature to be a foundation for other collaborative services.
Some key benefits of using Workspace-based projects are:
-
Simplified storage. No need to make decisions about storage locations. Backup and other basic services are taken care of.
-
Foundation for collaborative features.
-
Enforced version control.
-
Advantages of a dedicated commenting system.
-
Notifications and status. Document status including local modifications is visible to entire design teams.
-
Concurrent PCB design works without any complex setup.
-
Ability to share the project with multiple people for editing, or for viewing and commenting only.
-
Full functionality when using the Project History feature, including VCS-related commit events.
Technically a project is the combination of meta information stored in the Workspace, along with tight integration with the Workspace's inherent GIT-based version control. The typical workflow is as follows:
-
A user creates a new project (via the Create Project dialog in Altium Designer, from the Workspace browser interface, or by making an existing local project available in the Workspace (from within Altium Designer)). During creation, that user defines the project's name and description.
-
In the Workspace browser interface, or directly within Altium Designer, access to the project is defined and managed.
-
All collaborators select the project for opening (from within Altium Designer) after which it is automatically checked out.
This document takes a look at working with projects through the Workspace browser interface. For information on working with projects in your design software, see Getting Familiar with the Altium Design Environment.
Creating a New Project
A project can be created directly from the Projects page of the Workspace browser interface. The page lists all projects that have been made available to the Workspace, and which are shared with the currently signed-in user. To create a new project, click the ![]() button above the project list, then choose the Project entry in the menu's Create group to open the Create Project window.
button above the project list, then choose the Project entry in the menu's Create group to open the Create Project window.
 Creating a new project through the Workspace browser interface.
The Create Project window will initially present in a simplified view, with the following fields:
-
Project Name – enter the required name for the project
- Template – choose a project template if available – the associated drop-down field will list all Project Templates that exist in the Workspace (in the format <Comment> (<ItemID>)). Choosing a template will inherently define the project type. If you do not want to base the new project on an existing project template, simply specify the type of project to be created (using the PCB Project or Multiboard entries available from the list).
- Description – enter an optional description for the project.
To access more controls click the ![]() button. The following field will present:
button. The following field will present:
-
Parent Folder – use this field to specify where the project is to be created within the Workspace's folder structure. This will be the currently open folder, or otherwise (by default) Projects. Note that the default folder path for new projects is specified on the Admin – Settings – Projects page of the Workspace browser interface. In the Create Project window, click the Change link at the right of the field to access the server folder structure for the Workspace, from which to select an alternate folder to store the project.

Note that if a writable folder is not selected in the Parent Folder field when the process is executed, then a Personal Folder structure will be created automatically for project storage. This is a private top-level folder named as your email address, with a My Projects subfolder. Examples of its creation and usage are:
-
The default folder for new projects (typically Projects) is not available to you or is read-only (not writable). In this case, the created/uploaded project will be stored in the personal My Projects folder.

-
The Parent Folder target setting is other than the default, but you have only view access to this folder (it is not writable). In this case, the project creation is blocked, and the My Projects folder is not added to.

-
See Project Creation Without Folder Write Access for more information.

After defining the new project as required, click ![]() . You will come back to the summary-level project list, where you will now see an entry for the newly created project.
. You will come back to the summary-level project list, where you will now see an entry for the newly created project.
 The newly-created project, evident back on the Projects page of the Workspace browser interface.
For more information on configuring project access permissions, see Sharing a Project below.
Uploading an Existing Local Project
You can also upload an existing design project to the Workspace. To do so:
-
Click the
 button above the project list, then choose the Project entry in the menu's Upload group. Navigate to and select a project ZIP archive and click Open to invoke the upload.

-
A pop-up window will advise how many potential files are involved in the upload (contained in the chosen folder) and ask for confirmation to proceed – click
 .
.
-
The Upload Project window now appears. By default, the Project Name will be that of the existing project – change if required and add a suitable description. The Parent Folder will be set to the folder that was currently active when the upload process was started. Click the Change link at the right of the field to access the server folder structure for the Workspace, from which to select an alternate folder in which to store the project. You can organize projects into a hierarchy of sub-folders should you wish. For more information, see the section Creating a Hierarchy of Project Folders. With settings defined as required, click the
 button.

-
The upload will proceed, after which time an entry for the project will be added to the summary-level project list.

Important Considerations
A project upload will include:
-
design files that have been added to the project, as registered in the project file (
PrjPcb). - all other files in the specified project folder.
A project upload will not include:
-
files in sub-folders of the specified project folder, unless they are included in the project (registered in the project file).
-
any files that have been added/linked to the project that are located outside of the specified folder.
-
any files in the
Project Outputs for <project>folder, such as generated Gerber Fabrication outputs for example.
Recommendations:
-
Ensure that the source project folder contains one project file (
PrjPcb) only. If multiple project files are uploaded to the Workspace repository the Web Viewer may not show the correct design documents. ► More information. -
Avoid storing large additional files in the project folder, such as MCAD data, or archive files. Store these in a sub-folder so they will not unnecessarily be uploaded and processed.
-
Do not include files in your project that are stored outside the project folder, since as mentioned above, they will not be uploaded to the Workspace repository.
-
Use the Workspace History View to see a listing of the files that have been included in a newly uploaded Workspace project.
-
To view the project's CAM (manufacturing) data in Altium 365, such as generated Gerber files, they can be uploaded to and viewed in your Altium 365 Personal space.
-
The best way to access the project's design and manufacturing files in your Workspace is to Make the Project Available Online from Altium Designer, and then Release the Project. The resulting Workspace Release Package provides view access to the full set of design/manufacturing documents.
Uploading a Gerber or ODB++ Fileset
The Workspace also accepts sets of generated Gerber/ODB++ manufacturing files in archive format, which can be uploaded through the Manufacturing Files options available from the ![]() button menu. The upload process is essentially the same as the Project upload process outlined above.
button menu. The upload process is essentially the same as the Project upload process outlined above.


Click on the Gerber/ODB++ project name or use the associated menu's Open option to load the fileset in the Workspace's dedicated Fabrication Viewer. This provides a composite view of all included files/layers, allows layers to be hidden or viewed exclusively, offers a point-to-point Measurement feature, and accepts placed Comments.
For more information on these options, see the Fabrication section in the Web Viewer documentation.
Uploading an OrCAD Design
The Workspace OrCAD® Upload feature adds to the complement of design files that can be uploaded and interpreted by the Altium 365 Workspace. An archived file (*.zip) containing a suitable schematic (*.dsn) and PCB (*.brd) files is uploaded through the Design Files » OrCAD option available from the ![]() button on the Projects page, as shown below. The OrCAD design will be stored under Version Control in Altium 365.
button on the Projects page, as shown below. The OrCAD design will be stored under Version Control in Altium 365.


Open the uploaded OrCAD design like any other Workspace project by double-clicking on its tile, or by choosing the Open option from the tile ![]() menu or the page’s main
menu or the page’s main ![]() menu. Once processed, the OrCAD design files are interpreted into Schematic, PCB, 3D PCB, and BOM listing project views.
menu. Once processed, the OrCAD design files are interpreted into Schematic, PCB, 3D PCB, and BOM listing project views.


Thanks to the advanced Workspace features provided through the Web Viewer, the now unified design allows you to quickly cross-probe objects between domain views, search for objects, trace/highlight Nets, place Comments, Share the design with other users, inspect History, work with Task activities, and much more. You also can create an advanced Managed BOM document from an uploaded OrCAD project, which allows you to review, configure and share a procurement-ready BOM file populated from Altium’s extensive Supply Chain data resources – see the BOM Portal page for detailed information.
See the Web Viewer page for information on the viewer's functionality and features.
Uploading a New Version of the Design
When an OrCAD design has been uploaded to the Workspace and a new version of that design becomes available – due to further work by an external contractor, for example – then the existing Workspace project can be updated using the project's Upload New Version option. Since the existing project is stored under Git Version Control, this option allows the new design update to be committed as a new VCS revision of that project. All such Commit (and project Release) events are logged and accessible in the project’s History view.

Upload a new version of an existing OrCAD project design through the Upload New Version option, available from the OrCAD project tile's ![]() menu or from the main
menu or from the main ![]() menu.
menu.


OrCAD Integration with Altium 365
Along with the ability to upload OrCAD® designs to your Workspace, Altium 365 also allows for direct integration between OrCAD and your Workspace using a proprietary plugin.
See the Multi-CAD File Support page for information on the Altium 365 ECAD capabilities.
Installed on the machine hosting OrCAD, the Altium 365 Plugin for OrCAD is a small application that provides bidirectional design data exchange between the two domains. The integration provides a convenient way to harness the data management benefits of Altium 365 with an existing OrCAD installation. OrCAD designs that have been ported to your Workspace are stored under history-tracked version control and available for collaboration, viewing, sharing, commenting, and much more. Access for stakeholders is permission-controlled and available through their web browser.
Download and run the Altium OrCAD plugin executable on your OrCAD machine while following the installation wizard prompts – the installer should automatically detect your OrCAD installation location.

Once installed, the plugin is accessible from the Altium 365 entry in the main OrCAD menus. This allows you to sign in and save the current OrCAD project to your Altium 365 Workspace – or load a previously saved one from the Workspace – using the available menu options.


Note: OrCAD® is a federally registered trademark owned by Cadence Design Systems, Inc. All references to this trademark are for identification purposes only. Use of this trademark does not imply any connection, approval, or endorsement by Cadence Design Systems, Inc
Comments and Tasks Support
The Altium 365 Plugin for OrCAD brings enhanced collaboration capabilities from Altium 365 into OrCAD through the Comments and Tasks panel. The panel communicates directly with Altium 365 by synchronizing Comments and Tasks data in real time. OrCAD users can immediately benefit from Altium 365 collaboration features such as creating and contributing to comment threads, assigning job requests (tasks) to themselves or other users, pasting and viewing related images, and viewing the assigned priority and progress status of active Tasks.
See Web Viewer Comments for information on working with Altium 365 Comments and Tasks.
Select the Comments and Tasks option from the Altium 365 menu to open the plugin’s Comments and Tasks overlay panel. The panel will be populated with any existing document Comment and Task references drawn from the connected Altium 365 Workspace project.

The plugin’s Comments and Tasks panel is essentially a synchronized version of the Comments and Tasks pane in the connected Workspace. As a result, the panel offers most of the Workspace pane’s features except access to placed comments within a document, since OrCAD does not natively support document commenting. See Working with the Comments Pane for more information on those Workspace features.
A new comment can be added through the plugin’s Comments and Tasks panel in its upper section, and will be associated with the currently active OrCAD document. Press F5 at any time to refresh the panel data.


Optionally mention another user by adding the @ character followed by their Workspace member name and/or by choosing a name from the drop-down user list. 


When all options are completed click the ![]() button to create the Comment and optional Task.
button to create the Comment and optional Task.


In common with the Altium 365 Workspace Comments and Tasks pane, the OrCAD Plugin Comments and Tasks panel includes the following options and features:
-
Comments and Tasks Filtering – control which user comments (or just tasks) are included in the pane.

-
Threads and Notifications – constrain the entries to the current document and/or those that have not been resolved (the default setting). If Workspace Email Notifications are enabled, use the Notification Settings option to specify the range of comments that generate an email alert.

-
Comment entry options – use a comment’s
 menu to manage that entry or to create a corresponding Task from that comment.
-
Comment image – the Original Snapshot control will open a screenshot image that was automatically captured when the comment was placed on a document. Available only when the Altium 365 Workspace was used to place the comment.

-
Task assignment – create a Task associated with the comment by selecting a username from the Assign a task to menu. Available when a Task is not already assigned.

-
Link to associated Task – select a comment’s Task identification entry to open that Task in the Workspace project Tasks view. Changes to the task’s Priority and Status will be reflected in the OrCAD Comments and Tasks panel.

Uploading a KiCad Design
The Workspace KiCad® Upload feature provides another source of ECAD design data that can be uploaded and interpreted by the Altium 365 Workspace. An archived file (*.zip) containing a suitable KiCad schematic and PCB files is uploaded through the Design Files » KiCad option available from the ![]() button on the Projects page, as shown below. The processed KiCad design will be stored under Version Control in Altium 365.
button on the Projects page, as shown below. The processed KiCad design will be stored under Version Control in Altium 365.
See the Multi-CAD File Support page for information on the Altium 365 ECAD capabilities.
You can open the uploaded KiCad design like any other Workspace project by double-clicking on its tile, or by choosing the Open option from the tile ![]() menu or the page’s main
menu or the page’s main ![]() menu. Once processed, the KiCad design files are interpreted into Schematic, PCB, 3D PCB, and BOM listing project views.
menu. Once processed, the KiCad design files are interpreted into Schematic, PCB, 3D PCB, and BOM listing project views.


Open the uploaded KiCad design by double-clicking on its tile, or by choosing the Open option from the tile ![]() menu or the page’s main
menu or the page’s main ![]() menu.
menu.

The design and its documents will offer the advanced features available through Altium 365, including control of object/layer visibility, bidirectional cross-probing, collaboration through managed design sharing, document commenting, History access, and much more. If you have access to the BOM Portal application, a procurement-oriented Managed BOM document can be created from the design to manage its manufacturing and supplier parts data.
See the Web Viewer page for information on the design viewer's functionality and features.
 ).
).Uploading an EAGLE Design
The Workspace Autodesk® EAGLE™ Upload feature provides another source of ECAD design data that can be uploaded and interpreted by the Altium 365 Workspace. An archived file (*.zip) containing a suitable EAGLE schematic (*.sch) and PCB files (*.brd) is uploaded through the Design Files » EAGLE option available from the ![]() button on the Projects page, as shown below. The processed EAGLE design will be stored under Version Control in Altium 365.
button on the Projects page, as shown below. The processed EAGLE design will be stored under Version Control in Altium 365.
See the Multi-CAD File Support page for information on the Altium 365 ECAD capabilities.
You can open the uploaded EAGLE design like any other Workspace project by double-clicking on its tile, or by choosing the Open option from the tile ![]() menu or the page’s main
menu or the page’s main ![]() menu. Once processed, the EAGLE design files are interpreted into Schematic, PCB, 3D PCB, and BOM listing project views.
menu. Once processed, the EAGLE design files are interpreted into Schematic, PCB, 3D PCB, and BOM listing project views.


Open the uploaded EAGLE design by double-clicking on its tile, or by choosing the Open option from the tile ![]() menu or the page’s main
menu or the page’s main ![]() menu. The initial view is the schematic document.
menu. The initial view is the schematic document.


The BOM view data is limited to what information can be derived from the EAGLE design files, however you can create an advanced Managed BOM document from the design project's Create Managed BOM option ( ). Note: available when the BOM Portal is enabled.
The design and its documents will offer the advanced features available through Altium 365, including control of object/layer visibility, bidirectional cross-probing, collaboration through managed design sharing, document commenting, History access, and much more. If you have access to the BOM Portal application, a procurement-oriented Managed BOM document can be created from the design to manage its manufacturing and supplier parts data.
See the Web Viewer page for information on the design viewer's functionality and features.
 ).
).Uploading or Creating a Managed BOM
If the Altium 365 BOM Portal application is enabled for your Workspace, you can upload a CSV/XLS formatted BOM file to create a Managed BOM project item or create one directly from an existing design project. Managed BOM files are interpreted and processed by the BOM Portal to ultimately create procurement-ready BOM documents. These are populated with current manufacturer/supplier information sourced through Altium’s data resources and are fully configurable to suit your company’s needs.
See the BOM Portal page for detailed information.
To upload a BOM file, choose the BOM option from the ![]() button menu's Upload group, browse to and select a suitable
button menu's Upload group, browse to and select a suitable CSV/XML BOM file, enter its details in the Upload BOM window and confirm the upload. Managed BOM files are saved in the currently open folder or the Projects folder by default, and are accessed and managed in a similar way to design projects.


To create a Managed BOM from an existing design project, choose the Create Managed BOM option from the project tile’s ![]() menu, select a project variant and enter the BOM details in the Create Managed BOM window, and then confirm the BOM creation.
menu, select a project variant and enter the BOM details in the Create Managed BOM window, and then confirm the BOM creation.


Open a Managed BOM by double-clicking on its tile, clicking on its name, or by selecting Open from the associated ellipsis menu. The BOM Portal application will attempt to recognize and map BOM parameters automatically (Description, Designator, Manufacturer Part Number, etc), or will otherwise offer to step through a column mapping process based on your selections.
Once the parameter data are successfully mapped, the system will automatically source the most suitable component manufacturer and part supplier data, flag any compatibility or risk issues, and present a graphical overview of the BOM ‘health’.


Creating a Hierarchy of Project Folders
Related information: Managing Content Structure & Access
The Workspace also provides the ability to create and manage project folders within the server's structure. Projects may then be created in, or moved to, any folder in the resulting folder hierarchy.
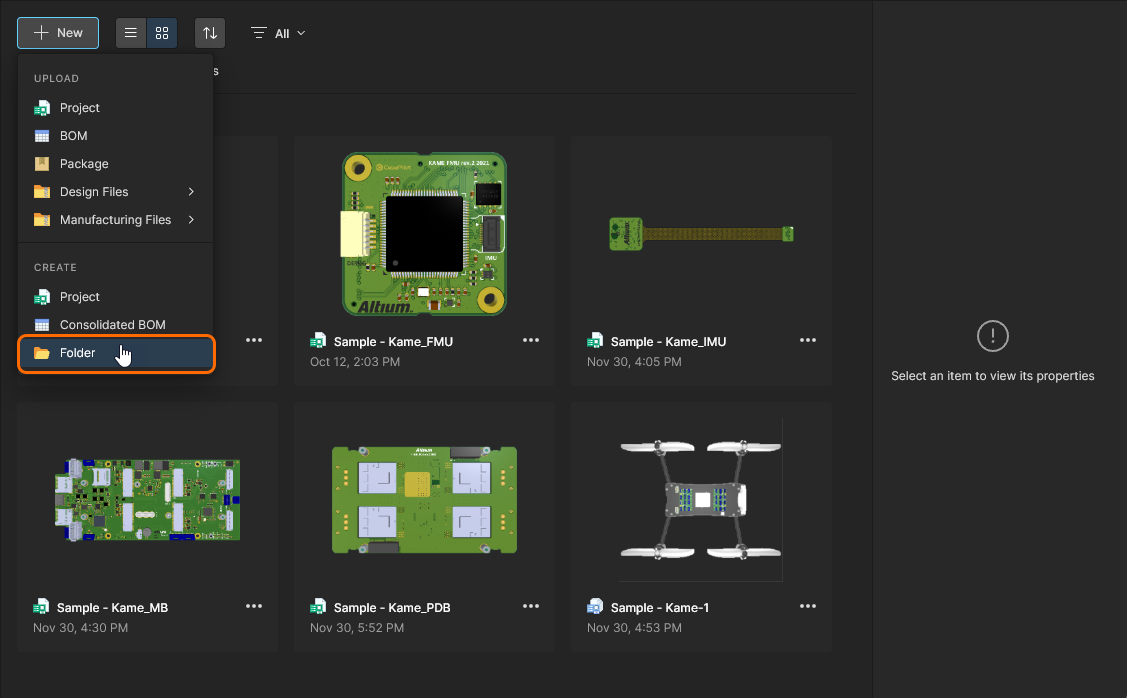
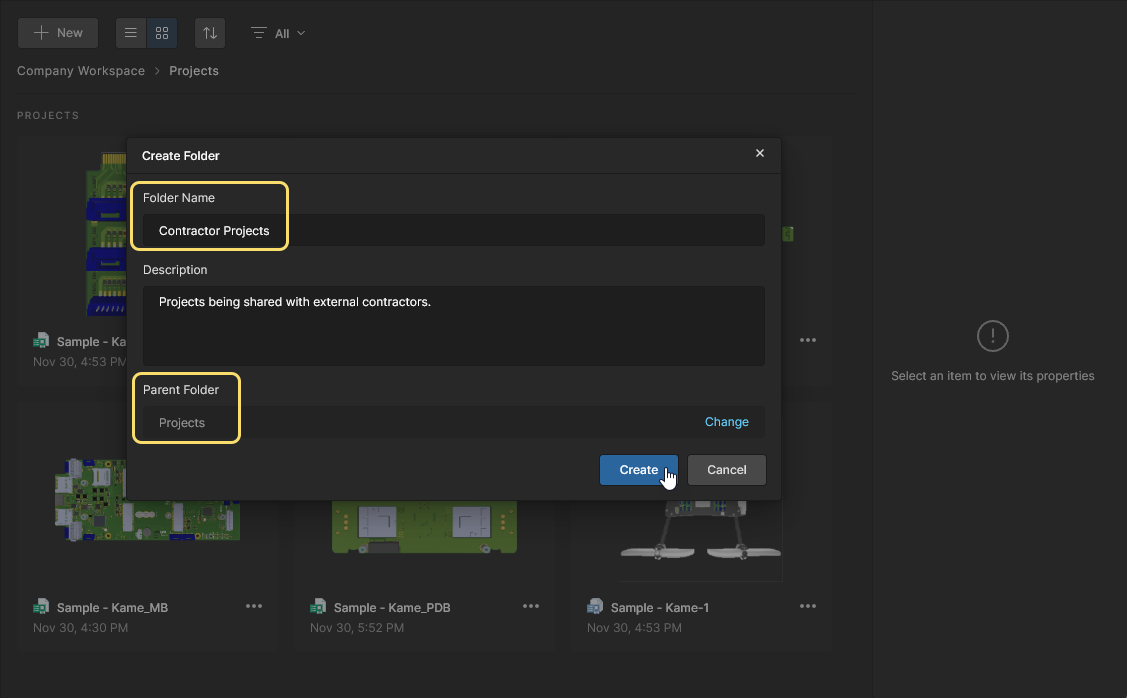
To create a new folder under the (default) top-level Project folder, click the ![]() button above the project list, then choose the Folder entry under the menu's Create group. In the Create Folder window that appears specify the name of the new folder, its parent folder, and an optional description. A new folder is always created under the currently selected folder, which becomes its parent folder. The new folder's permissions are inherited from its parent folder, which will include write access for the 'owner' of that folder if different to the current user.
button above the project list, then choose the Folder entry under the menu's Create group. In the Create Folder window that appears specify the name of the new folder, its parent folder, and an optional description. A new folder is always created under the currently selected folder, which becomes its parent folder. The new folder's permissions are inherited from its parent folder, which will include write access for the 'owner' of that folder if different to the current user.
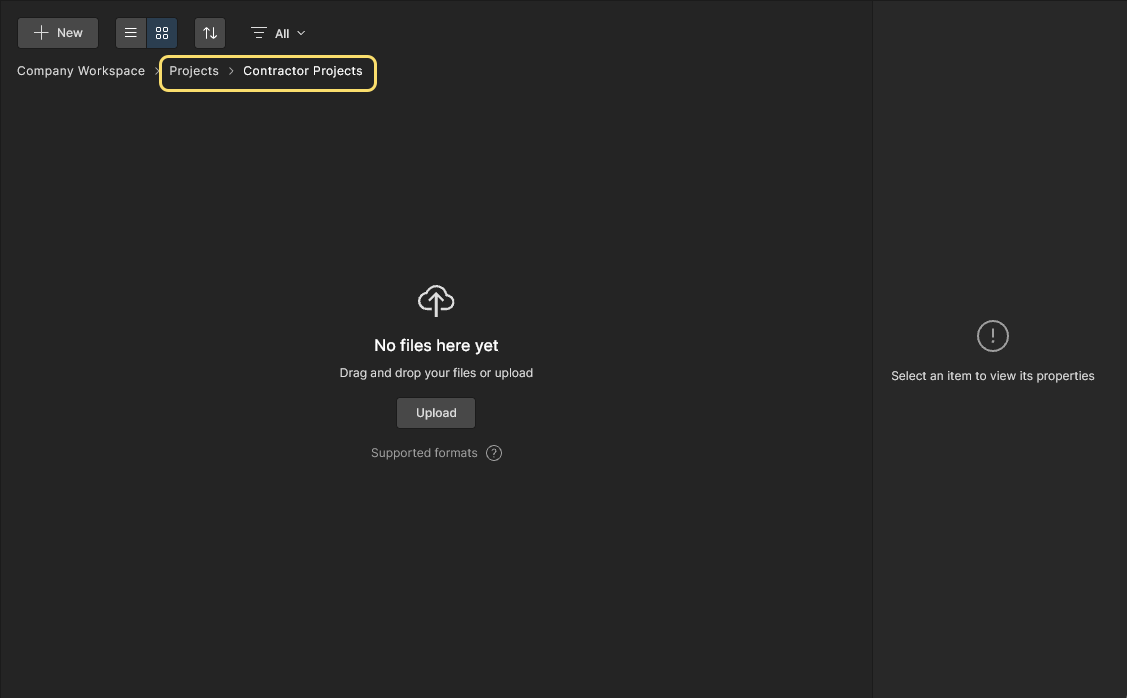
With attributes defined as required, click ![]() . The new folder (sub-folder) will be created and you will be taken to it.
. The new folder (sub-folder) will be created and you will be taken to it.
Continue creating further folders as required, effectively building a hierarchy of folders in which to store and categorize your design projects. Those folders will then be available to choose from as the parent folder when creating a subsequent folder, as illustrated in the following image.
 Example of a defined hierarchy of project folders.
Navigating the Folder Hierarchy
The default (graphical) view in the Projects page will present all child folders below the Projects folder. The details of a selected folder are shown in the right-hand information pane. 
Click on the folder entry’s name to open its contents, select breadcrumb entries to navigate back up the folder hierarchy, or select the Projects entry in the main navigation tree to return to the top projects level. Navigate in the same manner when accessing the List view (![]() )
)
Sharing a Folder
To modify the sharing permissions for an existing project folder, select its entry on the Projects page and then the Share entry from its associated ![]() control, or click the upper
control, or click the upper ![]() button. The Share Item window allows you to add folder access for specified users or groups (Share Item With entries), and view and modify the folder’s existing share permissions (under Share With) – the inherent Owner and Administrator rights cannot be changed.
button. The Share Item window allows you to add folder access for specified users or groups (Share Item With entries), and view and modify the folder’s existing share permissions (under Share With) – the inherent Owner and Administrator rights cannot be changed.
 The Share Item window allows for additions and modifications of the share permissions that apply to the selected folder.
Note that some levels of user access (View, Edit, or No access) may be unavailable for selection in a Shared With entry. This is because a change in access level would otherwise contradict (demote) the permission set inherited from its parent folder – by default, Edit rights for all users. The folder’s permissions can be disconnected from those of its parent folder, thus disabling the permission inheritance and enabling all access level options, by disabling the Inherit parent folder permissions option under the Share Item window’s Advanced Settings.

See the Managing Content Structure & Access page for more detailed information.
Editing a Folder
To edit the properties of an existing project folder select its entry on the Projects page, click the ![]() control above the listing of projects/folders, and choose the Edit entry on the associated menu.
control above the listing of projects/folders, and choose the Edit entry on the associated menu.
The editing command is also available in the Projects page by selecting the tile for the required folder and then the Edit command from the ![]() icon's context menu. When the Projects page is in its list view, click the
icon's context menu. When the Projects page is in its list view, click the ![]() control at the far right of the entry for the required folder and choose the Edit command from the associated menu.
control at the far right of the entry for the required folder and choose the Edit command from the associated menu.
In the following Edit Folder window you can change the folder's Name and Description. Click the ![]() button to confirm any changes you have made.
button to confirm any changes you have made.
 You can edit the Name and Description for a project folder at any stage.
Moving a Folder within the Hierarchy
To move (relocate) a folder under a different parent folder within the hierarchy, select its entry on the Projects page, click the ![]() control above the listing of projects/folders, and choose the Move entry on the associated menu.
control above the listing of projects/folders, and choose the Move entry on the associated menu.
The move command is also available in the Projects page by selecting the tile for the required folder and then the Move command from the ![]() icon's context menu. When the Projects page is in its list view, click the
icon's context menu. When the Projects page is in its list view, click the ![]() control at the far right of the entry for the required folder and choose the Move command from the associated menu.
control at the far right of the entry for the required folder and choose the Move command from the associated menu.
The Move folder window will appear, in which to choose the new parent folder. Click the ![]() button to effect the move. The folder will be moved to be a sub-folder of the chosen new parent, along with its constituent projects.
button to effect the move. The folder will be moved to be a sub-folder of the chosen new parent, along with its constituent projects.
 You can move a folder within the folder hierarchy at any stage.
Removing a Folder
To remove an existing project folder from the Workspace, select its entry on the Projects page, click the ![]() control above the listing of projects folders, and choose the Remove entry on the associated menu.
control above the listing of projects folders, and choose the Remove entry on the associated menu.
The remove command is also available in the Projects page by selecting the tile for the required folder and then the Remove command from the ![]() icon's context menu. When the Projects page is in its list view, click the
icon's context menu. When the Projects page is in its list view, click the ![]() control at the far right of the entry for the required folder and choose the Remove command from the associated menu.
control at the far right of the entry for the required folder and choose the Remove command from the associated menu.
The Remove window will appear, in which to confirm the removal. To proceed with the deletion, click the ![]() button.
button.
The folder will be removed from the folder hierarchy, along with its constituent projects, and you will be taken to the removed folder's parent. A project folder can be restored or permanently deleted from the Trash page. A project removed along with the folder can be restored or permanently deleted from the Trash page, but only by the owner of that project or a Workspace Administrator.
 Deleting a project folder – sending it to the isolated Trash area for the Workspace.
Browsing Projects
The projects listing on the Projects page of the Workspace browser interface includes all projects you have access to, and offers a comprehensive range of project management features and controls. Use the ![]() button to switch the page to its list view (
button to switch the page to its list view ( ) and the
 ![]() button to switch the page to its graphical view (the default view).
button to switch the page to its graphical view (the default view).
 The Projects page of the Workspace browser interface – command central for working with your projects. Here, the graphical view for the page is shown.
The list of projects is automatically sorted by the last modified date, with the most recently modified project appearing at the top-left of the list (in the graphical view) or at the top of the list (in the list view). In the graphical view (![]() ), the
), the ![]() button can be used to quickly sort the project documents by name, author, owner, or last modified date.
button can be used to quickly sort the project documents by name, author, owner, or last modified date. 
In the list view (![]() ), the project listing can be sorted by Name, Author, Owner, or Last Modified, using the column header in each case. Click once to sort in ascending order, and click again to sort in descending order. The arrows to the right of the column name will indicate the currently active sort direction. The chosen sorting method in one view is applied to both views.
), the project listing can be sorted by Name, Author, Owner, or Last Modified, using the column header in each case. Click once to sort in ascending order, and click again to sort in descending order. The arrows to the right of the column name will indicate the currently active sort direction. The chosen sorting method in one view is applied to both views.
Project Filters
Use the filter (![]() ) drop-down menu options to constrain the listing to a specific Owner and/or document type, or combinations of both.
) drop-down menu options to constrain the listing to a specific Owner and/or document type, or combinations of both.

The Filters window offers filter selections for project document Type or project Owner. Click the ![]() options to see more entries.
options to see more entries.


Information, Options and Search
In the default graphical view (![]() ), the tile for a project or Managed BOM includes the name of the project and the last modified date. A project tile auto-populates with the top-down 3D view of the project's PCB, where a PCB is available, while a Managed BOM tile populates with key procurement data extracted from the BOM itself.
), the tile for a project or Managed BOM includes the name of the project and the last modified date. A project tile auto-populates with the top-down 3D view of the project's PCB, where a PCB is available, while a Managed BOM tile populates with key procurement data extracted from the BOM itself.
 Selected project and Managed BOM tiles in the page graphical view.
In the list view (![]() ), each project entry includes the following information:
), each project entry includes the following information:
-
Name – the name of the project.
-
Description – the description entered or generated for the project.
-
Author – the user who created the project.
-
Owner – the Author, unless the project has been transferred to a new owner. ► See Transferring Project Ownership for related information.
-
Last Modified – the date and time when the project was last modified.
For both project views (graphical and list) the following controls are provided at the top-right of the list (and detailed in the linked sections that follow). They act on the currently selected project in the list :
![]() (Share) – click to access the Share window, with all the controls necessary to share the project with other users.
(Share) – click to access the Share window, with all the controls necessary to share the project with other users.
![]() (More) – click to access further options:
(More) – click to access further options:
-
Open – click to open the detailed management page for the project. This will open on a separate tab of the browser.
-
Share (available on the project tile's
 menu) – click to access the Share window, with all the controls necessary to share the project with other users.
-
Move – click to access the Move Project window. From here, you can choose an alternate parent folder in which to move the project, from all folders available in the folder hierarchy.
-
Edit – click to access the Edit Project window. From here, you can change the project's Name, Description and server Parameters. The Parent Folder field is non-editable, providing information only. To change the parent folder, you need to use the Move command.
-
Upload New Version – choose this command to browse to and upload a new version/revision of the project. This option is normally used for design projects that have been imported (uploaded) to the Workspace, such as designs created by OrCAD, KiCad, Eagle, etc.
-
Clone – choose this command to access the Clone Project window, providing the controls to make an identical copy of the project.
-
Watch – choose this command to follow the project. You will receive applicable notifications related to the project (e.g. updated, released, parameters and permission changes) through an email sent out from the Workspace (provided email notifications have been enabled for the Workspace by an Administrator). The creator/owner of the project will automatically be set to watch that project.
-
UnWatch – choose this command to stop following the project and cease the reception of notifications for events relating to that project.
-
Create Managed BOM – choose this command to generate a Managed BOM document from the current project's source data. Access Managed BOMs through the BOM Portal.
-
Remove – choose this command to remove the project. The Remove window will appear in which to confirm the deletion. The action is a 'soft delete', whereby the project (including its Revisions and Releases) will be moved into the Trash area of the Workspace.
Project Search
Also included is a project Search feature that allows you to search for projects across all project folders. You can search by Workspace parameters names and values – this enables you to craft custom project parameters for optimal searching (e.g. customer name, project number). Type any part of a search string in the field at the top of the browser interface. The list will update to include only those project entries whose attributes include the search string.
When searching by project parameter, you can either search by parameter name or a specific value (of a parameter that exists). In the case of parameter name, if the name has no spaces, enter the string <ParameterName> = into the search field. If the name includes spaces, enter the literal string as "<ParameterName>" =. Typically it will be a parameter value that is used, such as the name of a customer (in a parameter such as Customer, Customer Name, etc). In the example below, the full (rather than partial) search string would be "Customer Name"= CompanyXYZ. A parameter also could be used as a simple 'tag', allowing the projects listing to be filtered by a parameter that defines a particular project type, application, status, etc.
.") Example use of the search feature. In this case, using a partial search string to find a project based on the value of a project parameter (Customer Name).
Example use of the search feature. In this case, using a partial search string to find a project based on the value of a project parameter (Customer Name).
Properties Pane
If not already showing, click Properties at the top of the right-hand pane to access the Properties pane. This pane shows detailed property information for the currently selected project.
 Access more detailed information for the currently selected project on the Properties pane.
The property data that is available in the Properties pane has been extracted or generated by the Workspace from the currently selected project. The uppermost region of the pane presents the 3D view of the board (where a PCB is available for the project), along with general high-level information, including the project's name, description, owner, when it was created and last modified and also a link to the project's parent folder.

Additional properties are arranged under the following expandable headings (with example imagery to illustrate):
-
Child Projects (Multi-Board projects only) – the list of sub-project PCBs included in, and linked to, a Multi-board project. Click on a sub-project link to open that PCB project in the Web Viewer as normal.

-
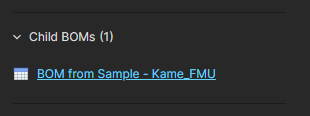
Child BOMs – the list of Managed BOM documents generated from (and linked to) the project.
-
Who Has Access – a summary of the Workspace Groups, Members and External Share guests that have access to the project. Hover over the icons to see details of the represented share access, which is also summarized in the text below – note that External Share user access icons include a yellow dot.

Use the Manage Access command to directly open the project’s Share dialog. See Sharing a Project below.

-
Issues (available when a Managed BOM is selected) – a categorized summary of all BOM Check Issues reported by the Managed BOM. See BOM Error Detection and Correction for related information.

-
Reports – the Electrical and Design Rule checks (ERC and DRC) that have been generated for the currently selected project, including the number of errors/violations in each report. Select an ERC or DRC entry to access and inspect the report details within the project. See DRC and ERC Reports in the Web Viewer.

- Parameters – a comprehensive collection of detailed data extracted or computed from the project design itself. Click the Show control to expand the full list, click Hide to contract again.

-
Where Used – a list of associated projects, such as Multi-board projects, that make use of the project as a child entity. Click on a listed Where Used project link to open that parent project.

-
Releases – a list of the Releases for the project. Multiple releases are shown in sequential order, with the most recent at the top. Click on an entry to open that release, which will be presented on a separate tab through a Manufacturing Portal. From this portal you can view and navigate the released file data, inspect the BOM, and view and comment on the snapshot of the design itself; the source for that released data. You'll also have access to controls for downloading manufacturing data at various levels of granularity (from full data set(s) to individual generated output file(s)). A chosen release can also be sent – as a Manufacturing Package – directly to your manufacturer.

Activity Pane
If not already showing, click Activity at the top of the right-hand pane to access the Activity pane. This pane shows activity information for the currently selected project. Each message highlights an event that took place in relation to the project (property change, new commit, release, etc). The most recent event appears at the top of the list.
 Access a history of events that have taken place for the currently selected project on the Activity pane.
Sharing a Project
Once a project is available in the Workspace, you'll want to determine which users can actually access that project. This is done by sharing the project rather than by configuring its access permissions as such.
Sharing Defaults
A project – newly created or made available in the Workspace – is shared, by default, with the following:
-
The Owner of the project, which is usually the designer who created it (or made it available in the Workspace): with full editing access.
-
The Administrators group: with full editing access.
-
Other Users or Groups as determined by the permissions inherited from the project’s parent folder (typically shared to all
Workspace Members) or as a fixed set of default permissions specified by the Workspace Administrator.
The default location for newly created projects is defined/changed on the Admin – Settings – Projects page of the Workspace interface. Select and edit the Default path for new projects field to specify a different default location. New projects will be stored in this location, or in any other folder the user currently has open – provided they have Write access to that folder.
 For folders other than the default location, a user with only
  Manage the default location for new projects from the Admin area of the Workspace browser interface.
The default access permissions for newly created projects can be specified by enabling the Default permissions for new projects option on the Admin –Settings – Projects page, which will overrule the default behavior where a new project inherits its parent folder’s permissions. When enabled, this option allows the definition of an explicit set of access permissions that will apply to all newly created projects. This may be the desirable approach if all new projects are created in a single location such as the Projects folder. See Managing Project Creation Permissions for more information.
 Specify a default set of access permissions for new projects from the Admin area of the Workspace browser interface.
The sharing of project folders can be configured on the Admin – Explorer page by accessing the Share Folder option from a folder entry's right-click context menu, or for Administrators or folder Owners, from the Projects page view – see Sharing a folder, above. With a newly activated Workspace, write access to the root Projects folder is available for all Workspace members – in sharing terms; Write permission for Workspace Members (all users can add to or edit the folder).
Sharing can be changed to specific Users or Groups, however, the recommended approach is to create a folder hierarchy below this top-level folder where sharing (and hence access) can be specifically controlled by applying custom sharing to specific folders and their constituent projects.
 unless that parent-child relationship is ‘disconnected’ by disabling the Inherit permissions from parent folder option under the Share window’s Advanced Settings
  . See
. See  The Projects folder is the Workspace's top level folder, accessible to administrators only. Create a permission-controlled folder hierarchy below this level to manage access for Workspace members.
Sharing Overview
To configure project access permissions from the Workspace browser interface, select the project’s tile on the Projects page of the interface and choose the Share command from its ![]() context menu, or click the upper
context menu, or click the upper ![]() button. When the Projects page is presented in its list view, click the associated
button. When the Projects page is presented in its list view, click the associated ![]() control at the far right of the project entry and choose the Share command from the associated menu.
control at the far right of the project entry and choose the Share command from the associated menu.
The following Share window includes all the controls necessary to share the project with other users.
 With your design projects centrally managed in a Workspace, sharing with others is simply a case of managing each project's permissions.
Things to be aware of:
-
In terms of permissions, a user/group has full editing access to the project when the Can Edit option is selected. Otherwise, they have View-only access.
-
The Owner and the Administrators group always have full editing access (Can Edit).
-
With the exception of the Owner and the Administrators group, permissions for all included users/groups may be individually set as Can View or Can Edit, or access rights completely removed.
-
Projects that have been made available to the Workspace from Altium Designer in a mirrored format (Simple Sync), rather than under the Workspace's version control (Git VCS), cannot be shared with edit permissions (Can Edit) – editing is available to the project owner only.
► See information about Making Altium Designer Projects Available Online. -
A project may be explicitly shared with particular Users and/or Groups, or simply shared with any member (or all members) of the Workspace.
-
If you have sufficient sharing rights to a project, it can be shared with users who are not members of your Workspace. Such users become External Share users of the Workspace and can access the shared project at a permission level you specify, and do not have access to any other Workspace data. See Sharing with External Users for further information.
Sharing with a Specific User or Group
The procedure for sharing a project in the Workspace with specified users and/or groups is as follows:
-
Add the required user/group name(s) to the Share Project With field in the Share window. To add an entry, begin typing the desired name/email/group in the field so the matching user/group can be selected from the dynamic list – which will only contain filtered members of your Workspace or users within your organization, and existing groups defined for the Workspace. Multiple users/groups can be chosen. To remove an entered user/group, click the
 control associated with the entry.

- Set the sharing access permissions for the added users/groups from the associated drop-down menu by selecting Can View or Can Edit, where the latter option inherently includes viewing capability. The setting initially applies to all entries (user/groups ) included in the Share Project With field.

-
Click the
 control to access a textual area if you wish to include information that relates to the sharing arrangement for this project.

- Click the Shared With control to present the users/groups with whom the project is currently (and specifically) shared, which by default includes the Owner and the Administrators group.

With the exception of the Owner and the Administrators group, permissions for all included users/groups may be individually set as Can View, Can Edit, Owner, or access rights completely removed. Click on the current permission state to access controls. ► See Transferring Project Ownership for more information on the Make Owner option.

-
To open access to all members in the Workspace, choose a suitable permission level – either Can View (Read-only access), or Can Edit (full Read/Write access) – from the Workspace Members entry drop-down menu. When set to
No access, only the Owner, Administrators and any users specifically added for sharing will have access.Note that Workspace's permission inheritance scheme may disable some permission level options.
 This prevents permissions that were inherited from the parent folder from being demoted, which would contravene the existing parent-child inheritance relationship. To intentionally break the parent-child inheritance, disable the Inherit parent folder permissions option in the Share window's Advanced Settings.

-
The Share window’s Advanced Settings include options that allow you to control who can re-share or download projects that are shared with them. Grouped into Workspace Member and guest-level access rights, the settings provide the means to specify if those granted editing rights (
Can Edit) are able to share the project, and if those with read-only rights (Can View) are able to download the project.In practice, this allows you to restrict further sharing by external contractors, for example.
 And for users with view-only access, you can control whether they can download native data (the project itself) and derived data (for example, generated Gerbers or PDFs).
  They can still view data in the Web UI and provide comments. In each case, separate permissions are provided for people inside (Members) and outside (External Shares) of the Workspace.

 )
)-
Click the
 button to confirm the updated sharing permissions for the project. What happens next depends on the type of user being invited:
-
A user who is already a member of your Workspace will be added to the access list for the project directly. They will receive an email notifying them that the project has been shared with them (and what access rights they have to it). They can open the project in Altium Designer (if permitted to do so) and access it through the Altium 365 Platform Interface (from the Projects page).
-
When an existing Workspace Group is added for sharing, it will be added to the access list for the project directly. All members of the group will receive an email notifying them that the project has been shared with them (and what access rights they have to it). They can open the project in Altium Designer (if permitted to do so) and access it through the Altium 365 Platform Interface (from the Projects page).
-
For a person outside of your Workspace, the project will be shared with them and they will receive a notification email – see Sharing with External Users below. As a Workspace External Share users (see below), they can open the project in Altium Designer (if permitted to do so) and access it through their Altium 365 Personal Space from the Shared with Me page. The email provides direct access to the design through Altium 365. Once they click the
 button in the email they will be taken to the Altium 365 Sign In page (unless already signed in to the platform, or their Altium Account). Upon signing in, they will be taken to the Web Viewer directly, with the shared design loaded.
Sharing with External Users
The process for sharing a Workspace project with ‘external’ users (those who are not members of the Workspace) will depend on the desired outcome and the current user’s own access rights to that project. A user can share a project with external users by providing them with contained External Share access, by submitting a Sharing Request, or by requesting they be added as Workspace Members. The latter case creates a user Invitation Request that is accepted or rejected by a Workspace Administrator.
These sharing mechanisms can be applied to other Altium Account users from within your own organization, Altium Account users from different organizations, and users without an Altium Account (who will need to then register for one). The level of project access available to the shared user will depend on the project's editing and sharing configuration.
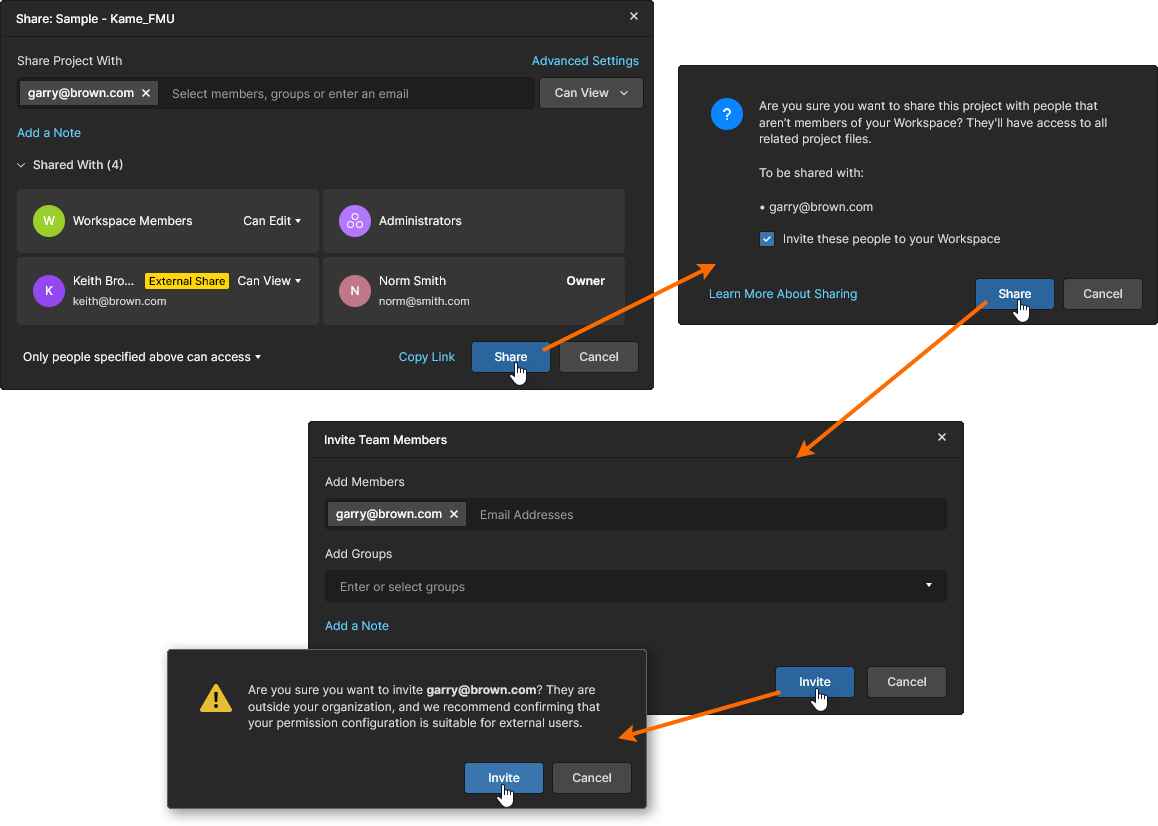
Applying an External Share
A user with editing rights and sharing rights for a project (which includes administrators) can share it with external users by providing them with contained External Share access, which does not expose any other Workspace data.
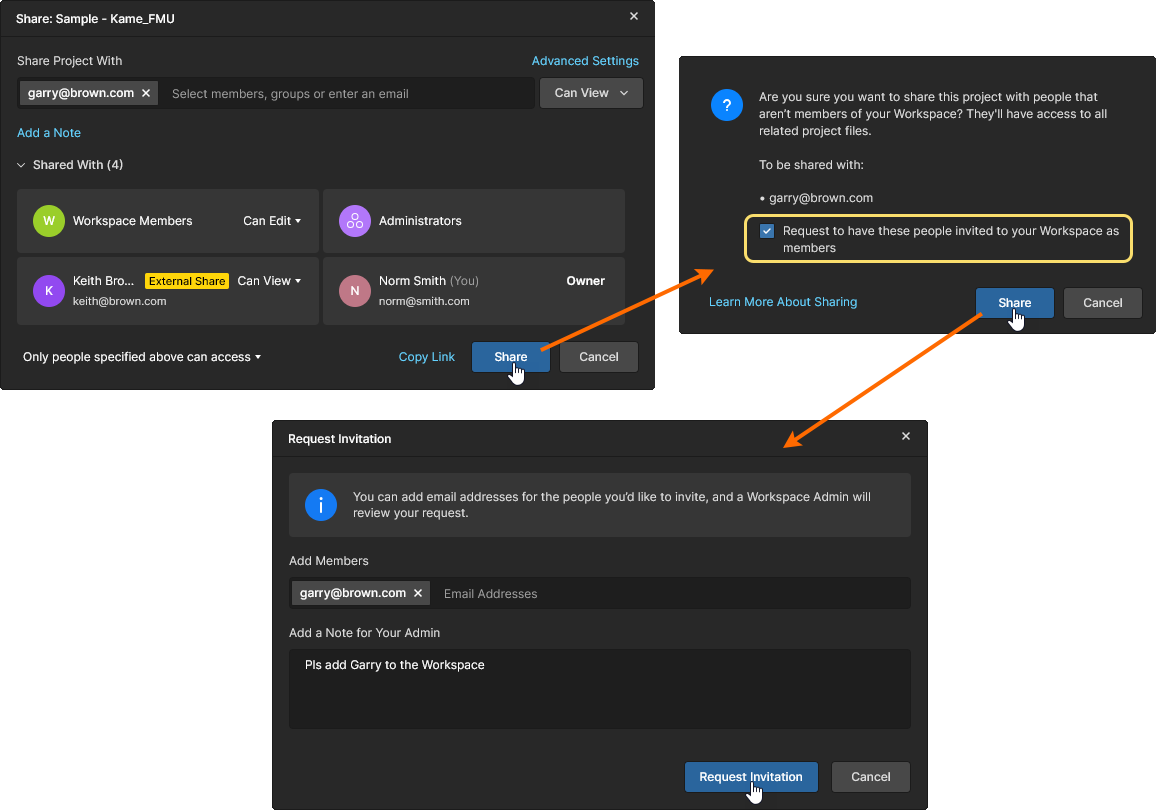
When sharing a project with an external user in the Share window, as defined by their Share Project With email address entry, the confirmed Share window is followed by a further confirmation window to show how and with whom the sharing will apply. Leave the Request to have these people invited to your Workspace as Members option unchecked and confirm this window (![]() ) to enable External Share access for the external user. For when the above option is checked (enabled), see Submitting an Invitation Request.
) to enable External Share access for the external user. For when the above option is checked (enabled), see Submitting an Invitation Request.
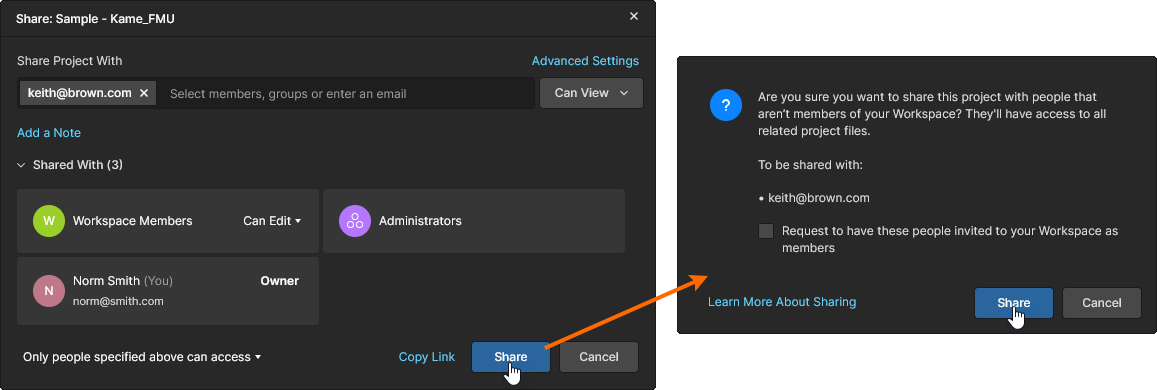
The project’s External Share status can be seen in the Properties pane’s Who Has Access list, where the external user’s icon has a yellow dot indicator (hover over the icon for details). In the project Share window’s Share With list, the user’s entry is marked by an external share label (![]() ). Also note that administrators can access and manage External Share entries under the Team page External Share tab.
). Also note that administrators can access and manage External Share entries under the Team page External Share tab.
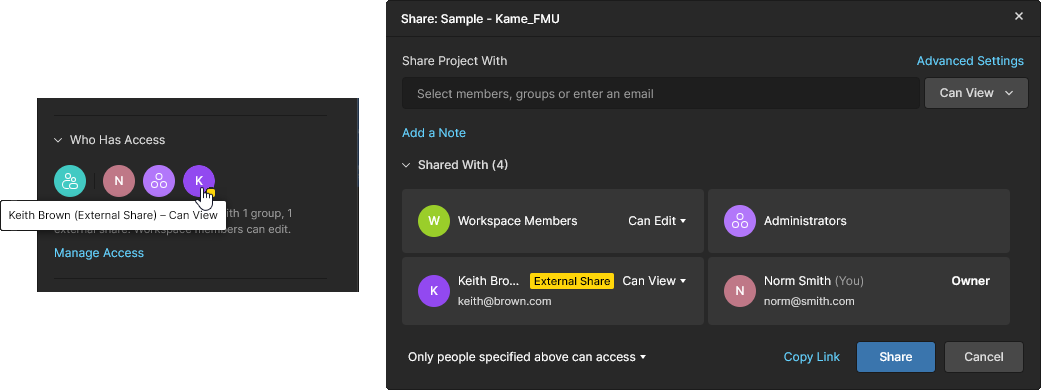
External users access a project shared with them through the Shared With Me page in their Personal Space or in another Workspace they have access to. Their level of access (Edit/ View and sharing rights) is determined by the options selected during the sharing process.
Submitting a Sharing Invitation Request
A user with editing rights for a project can share it with external users by submitting an Invitation Request (requesting they are added as Workspace Members), which when accepted by an administrator, will enable access to the project and all Workspace data and features.
In this case, the share confirmation window's Request to have these people invited to your Workspace as Members option is checked (enabled), and a following Request Invitation window allows a note and further users to be added to the request. The ![]() button confirmation will add the user as an External Share (for now), send an access request email to Workspace administrators. and create a request entry under the Invitation Requests tab on the Team page.
button confirmation will add the user as an External Share (for now), send an access request email to Workspace administrators. and create a request entry under the Invitation Requests tab on the Team page.
An administrator processes this entry by approving or declining the request. 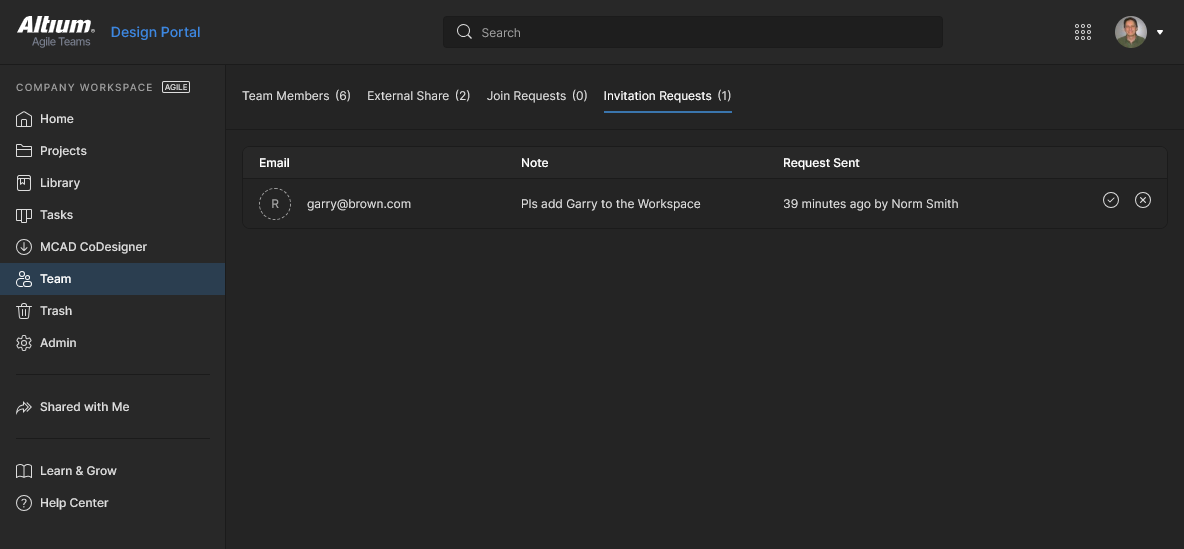 On approval, the user is promoted (from an External Share user) to be a new Workspace member, and as with other members, the level of access to the project is determined by the options selected during the sharing process. If the request is declined by the administrator, then the user will remain with External Share access only.
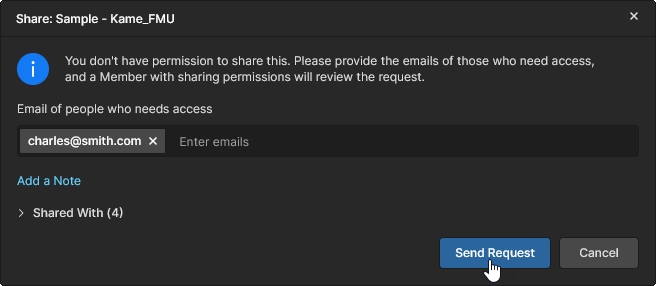
Submitting a Share Access Request
A user without sharing rights for a project can apply to share it with an external user by submitting a sharing Access Request for the project. The request can be processed by any Workspace member that has full sharing rights (Edit and share) for the project, and if approved will provide the requested user with External Share access to that project.
The Share window in this case will offer the ability to submit a project sharing access request for specified user (![]() ). Those with editing permissions for this project will receive an Access Request email that includes an Open sharing settings link to the project's Share window.
). Those with editing permissions for this project will receive an Access Request email that includes an Open sharing settings link to the project's Share window.
A Workspace user who receives an access request email can act on a corresponding Pending Approval entry in the project's Share window by specifying suitable Edit/View permissions for the user and then confirming the settings (![]() ). A following confirmation window will provide a warning to indicate that the user is outside (not a member) of the Workspace. An affirmative response (
). A following confirmation window will provide a warning to indicate that the user is outside (not a member) of the Workspace. An affirmative response (![]() ) will grant the user External Share access to the project.
) will grant the user External Share access to the project. 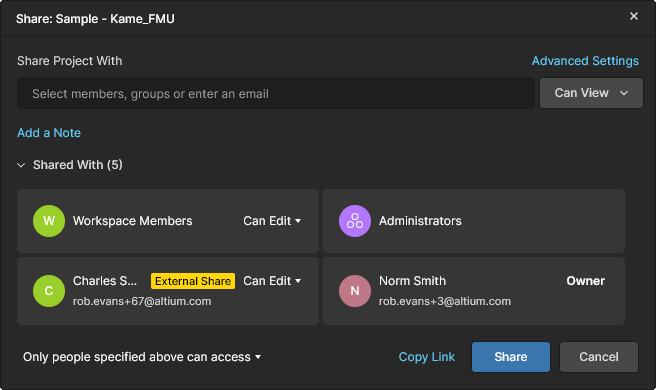

Sharing by adding a new Workspace Member
A Workspace administrator can immediately share a project with external users by adding them as full Workspace Members, which will enable access to the project and all Workspace data and features.
The share confirmation window's Request to have these people invited to your Workspace as Members option is checked (enabled), and a following Invite Team Members window allows a note and further users to be added to the request. The ![]() button confirmation will open a final window alerting you that an external user will be added as new member.
button confirmation will open a final window alerting you that an external user will be added as new member.
Click the window's ![]() button to complete the process. The previously external user is now a new Workspace member, and as with other members, the level of edit/share access is determined by the options selected during the sharing process.
button to complete the process. The previously external user is now a new Workspace member, and as with other members, the level of edit/share access is determined by the options selected during the sharing process. 
Sharing with your Organization
Separate from sharing a project with specific users or groups, as outlined above, basic view-only access can be provided to all members of your organization by selecting the Share window's Anyone in <company> can access option. The members of your organization this applies to are as defined in the Users page of your organization's Dashboard.

With only this level of sharing applied, all registered users in your organization can access the project through the Shared with Me option in both Altium Designer and in their Altium 365 Personal Space. The access for all users is view-only, while the project owner and administrators of the Workspace also maintain their full access through the Workspace itself.
Sharing by Direct Link
You can also share a direct link to the project. The link is obtained by clicking the ![]() control, at the bottom of the Sharing window. The link provides access based on the project's current sharing permissions:
control, at the bottom of the Sharing window. The link provides access based on the project's current sharing permissions:
-
For members of the Workspace – their access is determined by the Workspace Members entry permission settings (
No access,Can View,Can Edit), or by the permissions applied to an explicit Share With entry for their name (or a Group they are a member of). -
For users outside of the Workspace – their access is determined by an explicit Share With entry for their name, and the permissions that are applied to that name. For access, the user must be registered with and signed in to an Altium Account. They will be classed as an External Share user.
 Obtain a direct link to the project, the use of which is governed by the existing sharing permissions in the Sharing window.
The link is copied to the clipboard. When used, it provides the applicable user – where permitted – direct access to the detailed management page for the project. See the below section for more information.
Alternatively, if the user who opens the provided link does not have access to the project – it is not shared with them – they will be offered a way to submit a request for access..
Working with an Access Request
When a user submits an Access Request, those with the ability to share (provide access to) that project is determined by the project's Advanced Settings in the Share dialog, as outlined above. In this context, ‘Editors’ refers to users who have project editing rights (Can Edit). Note that Workspace Administrators and the project Owner can always share a project.
Corresponding access request emails also will be sent to those users if the Email Notifications option is enabled on the Workspace Admin-Settings page. The recipients are determined by the project Share window's Advanced Settings as follows:
-
When sharing is enabled for Workspace member Editors, Administrators, the project Owner, and Members with Edit rights to that project will receive an access request email.
-
When sharing is enabled for External Share Editors (Editors outside of the Workspace), Administrators, and guest-level users with Edit rights to that project will receive an access request email.
-
When both Editors options are unchecked for this project, Administrators only will receive an access request email.
Any user who receives an access request email can act on the request via the included Open sharing settings button. This opens the Share window for that project where the pending request can be approved (with View or Edit rights) or rejected. Note that access to the Share window's Pending approval entry is not bound to the receipt of an Access Request email – you can action the request directly through the Share dialog at any time. Once the sharing rights have been specified, the requested user is provided a corresponding level of access to the project, and an email is sent to them to confirm the result of the sharing approval process.
 An access request email to a project owner provides a direct link to the Share properties for that project.
Sharing a Multi-board Project
A Multi-board project is a special project type that encompasses multiple PCB design projects to create a complete functional system. The sub-projects are linked to the parent Multi-board project so their data can be sourced to establish the electrical and physical connectivity of the overall system.
See Multi-board Design for more information on working with Multi-board projects.
The links between the Multi-board and its associated sub-projects are saved as relative paths within the Multi-board project itself (*.PrjMbd), so these must remain valid when the projects are saved to the Workspace VCS from the design client (Project » Make available Online). In practice, this means ensuring that all the projects are saved to the Workspace and are located in the correct folder structure. In most cases though, all projects involved in a Multi-board system are likely to be in the same folder.
When it comes to sharing a Multi-board project the same considerations apply. Both the parent Multi-board project and its associated sub-projects should be shared with the same View/Edit permissions to the same Workspace members. Users who then open the Multi-board project for the first time in their design client must also open the associated sub-projects – again ensuring that the relative folder structure is locally correct.
 Both a Multi-board project and its sub-projects need to be saved online, shared and opened as individual projects.
Transferring Project Ownership
Along with Workspace Administrators, the Owner of a project – by default the user who created/added the project – has full project editing rights, while other members with shared access to the project have Edit/View permissions as specified in the project Share window.
 The Share window indicates the current project Owner and provides the option to transfer ownership to another Workspace member.
A project's Owner status and its inherent editing rights can be transferred from one Workspace member to another through the project Share window, allowing the new owner to take full control over that project. This option is available to Administrators and the current project owner, and the transfer can target other Workspace members only (but not member Groups such as Engineers or Administrators).
A Workspace member must already have shared access to a project to receive its ownership status and permission set. The member's current View/Edit permission setting for the project can then be changed to Owner through the permissions drop-down menu in the Share window (Make Owner). Confirm the ownership transfer with the window's ![]() button and then the following warning window (
button and then the following warning window (![]() ).
).
 Transfer project ownership to a different Workspace member with the Make Owner option from the permissions drop-down menu.
If Workspace Email Notifications are enabled, the new project Owner will receive an ownership transfer notification email.
![]()
Accessing the Detailed Management Page for the Project
Main page: Management of a Specific Project
The Workspace provides an advanced, manufacturing-oriented CAD-centric view of the project, opened by selecting the required project, clicking the ![]() control above the listing of projects, and choosing the Open entry on the associated menu. Alternatively, double-click directly on the required project entry in the list.
control above the listing of projects, and choosing the Open entry on the associated menu. Alternatively, double-click directly on the required project entry in the list.
The detailed management page for that project opens in a new browser tab incorporating the CAD-centric interface, which offers Design, Simulation, Releases, History and Assembly view options:
- Design – display and navigate source project design documents, view design object properties and place review comments. This view uses the Web Viewer interface to present your design across four distinct data sub-views, to show the source schematic(s), board in 2D, board in 3D and Bill of Materials respectively. This view is for the latest version of the source project data, rather than a specified release from that project, and so could be considered to be a work-in-progress (WIP) view. You can review both the base design and any defined variant thereof.

- Simulation – allows you to upload (drag & drop) circuit simulation results files that will be associated with the current project or project Release. The files are effectively attached to the project, which allows members of the Workspace to inspect and/or download simulation results documents that relate to the currently open project. See Management of a Specific Project – Simulation for more information.

-
Tasks – allows you to access and manage the job activity requests (Tasks) that apply to the currently open design project. Tasks are presented in a Kanban board flow style, with their progress state (
ToDo,InProgressandResolved) arranged as Task rows. One row is reserved for General Tasks, and each remaining row applies to Tasks for a specific project document. The latter is populated with Tasks that are associated with the open project, and are created when a project Comment is assigned to a particular user (Workspace member). In this sense, the Workspace Tasks system is effectively an extension of the Commenting system. You also have the option to create a General Task from the New button – these Tasks apply to the current project but are not associated with a project Comment or document.

-
Releases – view the releases for the project. Access is provided for opening the full release data, or a specific assembly package, which will be presented on a separate tab through a Manufacturing Portal. From this portal you can view and navigate the released file data, inspect the BOM, and view and comment on the snapshot of the design itself; the source for that released data. From either the Releases view, or through the Manufacturing Portal for a specific release, you'll have access to controls for downloading manufacturing data at various levels of granularity (from full data set(s) to individual generated output files). A chosen release can also be sent – as a Manufacturing Package – directly to your manufacturer. You also have the ability to directly compare Gerber, Schematic or BOM data. See Project Releases for more information.

-
Activities – provides insight into the open (currently active) or closed (completed/terminated) Process Workflows that apply to the current Project. These typically include activities such as
Ad-hoc,Milestoneand Handoff peer review workflows. Availability depends on your level of Altium software access.See Activities for more information.
-
Design Reviews – create and manage structured project review instances that can be assigned to other users (Reviewers) for their assessment. Reviews are task-driven, can be accepted or rejected, and include additional features such as a design snapshot, definable checklists, commenting, document attachments, and design source comparisons. Availability depends on your level of Altium software access.
See the Design Reviews page for more information.
-
History – browse a progressive timeline of major events relating to the project, including its creation, commits, releases, clones and MCAD exchanges. Each time a supported event happens in association with the project, that event is added to the timeline as a dedicated tile with various actions supported where applicable. For Release/Commit events, you also have the ability to directly compare Gerber (Release events only), Schematic or BOM data. See Project History for more information.

-
Assembly Assistant – work with the interactive Assembly Assistant tool to check and progress through the board assembly process. The tool brings together the project's detailed BOM data and its 2D/3D assembly view to present an interface that provides the required set of graphical and component part information for stepping through the assembly process. See the Assembly Assistant page for more information.

Moving a Project
To move (relocate) a project under a different parent folder within the folder hierarchy select its entry on the Projects page, click the ![]() control above the listing of projects/folders, and choose the Move entry on the associated menu.
control above the listing of projects/folders, and choose the Move entry on the associated menu.
The Move project window will appear, in which to choose the new parent folder. Click the ![]() button to effect the move. The project will be moved to the chosen folder and you will be taken to that folder.
button to effect the move. The project will be moved to the chosen folder and you will be taken to that folder.


Editing a Project
To edit the properties of an existing project in the Workspace, select its entry on the Projects page, click the ![]() control above the listing of projects, and choose the Edit entry on the associated menu. In the following Edit Project window – which opens in simplified view – you can change the project's Name and Description.
control above the listing of projects, and choose the Edit entry on the associated menu. In the following Edit Project window – which opens in simplified view – you can change the project's Name and Description.
 You can edit the Name and Description of a project at any stage.
Click the ![]() button to access the Edit Project window's additional fields.
button to access the Edit Project window's additional fields.
 Additional fields are accessed by clicking the Advanced button.
-
Requirements – this field, available to design Projects, provides the means to link a related Requirements Portal Block to the current Project. The connection enables real-time access to Requirements from within your design project, and is read-only unless unlocked. See Working with Requirements for related information.

-
Jira – this Advanced field is available when Jira Integration is enabled for your Workspace. It is used to establish a link from the design Project to an Atlassian Jira® Project, which allows for bidirectional tasks synchronization between the two entities through the Altium 365 Comments and Tasks feature. Click in the Jira entry field to select from a list of available Jira Projects. Note that this mapping option is available to administrators only unless enabled for all users through the Jira Application configuration. See the Working with Jira Tasks page for more information.

-
Project – this field is available when editing a Managed BOM project only and specifies the link between the BOM document and a PCB design project. The link enables synchronization of parts data from the source Project to the linked BOM. It is automatically defined for BOM documents created from a Project. Note that the Project-to-BOM synchronization will be broken if this link is redefined or removed – use the field's
 option for navigating to and selecting a Project link.

-
Parameters – click this control to expand an area in which you can manage server-side parameters for the project. Parameter Name/Value pairs can be added (
 ), edited (in-line editing), or removed (
 ).
).
 Edit server-side parameters for the project.
Edit server-side parameters for the project.
Click the ![]() button to confirm any changes you have made.
button to confirm any changes you have made.
Cloning a Project
To clone an existing project, select its entry on the Projects page, click the ![]() control above the listing of projects, and choose the Clone entry on the associated menu. The Clone Project window will appear.
control above the listing of projects, and choose the Clone entry on the associated menu. The Clone Project window will appear.
 You can clone a project to create an identical copy of it, along with its working files.
Use the Clone Project window to specify a name for the project and an optional description. By default the original project name will be used with the suffix ' – Copy', and a default description will be pre-filled.
Click the ![]() button to access the Parent Folder field. By default this will be set to the folder in which the source project is located. Click the Change link at the right of the field to access the server folder structure for the Workspace, from which to select an alternate folder in which to store the cloned project. You can organize projects into a hierarchy of sub-folders should you wish. For more information, see the section Creating a Hierarchy of Project Folders.
button to access the Parent Folder field. By default this will be set to the folder in which the source project is located. Click the Change link at the right of the field to access the server folder structure for the Workspace, from which to select an alternate folder in which to store the cloned project. You can organize projects into a hierarchy of sub-folders should you wish. For more information, see the section Creating a Hierarchy of Project Folders.
After setting the fields as required, click the ![]() button. The original project will be cloned (duplicated) along with its constituent files and data and be added as a new project entry to the Projects page listing (under the chosen parent folder). Since the created clone is effectively a new project, it's permissions will be established in the same way as when creating (or uploading) a new project – that is, permissions are inherited from the parent folder (by default), and the user who performed the clone is the Owner. Also see Managing Project Creation Permissions for related information.
button. The original project will be cloned (duplicated) along with its constituent files and data and be added as a new project entry to the Projects page listing (under the chosen parent folder). Since the created clone is effectively a new project, it's permissions will be established in the same way as when creating (or uploading) a new project – that is, permissions are inherited from the parent folder (by default), and the user who performed the clone is the Owner. Also see Managing Project Creation Permissions for related information.
Removing a Project
Related page: Trash
To remove (delete) an existing project from the Workspace, select its entry on the Projects page, click the ![]() control above the listing of projects or the
control above the listing of projects or the ![]() control within the project's tile, and choose the Remove entry on the associated menu. When the Projects page is presented in its list view, click the
control within the project's tile, and choose the Remove entry on the associated menu. When the Projects page is presented in its list view, click the ![]() control at the far right of the entry for the required project and choose the Remove command from the associated menu.
control at the far right of the entry for the required project and choose the Remove command from the associated menu.
The following Remove <project> window will list any Items related to the project, such as associated Releases, that will also be removed. Select the Show details option to open the project's Releases view and inspect its associated Releases and Manufacturing Packages.  A simplified Remove window is presented when the project has no associated Releases.
The action of removing a Workspace project is actually a 'soft delete', whereby the project and any associated Items will be moved into the Trash area of the Workspace. Confirm the removal process with the Remove <project> window's ![]() button.
button.

When the removal is complete, the project entry will be removed from the main listing of projects. In Altium Designer, your local working copy is not affected by this action, but you will no longer be able to commit changes to the server. You can close and reopen the local working copy to access a range of suggested actions, since the local project now references a VCS repository that no longer exists.
All projects removed in this manner can be found on the Trash page of the interface. Note that you can only view projects (and any other items for that matter) that you have personally soft deleted. Administrators will be able to see the full content of the Trash page – so all items that have been soft deleted.
Things to consider in relation to a soft-deleted project:
-
The project will not be available to open and browse from your design software, or from within the Web interface.
-
If the project had been shared externally outside of the Workspace, the related tile for it will be removed from the Shared with Me page of the Altium 365 Platform Interface, for all external people involved.
-
Any shared Manufacturing Packages that have been removed with the project also will be removed from the Shared with Me page of the Altium 365 Platform Interface, for all people involved.
-
When browsing any items that have been used in a project, the Where Used entry for the project will reflect that the project has been removed.
-
A project can be restored or permanently deleted from the Trash page, only by the owner of that project or a Workspace Administrator.