Хотя система скриптинга Altium Designer предоставляет средства для создания сложных автоматизированных задач в Altium Designer, получившиеся скрипты также должны быть легко доступны в процессе проектирования. Например, скрипт, созданный для выполнения сложного набора операций при редактировании PCB, должен быть доступен прямо в PCB Editor, чтобы его можно было запустить одним‑двумя щелчками мыши.
Altium Designer учитывает эту потребность, позволяя назначить скрипт на launcher процесса, а значит — на команду, которую можно привязать к меню, панели инструментов и сочетанию клавиш.
Выполнение скриптов
Если скрипт открыт в редакторе скриптов, его можно выполнить с помощью команды редактора Run » Run из главного меню (сочетание: F9). Будет запущен текущий скрипт, на который ссылается команда Run » Set Project Startup Procedure .
Если команда Set Project Startup Procedure не задана, появится диалог Select Item To Run, предлагающий выбрать, какой скрипт и какую его процедуру выполнить.
Если в скрипте есть ошибки, выполнение будет остановлено, и вы сможете использовать различные команды отладки, чтобы устранить ошибки и попробовать запустить снова.
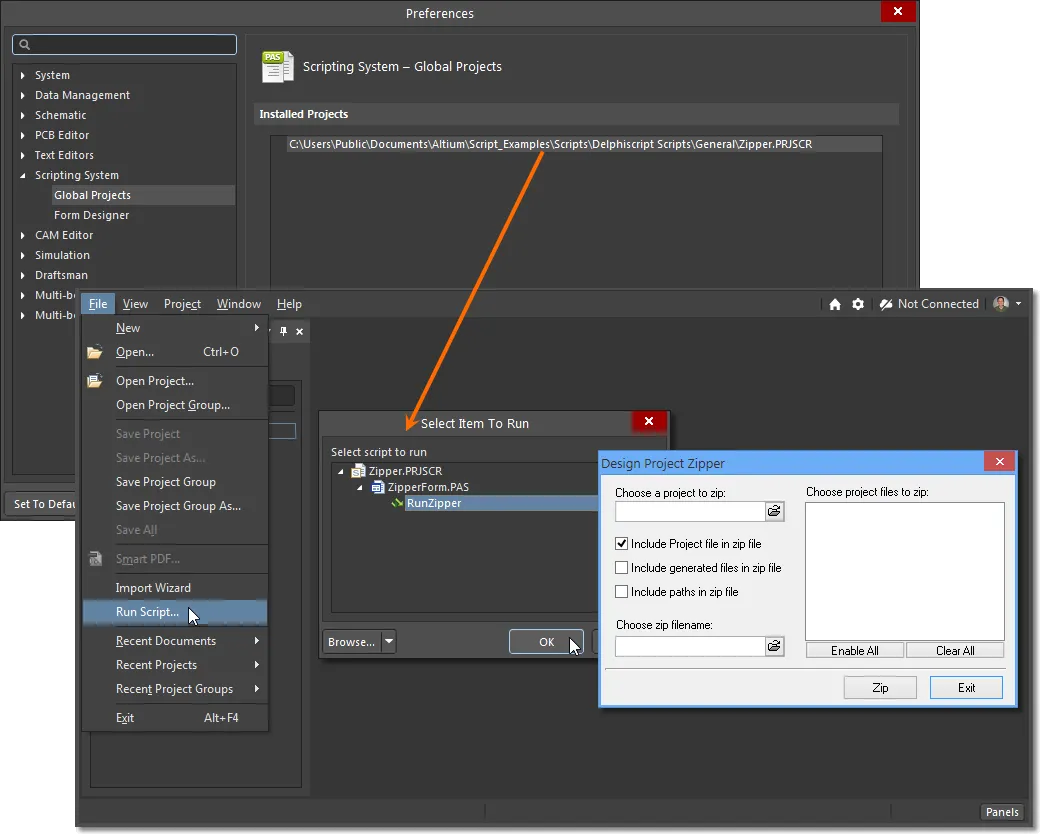
Команда Run требует, чтобы проект скрипта был открыт в Altium Designer, что, например, неудобно для доступа к скрипту, нужному во время проектирования PCB. В качестве альтернативы диалог Select Item To Run (File » Run Script) позволяет перейти к скрипту на локальном диске или в подключенном Workspace либо выбрать скрипт, открытый в панели Projects, а затем запустить нужный процесс. Скрипт остаётся загруженным на текущую сессию.
 Выполнение скрипта с помощью launcher процесса скрипта через диалог Select Item to Run.
Options and Controls of the Select Item to Run Dialog
- Grid - выводит список доступных проектов скриптов (*.PrjScr) и связанных исходных документов. Выберите нужный элемент скрипта в списке, затем нажмите OK для запуска скрипта.
- Browse - нажмите, чтобы открыть выпадающий список, в котором можно выбрать способ просмотра:
- From File - нажмите, чтобы найти и выбрать нужный элемент скрипта в стандартном диалоге Windows Open.
- From Server - нажмите, чтобы найти и выбрать нужный элемент скрипта в диалоге Choose item (вариант панели Explorer panel).
- Copy script parameters - щёлкните правой кнопкой по нужному элементу скрипта, чтобы получить корректные параметры. Это скопирует в буфер обмена полный путь, имя процесса и процедуру.
Если в скрипте присутствуют ошибки, то после нажатия OK в диалоге Select Item To Run откроется окно ошибки, уведомляющее о наличии ошибки. Диалог предоставит информацию об ошибке, исходный документ скрипта будет открыт, а проблемная строка скрипта — подсвечена. Закройте этот диалог, нажав кнопку OK, и остановите систему скриптинга, выбрав команду Run » Stop в главном меню (сочетание: Ctrl+F3).
Диалог ошибки отмечает только первую обнаруженную ошибку скрипта. Ошибок может быть больше — они будут выявлены при последующих попытках запуска скрипта.
Более подходящий способ доступа к часто используемому скрипту — установить проект как Global Project на странице Scripting System – Global Projects page диалога Preferences. В этом случае проект автоматически загружается при запуске Altium Designer и может быть выполнен в любое время через команду File » Run Script.
Однако идеальный способ доступа к функциональности скрипта — интегрировать её в GUI Altium Designer в виде команды меню или панели инструментов. Обычно это двухэтапный процесс: реализовать скрипт как Command (с необязательным shortcut), затем назначить Command в меню (статическое или всплывающее) либо на панель инструментов.
Скрипт как команда
Скрипт можно реализовать как команду приложения, используя встроенные серверные процессы Altium Designer, а точнее — процесс ScriptingSystem:RunScript.
Команда представляет выполняемое действие и поддерживается строкой процесса через упакованный launcher процесса. В случае процесса ScriptingSystem:RunScript он включает параметры, указывающие на конкретный файл проекта скрипта, входящий в него файл скрипта (*.pas) и процесс внутри этого скрипта. При правильной компоновке эти элементы образуют строку команды.
Преимущество этого подхода в том, что запуск скрипта как процесса избавляет от необходимости напрямую открывать скрипт или держать его загруженным как Global Project. Второе и более существенное преимущество метода запуска скрипта через процесс — его можно реализовать как доступную команду Altium Designer. Это делается через настройку системы меню Altium Designer, где скрипт можно назначить на команду для выбранного сервера — то есть подприложения, например файловой системы или редактора проектного документа.
Создание команды
Чтобы назначить скрипт HelloWorld как команду для PCB editor, например, сначала откройте документ PCB (и тем самым редактор) и выберите View » Tools » Customize в главном меню, чтобы открыть диалог Customizing PCB Editor dialog. К этому диалогу также можно перейти, щёлкнув правой кнопкой по строке меню или панели инструментов и выбрав Customize в выпадающем меню, либо двойным щелчком в пустой области (вдали от любых команд) строки меню или панели инструментов.
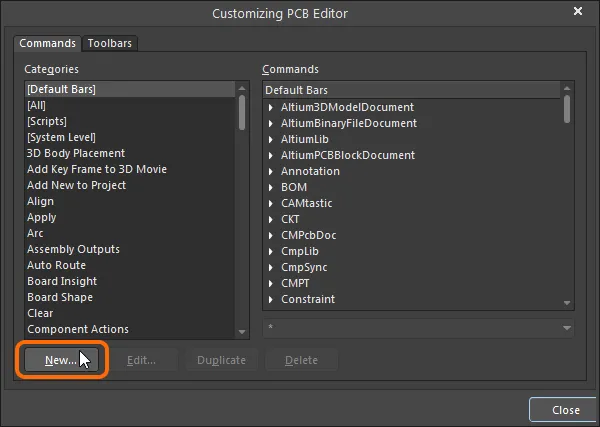
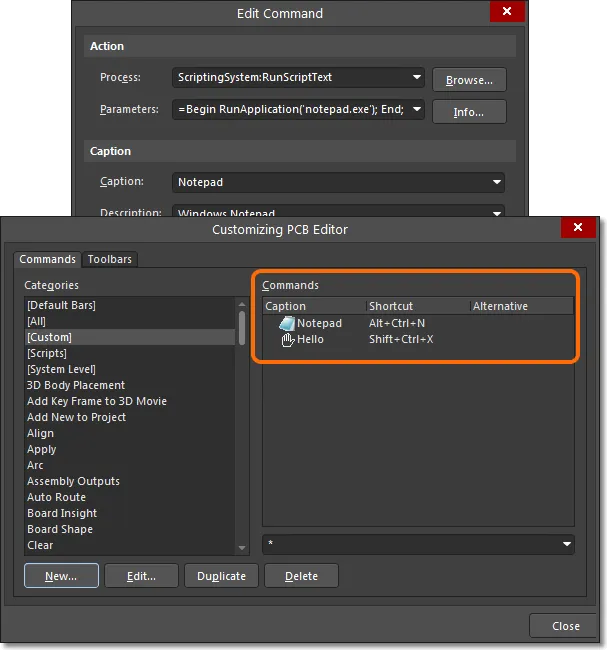
Чтобы создать новую команду, нажмите кнопку New в диалоге, чтобы открыть диалог Edit Command, где можно указать серверный процесс и детали пути к скрипту — убедитесь, что категория [Scripts] не выбрана при создании команды из скрипта.
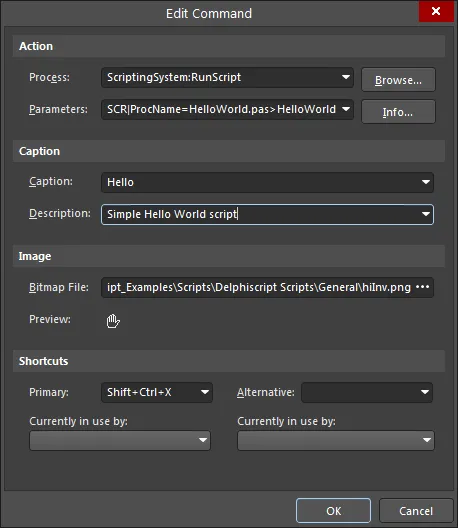
Поля Action в диалоге имеют вид:
Process: ScriptingSystem:RunScript
Parameters: ProjectName|ProcName>Process
В зависимости от исходного пути к скрипту строка Parameters будет похожа на:
ProjectName=C:\Users\Public\Documents\Altium\Delphiscript Scripts\General\HelloWorld.PRJSCR|ProcName=HelloWorld.pas>HelloWorld
Для проекта скрипта, размещённого в Workspace, путь, а значит и запись параметров команды, должен указывать на корректное расположение в Workspace — оно основано на GUID‑ссылке Workspace Script. Поэтому эту ссылку необходимо получить before перед попыткой создать новую запись команды скрипта. Чтобы получить корректные параметры для скрипта, установленного из Workspace, откройте диалог Select Item To Run (File » Run Script), щёлкните правой кнопкой по нужной процедуре в скрипте и выберите команду Copy script parameters в контекстном меню. Это скопирует в буфер обмена полный путь, имя процесса и процедуру.

Выберите нужный процесс/процедуру в проекте скрипта Workspace, затем скопируйте параметры скрипта.
Диалог Edit Command также предоставляет поля для заголовка команды, описания, сочетания клавиш и связанного растрового изображения (BMP/GIF/PNG; 18 x 18 пикселей). Эти настройки сохраняются вместе с командой и применяются ко всем случаям, когда она вставляется в меню, панели инструментов и всплывающие меню — как описано в разделе Assigning Menu Commands ниже.
Требуемые параметры можно скопировать из фактической записи скрипта в категории [Scripts] в диалоге Customize PCB Editor, если скрипт в данный момент загружен. Чтобы временно загрузить скрипт, найдите и откройте его через команду File » Run Script. После копирования убедитесь, что поле Categories больше не установлено в [Scripts], прежде чем создавать команду кнопкой New .
► ![]() См. пример изображения
См. пример изображения
После заполнения данных и закрытия диалога редактирования ( ) скрипт HelloWorld становится доступен как пользовательская команда (в разделе
 [Custom]) для PCB Editor.
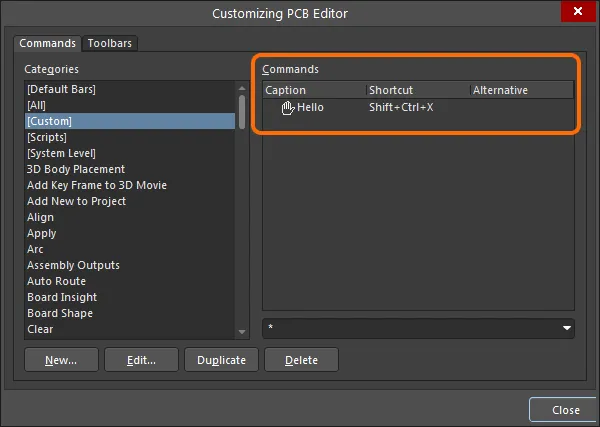
Обратите внимание: команды реализуются на уровне сервера, поэтому пользовательская команда, созданная для PCB Editor (как выше), не будет доступна для других функций, таких как Schematic Editor или Scripting System.
Выполнение скрипта с использованием процесса RunScriptFile
Скрипт DelphiScript unit из Altium Designer (с расширением *.pas) можно выполнить с помощью процесса RunScriptFile. Обратите внимание: можно использовать только DelphiScript unit‑скрипты — не те скрипты, у которых есть формы. В этом случае поля Action в диалоге имеют вид:
Process: ScriptingSystem:RunScriptFile
Parameters: FileName|ProcName
В зависимости от исходного пути к файлу скрипта строка Parameters будет похожа на:
FileName=C:\Users\Public\Documents\Altium\Delphiscript Scripts\Processes\ShowNetList.pas|ProcName=RunNetList
Выполнение скрипта с использованием процесса RunScriptText
Этот процесс можно использовать для выполнения серии команд внутри блока Begin End;. В этом случае поля Action в диалоге имеют вид:
Process: ScriptingSystem:RunScriptText
Parameters: Text
Например, внешнее приложение, такое как Microsoft Notepad, можно запускать из Altium Designer через программное управление. В этом случае поля процесса команды и параметров будут такими:
Process: ScriptingSystem:RunScriptText
Parameters: Text=Begin RunApplication('notepad.exe'); End;
Процесс ПО в этом случае, ScriptingSystem:RunScriptText, буквально выполняет последовательность операторов скрипта, а не открывает и запускает конкретный файл скрипта, как описано выше.
Альтернативный подход — создать скрипт с несколькими эквивалентными строками кода, а затем создать обычную запись команды ScriptingSystem:RunScript.
Procedure RunNotepad;
Begin
    RunApplication('notepad.exe');
End;
Обратите внимание: для обоих подходов реализации внешней команды Notepad достаточно просто ввести 'notepad.exe' в качестве параметра для RunApplication, а не указывать полный путь и имя файла приложения. Пути к таким приложениям Windows, как Calculator и Notepad, уже заданы операционной системой.
Чтобы запустить из Altium Designer приложение, у которого нет встроенного пути Windows, необходимо указать полный путь и имя файла приложения (в одиночных кавычках, чтобы учесть возможные пробелы в пути). Так, чтобы запустить вторую копию Altium Designer, поля процесса RunApplication и параметров будут такими:
RunApplication('C:\Program Files\Altium\xx\X2.EXE') – где xx обозначает имя папки версии Altium Designer.
Команды можно редактировать, дублировать и удалять прямо из диалога настройки (в данном случае диалога Customizing PCB Editor) с помощью кнопок в нижней части окна.
Назначение команд меню
Если скрипт реализован как пользовательская серверная команда через функцию Customizing в Altium Designer (View » Toolbars » Customize), как описано выше, его можно назначить GUI сервера простым перетаскиванием (drag-and-drop).
► См. также Настройка рабочей области проектирования
Панели инструментов
Чтобы назначить пользовательскую команду, например, в главное меню PCB-редактора или в меню панели инструментов, откройте диалог Customizing PCB Editor, найдите пользовательскую команду и перетащите её в нужное место меню. Обратите внимание: для доступа к меню PCB-редактора должен быть открыт PCB-документ. После закрытия диалога настройки новая команда меню будет доступна в PCB-редакторе в любое время.

Пользовательскую команду можно перетащить в требуемое место меню.
Команду также можно добавить с помощью пункта
Insert Link option в контекстном меню (по правому клику) для меню.
Поскольку в этом примере новая пользовательская команда назначена на PCB Active Bar, её можно увидеть в категории команд PCB Active Bar в диалоге Customizing PCB Editor.

При назначении в меню пользовательская скриптовая команда будет отображаться в диалоге настройки в категории соответствующего меню.
Чтобы удалить команду из меню, откройте диалог настройки, затем перетащите значок команды меню обратно в диалог.

Удаление команды, назначенной на панель инструментов.
В режиме настройки команды, назначенные меню, также можно редактировать и удалять, щёлкнув правой кнопкой мыши по самой команде в меню.
Меню
Пользовательскую команду можно назначить в меню на любом уровне вложенности, используя тот же процесс перетаскивания, описанный выше.
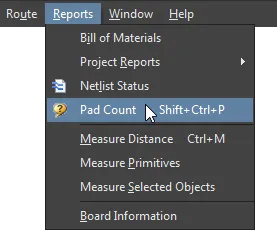
Когда сервер находится в режиме настройки, меню остаются активными для указателя мыши и будут соответственно раскрываться и сворачиваться. Чтобы, например, поместить команду в меню PCB-редактора Reports , перетащите команду в меню и далее вниз по списку, где её можно отпустить в подходящей позиции. После закрытия диалога настройки новая команда меню — здесь Notepad — будет доступна из меню Reports .

Активные меню во время настройки позволяют перетащить пользовательскую команду в выпадающее меню.
Всплывающее меню
Команду можно назначить во всплывающее меню по правому клику тем же способом, что описан выше, без ограничений по глубине подменю.
В этом примере команда перетаскивается по пути меню PCB Popups » Right Mouse Click Free Space и помещается в подменю, как показано ниже. После назначения пользовательская скриптовая команда Notepad становится доступной в PCB-редакторе при щелчке правой кнопкой мыши по свободному месту.

Пользовательская команда, назначенная подменю по правому клику
Прямое назначение скрипта
В качестве альтернативы созданию повторно используемой пользовательской команды из скрипта с последующим назначением её в меню, скрипт можно применить к меню напрямую — как быстрый разовый вариант.
При этом пропускается шаг создания пользовательской команды: загруженный скрипт назначается меню напрямую. Без существования соответствующей пользовательской команды, которую можно применять как полностью настроенную команду к нескольким меню, этот прямой метод является единичным решением для доступа к скрипту из меню. Соответственно, различные настройки команды — такие как Caption, Description, Image и Shortcuts — применяются только к назначенному экземпляру.
Чтобы назначить скрипт напрямую в меню, загрузите проект скрипта, откройте диалог сервера Customizing (View » Toolbars » Customize), выберите [Scripts] в списке Categories, найдите нужный скрипт и перетащите его в позицию меню. Нажмите , чтобы закрыть диалог Edit Command.

Скрипт, а не команда, также может быть назначен напрямую в меню.
Как и для всех размещений в меню, если новый пункт меню всё ещё имеет настройки по умолчанию (имя подписи, сочетание клавиш и т. п.), их можно исправить, щёлкнув правой кнопкой мыши по пункту меню и выбрав Edit в подменю. Это откроет диалог Edit Command, где можно задать подходящие параметры.

В режиме Customizing щёлкните правой кнопкой мыши по меню, чтобы получить доступ к его параметрам.
После настройки новое меню будет доступно во время проектирования без необходимости дополнительно явно загружать проект скрипта или устанавливать его как Global Project.
Обратите внимание: такой способ применения скрипта к меню автоматически создаёт требуемую команду. Это не переназначаемая пользовательская полностью настроенная команда, как в описанных выше методах, а команда, созданная для данного прямого пункта меню.
Это можно увидеть в записи категории соответствующего меню в диалоге Customizing . Для приведённого выше примера индивидуально настроенную команду можно увидеть в категории Reports в диалоге Customizing PCB Editor.

При прямом применении скрипта к меню соответствующая команда создаётся только для этого пункта меню.

 Локализовано с помощью ИИ