Каждый элемент (Item) в подключенном Workspace состоит из серии ревизий; новая ревизия используется для размещения новых данных каждый раз, когда эти данные изменяются и фиксируются/загружаются/выпускаются. Таким образом, ревизия отражает прогресс элемента по мере внесения изменений. Иными словами, если изменяется сущность данных, представленная элементом, номер ревизии должен быть увеличен, чтобы это отразить.
Для любой ревизии элемента также важно отражать текущее состояние этой ревизии — на какой стадии своей «жизни» она находится. Этот статус называется Lifecycle ревизии элемента.
Жизненный цикл позволяет компании управлять элементом с бизнес-точки зрения и в соответствии с корпоративными политиками и практиками. Имея информацию о жизненном цикле, люди, которым нужно использовать элемент в Workspace — от разработчика, рассматривающего повторное использование выпущенного «строительного блока» проекта, до службы снабжения, которой нужны данные для изготовления и сборки платы, — могут с первого взгляда увидеть, на какой стадии «жизни» находится ревизия элемента и, следовательно, для чего её можно безопасно использовать.
Моделирование жизненного цикла
Хотя разные организации могут моделировать или обозначать жизненный цикл проектных элементов немного по-разному, общая логика у всех схожа. Например, общий цикл жизни продукта может быть таким: он начинается как идея проекта, затем становится прототипом, затем переходит в производство, а затем в какой-то момент устаревает и больше не производится и не продаётся.
Использование информации о статусе жизненного цикла для каждого компонента проекта помогает гарантировать, что проект можно повысить до более высокого состояния только в том случае, если это новое состояние меньше либо равно минимальному состоянию среди компонентов проекта. Например, если проект готов перейти в производство, это должно быть разрешено только если все компоненты в нём также находятся в производстве — т. е. компоненты, которые всё ещё In Prototype (или New From Design), должны быть переведены в In Production, прежде чем проект в целом можно будет перевести на этот уровень.
Во многих случаях ревизии проектных элементов будут проходить различные состояния жизненного цикла линейно, однако не следует считать, что это единственный возможный путь. Например, некоторые ревизии элементов могут быть заброшены ещё до того, как достигнут стадии прототипирования. В подключенном Workspace допустимые состояния, между которыми может перемещаться ревизия элемента, определяются таблицей Transition, включённой в определение жизненного цикла.
Подключенный Workspace поддерживает два уровня управления жизненным циклом: Simple или Advanced. Они по сути определяют стиль управления, на основе которого затем строятся сами определения жизненного цикла. Для определения жизненного цикла на основе простого стиля управления используются только состояния и переходы между состояниями. Для определения жизненного цикла на основе расширенного стиля управления состояния могут дополнительно группироваться по определённым стадиям.
И простой, и расширенный стили управления жизненным циклом поддерживают один и тот же набор States (различные точки, в которых может находиться ревизия элемента в течение своей жизни) и Transitions (как ревизия элемента перемещается между этими состояниями).
Состояния, стадии и переходы
Related page: Доступ к подробному представлению элемента
Каждая точка в жизненном цикле ревизии элемента называется State, например In Production. Когда ревизия элемента меняет состояние, это называется Transition, и оно может быть только в другое состояние.
Определения жизненного цикла на основе расширенного стиля управления поддерживают группировку состояний в Stages. Стадии позволяют создавать метки, которые показывают, где находится ревизия элемента в процессе разработки. Например, она может быть в Design, или в Prototype, или в Production.

Пример определения жизненного цикла, в котором состояния сгруппированы в три стадии.
На изображении ниже показан фрагмент подробного представления Item для элемента, в котором используется трёхуровневая схема именования ревизий: Model, Prototype и Revision. Каждая модель показана отдельным блоком. Внутри модели каждый прототип — это подблок. Под каждым прототипом находятся ревизии этой модели/прототипа, а внутри каждой ревизии — различные состояния, в которых эта ревизия находилась.

Пример состояний жизненного цикла для различных ревизий элемента.
Стадии в определении жизненного цикла расширенного типа также могут быть связаны с уровнями ревизий используемой схемы именования ревизий, создавая горизонтальное измерение в представлении жизненного цикла элемента, которое согласуется с ревизией элемента — см. раздел
Linking Stages to Levels of the Revision Naming Scheme для получения дополнительных сведений.
Определения жизненного цикла по умолчанию
Подключенный Workspace предоставляет восемь определений жизненного цикла по умолчанию. Эти определения можно использовать «как есть» или изменить в соответствии с требованиями компании (или личными требованиями). При необходимости также можно добавлять и настраивать новые, пользовательские определения.
Определения жизненного цикла по умолчанию следующие:
-
Component Lifecycle
-
Design Lifecycle
-
Extension Lifecycle
-
Generic Lifecycle
-
Sample - Basic Lifecycle
-
Sample - Simple Lifecycle
-
Sample - Simple Lifecycle With Approvals
-
Sample - Structured Lifecycle With Approvals
Применяемое определение жизненного цикла выбирается на уровне отдельного элемента при создании элемента. Поэтому разным элементам могут быть назначены разные определения жизненного цикла.
После того как определённое определение жизненного цикла используется элементом в Workspace, это определение нельзя удалить. Однако его можно в некоторой степени изменить, включая переименование, изменение атрибутов состояний (цвет, переходы, применимость, видимость), добавление новых состояний в определение, удаление любых неиспользуемых состояний и связывание стадий с уровнями ревизий (где применимо). После создания элемента и выполнения первого выпуска в запланированную ревизию этого элемента, для элемента нельзя изменить определение жизненного цикла на другое.
Определения жизненного цикла, содержащие выделенные состояния и переходы утверждения, фактически позволяют соответствующему уполномоченному лицу принимать окончательное решение о том, может ли ревизия элемента перейти, например, из Design в Prototype или из Prototype в Production.
Управление определениями жизненного цикла
В Altium Designer определения жизненного цикла можно просматривать и управлять ими через диалог Edit Lifecycle Definitions. Чтобы открыть этот диалог для подключенного Workspace, в который вы сейчас вошли:
-
Откройте страницу Data Management – Servers page в диалоге Preferences.
-
Нажмите элемент управления Properties в крайней правой части записи Active Server.
-
Выберите команду Lifecycles в соответствующем меню.

Определения жизненного цикла для активного подключенного Workspace создаются и редактируются — в Altium Designer — через диалог Edit Lifecycle Definitions.
Управление жизненным циклом через браузер
Ваш подключенный Workspace предоставляет возможность определять и управлять определениями жизненного цикла через браузерный интерфейс, дополняя возможность делать это через Altium Designer. И обеспечивая лучшую наглядность задействованных состояний и переходов, каждый жизненный цикл строится графически, показывая с первого взгляда соответствующие потоки.
Определение и управление определением жизненного цикла через браузерный интерфейс Workspace — это в значительной степени визуальный процесс. Определение строится подобно блок-схеме с использованием различных графических объектов, представляющих состояния и переходы между состояниями (а также стадии, если используется стиль управления Advanced).
Дополнительные сведения см. в Lifecycle Management (Altium 365 Workspace, Enterprise Server Workspace).
Добавление нового определения
Чтобы создать новое определение жизненного цикла, нажмите кнопку  в нижней части диалога Edit Lifecycle Definitions. В диалоге появится новая вкладка, готовая к настройке.

Создайте собственное пользовательское определение жизненного цикла.
Вновь добавленное определение жизненного цикла отличается суффиксом «+» на своей вкладке. Это означает, что определение всё ещё настраивается и ещё не было «сохранено» в набор определений жизненного цикла, доступных для Workspace.
Настройка определения
Используйте элементы управления, доступные на вкладке определения жизненного цикла, чтобы настроить это определение по мере необходимости.
После того как определённое определение жизненного цикла используется элементом в Workspace, это определение нельзя удалить. Однако его можно в некоторой степени изменить, включая переименование, изменение атрибутов состояний (цвет, переходы, применимость, видимость), добавление новых состояний в определение, удаление любых неиспользуемых состояний и связывание стадий с уровнями ревизий (где применимо).
Сначала введите осмысленное имя определения в поле Definition Name. Вкладка будет динамически отражать введённое имя.
Используйте элементы управления Lifecycle Management, чтобы выбрать стиль управления жизненным циклом — либо Simple, либо Advanced. Простой стиль означает, что задействованы только States и State Transitions. Расширенный стиль позволяет определять Stages, в которые группируются состояния.

Укажите имя и стиль для определения жизненного цикла.
Начальное состояние
Используйте поле Initial State of Revisions, чтобы определить начальное состояние для ревизии элемента, то есть состояние ревизии, в котором она не содержит выпущенных данных — своего рода «состояние до выпуска». По умолчанию это состояние называется Planned. Чтобы изменить его, щёлкните ссылку и используйте диалог State Properties, чтобы задать имя и описание, а также цвета текста и фона.

Настройте начальное состояние для ревизий.
Стадии
Если выбран стиль управления жизненным циклом Advanced, становятся доступны элементы управления для добавления и определения необходимых стадий. По умолчанию предоставляется одна стадия — с именем Design - — с возможностью добавить ещё две стадии. Чтобы добавить дополнительную стадию, нажмите ссылку Add Stage.
Введите имена стадий по мере необходимости, набирая их непосредственно в соответствующем поле Stage Name.

Добавляйте стадии по мере необходимости — они будут использоваться для группировки состояний и создания более насыщенного, структурированного определения жизненного цикла.
Чтобы удалить стадию, нажмите элемент управления

справа от соответствующего поля
Stage Name.
Состояния
Следующий шаг — добавить необходимые состояния для определения жизненного цикла. Для определения жизненного цикла, основанного на простом стиле управления, это будет плоский список. Для расширенного стиля управления потребуется добавлять состояния в различные определённые этапы.
Нажмите элемент управления  под списком состояний, чтобы добавить новое состояние. Используйте появившееся диалоговое окно State Properties, чтобы задать это состояние с точки зрения его имени, описания и атрибутов цвета.

Добавление состояния в определение жизненного цикла.
Options and Controls of the State Properties Dialog
Свойства
-
State Name — укажите имя для состояния.
-
Description — введите описание для состояния.
-
Text Color — щёлкните по полю цвета, чтобы открыть диалоговое окно Choose Color, затем выберите нужный цвет текста.
-
Background Color — щёлкните по полю цвета, чтобы открыть диалоговое окно Choose Color, затем выберите нужный цвет фона.
Предпросмотр цвета текста
Отображает предварительный просмотр цвета текста.
Предпросмотр цвета фона
Отображает предварительный просмотр цвета фона.
-
Visible in Vault panels — при включении этой опции ревизия элемента, использующая родительское определение жизненного цикла будет отображаться в панели Explorer panel когда она установлена в это состояние жизненного цикла. Когда эта опция отключена, ревизия будет скрыта в обоих местах. Скрытую ревизию, однако, можно отобразить (переопределив эту опцию), включив элемент управления Show Hidden Revisions в панели Explorer panel.
-
Allowed to be used in designs — при включении этой опции ревизию элемента в этом состоянии разрешено использовать в проекте. Она считается Applicable. Если эта опция отключена, ревизию элемента в этом состоянии нельзя корректно использовать и она считается Inapplicable (или Not-applicable). Она будет помечена соответствующим образом в Properties panel в режиме Component mode и в диалоговом окне Item Manager dialog. Компилятор проекта также можно настроить на поиск таких случаев.
Обратите внимание, что компоненты, у которых состояние ревизии установлено в Inapplicable (Not-applicable) не отображаются в панели Components panel.
Новое состояние добавляется в конец списка. Щёлкните по состоянию, чтобы выбрать его, затем используйте элементы управления  и
и  (под списком состояний), чтобы переместить его в нужное место в списке.
При определении состояний для жизненного цикла расширенного типа доступны дополнительные элементы управления (под списком состояний) для перемещения состояния между этапами. В зависимости от положения этапа переместите состояние на этап справа ( ) или слева (
 ) по необходимости.
Чтобы отредактировать свойства состояния, щёлкните, чтобы выбрать его, затем нажмите элемент управления

справа. Чтобы удалить выбранное состояние, используйте элемент управления

.

Пример состояний, определённых в рамках двухэтапного определения жизненного цикла.
Переходы
Последний шаг — определить State Transitions — пути между различными состояниями. Щёлкните, чтобы выбрать состояние, затем нажмите элемент управления  справа, чтобы добавить новый переход состояния. Используйте появившееся диалоговое окно State Transition Properties, чтобы задать переход с точки зрения его имени, целевого (следующего) состояния, текста меню и разрешений.

Добавление перехода состояния.
Options and Controls of the State Transition Properties Dialog
Свойства
-
State Transition Name — введите имя для перехода состояния.
-
State After — используйте раскрывающийся список, чтобы выбрать состояние, которое следует за добавляемым переходом состояния.
-
Menu Entry Text — это текст, который будет отображаться в контекстном меню по правому щелчку в представлении элемента, позволяя выполнить этот переход состояния для заданной ревизии элемента. Параметр $RevisionId будет заменён на ID ревизии.
Разрешения перехода состояния
Используйте раскрывающийся список, чтобы выбрать, как задаются разрешения для перехода состояния:
-
Controlled — выберите эту опцию, чтобы ограничить разрешения на основе разрешений сервера по умолчанию.
-
Using Approvals — выберите эту опцию, чтобы разрешить разрешения, выбранные для этого конкретного перехода состояния, которые можно добавить в таблицу ниже с помощью кнопки Add .
Дополнительные элементы управления
-
Add — используйте раскрывающийся список, чтобы выбрать один из следующих вариантов:
-
Add Approval Group — выберите, чтобы добавить группу утверждения. Новая группа по умолчанию называется New Approval Group. Вы можете изменить имя с помощью команды Edit Approval Group Name , определённой ниже.
-
Add Role — выберите, чтобы добавить группу с помощью диалогового окна Search for Role.
-
Add User — выберите, чтобы добавить пользователя с помощью диалогового окна Search for Users.
-
Edit Approval Group Name — выберите, чтобы открыть диалоговое окно, в котором можно ввести имя для вновь добавленной группы утверждения.
-
Move Up — нажмите, чтобы переместить текущий выбранный элемент на одну позицию вверх.
-
Move Down — нажмите, чтобы переместить текущий выбранный элемент на одну позицию вниз.
-
Remove — нажмите, чтобы удалить текущую выбранную группу или пользователя.
Команды Add доступны только если Using Approvals выбрано в State Transitions Permissions.
-
Remove — нажмите, чтобы удалить текущую выбранную группу или пользователя.
Необходимо определить
Menu Entry Text. Этот текст будет отображаться в представлении
Item (или на вкладке представления аспекта
Lifecycle в панели
Explorer panel) при щелчке правой кнопкой по ревизии элемента для перевода её в новое состояние.
При вводе текста меню используйте запись $RevisionId как заполнитель для ID ревизии. Например, рассматривая ревизию 01.A.1 определённого элемента Workspace, ввод текста меню Promote $RevisionId to In Production приведёт к тому, что в меню будет отображаться пункт Promote 01.A.1 to In Production.
Новый переход добавляется в конец списка. Щёлкните по переходу, чтобы выбрать его, затем используйте элементы управления и под списком состояний, чтобы переместить его в нужное место в списке.
Если следующее состояние для перехода находится на другом этапе, будет показана стрелка-индикатор — цвета целевого состояния — чтобы обозначить это.

Пример полностью определённых состояний и переходов состояний в рамках двухэтапного определения жизненного цикла. Стрелки используются для обозначения переходов между этапами.
Чтобы отредактировать свойства перехода, щёлкните, чтобы выбрать его, затем нажмите элемент управления
справа. Чтобы удалить выбранный переход, используйте элемент управления
.
Чтобы полностью удалить все определённые состояния и переходы для простого определения жизненного цикла, либо все состояния и переходы для конкретного этапа в расширенном определении жизненного цикла, используйте команду Clear, доступную из соответствующего контекстного меню по правому щелчку.
Example Default Lifecycle States and Transitions
Следующая таблица содержит перечень состояний и переходов состояний, используемых в определении жизненного цикла Sample - Structured Lifecycle With Approvals по умолчанию.
Текущее состояние
|
Возможные переходы
|
Следующее состояние
|
Комментарий
|
Planned
|
Выполнить выпуск
|
New From Design
|
Все новые, невыпущенные ревизии элемента начинаются в состоянии Planned. Для ревизии элемента в этом состоянии нельзя вручную изменить статус жизненного цикла — её можно только выпустить, при этом она автоматически перейдёт в New from Design.
|
New from Design
|
Установить «Готово к прототипированию»
|
Pending Prototype Approval
|
Указывает, что эта ревизия элемента выпущена и теперь находится в состоянии New from Design. Когда всё готово к прототипированию, её можно перевести в Pending Prototype Approval.
|
|
Отказаться от разработки
|
Abandoned
|
Если ревизия элемента признана ненужной на данном этапе, её можно перевести в состояние Abandoned.
|
Pending Prototype Approval
|
Утвердить для прототипа
|
In Prototype
|
Ревизия элемента готова к утверждению для прототипирования. Успешное утверждение переводит ревизию в состояние In Prototype.
|
|
Отклонить для прототипа
|
New From Design
|
Если ревизию элемента не удаётся утвердить для прототипирования, она переводится обратно в New from Design.
|
Abandoned
|
Восстановить разработку
|
New from Design
|
Отменённую ревизию элемента можно восстановить, вернув её в New from Design.
|
In Prototype
|
Установить «Готово к производству»
|
Pending Production Approval
|
Ревизия элемента находится в состоянии In Prototype; обычно это этап, когда вы готовы собрать первые физические прототипы. Если она проходит испытания прототипа, её можно перевести в Pending Production Approval.
|
|
Откатить к разработке
|
New from Design
|
Если ревизия элемента не проходит испытания, её следует перевести обратно в New from Design.
|
|
Закрыть прототип
|
Closed Prototype
|
Если ревизию элемента больше нельзя развивать (возможно, требуются изменения конструкции, что потребует новой ревизии), переведите её в Closed Prototype.
|
Pending Production Approval
|
Утвердить для производства
|
In Production
|
Ревизия элемента готова к утверждению для производства. Успешное утверждение переводит ревизию в состояние In Production.
|
|
Отклонить для производства
|
In Prototype
|
Если ревизию элемента нельзя выпустить в производство, её можно перевести обратно в In Prototype.
|
Closed Prototype
|
Восстановить прототип
|
In Prototype
|
Closed Prototype — это состояние, в котором ревизия считается непригодной для дальнейшей разработки. Если работу с ней можно продолжить, её можно перевести обратно в In Prototype.
|
In Production
|
Откатить к прототипу
|
In Prototype
|
Если ревизия элемента находится в производстве, но по какой-то причине её нельзя производить, её можно перевести обратно в In Prototype.
|
|
Снять с производства (Deprecate)
|
Deprecated
|
Если вы планируете прекратить выпуск элемента в текущей ревизии (например, компонент на плате становится трудно закупаемым), переведите её в состояние Deprecated.
|
|
Сделать производственный элемент устаревшим (Obsolete)
|
Obsolete
|
Если ревизию элемента, которая сейчас находится в состоянии In Production, больше невозможно изготавливать, её можно немедленно перевести в Obsoleted.
|
Deprecated
|
Сделать снятый с производства элемент устаревшим (Obsolete Deprecated Item)
|
Obsolete
|
Deprecated обычно означает, что производство может продолжаться за счёт имеющихся запасов, но новые компоненты для этой ревизии элемента заказывать не следует. Если ситуация изменится и такие запасы станут недоступны, ревизию можно сделать устаревшей (Obsolete).
|
|
Повторно активировать снятый с производства элемент
|
In Production
|
Восстановить элемент в состоянии Deprecated, переведя его в In Production.
|
Obsolete
|
Повторно активировать устаревший элемент
|
In Production
|
Восстановить элемент в состоянии Obsolete, переведя его в In Production.
|
|
Снять с производства устаревший элемент
|
Deprecated
|
Восстановить элемент в состоянии Obsolete, переведя его в Deprecated.
|
Управление переходами между состояниями жизненного цикла
Подключённое рабочее пространство (Workspace) предоставляет широкие возможности по определению того, кто может выполнять конкретные переходы между состояниями для ревизии элемента в этом Workspace — то есть переводить ревизию из одного состояния в другое, как это задано определением жизненного цикла, применяемым к родительскому элементу. Можно запретить обычным (неадминистративным) пользователям выполнять определённые переходы между состояниями жизненного цикла «на лету», при этом расширив права не только для администраторов Workspace. Вы можете задавать разрешения на глобальном уровне — как часть глобальных разрешений операций Workspace — а также на уровне отдельных переходов. Последние работают совместно с настройками глобального уровня и позволяют тонко настроить права для более важных переходов (например, перевода ревизии элемента в состояние Ready for Production).
Кроме того, для отдельных переходов состояния обычных пользователей можно обязать запрашивать утверждение. В свою очередь, эти Approval Requests отправляются, просматриваются и обрабатываются теми, кто назначен участником одной или нескольких Approval Groups.
Благодаря различным уровням контроля разрешений вы можете определить стратегию переходов жизненного цикла, соответствующую предпочтительному подходу вашей организации.
Разрешения можно определить на двух уровнях:
-
Globally – определение, какие пользователи и/или группы могут выполнять переходы состояний для всего набора определённых переходов во всех определениях жизненного цикла.
-
Locally – задание разрешений на уровне отдельного перехода состояния.
Глобальные разрешения на переходы состояний
Глобальные разрешения на переходы состояний задаются и управляются в Altium Designer с помощью диалога Edit Operation Permissions dialog. Доступ к этому диалогу осуществляется со страницы Data Management – Servers page в диалоге Preferences. Для подключённого Workspace, разрешения которого вы хотите просмотреть/изменить, нажмите элемент управления Properties справа и выберите команду Operations в соответствующем меню.
Значимая здесь запись операции Workspace — Move revision between lifecycle states.

На глобальном уровне задайте и настройте, кому разрешено выполнять переходы между состояниями жизненного цикла.
Для нового подключённого Workspace настройки разрешений по умолчанию для этой операции следующие:
-
Администраторы
-
Collaborator
-
Библиотекари
-
Менеджеры
В большинстве случаев эти настройки по умолчанию подходят и требуют изменения лишь в исключительных ситуациях.
При необходимости задайте дополнительные разрешения (нажмите кнопку Add). Разрешения на переходы состояний на этом глобальном уровне можно назначать следующим сущностям:
-
 Administrators (это определённая группа).
-
 Collaborator (пользователь, имеющий права редактирования для элемента/ревизии).
-
 Owner (для выпущенных данных — это человек, создавший исходный элемент).
-
Конкретная пользовательская группа.
-
 Конкретный пользователь.
Управление пользователями, а также определёнными группами выполняется через браузерный интерфейс Workspace. Это можно делать из внешнего браузера. Подробности см. в разделе Managing Your Workspace Membership (Altium 365 Workspace, Enterprise Server Workspace).
Локальные разрешения на переходы состояний
Разрешения для конкретного перехода состояния задаются в соответствующем диалоге State Transition Properties dialog, доступ к которому осуществляется из области States and Transitions применимого перехода в определении жизненного цикла, которое в данный момент настраивается в диалоге Edit Lifecycle Definitions.
Чтобы отредактировать свойства перехода, щёлкните по нему для выбора, затем нажмите элемент управления в крайней правой части.

Элементы управления доступом для задания разрешений редактируемого перехода состояния.
Выберите тип контроля разрешений, который вы хотите использовать для перехода, в поле State Transition Permissions. Доступны два варианта:
-
Controlled – этот тип позволяет точно настроить, кто может выполнять данный переход, указав одного или нескольких пользователей и/или групп. Этот тип локального контроля разрешений используется совместно с разрешениями, заданными на глобальном уровне (см. How Permissions are Applied). Используйте элементы управления в области ниже, чтобы соответствующим образом определить разрешённые сущности. По умолчанию добавляется сущность Anyone, что означает: на этом локальном уровне переход разрешён всем пользователям.
Чтобы настроить конкретных пользователей и/или группы, сначала выберите, а затем удалите сущность Anyone. После этого вы сможете добавить пользователя или группу по необходимости из меню, связанного с кнопкой Add. Используйте последующие диалоги Search for Users или Search for Role, чтобы найти нужного пользователя или группу соответственно.

С разрешениями Controlled вы можете переключиться с доступа «для всех» на доступ только для указанных пользователей/групп.
-
Using Approvals – этот тип позволяет любому обычному пользователю запросить выполнение данного перехода состояния. Запросы обрабатываются одним или несколькими пользователями, добавленными (индивидуально или через группы) в определённые группы утверждения (Approval Groups). Любой участник такой группы может одобрить или отклонить запрос на переход. Кроме того, можно определить и упорядочить несколько групп утверждения. Это позволяет реализовать многоуровневое согласование.
Используйте элементы управления в области ниже, чтобы соответствующим образом определить группу(ы) утверждения. По умолчанию добавляется одна пустая группа утверждения, готовая к настройке — New Approval Group. При необходимости её можно переименовать с помощью команды Edit Approval Group Name из меню, связанного с кнопкой Add (или из контекстного меню области).
Вы можете добавить пользователя или группу в выбранную группу утверждения по необходимости из меню, связанного с кнопкой Add (или из контекстного меню области). Используйте последующий диалог Search For Users или Search For Role, чтобы найти нужного пользователя или группу соответственно. Упорядочивайте несколько групп утверждения с помощью команд Move Up и Move Down из меню — утверждение выполняется сверху вниз.

При использовании Using Approvals все неадминистративные пользователи должны запрашивать переход, а решение по нему принимает пользователь из одной или нескольких определённых групп утверждения.
Управление пользователями, а также определёнными группами, выполняется через браузерный интерфейс Workspace. Это можно сделать из внешнего браузера. Подробную информацию см. в разделе Managing Your Workspace Membership (
Altium 365 Workspace,
Enterprise Server Workspace).
How Permissions are Applied
Как применяются разрешения, зависит от выбранного и настроенного типа контроля разрешений на уровне перехода состояния:
-
Controlled Permissions – чтобы пользователь мог выполнить переход состояния, должны быть выполнены следующие условия:
-
У него должно быть разрешение на глобальном уровне на
Move revision between lifecycle states (задаётся в диалоге Edit Operation Permissions dialog).
-
У него должно быть разрешение на локальном уровне для данного конкретного перехода состояния.
-
Он также должен быть соавтором (collaborator) для Item Revision, жизненный цикл (lifecycle state) которого переводится (т. е. у него должны быть права на редактирование).
Эти три условия объединяются логическим AND — если хотя бы одно не выполнено, пользователю будет запрещено выполнять данный конкретный переход.
Для пользователей без административных прав настройки разрешений по умолчанию (Collaborator на глобальном уровне и Anyone на локальном уровне перехода состояния) означают, что достаточно сделать пользователя соавтором (collaborator) для требуемого Item Revision, чтобы выполнить все условия. Затем для ключевых переходов можно просто ужесточить разрешения на локальном уровне перехода состояния, чтобы переход мог выполнять не любой соавтор.
-
Using Approvals – все пользователи без административных прав должны использовать систему согласований (approvals) и отправлять запрос на выполнение перехода состояния. Система согласований не требует, чтобы у пользователя было разрешение на выполнение переходов состояния на глобальном уровне, и также не требует, чтобы пользователь был соавтором (collaborator) для Item Revision.
Хотя пользователю не обязательно быть соавтором (collaborator) для Item Revision, этот объект должен быть с ним расшарен, иначе он не сможет увидеть его в Workspace.
Администраторы Workspace всегда смогут переводить Item Revision между различными состояниями, независимо от локально заданных разрешений переходов состояния.
Linking Stages to Levels of the Revision Naming Scheme
Ревизии и состояния жизненного цикла можно увеличивать (increment) из соответствующего контекстного меню (правый клик) в представлении Item, либо на вкладке представления аспектов Lifecycle в панели Explorer panel. Хотя создание новой ревизии и продвижение по жизненному циклу — это полностью разные задачи, выполняемые по разным причинам (новая ревизия — при изменении проекта, новое состояние жизненного цикла — чтобы отразить повышенную пригодность к использованию данного Item Revision), они взаимосвязаны.
Для определения жизненного цикла на основе расширенного (advanced) стиля управления заданные стадии (stages) можно связать с уровнями ревизий (revision levels) используемой схемы именования ревизий. Сделайте это с помощью опции в нижней части диалога Edit Lifecycle Definitions.

Опция связывания стадий с уровнями ревизий.
Это создаёт связь между стадией жизненного цикла и уровнем ревизии. Это означает, что когда жизненный цикл Item Revision увеличивается так, что он переходит из состояния в одной стадии в состояние в другой стадии, доступные команды изменения типа ревизии (revision modification type) — в контекстном меню — также изменятся.
Рассмотрим определение жизненного цикла по умолчанию Sample - Structured Lifecycle With Approvals и 3-уровневую схему именования ревизий (с уровнями для Revision, Prototype, и Model). Если Item Revision находится в состоянии New From Design в первой стадии, то в контекстном меню доступны варианты типа ревизии: создать новую Revision; новый Prototype; или новый Model.
Если затем жизненный цикл увеличивается до состояния In Prototype, объект перейдёт во вторую стадию. При правом клике по нему доступные варианты типа ревизии теперь включают: создать новый Prototype или новый Model, то есть опции начать новую Revision больше нет. Такое поведение интуитивно ожидаемо — если разработка дошла до Prototype, то при необходимости изменения проекта потребуется новый Prototype или даже новый Model, в зависимости от масштаба изменения.
Когда Item Revision достигает состояния In Production в третьей стадии, доступна только опция типа ревизии для создания нового model — что также ожидаемо.
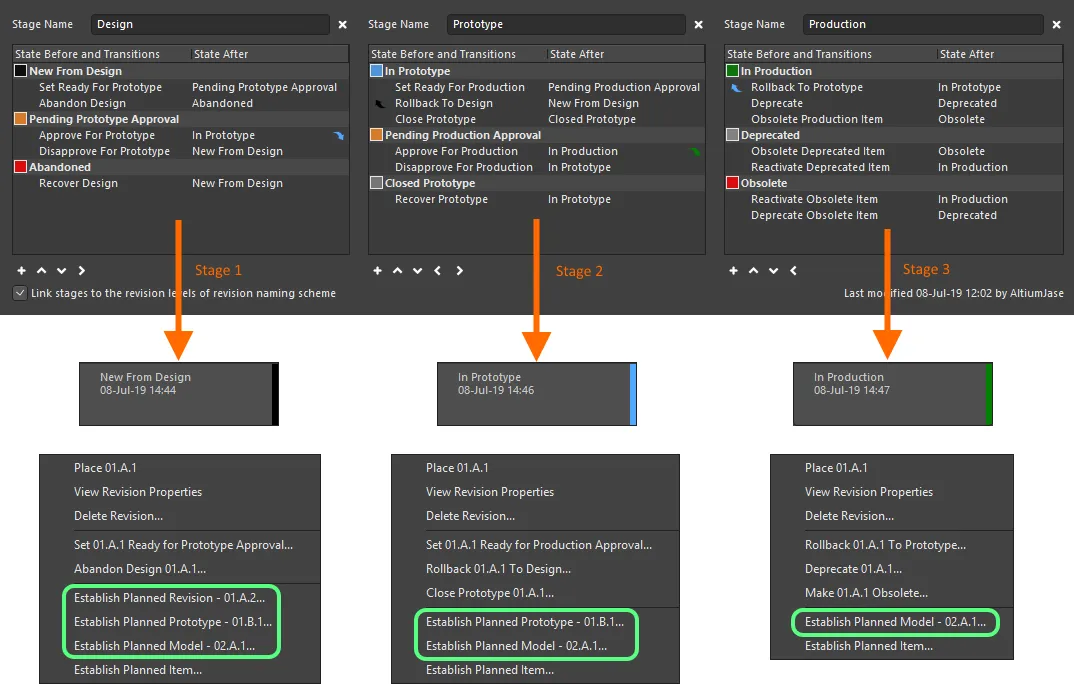
При наличии связи команды типа ревизии меняются по мере продвижения состояния жизненного цикла Item Revision через различные заданные стадии.
Saving a Definition
Независимо от того, было ли добавлено новое определение жизненного цикла или существующее определение было каким-либо образом изменено, это определение необходимо сохранить. Хотя отдельного элемента управления «save» нет, для этого доступны следующие элементы управления:
-
Для нового определения жизненного цикла — обозначенного суффиксом «+» — используйте элемент управления Add Definition (в правом верхнем углу вкладки определения) либо нажмите основную кнопку диалога
 .
.
-
Для существующего определения жизненного цикла, которое было изменено — обозначенного суффиксом «*» — используйте элемент управления Apply Changes (в правом верхнем углу вкладки определения) либо нажмите основную кнопку диалога .
В обоих случаях суффикс будет удалён, и новое (или изменённое) определение станет доступно в наборе определений жизненного цикла, доступных для Workspace.
Использование основной кнопки диалога
обеспечивает «сохранение» в пакетном стиле (batch-style), при этом диалог остаётся открытым.
Перед нажатием кнопки OK убедитесь, что определение жизненного цикла действительно добавлено или изменения применены. Нажатие этой кнопки без «сохранения» определения приведёт к закрытию диалога и потере изменений. Кроме того, если для определения жизненного цикла задано более одного состояния, необходимо определить переходы, которые фактически соединяют эти состояния, иначе изменения не могут быть применены. Диалог ошибки укажет на эту ситуацию, перечислив «недостижимые» (unreachable) состояния.
При повторном открытии диалога Edit Lifecycle Definitions коллекция определений будет отсортирована по имени в возрастающем алфавитном порядке слева направо.
В целях обеспечения понятного и прозрачного аудиторского следа — кто что изменил и когда — сведения о том, когда определение жизненного цикла было изменено в последний раз, отображаются в правом нижнем углу его вкладки.

Определение того, когда определение жизненного цикла было изменено в последний раз и кем.
В любой момент до применения изменений для активного определения эти изменения можно полностью «откатить» (rewind), нажав элемент управления Reset в правом верхнем углу вкладки этого определения.
Renaming a Definition
Эта функция доступна только пользователю с административными правами в Workspace.
Чтобы переименовать существующее, используемое определение жизненного цикла:
-
Откройте диалог Edit Lifecycle Definitions для активного подключённого Workspace.
-
Нажмите вкладку определения, имя которого нужно изменить.
-
Измените имя в поле Definition Name.
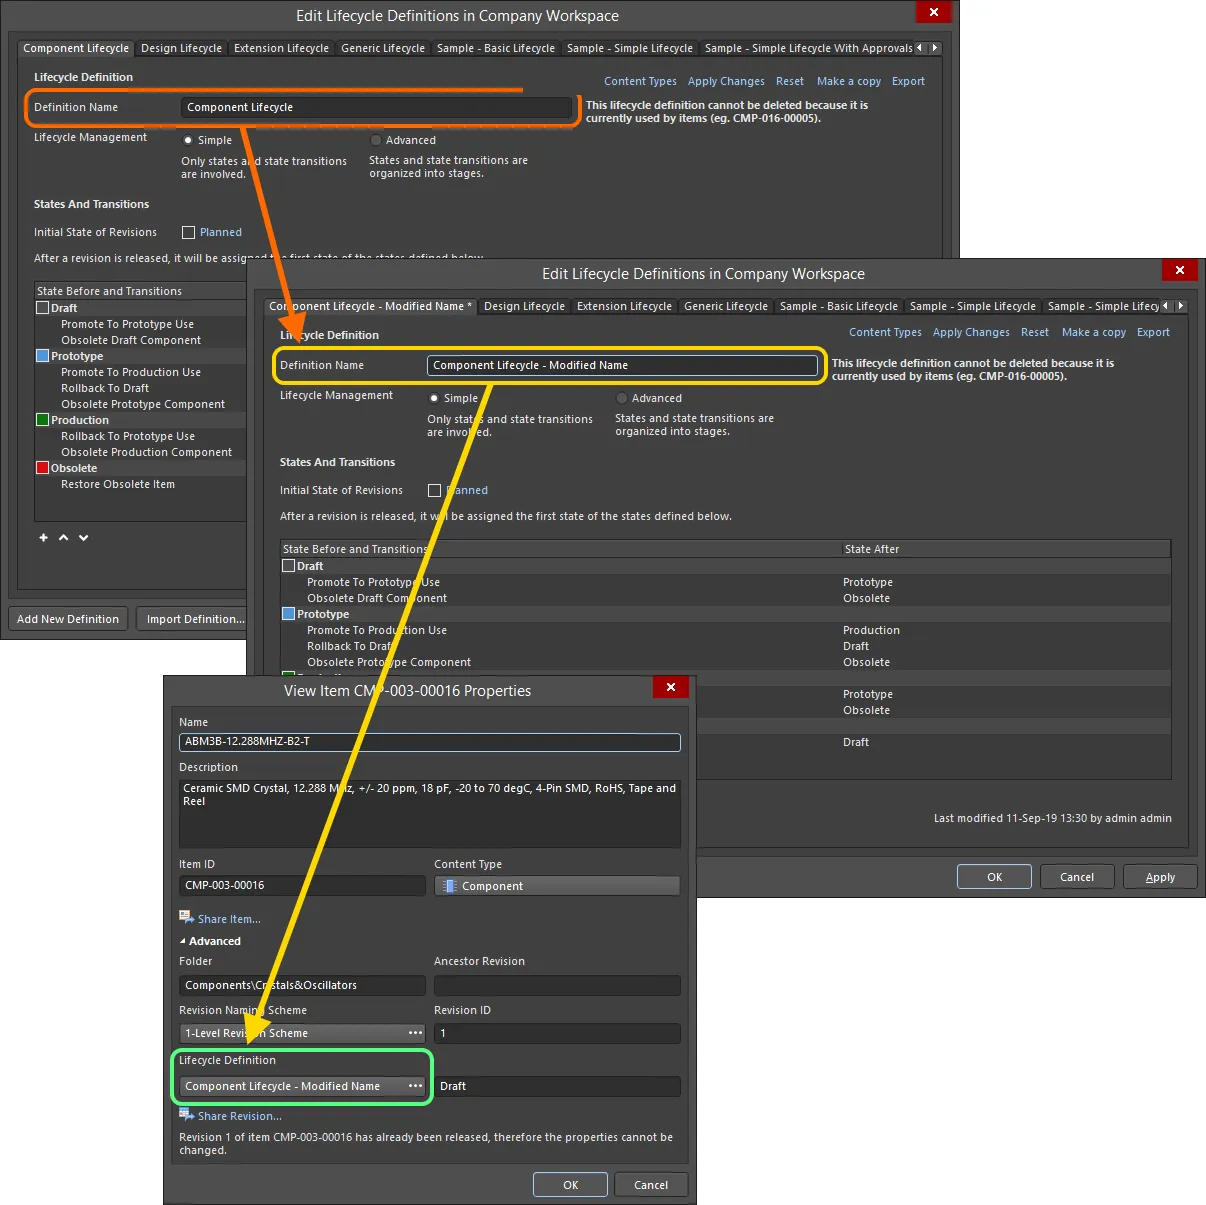
Пример переименования определения жизненного цикла и проверки изменения в свойствах Item, который уже использует это определение.
Copying a Definition
Новые определения жизненного цикла не обязательно создавать с нуля. Диалог Edit Lifecycle Definitions позволяет быстро копировать любое из существующих определений. Для этого:
-
Сделайте требуемое определение жизненного цикла, которое нужно скопировать, активным.
-
Нажмите элемент управления Make a copy в правом верхнем углу вкладки этого определения.
-
Будет создана точная копия определения — новое определение с исходным именем по умолчанию
New Lifecycle Definition. Переименуйте при необходимости.
-
Нажмите элемент управления Add Definition (или основную кнопку ), чтобы фактически сохранить новое определение.
Deleting a Definition
Чтобы удалить существующее определение жизненного цикла, выберите его (сделав активным в диалоге Edit Lifecycle Definitions), затем нажмите элемент управления Delete в правом верхнем углу вкладки определения.
Определение жизненного цикла, которое в данный момент используется каким-либо Item в Workspace, удалить нельзя.
Окончательное удаление определения жизненного цикла выполняется при нажатии основной кнопки диалога (или при нажатии OK). До этого момента операцию удаления можно отменить, нажав кнопку  в нижней части диалога.
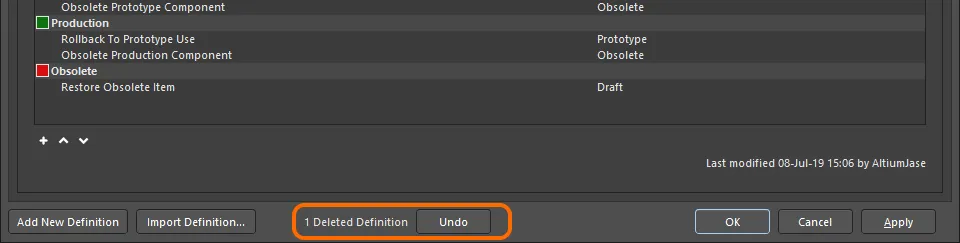
Операцию удаления определений жизненного цикла можно отменить.
Exporting and Importing Definitions
Пользовательские определения жизненного цикла доступны для использования только в том подключённом Workspace, в котором они определены. Диалог Edit Lifecycle Definitions содержит функции Export и Import, позволяющие переносить определения между Workspace.
Определение жизненного цикла хранится в файле Lifecycle Definition (*.definition).
Чтобы экспортировать определение жизненного цикла, нажмите элемент управления Export в правом верхнем углу его вкладки. В появившемся диалоге Save Lifecycle Definition укажите, где и под каким именем следует сохранить файл.
Чтобы импортировать определение жизненного цикла, нажмите кнопку  в нижней части диалога Edit Lifecycle Definitions. В диалоге Open Lifecycle Definition найдите и откройте нужный файл Lifecycle Definition. Определение жизненного цикла будет добавлено в список существующих определений жизненного цикла, доступных для Workspace.
Импортированное определение жизненного цикла появляется как новое определение с суффиксом «+». Его имя берётся из файла Definition, а не из имени самого файла. Убедитесь, что оно «сохранено», нажав элемент управления
Add Definition или основную кнопку диалога
.
Некоторые предопределённые примеры файлов определений жизненного цикла доступны в папке \Program Files\Altium\AD<Solution/Version>\System\EDMSTemplates для установки Altium Designer по умолчанию.
Controlling the Use of a Lifecycle Definition
Контроль того, какие типы Items могут использовать конкретное определение жизненного цикла, можно задать и включить на глобальном уровне при создании каждого определения. Если эта функция включена, то при выборе определения жизненного цикла для конкретного типа Item будут доступны только разрешённые определения. Это даёт дополнительный уровень контроля, чтобы гарантировать: создаваемые Items определённого типа используют только то определение жизненного цикла, которое вам требуется.
Управление выполняется в диалоговом окне Content Types. Нажмите вкладку нужного определения, доступ к которому вы хотите настроить, затем щёлкните ссылку Content Types в правом верхнем углу вкладки этого определения.

Открытие диалогового окна Content Types — центральной команды для определения того, какие типы контента могут использовать настраиваемое определение жизненного цикла.
В диалоговом окне Content Types перечислены все поддерживаемые типы контента, которые могут быть созданы в вашем активном подключённом Workspace (пользователем или системой). Параметр над списком — Control Lifecycle Definition per Content Type — обеспечивает глобальный контроль того, активна (enabled) или нет (disabled) эта функция для данного определения. Включите этот параметр, затем включите связанный параметр Use для каждого типа контента, которому вы хотите разрешить использовать это определение.
-
Чтобы иметь возможность создавать проект Workspace, параметр Use должен быть включён для типа контента Project как минимум в одном определении жизненного цикла.
-
Чтобы иметь возможность загружать наборы файлов Gerber и ODB++ в ваш Workspace (Altium 365 Workspace или Enterprise Server Workspace), параметр Use должен быть включён для типа контента Fabrication File как минимум в одном определении жизненного цикла.
-
См. страницу Working with Items, чтобы узнать больше о поддерживаемых типах контента. Другие типы контента, перечисленные в диалоговом окне Content Types, но не описанные там, не являются функциональными в программном обеспечении.
-
Вариант этого же диалогового окна используется для управления применением конкретной схемы именования ревизий. Подробнее см. Controlling the Use of a Revision Naming Scheme.
Переключение между режимами Advanced и Simple управления жизненным циклом
Вы можете переключить существующее определение жизненного цикла с использования стиля управления жизненным циклом Advanced (состояния, переходы между состояниями и этапы) на стиль управления Simple (только состояния и переходы между состояниями). Когда вы включаете параметр Simple, появится диалоговое окно Confirm Merge States. Используйте это окно, чтобы определить, как выполнить переключение, следующим образом:
-
Нажмите Yes — все определённые состояния (и переходы между состояниями) на этапах Stage 1, 2 и 3 объединяются в единый плоский список состояний.
-
Нажмите No — все определённые состояния (и переходы между состояниями) на этапах Stage 2 и 3 удаляются. Останутся только состояния (и переходы между состояниями) этапа Stage 1 (самого левого этапа) в виде единого плоского списка состояний.
 на других этапах.")
Переключение стиля управления жизненным циклом — с Advanced на Simple — с контролем того, как обрабатываются состояния (и переходы между состояниями) на других этапах.
Запросы на утверждение переходов между состояниями
Следующие разделы подробнее рассматривают различные аспекты использования системы утверждений, позволяющей неадминистративным пользователям вашего Workspace выполнять определённые переходы между состояниями.
Создание запроса (запрос утверждения)
Запрос утверждения перехода между состояниями выполняется в Altium Designer из представления аспекта Lifecycle для требуемой ревизии Item (в панели Explorer panel) либо из графической области жизненного цикла в детальном представлении Item. Щёлкните правой кнопкой мыши по жизненному циклу ревизии и выберите команду, запрашивающую переход. Появится диалоговое окно Confirm, в котором можно ввести примечание о том, почему вы делаете запрос — это может помочь участникам группы утверждения при принятии решения, утверждать ли ваш запрос! Нажмите Yes, чтобы создать запрос.

Запросите переход между состояниями и добавьте полезное примечание, подтверждающее вашу позицию.
После создания участники соответствующей группы утверждения для этого перехода между состояниями получат уведомление по электронной почте — при условии, что функция Email Notifications включена.
Настройка функции Email Notifications выполняется администратором Workspace на странице Email Notifications в браузерном интерфейсе Workspace (Admin – Settings – Email Notifications).
Просмотр запросов на утверждение
Как для инициатора запроса перехода между состояниями (Requester), так и для пользователя(ей), определённых в соответствующей группе утверждения для этого перехода (Approvers), ожидающие запросы отображаются в панели Explorer с использованием специальной папки Approval Requests.
 и один из участников определённой (начальной) группы утверждения для конкретного перехода между состояниями (Des Igner).")
Пример запроса на утверждение в папке Approval Requests, как его видит запрашивающий (Simon Entist) и один из участников определённой (начальной) группы утверждения для конкретного перехода между состояниями (Des Igner).
Число рядом с именем папки
Approval Requests показывает, сколько ожидающих запросов имеется. Если включена опция
Show Approved Requests (в меню
 )
), то это число будет отражать общее количество (ожидающие + утверждённые).
Для каждого запроса на утверждение отображается следующая информация:
-
Item Revision – конкретная ревизия Item, для которой создаётся запрос.
-
Requested By – инициатор запроса (запрашивающий). Здесь используется User Name пользователя.
-
Requested At – дата и время создания запроса.
-
Status – текущий статус запроса. Он может быть одним из следующих:
-
Awaiting – запрос в настоящее время ожидает действия одного или нескольких утверждающих.
-
Approved – запрос был утверждён. Обратите внимание: это состояние будет установлено только после полного, окончательного утверждения всеми группами утверждения, определёнными для данного перехода.
-
Transition – конкретный переход между состояниями, который запрашивается для этой ревизии Item.
-
Request Note – любое примечание, добавленное запрашивающим в момент создания запроса.
-
Action Forward – элементы управления, показанные здесь, доступны только для ожидающих запросов (со статусом
Awaiting). Элементы управления различаются для двух сторон следующим образом:
-
Requester – пользователь, создавший запрос, может Remind его.
-
Approvers – пользователь из группы утверждения может Approve запрос.
-
Action Backward – элементы управления, показанные здесь, доступны только для ожидающих запросов (со статусом
Awaiting). Элементы управления различаются для двух сторон следующим образом:
-
Requester – пользователь, создавший запрос, может Cancel его.
-
Approvers – пользователь из группы утверждения может Reject запрос.
Команды действий для запроса на утверждение также доступны из контекстного меню (правый клик) для жизненного цикла ревизии Item (в представлении аспекта Lifecycle).
Обработка запроса
Как кратко описано в предыдущем разделе, и запрашивающий, и утверждающий имеют доступные действия. Следующие сворачиваемые разделы подробнее рассматривают каждое из этих действий:
Remind
Это действие может выполнить запрашивающий, если он ждёт утверждения, но ещё не получил его. Это аналог «подтолкнуть» человека или «поднять» тему на форуме — то есть вежливый способ напомнить участникам соответствующей группы утверждения, что им нужно выполнить действие (в ту или иную сторону). Нажмите элемент управления Remind, связанный с запросом на утверждение. Появится диалоговое окно Confirm, в котором можно ввести примечание, возможно повышающее уровень срочности утверждения! Нажмите Yes, чтобы отправить напоминание — участники соответствующей группы утверждения для этого перехода между состояниями получат уведомление по электронной почте — при условии, что функция Email Notifications включена.

Пример использования действия Remind.
Approve
Это действие может выполнить участник соответствующей группы утверждения, чтобы утвердить запрос. Нажмите элемент управления Approve, связанный с запросом на утверждение. Появится диалоговое окно Confirm, в котором при необходимости можно ввести примечание. Нажмите Yes, чтобы выполнить утверждение — запрашивающий для этого перехода между состояниями получит уведомление по электронной почте — при условии, что функция Email Notifications включена.

Пример использования действия Approve.
Если есть только одна группа утверждения, утверждение запроса приведёт к автоматическому выполнению перехода между состояниями. Если групп утверждения несколько, запрос будет ожидать утверждения участником следующей группы. Если утверждающий из первой группы также является участником следующей группы, утверждение для второй группы будет выполнено автоматически.
Reject
Это действие может выполнить участник группы утверждения, чтобы отклонить запрос. Нажмите элемент управления Reject, связанный с запросом на утверждение. Появится диалоговое окно Confirm, в котором при необходимости можно ввести примечание, возможно указывающее, почему запрос был отклонён. Нажмите Yes, чтобы выполнить отклонение — запрос на утверждение будет удалён, а запрашивающий для этого перехода между состояниями получит уведомление по электронной почте — при условии, что функция Email Notifications включена.

Пример использования действия Reject.
Cancel
Это действие может выполнить инициатор запроса, если он ожидал утверждения, но затем решил отменить запрос. Это может произойти, например, если позже была обнаружена другая проблема, из‑за которой отпадает необходимость перехода в требуемое состояние жизненного цикла. Щелкните элемент управления Cancel, связанный с запросом на утверждение. Появится диалоговое окно Confirm, в котором при необходимости можно ввести примечание. Нажмите Yes, чтобы выполнить отмену — запрос на утверждение будет удален.

Пример использования действия Cancel.
Лента информации об утверждении
Когда запрос утвержден, уведомление также доступно в центральной области страницы при просмотре этого запроса на утверждение. Эта информация состоит из следующих элементов:
-
Created At – дата и время, когда запрос на утверждение был утвержден.
-
Created By – участник соответствующей группы утверждения, который утвердил запрос. В этой записи используется имя пользователя (User Name).
-
Description – запись, состоящая из автоматически сгенерированного сообщения, а также любого примечания, добавленного утверждающим в момент утверждения. Автоматически сгенерированная часть описания зависит от типа утверждения:
-
Final approval (от участника единственной или последней группы утверждения) –
task approved and completed.
-
Intermediate approval (от участника группы утверждения, которая не является последней) –
task approved and assigned to next approval group <ApprovalGroupName>.
, как ее видит инициатор запроса. В данном случае переход должен был пройти два этапа утверждения (получение утверждения от участника двух разных групп утверждения).")
Пример ленты утверждения для конкретной ревизии элемента (Item Revision), как ее видит инициатор запроса. В данном случае переход должен был пройти два этапа утверждения (получение утверждения от участника двух разных групп утверждения).
Такая информация об утверждении доступна только для запросов на утверждение, которые имеют статус Approved, либо имеют статус Awaiting и были утверждены первой из нескольких связанных групп утверждения.
Эту информацию видят следующие пользователи:
-
Инициатор перехода состояния.
-
Пользователь, который дает окончательное утверждение запроса. Поэтому, когда задействовано несколько групп утверждения, эту информацию увидит только участник последней группы утверждения — тот, кто дает финальное утверждение. Участник группы утверждения, дающей промежуточное утверждение, эту ленту не увидит.
Управление видимостью и применимостью ревизии элемента (Item Revision)
При настройке каждого отдельного состояния в определении жизненного цикла вы можете задать дополнительные атрибуты состояния, которые управляют видимостью и применимостью ревизии элемента, использующей это определение жизненного цикла и входящей в данное состояние. С точки зрения применимости также можно настроить отчет о нарушениях проекта, чтобы он обнаруживал и помечал любые элементы Workspace, используемые в проекте, ревизии которых находятся в неприменимых состояниях — выявляя и предотвращая проблемы до выпуска.
Элементы управления, определяющие, является ли ревизия элемента в конкретном состоянии видимой и/или применимой, доступны в диалоговом окне State Properties dialog. Внутри диалога Edit Lifecycle Definitions откройте это окно для нужного состояния либо двойным щелчком по записи состояния в родительском определении жизненного цикла, либо выбрав запись и нажав появляющийся значок редактирования ( ).
).

Используйте атрибуты, заданные на уровне состояния, чтобы управлять видимостью и/или применимостью ревизии элемента, входящей в это состояние.
Доступны два параметра:
-
Visible in Vault panels – если этот параметр включен, ревизия элемента, использующего родительское определение жизненного цикла, будет отображаться в панели Explorer panel, когда она установлена в это состояние жизненного цикла. Если параметр отключен, ревизия будет скрыта. Скрытую ревизию можно отобразить (переопределив этот параметр) в панели Explorer, включив элемент управления Show Hidden Revisions (см. Showing Hidden Revisions).
-
Allowed to be used in designs – если этот параметр включен, ревизию элемента в этом состоянии разрешено использовать в проекте. Она считается Applicable. Если параметр отключен, ревизию элемента в этом состоянии нельзя корректно использовать, и она считается Inapplicable (или неприменимой). Она будет помечена соответствующим образом в панели Properties и в диалоговом окне Item Manager dialog (см. Flagging Inapplicable Revisions). Компилятор проекта также можно настроить на обнаружение таких случаев (см. Detecting Inapplicable Revision States on Compilation).
В панели
Components panel представлены все последние ревизии компонентов, разрешенных к использованию в проектах, даже если для этих компонентов было отключено значение параметра панели
Visible in Vault. Фильтр
LifeCycle можно использовать для поиска компонентов в определенном состоянии (или состояниях).
Отображение скрытых ревизий
Для ревизии элемента, входящей в состояние жизненного цикла, у которого атрибут Visible in Vault panels отключен, эта ревизия по умолчанию не будет отображаться в панели Explorer panel. А если это последняя ревизия элемента, то вся запись этого элемента фактически будет скрыта из вида. Это состояние видимости — заданное на уровне состояния — можно глобально переопределить для всех элементов при просмотре в панели Explorer. Чтобы отобразить все ревизии элементов, которые сейчас не видимы, нажмите элемент управления в правом верхнем углу области Items панели, затем включите параметр Show Hidden Revisions в соответствующем меню.

Отображение скрытых ревизий элементов при просмотре содержимого в панели Explorer. Наведите курсор на изображение, чтобы увидеть результат.
Пометка неприменимых ревизий
Обычно состояние жизненного цикла, которое задано как скрытое (параметр Visible in Vault panels отключен), также делают неприменимым (параметр Allowed to be used in designs тоже отключен). Например, ревизии компонента, которые сейчас Depracated или Obsolete, не должны присутствовать в актуальной итерации проекта! Скрывать ревизии элементов, вошедших в такие состояния, — это одно: если вы не видите компонент, например, вы не сможете его разместить. Но вы могли уже использовать экземпляры таких ревизий элементов в проекте или случайно разместить неприменимую ревизию компонента из‑за того, что при просмотре показывали скрытые ревизии!
Не беспокойтесь. Помимо обнаружения ревизий Component Item, находящихся в неприменимых состояниях, при компиляции (см. следующий раздел), вы можете вручную проверять применимость ревизий элементов (компонентов и управляемых листов) прямо в вашей САПР. Это делается через панель Properties при просмотре свойств элемента или с помощью Item Manager.
-
Properties panel – при использовании этой панели для просмотра свойств размещенного экземпляра ревизии компонента или управляемого листа схемы справа от записи статуса ревизии отображается индикатор. Если ревизия находится в неприменимом состоянии (не разрешена для использования в проектах), запись будет показывать Not applicable. Если ревизия находится в применимом состоянии (разрешена для использования в проектах), запись будет указывать, является ли ревизия последней (Up to date) или нет (Out of date).

Отражение неприменимости на уровне свойств для размещенного экземпляра ревизии компонента и управляемого листа схемы.
-
Item Manager – в диалоговом окне Item Manager dialog (Tools » Item Manager) индикация отображается в поле Revision Status. Если ревизия находится в неприменимом состоянии (не разрешена для использования в проектах), запись будет показывать Not applicable. Если ревизия находится в применимом состоянии (разрешена для использования в проектах), запись будет указывать, является ли ревизия последней (Up to date) или нет (Out of date).

Отражение неприменимости через диалог Item Manager для размещенного экземпляра ревизии компонента и управляемого листа схемы.
-
Используйте элементы управления, доступные в панели Properties или диалоге Item Manager, чтобы выбрать более позднюю ревизию элемента, которая is находится в применимом состоянии, или, если это невозможно (элемент в целом не предназначен для использования в проектировании), просто выберите применимую ревизию другого элемента.
-
При изменении состояния жизненного цикла ревизии элемента компонента (learn more), Altium Designer проверяет, что связанные дочерние ревизии элементов (шаблон и используемые модели) находятся в применимом состоянии для выполнения этого действия. В противном случае статус перехода состояния будет указывать, что дочерняя ревизия элемента находится в неприменимом состоянии.
Обнаружение неприменимых состояний ревизий при валидации проекта
Для размещенных экземпляров ревизий Component Item применимость состояний этих ревизий можно проверять в рамках project validation. В основе этой проверки лежит тип нарушения Component revision has inapplicable state, входящий в категорию Violations Associated with Components. Настройте режим отчетности для этой проверки на вкладке Error Reporting tab диалогового окна Project Options.
Значение
Report Mode по умолчанию для этого типа нарушения —

. Измените его в соответствии с требованиями вашего проекта.

Валидация проекта включает проверку нарушений, связанных с компонентами, находящимися в неприменимых состояниях ревизий. Нарушение возникнет, если состояние жизненного цикла размещенной ревизии Component Item задано как не допускаемое для целей проектирования.
Если ошибки и предупреждения компилятора включены для отображения на схеме (включается на странице Schematic – Compiler page диалогового окна Preferences dialog), под объектом‑нарушителем будет показана цветная волнистая линия. Уведомление также отображается в панели Messages в следующем формате:
Component <Designator> <Comment>: Component revision has inapplicable state,
где:
-
Designator — это Designator экземпляра компонента.
-
Comment — это Comment экземпляра компонента.
.")
Пример нарушения (влияние установлено как Fatal Error).
На что следует обратить внимание:
-
Если размещенный компонент теряет связь с подключенным Workspace, из которого он был размещен — например, Workspace отключен или вы вышли из своего Workspace — он будет нарушать проверку
Component revision has inapplicable state. Это будет отражено в панели Messages записью вида: Component <Designator> <Comment>: Can't perform revision status validation: Failed to connect to server.
- Вы также можете выявлять компоненты, которые некорректно используются в проекте, на этапе выпуска проекта. Просто добавьте и настройте Component State Checking в рамках общего набора проверок валидации при выпуске. Дополнительные сведения см. в разделе Validating Component Status.

 Локализовано с помощью ИИ