可以为 PCB 设计生成(以及从 PCB 设计生成)多种多样的输出,而且每种输出类型都有各自的设置。管理这大量输出的最佳方式是使用 Output Job 文件,或更常见的称呼“OutJob”。
OutJob 是一组预先配置好的输出集合。每个输出都使用其各自的设置和输出格式进行配置,例如输出到文件或输出到打印机。这些输出的设置会存储在 OutJob 文件中;该文件是一个 ASCII 文件,并会成为项目的一部分。
OutJob 非常灵活——可按需包含任意多或任意少的输出,并且一个项目中可以包含任意数量的 OutJob。最佳做法是:针对项目中要生成的每一种特定输出用途,使用一个 OutJob 来配置该用途所需的全部输出。例如,制造裸板所需的所有输出放在一个 OutJob 中,装配电路板所需的所有输出放在第二个 OutJob 中,依此类推。
OutJob 还可以包含验证类检查,例如 ERC 和 DRC 报告。这些报告适合在生成输出之前做最后的确认检查,并可作为设计已准备好发布的记录保存。
OutJob 具有可移植性,也可以在不同设计之间复用:将 Output Job 文件从一个项目复制到下一个项目,然后按需重置 Data Source。
总结来说,使用 OutJob 有以下优势:
-
所有输出都在同一位置进行配置并从同一位置生成。
-
如有需要,可将多个输出串流到同一个输出文件中——例如,原理图打印和 PCB 布局打印可以输出到同一个 PDF。
-
OutJob 可用于 Workspace 项目,从而支持对设计进行受控发布。
-
OutJob 文件可从一个项目复制到另一个项目,确保始终使用公司偏好的输出设置。
添加并定义 Outjob
OutJob 通过 OutputJob 编辑器来定义。创建新的 Output Job 文件的方法如下:
-
使用 File » New » Output Job File 命令。
-
在 Projects 面板中右键单击项目名称,并从弹出的菜单中选择 Add New to Project » Output Job File 。
当 Output Job 文件添加到项目后,会显示在 Projects 面板的 Settings\Output Job Files 子文件夹下。
创建 Workspace Outjob
你也可以利用 Workspace 托管的内容,在已连接的 Workspace 中创建 Output Job:
-
打开 Preferences 对话框中 Data Management – Templates page 的 Templates 选项卡。
-
从 Add 按钮的菜单或模板网格的右键菜单中选择 Output Job 命令。

-
选择该命令后,在打开的 Close Preferences 对话框中单击 OK,以关闭 Preferences 对话框并打开临时 OutputJob 编辑器。系统会在 Output Jobs 类型的 Workspace 文件夹中自动创建该新输出作业的计划修订版。
-
按需配置输出作业,如本页下文所述。
-
通过在主菜单中选择 File » Save to Server 命令,将输出作业保存到已连接的 Workspace。将出现 Edit Revision 对话框,你可以在其中定义要在 Workspace 中创建的输出作业的 Name 和 Description,并按需添加发布说明。
将现有本地 Output Job 保存到 Workspace
如果你已有一个输出作业文件(*.OutJob),也可以将该文件直接保存到 Workspace。流程如下:
-
在 Altium Designer 中打开该输出作业文件。
-
从主菜单选择 File » Save to Server 命令。
在保存到 Workspace 之前,必须先将文件保存到本地(File » Save)。
-
将出现 Choose Planned Item Revision 对话框。用它选择目标 Workspace Output Job,文件将保存到其下一个修订版(或处于 Planned 状态的既有修订版)中,然后单击 OK。
如果目标 Workspace Output Job 不存在,你可以在 Choose Planned Item Revision 对话框中即时创建:在对话框的修订版列表区域右键单击(或者如果该文件夹尚无任何条目,则单击 Add an item 控件),然后选择 Create Item » Outputjob 命令。若采用此方式,请务必禁用 Open for editing after creation 选项(在 Create New Item 对话框中)。否则你将进入直接编辑模式。
-
将出现 Edit Revision 对话框,你可以在其中定义 Name、Description,并按需添加发布说明。
-
单击 OK 后,文件将被保存并存储在该 Workspace Output Job 的修订版中。
如果要保存到 Workspace 的输出作业文件位于 Local Template folder(在 Preferences 对话框的 Data Management – Templates page 底部标注)中,并且在模板网格的 Local 条目下列出,则可通过右键单击它并选择 Migrate to Server 命令,将其迁移到新的 Workspace Output Job。然后在 Template migration 对话框中单击 OK 按钮以继续迁移流程——如该对话框所述,原始项目文件将被添加到本地模板文件夹中的 Zip 归档中(因此它将不会在 Local 模板列表下可见)。
编辑 Workspace Output Job
在任何阶段,你都可以回到 Workspace 中的某个 Output Job 并进行编辑。在 Preferences 对话框的 Data Management – Templates page 的 Templates 选项卡中,右键单击输出作业条目,并从右键菜单中选择 Edit 命令。临时编辑器将打开,并载入该 Workspace Output Job 最新修订版中的输出作业以供编辑。按需修改后,将输出作业保存到该 Workspace Output Job 的下一个修订版中。
将 Workspace Output Job 添加到项目
Workspace Output Job 可用于设计项目。
在 Project Options 对话框的 Managed OutputJobs tab 中选择要使用的某个 Workspace Output Job 修订版。单击  按钮——将出现 Select configuration item (Output Jobs) 对话框,列出 Workspace 中你可用的所有 Output Job 的最新修订版。选择所需的 Output Job 并单击 OK。

在 Project Options 对话框的 Managed OutputJobs 选项卡中手动选择某个 outputjob 的修订版。
Options and Controls of the Select configuration item (Output Jobs) Dialog
Grid - 可用的配置项会按 Name、Description、Item Revision 和 Revision State 列出。从列表中选择所需配置项,然后单击 OK,将所选条目添加到 Project Options 对话框的 Managed OutputJobs tab 中。
右键菜单
按需继续添加不同 Output Job 的更多修订版。单击 OK 退出 Project Options 对话框后,所选 outputjob 将显示在 Projects 面板中。Workspace OutputJob 在 Projects 面板中会以  图标加以区分。

已添加的 outputjob 修订版也会反映在 Projects 面板中。
Using a Workspace Output Job as Part of an Environment Configuration
Workspace Output Job 也可以作为一个或多个已定义 Environment Configurations 中的配置数据项使用。环境配置用于约束设计人员的工作环境,使其只能使用公司认可的设计元素。环境配置在 Team Configuration Center 中定义并存储——该服务通过 Workspace 提供。
一旦你已连接到 Workspace,并从可用的环境配置中进行选择(如适用),Altium Designer 将会针对 Output Job Configurations 的使用方式完成配置。如果所选环境配置定义了一个或多个 outputjob 修订版,那么 only 这些已定义的配置即可使用。如果适用于你的所选环境配置未指定/添加任何 outputjob 修订版,那么这些仍将保持为可手动定义。换句话说,你可以自由地手动复用基于 Workspace 的 Output Job Configuration 和/或使用本地模板。更多信息请参见 Environment Configuration Management(Altium 365 Workspace、Enterprise Server Workspace)。
在环境配置的强制约束下,Altium Designer 将在以下方面针对 Output Jobs 的使用进行配置。
当将 Workspace Output Job 添加到项目并打开时,OutputJob 编辑器会反映该文件是一个 Managed OutputJob Document,并指示 Item Revision、其描述,以及该 Output Job 所在的父级 Workspace。

查看 Workspace Output Job 时的 Output Job Editor。
对于 Workspace Output Job,任何原本会以某种方式影响其修改的控件都会被禁用。因此,以下能力将 ARE NOT 不可用:
-
添加新的 Output Generators。
-
配置现有的 Output Generators。
-
对现有 Output Generator 进行剪切、复制、粘贴、重复或删除。
-
添加新的 Output Containers 或 Hard Copy Jobs。
-
配置现有 Output Container 或 Hard Copy Job。
-
对现有 Output Containers 或 Hard Copy Jobs 进行剪切、复制、粘贴或删除。
-
切换某个 Output Generator 相对于有效 Output Container 或 Hard Copy Job 的包含状态。
不过,你仍然可以为 OutJob 确定 variant 的使用方式。
在编辑器主
Outputs 区域内任意位置右键单击,然后从上下文菜单中选择
Document Options。将打开
![]() Document Options dialog
Document Options dialog,提供关于所选 OutputJob 文件的信息:正在使用 Outputjob Item 的哪个修订版、其生命周期状态,以及它是否为最新修订版。同时还会显示该 OutputJob 所在的源 Workspace 。单击
Show in Explorer 按钮以访问
Explorer 面板,并加载相应的 Outputjob 修订版以备使用。
OutJob 的元素
配置 OutJob 有三个步骤:

OutJob 的组成元素,均在 OutputJob Editor 中定义和管理。
-
Add and configure the required outputs – 输出会被归类到功能类别中,例如 Assembly Outputs、Fabrication Outputs 和 Report Outputs。严格来说,输出是通过运行关联的 Output Generator 来获得的,该过程会进行适当配置,并使用项目中的指定文档(或项目本身)作为其数据源。
-
Add and configure the required output formats – 生成任意给定的输出类型,都需要将该输出映射到相应(且适用)的输出格式。这可以是受支持的 Output Containers(PDF、Folder Structure、Video)之一,或 Hard Copy(基于打印的输出)。多个输出可以映射到同一个 container 或 hard copy,并且用户可以控制输出生成的位置与方式(与 container/hard copy 相关的任何介质选项)。
-
Set the variant choice – Altium Designer 允许使用基础(非变体)设计来驱动 PCB 项目的输出,或指定使用该设计的某个已定义 variant。你可以为每个适用输出选择一个 variant,或选择一个单一 variant 应用于文件中所有适用输出。
向 OutJob 添加输出
通过单击某个类别底部的相应 Add New [type] Output 文本,然后从弹出菜单中选择所需输出类型,即可添加所需类型的新输出。或者,从主 Edit menu 中选择相关命令条目。
通过选择合适的 Data Source 来添加每个所需输出。对于项目中具备相应源数据的输出类型,将显示为可用;其他输出类型将显示为不可用(灰显)。
还提供了第二个菜单,用于指定 Data Source,即在生成输出时要使用哪些源文档。每种输出仅提供适用的数据源,从而减少出错空间。
Data Source 取决于具体输出。与 PCB 相关的输出(如 PCB Prints、Gerber Files 和 Testpoint Reports)将使用 PCB 设计文档作为 Data Source。BOM 的 Data Source 可以是单个特定的源原理图文档、PCB 设计文档,或所有源原理图文档。最后一种由 [Project] 条目表示。
在添加输出之后的任何阶段都可以更改 Data Source。单击当前 Data Source,会出现下拉箭头;从列表中选择替代来源即可。
对于某些输出,Data Source 列表将包含 [Project Physical Documents]。当物理设计(将在板上实现的设计)必须与逻辑设计(原始原理图)采用不同的标注方式时,请使用此选项。如果设计包含 Device Sheets ,或使用了 多通道能力并且更偏好简单的扁平标注方案,则需要这样做。
术语 “Project Physical Documents” 指的是原理图的物理 或编译视图。
在为 Schematic Prints 输出设置 Data Source 时,All SCH Documents 对应于打印项目中所有逻辑原理图的集合(每张原理图未经编译的原始 “Editor” 视图)。要打印项目中所有物理原理图的集合 (每张原理图的编译文档视图),请务必将 Data Source 设置为 [Project Physical Documents]。
要构建输出列表,你还可以使用 Edit 主菜单(或 Help » Right Mouse Click Output Medium 子菜单或 Job Manager Toolbar 工具栏)中的 Cut、Copy、Paste、Duplicate 和 Delete 命令,或使用 Outputs 区域的右键菜单(可使用标准多选控制选择多个输出:Ctrl+click、 Shift+click)。
请注意,软件在 OutputJob 文档中进行常规剪切/复制操作时不会使用 Windows 剪贴板。相反,会为该文档类型维护一个独立的内部剪贴板。此外,OutputJob 的内部剪贴板与软件中其他任何编辑器使用的内部剪贴板完全独立。你只能在 OutputJob 文档之间或文档内部进行剪切/复制与粘贴。
最大化可复用性——让你的 Output Job 更通用
在配置输出时提供了多项创新功能,可使最终的 Output Job Configuration 尽可能通用。保持 OutJob 的通用性,可以有效最大化其在未来设计项目中的复用能力。
Generic Data Source Names
许多 output generator 使用一个具有特定名称的底层文档作为其源,从中生成相应的输出数据——例如,从 PCB 文档 FluxTriangulator.PcbDoc 生成 Gerber 文件。然而,这样会将 Output Job Configuration 锁定为仅对该文档所属的设计项目有用。为保持非特定性,许多 output generator 都提供了一个可选的通用底层 Data Source 条目。下表汇总了支持的 output generator 以及可用的通用条目(一个或多个)。
| 类别 |
输出类型 |
通用数据源条目 |
| 网表输出 |
全部 |
[Project] |
| 仿真器输出 |
混合仿真
SIMetrix
SIMPLIS |
[Project] |
| 文档输出 |
复合
PCB 3D 打印
PCB 3D 视频
PCB 打印
PDF3D |
[PCB Document] |
| |
PDF3D MBA |
[MBA Document] |
| |
原理图打印 |
[Project Physical Documents] |
| 装配输出 |
全部 |
[PCB Document] |
| 制造输出 |
全部 |
[PCB Document] |
| 报表输出 |
物料清单 |
[Project]
[ActiveBOM Document] |
| |
元件交叉引用
导出注释
生成项目层次结构报表
生成单引脚网络报表 |
[Project] |
| 验证输出 |
BOM 检查 |
[ActiveBOM Document] |
| |
元件状态
配置符合性
电气规则检查
|
[Project] |
| |
设计规则检查
差异报表
封装对比报表 |
[PCB Document] |
| 导出输出 |
Ansoft Neutral (AutoPCB)
Ansys EDB
AutoCAD dwg/dxf PCB
导出 IDF
导出 PARASOLID
导出 STEP
导出 VRML
Hyperlynx (AutoPCB)
MathWorks (AutoPCB)
P-CAD ASCII (AutoPCB)
另存为/导出 PCB
Specctra Design PCB |
[PCB Document] |
| |
MBA 导出 PARASOLID
MBA 导出 STEP |
[MBA Document] |
| |
AutoCAD dwg/dxf 原理图
OrCAD v7 Capture Design (AutoSCH)
P-CAD V16 Schematic Design (AutoSCH)
另存为/导出原理图 |
[Project] |
| 后处理输出 |
复制文件 |
[Project] |
Layer Classes
你可以为以下输出生成器的配置添加命名的层类:
-
PCB 打印
-
装配图
-
钻孔图
-
最终
-
Gerber 文件
-
阻焊层集合
-
电源平面层集合
这使这些输出生成器可以通用复用。例如,添加一个名为“signal layers(信号层)”的类,并在 OutJob 中引用它——任何具有“signal layers”类的设计都可以无需修改就使用该输出生成器。
配置输出
根据具体的输出类型,可能会提供用于配置相关输出生成器的选项,从而对生成的输出提供更多控制。若存在配置选项,可通过以下方式之一访问:
-
在所需输出对应的行内直接双击。
-
右键单击所需输出,然后从右键菜单中选择 Configure 。
-
选中所需输出,然后使用键盘快捷键 Alt+Enter。
-
选中所需输出,然后选择 Edit » Configure 命令。
如果选择了多个输出,将显示最后选中(当前聚焦)的输出所对应的配置对话框。
启动该命令后,将显示相应的配置对话框。使用该对话框为你希望生成的特定输出文件定义设置选项。所定义的任何选项都会在下次生成该输出时使用。

不同的输出生成器具有各自独特的对话框,用于精确配置生成内容。
对话框的类型(甚至是否会出现配置对话框)取决于你选择的输出。对于直接生成数据的输出,使用该命令时不会出现对话框(例如生成设计规则检查验证报表)。
对于可用于生成硬拷贝(即发送到打印设备的打印输出)的输出,也可以访问用于定义页面属性的对话框。可通过右键单击该输出并从右键菜单中选择
Page Setup,或选中该输出后使用
File » Page Setup 命令。
可用的输出类型
下面汇总了可用的输出类型。在适用的情况下,包含指向相关文档的链接,用于说明如何配置特定输出。
Netlist Outputs
网表描述了设计中元件之间的逻辑连接关系,可用于将设计传输到其他设计平台。提供了多种网表格式。
Simulator Outputs
SPICE 网表是电路的文本表示。要将网表输出添加到当前的 OutputJob 文件中,请从 Edit » Add Simulator Outputs 子菜单中选择命令,或使用主作业配置窗口中 Simulator Outputs 区域底部的 [Add New Simulator Output] 控件所关联的菜单。
Documentation Outputs
-
PCB 打印 - 可配置任意数量的打印输出(页面),并可任意组合层与图元显示;用于创建装配图等打印输出。
-
PCB 3D 打印 - 从三维视角查看电路板的视图。
-
PCB 3D 视频 - 基于 PCB 编辑器 PCB 3D Movie Editor 面板中定义的一系列 3D 关键帧,输出电路板的简单视频。
-
PDF 3D - 生成电路板的 3D PDF 视图,在 Adobe Acrobat® 中完整支持缩放、平移和旋转。PDF 包含模型树,可控制网络、元件和丝印的显示。
-
原理图打印 - 设计中使用的原理图图纸。
-
Draftsman - 添加到项目中的 Draftsman 图纸。
Assembly Outputs
Fabrication Outputs
Report Outputs
可为项目或其某个文档准备多种报表,例如 BOM、项目层次结构报表以及项目注释 PDF。
-
物料清单 – 以多种格式创建制造电路板所需的零件与数量(BOM)清单。
-
元件交叉引用报表 – 基于设计中的原理图图纸创建元件清单。
-
报告项目层次结构(Report Project Hierarchy)– 创建项目中使用的源文档列表。
-
报告单引脚网络(Report Single Pin Nets)– 创建一份报告,列出仅有一个连接的所有网络。
请参阅 Preparing Reports 页面以了解更多信息。
Validation Outputs
软件包含多种验证检查,在生成输出时可将其作为输出包含在内。每项检查都会生成一个 HTML 报告文件。
请注意,这些验证报告的设置保存在 OutputJob 中。当你在软件的其他位置配置某项验证检查时,其设置会随对应文件保存——例如,项目错误检查的设置存储在项目文件中,PCB DRC 设置存储在 PCB 文件中。
Export Outputs
PostProcess Outputs
定义输出格式
为 OutJob 添加并配置输出,用于定义要生成的what内容以及how生成方式。需要定义where 生成的输出要写入到哪里,即输出要以何种格式生成。根据所生成输出的类型,这通过组合使用 Output Containers 和 Hard Copy 来实现。
输出容器
输出(在适用时)可以写入三种类型的输出容器——PDF、特定格式的输出文件(例如 Gerber 文件) 或视频。
新建 OutJob 默认会包含每种类型各一个容器 ,名称分别为 PDF、Folder Structure 和 Video。可通过点击 [Add New Output Container] 或从 Edit » Add Output Medium 子菜单添加任意数量的此类附加容器,并且可以编辑名称以便于识别。
也可以从一个或多个选中的适用输出创建新的输出容器:将所选内容拖放到 Output Containers 或 Hard Copy 区域中——放到远离现有、已定义输出容器的位置。输出将自动建立链接。
要形成输出容器列表,你也可以使用主菜单的 Help » Right Mouse Click Output Medium 子菜单 或在 Output Containers 或 Hard Copy 区域的右键菜单中的 Cut、Copy、Paste 和 Delete 命令。
使用 Paste As 命令, 可以基于当前位于 Output Job Editor 剪贴板上的内容创建新的输出容器。仅当剪贴板内容兼容时这些命令才可用——例如,只有复制的打印作业、PDF 输出容器、Folder Structure 输出容器(如果其关联输出可生成 PDF)、或可生成 PDF 的已复制输出,才能作为新的 PDF 输出容器粘贴。
请注意,软件在 OutputJob 文档中进行常规剪切/复制/粘贴操作时不会使用 Windows 剪贴板。相反,会为此文档类型维护一个独立的内部剪贴板。此外,OutputJob 的内部剪贴板与软件中其他任何编辑器使用的内部剪贴板完全独立。你只能在 OutputJob 文档之间或文档内部进行剪切/复制/粘贴。

输出容器用于“接收”生成的输出。
配置容器
单击 某个容器以访问附加控件,包括配置该容器的能力。单击所需容器后, 点击 Change 链接以访问与该容器类型对应的 Settings 对话框:
-
对于 PDF 输出容器,将显示 PDF Settings 对话框。

Advanced 和 Basic 版本的 PDF Settings 对话框
Options and Controls of the PDF Settings Dialog
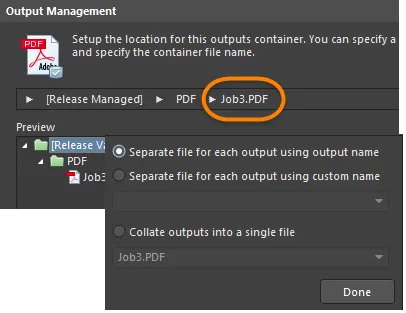
输出管理
使用此区域 设置该输出容器的位置。你可以指定路径、包含与容器相关的容器文件夹,并指定容器的文件名。
你可以通过拖动右下角来水平调整下方所述窗口的大小。
-
Release Managed - 单击 以打开弹出窗口,在其中可指定文件夹管理。
-
Release Managed - 选择以使 PDF 可用于 PCB 发布系统。
-
Manually Managed - 选择以将 PDF 设置为手动管理并存储在本地文件夹中。默认情况下,这将是项目选项对话框的 Options 选项卡中 Output Path 字段所指定的路径。
-
File Location textbox - 单击文件浏览按钮以浏览并选择 PDF 的目标文件夹。仅当选择了 Manually Managed 时此选项可用。
-
Use relative path - 启用此选项以在 File Location textbox 中使用相对路径。 仅当选择了 Manually Managed 时此选项可用。
-
Done - 单击以完成配置。
-
None - 单击以打开弹出窗口,在其中可配置 PDF 的容器文件夹。
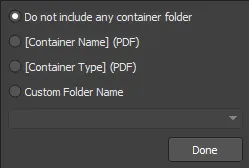
-
Do not include any container folder - 选择不包含容器文件夹。
-
[Container Name] (PDF) - 选择 使用容器名称作为容器文件夹名称。
-
[Container Type] (PDF) - 选择使用容器类型作为容器文件夹类型。
-
Custom Folder Name - 选择自定义文件夹名称。单击下拉箭头打开 下拉列表,从中可选择文件夹的命名字符串。你也可以直接在文本框中输入文件夹名称。
-
Done - 单击 以完成配置。
-
[Filename].pdf - 单击 以打开弹出窗口,在其中可配置 PDF 输出。
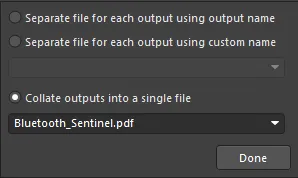
-
Separate file for each output using output name - 选择使用指定的输出名称为每个输出创建单独文件。
-
Separate file for each output using custom name - 选择使用下方文本框中指定的自定义名称为每个输出创建单独文件。单击下拉箭头打开 下拉列表,从中可选择命名字符串。你也可以直接在文本框中输入自定义名称。
-
Collate outputs into a single file - 选择将输出整理合并到单个文件中。 单击下拉箭头打开 下拉列表,从中可选择文件的命名字符串。你也可以直接在文本框中输入自定义名称。
-
Done - 单击以完成配置。
-
Preview - 此区域显示 PDF 位置的预览。随着在上述弹出对话框中进行更改,预览窗口会更新,以便你能立即看到更改如何影响 文件夹结构。
高级版本命令
-
Zoom - 使用滑块条控制缩放级别(Far 到 Close) 在跳转到元件或网络时。
-
Page Size And Orientation - 使用这些设置来控制页面大小和方向是从 Page Setup dialog 配置,还是从源文档获取。
-
Schematic Page Size and Orientation Source - 从下拉列表中选择 Page Setup Dialog 或 Source Document,以指定原理图文档要使用的页面大小和方向设置。
-
PCB Page Size and Orientation Source - 从下拉列表中选择 Page Setup Dialog 或 Source Document,以指定 PCB 文档要使用的页面大小和方向设置。
-
Output Options
-
Additional Bookmarks
-
Generate nets information - 启用后在 PDF 文件中包含网络信息。启用该选项后可用以下选项:
-
Pins - 启用后在 PDF 文件中为引脚添加书签。
-
Net Labels - 启用后在 PDF 文件中为网络标号添加书签。
-
Ports - 启用后在 PDF 文件中为端口添加书签。
-
Global Bookmarks for Components and Nets - 启用后在 PDF 文件中为所有元件和网络创建书签。
附加控件
-
Advanced/Basic - 单击以在对话框的 Advanced 与 Basic 版本之间切换。
-
对于 Folder Structure 输出容器,将显示 Folder Structure Settings 对话框。

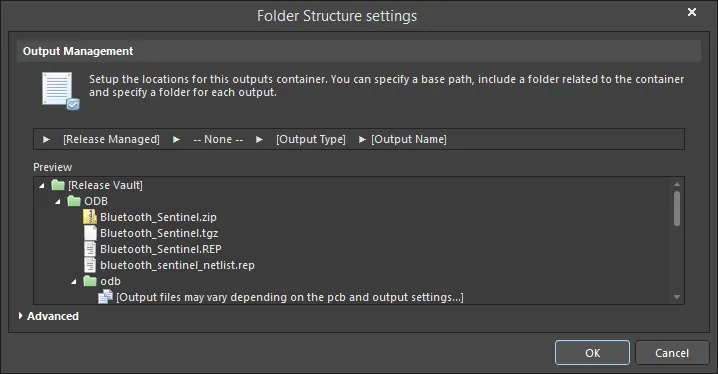
Advanced 与 Basic 版本的 Folder Structure settings 对话框
Options and Controls of the Folder Structure Settings Dialog
输出管理
使用此区域设置该输出容器的位置。你可以指定基础路径、包含与容器相关的文件夹,并指定容器的文件名。
-
Release Managed - 单击以打开弹出窗口,在其中可指定文件夹管理。
-
Release Managed - 选择以使该文件可用于 PCB 发布系统。
-
Manually Managed - 选择以将文件设置为手动管理并存储在本地文件夹中。默认情况下,这将是 Project Options 对话框的 Options 选项卡中 Output Path 字段所指定的路径。
-
File Location textbox - 单击文件夹图标以浏览并选择该文件的目标文件夹。仅当选择了 Manually Managed 时此选项可用。
-
Use relative path - 启用此选项以在 File Location textbox 中使用相对路径。 仅当选择了 Manually Managed 时此选项可用。
-
Done - 单击以完成配置。
-
None - 单击以打开弹出窗口,在其中可配置容器文件夹。
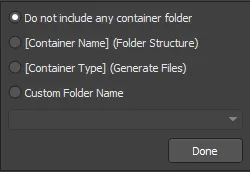
-
Do not include any container folder - 选择不包含容器文件夹。
-
[Container Name] (Folder Structure) - 选择使用 Folder Structure 作为文件夹名称。
-
[Container Type] (Generated Files) - 选择使用 Generated Files 作为文件夹类型。
-
Custom Folder Name - 选择自定义文件夹名称。单击下拉箭头打开列表,从中可选择文件夹的命名字符串。也可以直接在文本框中输入文件夹名称。
-
Done - 单击以完成配置。
-
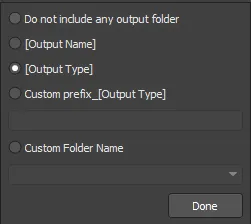
Output Type - 单击以打开弹出窗口来配置输出文件夹。

-
Do not include any output folder - 选择不包含输出文件夹。
-
Output Name - 选择使用输出名称作为输出文件夹名称。
-
Output Type - 选择使用输出类型。
-
Custom prefix_[Output Type] - 选择在文本框中指定自定义前缀。
-
Custom Folder Name - 选择自定义文件夹名称。单击下拉箭头打开列表,从中可选择命名字符串。也可以直接在文本框中输入自定义名称。
-
Done - 单击以完成配置。
-
Output Name - 单击以打开弹出窗口,在其中可配置输出文件名。
-
Use standard output file name - 选择使用标准输出文件名。
-
Use custom output file name - 选择使用自定义输出文件名。 单击下拉箭头打开列表,从中可选择命名字符串。也可以直接在文本框中输入自定义名称。
-
Done - 单击以完成配置。
-
Preview - 此区域显示文件夹结构的预览。 当在上述弹出对话框中进行更改时,预览窗口会更新,以便你能立即看到更改对文件夹结构的影响。
高级版本命令
输出选项
-
Open generated outputs - 启用后在生成后打开输出。
-
Add generated files to project - 启用后将生成的文件添加到项目中。这些文件将显示在 Projects panel 面板的 Generated 子文件夹下。
-
Use the Output Name as the file name instead of the default - 启用后使用指定的输出名称而非默认名称。
-
Timestamp folder - 启用后创建时间戳文件夹。日期和时间将采用与你的系统设置相同的格式。
CAMtastic 自动加载选项
如果你希望将相关输出自动加载到 CAMtastic 中,请启用以下输出类型。每当执行批量生成时,已启用的输出类型将自动加载到一个新的 CAMtastic 文档中。
-
ODB++ Output
-
Gerber Output
-
NC Drill Output
-
IPC-356-D Output
一旦定义了上述选项,它们将保持生效。这意味着下次运行 Output Generators 时,生成的输出将被加载到另一个新的 CAM Editor 文档中。如果你希望仅更新现有 CAM 文档,请启用
Reset auto-load options after generation 选项。这样会在首次生成后清除(禁用)所有自动加载选项。随后你可以访问 CAM Editor 的
Rescan 与
Reload 命令(位于
CAMtastic panel 中;当
*.Cam 文档处于活动状态时该面板可用),这些命令会对生成文件与现有(已导入)文件进行时间戳比较,并将数据加载到现有层中。
-
Reset auto-load option after generation - 启用后在生成输出后重置自动加载选项。
高级/基础
单击以在对话框的 Advanced 与 Basic 版本之间切换。
-
对于 Video 输出容器,将显示 Video Settings 对话框。

Advanced 与 Basic 版本的 Video settings 对话框
Options and Controls of the Video Settings Dialog
输出管理
使用此区域设置该输出容器的位置。你可以指定基础路径;包含与容器相关的文件夹,然后指定容器的文件名。
-
Release Managed - 单击以打开一个弹出窗口,在其中可指定文件夹管理方式。
-
Release Managed - 选择此项可使视频可用于 PCB 发布系统。
-
Manually Managed - 选择此项可将视频设置为手动管理并存储在本地文件夹中。默认情况下,该路径为在“项目选项”对话框的 Options 选项卡上的 Output Path 字段中指定的路径。
-
File location field - 单击浏览图标以浏览并选择视频的目标文件夹。仅当选择了 Manually Managed 时,此选项才可用。
-
Use relative path - 启用此选项可在 File Location textbox 中使用相对路径。 仅当选择了 Manually Managed 时,此选项才可用。
-
Done - 单击以完成配置。
-
None - 单击以打开一个弹出窗口,在其中可配置容器文件夹。
-
Do not include any container folder - 选择此项表示不包含容器文件夹。
-
[Container Name] (Video) - 选择此项以使用 Video 作为文件夹名称。
-
[Container Type] (Multimedia) - 选择此项以使用 Multimedia 作为文件夹类型。
-
Custom Folder Name - 选择此项以自定义文件夹名称。单击下拉箭头打开列表,从中可选择用于文件夹的命名字符串。也可以直接在文本框中输入文件夹名称。
-
Done - 单击以完成配置。
-
Output Type - 单击以打开一个弹出窗口来配置输出文件夹。
-
Do not include any output folder - 选择此项表示不包含输出文件夹。
-
Output Name - 选择此项以使用输出名称作为输出文件夹名称。
-
Output Type - 选择此项以使用输出类型。
-
Custom prefix_[Output Type] - 选择此项以在文本框中指定自定义前缀。
-
Custom Folder Name - 选择此项以自定义文件夹名称。单击下拉箭头打开列表,从中可选择命名字符串。也可以直接在文本框中输入自定义名称。
-
Done - 单击以完成配置。
-
Separate file for each output - 单击以打开一个弹出窗口,用于指定输出文件的配置方式。

-
Separate file for each output using output name - 选择此项可为每个视频使用指定的输出名称创建单独的文件。
-
Separate file for each output using custom name - 选择此项可为每个视频使用自定义名称创建单独的文件。 单击下拉箭头打开列表,从中可选择命名字符串。也可以直接在文本框中输入自定义名称。
-
Collate outputs into a single file - 选择此项可将输出合并为单个文件。 单击下拉箭头打开列表,从中可选择用于该文件的命名字符串。也可以直接在文本框中输入文件名。
-
Done - 单击以完成配置。
Preview - 此区域显示文件夹预览。 当在上述弹出对话框中进行更改时,预览窗口会更新,以便你能立即看到更改对文件夹结构的影响。
高级版本命令
媒体设置
-
Type - 从下拉列表中选择媒体类型:
-
Video (FFmpeg)
-
Video (Windows Multimedia)
-
Video (Windows Media Format)
对于所有视频类型/格式,导出的视频将使用默认帧率 25 帧/秒生成。对于 Windows Multimedia 视频,默认使用的像素格式为 32。对于 FFmpeg 视频(所有格式),像素格式不可编辑,并设置为 Planar YUV 4:2:0, 12bpp, (1 Cr & Cb sample per 2x2 Y samples)。Windows Media 格式的视频未定义像素格式。
下表汇总了当前支持的视频类型和格式:
Video Type
|
Supported File Format(s)
|
Video (FFmpeg)
|
3GP2 (*.3g2)
ASF (*.asf, *.wmv, *.wma)
ASF-Streaming (*.asf, *.wmv, *.wma)
AVI (*.avi)
Flash (*.swf)
FLV (*.flv)
MOV (*.mov)
MP4 (*.mp4)
|
Video (Windows Multimedia)
|
Windows Video file (*.avi)
|
Video (Windows Media Format)
|
Windows Media file (*.wmv, *.wma, *.asf)
|
-
Format - 从下拉列表中选择媒体格式。仅当 Video (FFmpeg) 被选为 Type 时,此选项才可用。
-
Video Pixels - 使用向上/向下箭头(或直接在文本框中输入数字)选择所需的视频像素。
输出选项
-
Open after export - 启用此选项可在导出后打开视频。
-
Prompt if file already exists - 启用此选项可在文件已存在时显示提示。
高级设置
-
Video Codec - 从下拉列表中选择一个选项。仅当 Video (FFmpeg) 或 Video (Windows Media Format) 被选为 Type 时,此选项才可用。 下表根据所选视频类型/格式汇总了可用的编解码器(Codec)。
视频类型/格式
|
支持的编解码器
|
FFmpeg / 3GP2
|
H.263 / H.263-1996
|
FFmpeg / ASF
|
MPEG-4 part 2 Microsoft variant version 2
MPEG-4 part 2 Microsoft variant version 3
raw video
Windows Media Video 7
Windows Media Video 8
|
FFmpeg / ASF-Streaming
|
MPEG-4 part 2 Microsoft variant version 2
MPEG-4 part 2 Microsoft variant version 3
raw video
Windows Media Video 7
Windows Media Video 8
|
FFmpeg / AVI
|
MPEG-4 part 2
MPEG-4 part 2 Microsoft variant version 2
raw video
|
FFmpeg / Flash
|
Flash Video (FLV) / Sorenson Spark / Sorenson H.263
|
FFmpeg / FLV
|
Flash Video (FLV) / Sorenson Spark / Sorenson H.263
|
FFmpeg / MOV
|
MPEG-4 part 2
|
FFmpeg / MP4
|
MPEG-4 part 2
|
Windows Multimedia
|
cvid Cinepak Codec
MSVC MS-CRAM
tscc TSCC
|
Windows Media
|
Windows Media Video V7
Windows Media Video 9 Screen
Windows Media Video 9
Windows Media Video V8
Windows Media Video 9 Advanced Profile
|
-
Compression - 从下拉列表中选择所需的压缩设置。 仅当 Video (Windows Multimedia) 被选为 Type 时,此选项才可用。
-
Pixel Format - 使用下拉列表选择所需的视频像素格式。仅当 Video (Windows Multimedia) 被选为 Type 时,此选项才可用。
-
Frames Per Second - 输入视频所需的帧率(每秒帧数)。默认值为 25。
-
Quality - 使用滑块指定视频质量,从最低到最高。
高级/基础
单击以在对话框的 Advanced 版本与 Basic 版本之间切换。
也可以通过以下方式访问 Settings 对话框:
-
双击容器条目;
-
选择容器条目,右键单击,然后选择 Properties 命令;
-
选择容器条目,并从主菜单中选择 Tools » Container Setup 命令;
-
选择容器条目并使用 Ctrl+Shift+O 快捷方式。
Settings 对话框初始以 Basic 模式打开,用于配置输出位置,即将创建容器的位置。要访问与在容器中生成输出相关的更多高级选项,请单击对话框底部的 Advanced 按钮。

访问该容器的 Settings 对话框,并按需进行配置。在 Basic 模式下,使用该对话框定义容器的输出位置。

当对话框处于 Advanced 模式时,可使用更详细的选项。
可以重命名输出容器——单击一次以选中输出容器,稍作停顿,然后再次单击以编辑名称。
输出位置
输出位置(即将创建容器的位置)在容器设置对话框的 Output Management 区域中指定。该位置由多个阶段组成,每个阶段都可通过单击该阶段来打开相应的弹出窗口进行定义。
-
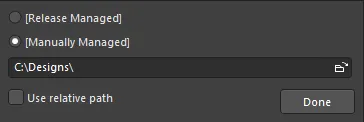
Base Path – 此阶段用于定义输出容器的“根”路径。

用于定义输出位置基路径的选项。
默认设置为 [Release Managed],这意味着在 Project Releaser 中执行的 Board Design Release 过程将自动处理基路径。
可通过将此阶段切换为 [Manually Managed] 并相应指定路径来定义本地输出路径(该路径可相对于设计项目)。
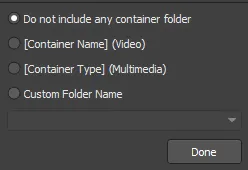
-
Container Type Folder – 此阶段用于根据正在生成的媒体容器类型定义一个子文件夹。是否使用这个额外的“总括”文件夹完全可选。若使用,可由系统命名(使用容器名称或类型),也可按需指定自定义名称。

用于为输出位置定义容器子文件夹的选项。
-
Output Folder / Output Filename– 此阶段的功能取决于要为其指定输出位置的输出容器类型。对于 PDF 或 Video 容器类型,此阶段需要输入所需的文件名。默认情况下,生成到该容器中的多个输出会被汇总到单个文件中,但如果需要,你也可以选择为每个输出生成一个单独的文件。
如果为每个输出生成单独文件,则会额外提供“将每个文件放入其各自子文件夹”的选项。启用后,文件夹可根据输出名称或类型 自动命名,或使用特定前缀进行自定义。

用于定义文件名及可选子文件夹的选项。
对于 Folder Structure 容器类型,此阶段用于为每种生成的输出类型指定一个文件夹。同样,文件夹可根据输出名称或类型 自动命名,或使用特定前缀进行自定义。随着对输出位置任一阶段的更改,对话框的预览窗口会动态更新,使你能够快速锁定偏好的输出文件夹结构。对于每个已定义的容器,其路径——包括基于服务器的(Release Managed)和本地的(Manually Managed)——都会显示在 OutJob 的主 Output Containers 区域中,便于快速参考。
拼接元素的规则
用户自定义的输出名称通过拼接(连接)所需元素来构建。拼接过程遵循以下规则:
| 元素 |
功能 |
示例 |
返回 |
| =(等号) |
表示后续字符串是必须被解释的表达式。 |
=ProjectName |
DB31 以示例工程 DB31.PrjPcb 为例 |
| +(加号) |
用于拼接输出名称中所需的元素。 |
=ProjectName + '-' + ProjectRevision + '.PDF' |
DB31-07.PDF 以示例工程 DB31.PrjPcb 为例 |
| ' '(单引号) |
用于在输出名称中的任意位置插入固定字符串。非法字符见下文。 |
='AcmeEngineering' +_+ ProjectName + '.PDF' |
AcmeEngineering_DB31.PDF 以示例工程 DB31.PrjPcb 为例
|
非法字符与语法错误
以下字符不允许出现在用户自定义输出名称中:
< > : " \ | ? *
如果表达式存在语法错误,例如引号不成对(如 =ProjectName+.PDF' 而不是 =ProjectName+'.PDF'),将得到结果 #NAME。看到这种情况时,请仔细检查是否缺少引号,或是否存在无效/错误输入的特殊字符串。
支持的 参数
支持用户自定义的项目级参数和变体参数。项目参数在 Parameters 选项卡中定义,该选项卡位于 Project Options 对话框(Project » Project Options)内。变体参数可在 Variant Management dialog 或 Variant Manager(Project » Variants)中为每个变体定义。
参数名不能包含空格。例如,可以使用参数 PartNumber ,但不能使用参数 Part Number 。
支持的特殊字符串
在 Altium Designer 中,“Special Strings”用于定义可被解释的字符串。多数此类字符串可通过在屏幕上放置一个值为 =SpecialStringName 的文本字符串来进行解释,例如 =CurrentDate。它们在生成输出时始终会被解释。
当前支持、可用于输出文件名的 Special Strings 包括:
| 特殊字符串 |
返回 |
| CurrentDate |
从操作系统获取的当前日期,采用 ISO 8601 格式 yyyy-mm-dd。示例: 2016-01-25 |
| CurrentTime |
从操作系统获取的当前时间,格式为 hh_mm。示例: 14_55。 |
| DataSource |
在 Output Job 文件中用于此输出的 Data Source。 |
| OutputName |
在 Output Job 文件中该输出的用户自定义名称。仅当在输出文件命名设置中选择了 Separate File for Each Output 选项时才生效。 |
| ProjectName |
显示项目的实际名称(不含扩展名)。 |
| VariantName |
在 Variant Management dialog 或 Variant Manager 中为该项目定义的装配变体名称。使用的值取决于 Output Job 中为正在定义文件名的那个输出所选择的 Variant。 |
| ProjectParameterName |
名为 <ProjectParameterName> 的项目参数值。 |
| VariantParameterName |
名为 <VariantParameterName> 的变体参数值。
|
汇总输出文件的命名
对于汇总输出文件,只能使用那些不限定于特定输出的特殊字符串。例如,OutputName 不能用于汇总输出文件,因为它对应 Output Job 文件中的某个特定输出。VariantName 和 DataSource 也不能使用。在汇总输出文件中使用这些特殊字符串之一,会导致实际字符串被直接用作文件名。
如果表达式无法被解析,请保存并关闭,然后重新打开 Output Job 文件,以刷新表达式分析引擎。
硬拷贝 - 打印任务
某些输出(包括原理图打印、装配图和 BOM)也可以作为硬拷贝直接发送到打印设备。要确定此类硬拷贝如何处理,需要添加并配置一个 Print Job。
新建 OutJob 默认会包含一个名为 Print Job 的 Print Job,并以运行 Altium Designer 的计算机上所关联的默认打印机为目标。可通过点击 [Add New Print Job] 文本或从 Edit » Add Print Job 子菜单添加任意数量的额外 Print Jobs,并可编辑其名称以便识别(例如与该任务关联的打印设备名称)。
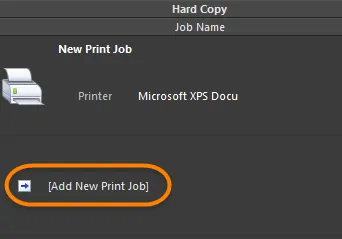
Print jobs 用于处理基于打印的输出或“硬拷贝”。
配置 Print Job
点击某个 Print Job 可访问更多控件,包括配置该任务的能力。为此,点击 Change 链接以打开与该任务对应的 Printer Configuration 对话框。也可以通过双击 Print Job 条目,或选中后右键并选择 Properties 命令来打开 Printer Configuration 对话框。

访问 Printer Configuration 对话框,根据需要配置 Print Job。
在 Printer Configuration 对话框中,点击 Properties 按钮以打开目标打印机的标准 Properties 对话框。在该对话框中,定义纸张来源与布局,并访问打印机的高级属性设置。
将输出关联到输出容器与 Print Jobs
在 OutJob 的输出已添加并配置完成,且所需的 Output Containers 与 Print Jobs 已定义后,需要对它们进行映射,即指定哪些输出使用哪个容器和/或打印任务来生成。
每个输出都有一个关联的 Enabled 字段。该字段用于控制某个输出是否被包含(启用选项)或排除(禁用选项)在所选的 Output Container 或 Print Job 中。
仅当所选容器支持生成该输出,或所选打印设备支持打印该输出时,Enabled 字段才可用。
你也可以通过右键点击所选输出中的某个输出,或在所需输出类别中右键点击某个输出,然后从上下文菜单选择 Enable Selected (快捷键: Ctrl+Num +)/Disable Selected (快捷键: Ctrl+Num -)、 Enable All/Disable All 命令,来快速启用/禁用所有选中的输出或当前聚焦类别中的所有输出,将它们连接到/从当前选定的输出容器或打印任务断开连接。
启用后,会有一条绿色线将某个输出连接到所选容器/打印任务。同一个输出可以包含在多种输出介质中,例如 BOM 可以生成并输出为 PDF(作为独立文件),或发送到打印机以立即获得硬拷贝。

选择容器或打印任务,然后启用要使用该容器或打印任务生成的输出。
在上图中,已启用三个输出,使用名为 PDF 的基于 PDF 的 Output Container 生成。注意 Test Point Report、Pick and Place 和 Gerber Files 输出没有 Enabled 字段,因为这些输出类型无法写入 PDF 文件。
当输出被启用时,会按顺序连续编号。该顺序用于定义输出生成的先后次序。如果创建一个包含多个不同输出的单一 PDF,该顺序将决定这些输出在该 PDF 中的内容排列顺序。
如果从容器或打印任务中移除某个输出,编号会相应重新排序。要更改已启用输出的顺序,可以双击某个输出的 Enabled 字段中的编号,并使用可用控件更改所需编号,或按顺序重新选择每个输出。
使用 Enable Selected/Disable Selected、 Enable All/Disable All 命令时,先对顺序进行排序会是个好主意,因为输出生成顺序由输出的排列顺序决定。可通过点击某个输出并将其拖动到其类别中的新位置来快速高效地完成。
Why is my Output to Container Link Red?
当某个适用的基于打印的输出,其目标从 PDF 输出容器更改为物理打印机(打印作业)时,很可能在生成器中通过相关属性对话框(右键单击,Page Setup)所定义的纸张尺寸并不被目标介质支持。在这种情况下,当输出被启用时,从生成器到介质的连接箭头会显示为红色。处于该状态时将无法进行预览/打印。你可以更改输出生成器的纸张尺寸,使连接箭头恢复为绿色,然后即可成功生成相应输出;或者,直接将目标介质更改为支持所选纸张尺寸的介质。若存在纸张尺寸不匹配且你选择更改已配置输出的纸张尺寸,则对该输出使用 Page Setup 命令会弹出信息对话框,提示该问题并通知纸张尺寸已恢复为默认值。这意味着配置器对话框中的纸张尺寸下拉列表会重新加载为目标打印机所支持的标准纸张尺寸集合。

红色链接表示页面设置与所选容器中可用的页面属性不匹配。
变体选择
产品需求可能需要生成多种相似的印制电路板(PCB),它们都基于同一个基础设计但略有差异。例如,某商业电子产品的标准版与豪华版在功能上可能不同,标准版只装配豪华版所用器件的一个子集。
在设计层面,Altium Designer 允许使用其 Variants 功能来定义一个或多个板级设计的变体。变体本质上就是原始板级设计的另一种装配“版本”。
变体通常用于驱动适用的装配类输出——这正是 Assembly Variant 的核心,其变化仅体现在装配后的电路板(例如哪些元件装配、哪些不装配)。不过,Altium Designer 也允许变体驱动某些制造类输出:允许在设计中对元件的注释进行变更,并将该变更传递到 Gerber、ODB++ 文件、综合钻孔图(Composite Drill Drawings)、钻孔图/导引(Drill Drawing/Guides)以及最终菲林打印(Final Artwork Prints)等输出中。
尽管可以驱动制造类输出,但实际上仅能基于目标板装配的元件级变体来改变这类输出——在此情况下是元件的 Comment 参数。已制造电路板的其他任何方面(PCB 的物理特性)都不能改变,例如走线、元件布局或层叠结构。
在 OutJob 中,你可以完全控制用于驱动已定义输出的来源——可以是基础(无变体)设计,也可以是该设计中指定的某个已定义变体。
如果要为特定变体生成输出,则必须在 OutJob 的配置中指定该变体。你可以为每个适用输出分别选择变体,或选择一个变体应用于文件中所有适用输出。该“变体作用域”通过 Output Job 文件顶部的变体选择(Variant Choice)选项来确定。

变体选择选项决定在驱动 Output Job 文件中已配置输出时,变体在何种层级被使用。
-
Choose a single variant for the whole outputjob file——启用该选项后,选择一个变体来驱动 Output Job 文件中所有适用输出。在右侧下拉字段中指定变体。下拉列表会列出活动工程中所有已定义变体,以及条目
[No Variations]。
-
Choose a different variant for each output——启用该选项后,OutJob 的 Outputs 区域会新增一列 Variant 。使用该字段为单个输出指定要使用的变体。同样,下拉列表会列出活动工程中所有已定义变体,以及条目
[No Variations]。使用此作用域设置,可以为不同输出分配不同变体来驱动生成。
若要使用基础(无变体)设计来驱动输出,请使用 [No Variations] 条目。
当在单个输出层级定义变体使用时,如果所选变体不允许对制造类输出进行变更,却又将该变体用于某个制造类输出,则 OutJob 中的变体条目会显示为红色,并通过悬停提示标记该情况。使用所选变体生成输出时,将按选择了 [No Variations] 的方式继续进行。换言之,将改用基础(无变体)设计作为输出来源。
输出生成
OutJob 中已配置的输出可通过以下方式生成:
从输出容器生成
选择一个输出容器即可访问 Generate content 控件。该控件在至少有一个输出被分配到该容器后启用。

为所选输出容器生成内容。
单击该控件会按顺序将容器中启用生成的每个输出生成到该容器中。或者,在选中容器的情况下,可使用以下任一方法生成内容:
-
按 F9 键。
-
右键单击,然后从上下文菜单选择 Generate 命令(对 Folder Structure 容器为 Run 命令)。
-
使用 Tools » Generate 命令(PDF 与 Video 容器类型)或 Tools » Run 命令(Folder Structure 容器类型)。
-
单击 Job Manager Toolbar 工具栏上的
 (PDF 容器类型)、
 (Video 容器类型)或
  (Folder Structure 容器类型)按钮。
进度可在状态栏中查看。生成的输出将写入输出容器设置中定义的位置。这些设置也会控制输出是否打开和/或添加到 Projects 面板。若在容器的高级选项中启用了打开选项,则生成的输出会被自动打开。
不支持对多个输出容器进行批量生成;只会生成分配给当前所选输出容器的输出。要生成所有输出,请分别选择每个已定义的输出容器并生成其内容。
当将 Gerber、ODB++、NC Drill 或 IPC-356-D 输出生成到 Folder Structure 输出容器时,可将其自动导入到新的 CAM Editor 文档(*.cam)中。相关选项可在与该容器类型关联的 Files Settings 对话框中找到。
要打开一个已通过活动 Output Job Configuration 文件中已定义的 PDF 输出容器生成的现有 PDF 文档,请在所需的 PDF 输出容器上右键单击(位于 Output Containers 区域),然后从上下文菜单选择 Open PDF 命令。该命令仅在 PDF 已生成且 Output Job Configuration 文件保持打开时可用。
请注意:如果关闭 Output Job Configuration 文件后再重新打开,即使 PDF 文件仍然存在,该命令也将不可用。你需要重新生成该文件,或在其创建位置中浏览并打开该文件。
发布已生成内容
第二个控件——Generate and publish——可用于生成分配给所选输出容器的输出,并将该输出发布到已定义的 Publishing Destination。
发布目标(Publishing Destinations)支持将数据发布到存储空间,例如 Box.net、Amazon S3、FTP 服务器或共享网络上的文件夹位置。在分发与协作方面,这在当今具有无可比拟的优势:整体“产品团队”的成员——设计团队、制造团队以及所有参与将产品从构想到落地过程的人员——往往分布在全球各地。各方都能在共享(且受控)的权限下访问、查看、讨论并使用这些数据。
要发布,请单击该命令,然后在弹出的菜单中从当前已定义的目标列表中选择。输出会先生成到本地路径目标,然后再发布。发布过程中会出现提示,要求选择一个文件夹(位于目标发布位置内)用于存放输出。你可以浏览到现有文件夹、指定新文件夹,或接受默认文件夹——默认文件夹名称由容器内容类型加日期时间戳组成(例如 PDFs - 10-24-2011 11-32-33 AM)。
使用菜单中的 Manage Publishing 命令可访问 Preferences 对话框的 Data Management – Publishing Destinations 页面。在此可定义新的目标,或修改到现有目标的连接。

发布目标是在 Data Management 首选项中指定的。
对于从板级设计工程生成的已发布数据,服务器支持将这些已发布文档(即分配给已发布工程配置的 Output Job 文件所生成的输出)针对任意 Item Revision 发布到已定义的发布目标。
直接从 OutJob 发布数据,会将生成文件的副本放到目标位置中指定的子文件夹内。为确保高完整性并便于形成可靠的审计追踪,生成的数据应在发布(release)之后,发布到服务器中某个目标条目的一个修订版中。此类输出会在文件名中标记 Item 和 Revision,使所有相关人员都能立即看出:哪个输出对应将要制造的条目(裸板或组装板)的哪个修订版。
从 Print Jobs
选择一个 Print Job 后即可访问预览和打印控件。只要该作业至少分配了一个输出,这些控件就会启用。

所选 Print Job 的预览和打印控件。
打印预览
单击 Preview 将该 Print Job 分配的输出加载到打印预览中。或者,在选中该作业后,使用以下方法之一访问打印预览:
-
右键单击,然后从上下文菜单中选择 Print Preview 。
-
使用 Tools » Print Preview 命令。
-
单击 Job Manager Toolbar 工具栏上的
 按钮。
按钮。
-
在 Page Setup 对话框(File » Page Setup)中,针对所选(获得焦点的)输出单击 Preview 按钮。注意:这只会加载该特定输出的页面,而不会加载分配给该 Print Job 的所有输出的全部页面。
源文档将按顺序加载,并遵循关联的 Page Setup 对话框中定义的选项。
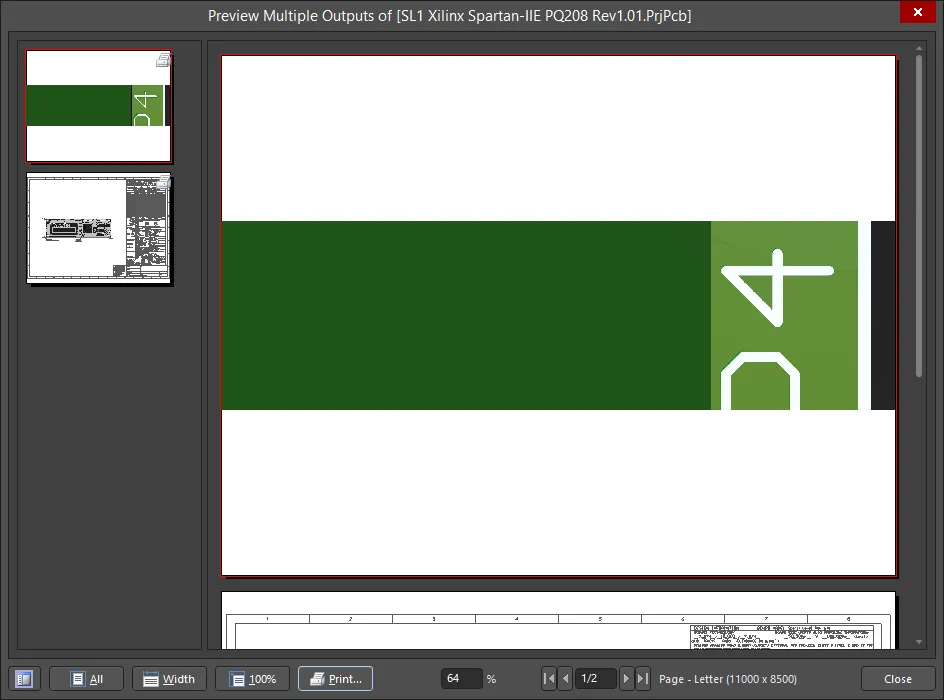
在 Report Preview 底部及其右键菜单中提供了控件,用于调整视图、访问打印机设置对话框、打印、将页面复制到 Windows 剪贴板,以及将活动页面导出为 Windows Metafile。
打印
单击 Print 将输出直接发送到指定的打印设备。或者,也可通过以下方法之一打印已分配的输出:
-
按 F9 键。
-
右键单击,然后从上下文菜单中选择 Print 命令。
-
使用 Tools » Print 命令。
-
在 Page Setup 对话框中,针对所选(获得焦点的)输出单击 Print 按钮。注意:这只会打印该特定输出的页面,而不会打印分配给该 Print Job 的所有输出的全部页面。
-
在 Print Preview 对话框中单击 Print 按钮。
-
单击 Job Manager Toolbar 工具栏上的
 按钮。
按钮。
Print 控件以及上面列出的前三种方法提供直接打印。上面最后两种方法为通过 Printer Configuration 对话框进行的间接打印。
不存在多个 Print Job 的批量打印流程;只会预览/打印当前选中的 Print Job 所分配的输出。若要打印所有输出,请分别选择并打印每个已定义的打印作业。
从 Project Releaser
当 PCB 项目的某个配置被发布时,会生成分配给该配置的一个或多个 Output Job 文件中定义的输出。该生成过程是高完整性发布流程的一部分,发布数据会存储在服务器中目标 Item 的一个新的、计划中的修订版里。Project Releaser 是用于实现该过程的界面。
Project Releaser 可通过以下方式访问:
-
从主菜单选择 Project » Project Releaser 命令(将所需项目的源文档打开并设为活动文档)。
-
在 Projects panel 中右键单击所需项目的条目,然后从上下文菜单中选择 Project Releaser 命令。
如果在运行 Project Releaser 之前尚未定义 Outputs 的 not,也可以在发布流程中完成该操作。
要在发布中包含 Fabrication 和 Assembly 数据条目,至少需要为它们分配一个 OutputJob 文件。如果你的 Output Job 文件名称以子串“fab”和“ass”开头,那么在首次访问 Release 视图时,这些 OutJobs 将分别自动分配到 Fabrication Data 和 Assembly Data 部分。否则,你需要在每种情况下手动分配适用的 OutJobs。

为所选配置生成的输出示例列表。
在 Project Releaser 中,单击 Options 按钮(左下角)打开 Project Release Options dialog。该对话框用于分配适用的 OutJobs,并定义在发布项目时服务器中的目标数据条目(其修订版将接收生成数据)的命名方式。Release Options 选项卡在 Output Jobs 区域下包含多个选项,用于启用所需的输出数据。

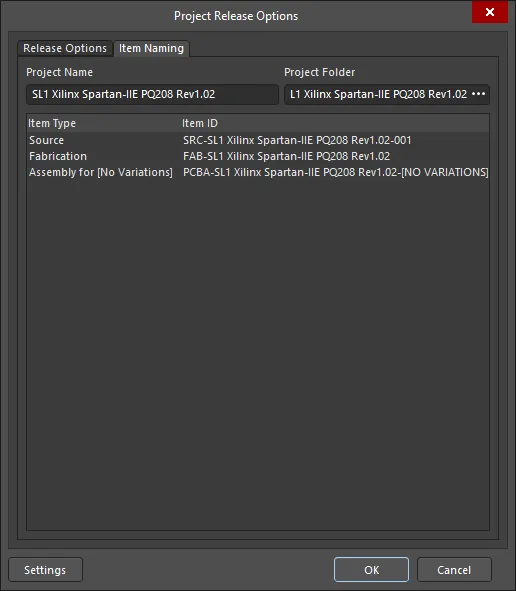
Release Options 对话框的 Project Release Options 选项卡。
如果你的项目当前没有关联任何 Output Job 文件,Project Releaser 将检测到这一点,并询问你是否要添加默认文件。如果选择添加,将创建以下内容:
-
Fabrication.OutJob - 并定义以下输出:
-
Documentation Outputs: PCB Prints
-
Fabrication Outputs: Gerber、NC Drill 和 IPC-2581
-
Validation Outputs: Design Rules Check、Footprint Comparison Report
-
Export Outputs: Save As/Export PCB(ASCII 格式)
-
Assembly.OutJob - 并定义以下输出:
-
Documentation Outputs: PCB 3D Print、Schematic Prints、Composite Drawing
-
Assembly Outputs: Pick and Place Report、Assembly Drawings、Test Point Report
-
Report Outputs: Bill of Materials、Component Cross Reference、GOST BOM
-
Export Outputs: Export STEP
如果项目已定义至少一个 OutJob 文件,则不会提供此自动创建选项。
有关发布流程的更多信息,请访问 Design Project Release 页面。


 AI 翻译
AI 翻译